家用万兆网络指南 1 - 不如先来个最简单的100G网络

本文看点:
- 100Gb 网卡介绍
- 100Gb 网络光纤介绍
- 如何设置一个简单的直通网络
- Mellanox 网卡驱动的 windows 安装
- Mellanox 网卡驱动的 linux 安装
- Infiniband 网络的设置
注意:
- 因经验和知识有限, 难免文章中会出现错误, 请不吝赐教.
先上图.

前言
对于内网有重型应用的玩家, 例如大容量 NAS, FULL SSD NAS, 4k视频编辑, 家里有好几台电脑, 家里有服务器, 家里塞满了42U 机柜, 在家办公的程序猿等等等等.
千兆网络的瓶颈开始凸显, 千兆网理论传输速度128MB/s, 而随便一个 SATA SSD 都能超过.
尤其是2018年开始, 部分地区的宽带运营商已经开始提供千兆宽带入户的服务.
是时候开始尝试万兆了!
本系列文章从最简单拓扑开始, 一步一步教大家如何在家搭建万兆网络 (包括但不限于10/40/56/100Gbps) 以及各种所需的相关知识.
给钱包系好安全带, 让我们开始.
本次目标
本次我们会演示用 100G 网卡直接将两台机器 (包含 windows, linux) 连起来并通信. 本文也同样适合其他 Mellanox 网卡, 除去安装 Mellanox 网卡驱动的部分, 本文适合任何两台机器的直连教程 (比如你可以找根网线把两台电脑按照本文教程连起来然后直接传数据, 比用移动硬盘节省50%时间).
网卡
我手头有很多万兆或超过万兆的网卡, 让我们这次使用带宽最高的 Mellanox MCX455A-ECAT ConnectX-4 VPI 卡.
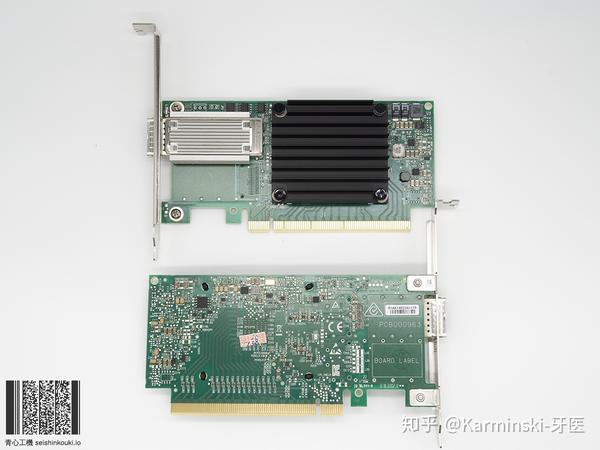

看到 "Mellanox MCX455A-ECAT ConnectX-4 VPI" 这一长串是不是比 "ASUS ROG-STRIX-RTX2070-O8G-GAMING" 还吓人? 不要担心, 看完本系列文章, 就可以利用这个魔咒搓火球了.
我们来依次解释.
- Mellanox 是厂商, 该厂产品覆盖 Infiniband 网络和以太网网络的网卡, 交换设备, 软件等. 以前被应用于超算. 现在越来越多的高性能数据中心和云计算, 大数据, 机器学习等业务也开始采用. 2016 Sort Benchmark 竞赛中, 腾讯云方案用 98.8 秒就完成了 100TB 的数据排序, 其中用到的网卡就是 Mellanox 的 100G 网卡.
- ConnectX-4 是产品名称, Mellanox 的网络适配器有 ConnectX 1 - 5 代. 这个卡是其第4代.
- MCX455A-ECAT 是卡的具体型号, 没必要记住编号来推断卡的参数, 直接去 Mellanox 官网查询即可.
- VPI 指的是这个卡是个VPI卡, 同时支持 Infiniband 和以太网, 可以在两种模式中切换.
- ETH(以太网), 就是你平时用的网.
- Infiniband 网络, 是区别于以太网的另外一种基于 Infiniband 协议的传输网络, 不可以与以太网络直接通信(后续文章我们会介绍如何将以太网与IB网络耦合).
- IPoIB, IP over Infiniband, 用 Infiniband 承载 IP 数据包, 这样上层的协议(例如tcp, udp等)就能直接运行了.
注意 Mellanox 的型号很多, 因此完全会出现卡长得一样但型号不一样的状况. 一定要确认好型号, 不要上当.
例如, 跟这个卡长得一样的卡还有个叫 Mellanox MCX455A-FCAT ConnectX-4 VPI 的, 注意到了么? 是 FCAT, 不是 ECAT. 这个卡就是 40/56GbE 的卡, 不是 100G 的.
电缆
100G QSFP28 光纤.
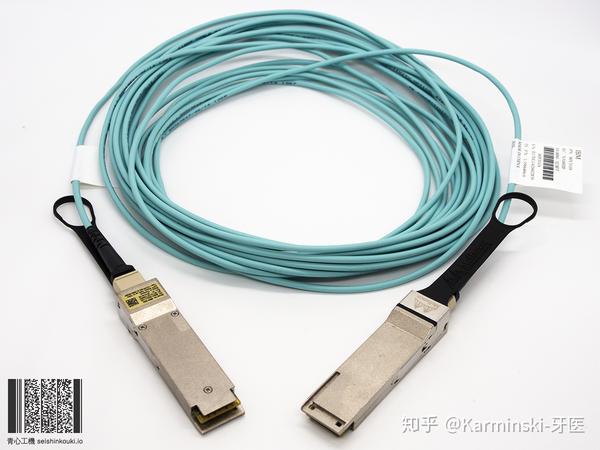

光模块是 2 个 Mellanox MMA1B00-C100 Optical Transceiver 100GbE QSFP28 MPO 850nm SR4 up to 100m DDMI
光纤是 10m 12芯 OM3 MPO.
下面是名词解释,
- Mellanox 厂商与网卡相同, 防止出现兼容性问题.
- MMA1B00-C100 光模块型号.
- Optical Transceiver 光收发器.
- 100GbE 100Gb 以太网, 实际上也能跑 Infiniband.
- QSFP28 是光模块的接口型号, 与网卡上的接口对应.
- MPO 是光纤的接口型号. 与光模块的光收发口对应.
- 850nm 光模块的激光波长.
- SR4 up to 100m 接口标准和传输距离, 指的是 100GBASE-SR4, 用 OM4 光纤可以传输 100m 距离.
- DDMI Digital Diagnostics Monitoring Interface 的缩写, 带诊断功能.
- OM3, OM4, 多模光纤标准, 由 ISO 11801 定义, 其中 OM3 光纤线外表是水蓝色的(如图), OM4是紫色的(也有可能是水蓝色), 越好的传输距离越远.
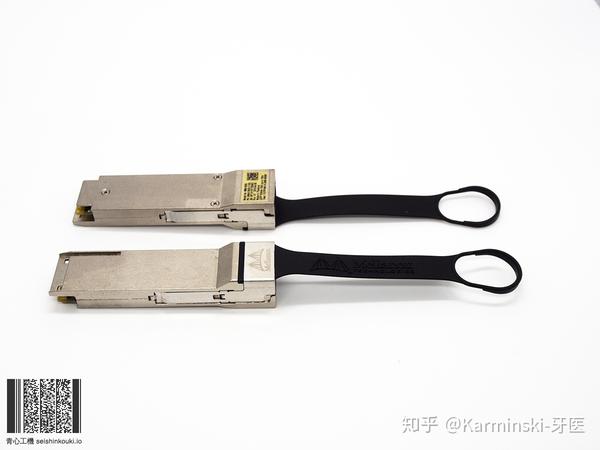

如图, 光模块左边是 QSFP28 接口, 右边是 MPO 接口.
硬件安装
我们这次要组一个直通网络, 即两台机器直接连到一起 (因为买不起100G交换机...).
那么就很简单了, 打开机箱, 把卡插在电脑 PCIe x16 接口上, 关闭机箱.
注意卡需要 PCIe 3.0 x16, 有的机器不支持 PCIe 3.0, 有的看上去是 PCIe x16 插槽, 但实际可能是个 x4. 稍后我们讲解辨别方法, 总之先把卡怼上去就行.
电缆也简单, 直接插进去, 插到位会有咔哒锁定的感觉或声音. 插反了会插到一半插不进去. 拔电缆的时候拔塑料拉手, 别直接拔线或模块, 会弄坏电缆.
驱动安装
首先我们先演示 linux 的驱动安装.
我准备了两台 Lenovo ThinkStation C30, 环境信息分别是:
- hostname: m01.lobj.eth6.org
- hardware: E5-2680v2 x2, 64G REG ECC, Intel X520-2 10G Ethernet Adapter.
[root@m01 ~]# uname -a
Linux m01.lobj.eth6.org 3.10.0-957.21.3.el7.x86_64 #1 SMP Tue Jun 18 16:35:19 UTC 2019 x86_64 x86_64 x86_64 GNU/Linux
[root@m01 ~]# cat /etc/redhat-release
CentOS Linux release 7.6.1810 (Core)
[root@m01 ~]# - hostname: m02.lobj.eth6.org
- hardware: E5-2670 x2, 64G REG ECC, Intel X520-2 10G Ethernet Adapter.
[root@m02 ~]# uname -a
Linux m02.lobj.eth6.org 3.10.0-957.el7.x86_64 #1 SMP Thu Nov 8 23:39:32 UTC 2018 x86_64 x86_64 x86_64 GNU/Linux
[root@m02 ~]# cat /etc/redhat-release
CentOS Linux release 7.6.1810 (Core)
[root@m02 ~]#
我们开始安装驱动, 我这里在 m01 机器上示例, 其他 linux 机器按照同样操作即可.
安装驱动依赖
直接粘贴以下命令就行了, 注意我的机器是 centos, 别的 linux 发行版本自己换一下.
yum -y install pciutils gtk2 atk cairo gcc-gfortran tcsh lsof tcl tk perl usbutils下载安装 OFED
OFED 就是网卡的驱动, Mellanox 所有网卡的驱动都用 OFED, 所以很方便, 直接去官网, 在导航选 Products->Software->Infiniband/VPI Drivers. 然后根据操作系统下载即可.
下载好了解压缩, 然后安装:
[root@m02 MLNX_OFED_LINUX-4.6-1.0.1.1-rhel7.6-x86_64]# ./mlnxofedinstall
Logs dir: /tmp/MLNX_OFED_LINUX.21721.logs
General log file: /tmp/MLNX_OFED_LINUX.21721.logs/general.log
Verifying KMP rpms compatibility with target kernel...
This program will install the MLNX_OFED_LINUX package on your machine.
Note that all other Mellanox, OEM, OFED, RDMA or Distribution IB packages will be removed.
Those packages are removed due to conflicts with MLNX_OFED_LINUX, do not reinstall them.

Do you want to continue?[y/N]:y


Starting MLNX_OFED_LINUX-4.6-1.0.1.1 installation ...

Installing mlnx-ofa_kernel RPM
Preparing...                          ########################################
Updating / installing...
...
Preparing...                          ########################################
mpitests_openmpi-3.2.20-e1a0676.46101 ########################################
Device (03:00.0):
    03:00.0 Infiniband controller: Mellanox Technologies MT27700 Family [ConnectX-4]
    Link Width: x16
    PCI Link Speed: 5GT/s

Device (04:00.0):
    04:00.0 Network controller: Mellanox Technologies MT27500 Family [ConnectX-3]
    Link Width: x8
    PCI Link Speed: 5GT/s

Device (06:00.0):
    06:00.0 Ethernet controller: Mellanox Technologies MT27500 Family [ConnectX-3]
    Link Width: x4 ( WARNING - device supports x8 )
    PCI Link Speed: 5GT/s


Installation finished successfully.


Preparing...                          ################################# [100%]
Updating / installing...
   1:mlnx-fw-updater-4.6-1.0.1.1      ################################# [100%]

Added 'RUN_FW_UPDATER_ONBOOT=no to /etc/infiniband/openib.conf

Attempting to perform Firmware update...
Querying Mellanox devices firmware ...

Device #1:
----------

  Device Type:      ConnectX4
  Part Number:      MCX455A-ECA_Ax
  Description:      ConnectX-4 VPI adapter card; EDR IB (100Gb/s) and 100GbE; single-port QSFP28; PCIe3.0 x16; ROHS R6
  PSID:             MT_2180110032
  PCI Device Name:  03:00.0
  Base GUID:        0002c90300212111
  Versions:         Current        Available
     FW             12.21.1000     12.25.1020
     PXE            N/A            3.5.0701
     UEFI           N/A            14.18.0019

  Status:           Update required

---------
Found 1 device(s) requiring firmware update...

Device #1: Updating FW ...       Done

Restart needed for updates to take effect.
Log File: /tmp/MLNX_OFED_LINUX.21721.logs/fw_update.log
Querying Mellanox devices firmware ...

Device #1:
----------

  Device Type:      ConnectX3
  Part Number:      MCX354A-FCB_A2-A5
  Description:      ConnectX-3 VPI adapter card; dual-port QSFP; FDR IB (56Gb/s) and 40GigE; PCIe3.0 x8 8GT/s; RoHS R6
  PSID:             MT_1090120019
  PCI Device Name:  04:00.0
  Port1 GUID:       ec0d9a03000008a1
  Port2 GUID:       ec0d9a03000008a2
  Versions:         Current        Available
     FW             2.42.5000      2.42.5000
     PXE            3.4.0752       3.4.0752

  Status:           Up to date


Log File: /tmp/MLNX_OFED_LINUX.21721.logs/fw_update.log
Querying Mellanox devices firmware ...

Device #1:
----------

  Device Type:      ConnectX3
  Part Number:      MCX342A-XCC_Ax
  Description:      ConnectX-3 EN NIC for OCP;10GbE;dual-port SFP+;PCIe3.0 x8;IPMI disabled;R6
  PSID:             MT_1680110023
  PCI Device Name:  06:00.0
  Port1 MAC:        0002c9cf7090
  Port2 MAC:        0002c9cf7091
  Versions:         Current        Available
     FW             2.42.5000      2.42.5000
     PXE            3.4.0752       3.4.0752
     UEFI           14.11.0045     14.11.0045

  Status:           Up to date


Log File: /tmp/MLNX_OFED_LINUX.21721.logs/fw_update.log
To load the new driver, run:
/etc/init.d/openibd restart
[root@m02 MLNX_OFED_LINUX-4.6-1.0.1.1-rhel7.6-x86_64]#
注意驱动默认会帮你更新网卡的固件到最新版本. 如果不想更新的话看驱动的帮助文档, 有相关的配置参数.
Linux 以太网互通
接下来演示两台机器利用以太网互通并跑分.
开启 openibd
openibd 是网卡需要的 daemon 程序, 并且会给内核加载需要的mod, 我们开启并设置为开机启动.
[root@m02 MLNX_OFED_LINUX-4.6-1.0.1.1-rhel7.6-x86_64]# systemctl enable openibd
[root@m02 MLNX_OFED_LINUX-4.6-1.0.1.1-rhel7.6-x86_64]# systemctl start openibd
[root@m02 MLNX_OFED_LINUX-4.6-1.0.1.1-rhel7.6-x86_64]# systemctl status openibd
● openibd.service - openibd - configure Mellanox devices
   Loaded: loaded (/usr/lib/systemd/system/openibd.service; enabled; vendor preset: disabled)
   Active: active (exited) since Fri 2019-07-12 05:19:02 CST; 15s ago
     Docs: file:/etc/infiniband/openib.conf
  Process: 24451 ExecStart=/etc/init.d/openibd start bootid=%b (code=exited, status=0/SUCCESS)
 Main PID: 24451 (code=exited, status=0/SUCCESS)
   CGroup: /system.slice/openibd.service
           ├─25259 /bin/bash /etc/init.d/openibd start bootid=3659f221be324cdda743ab708e0af13d
           └─25262 sleep 20

Jul 12 05:18:34 m02.lobj.eth6.org systemd[1]: Starting openibd - configure Mellanox devices...
Jul 12 05:18:40 m02.lobj.eth6.org openibd[24451]: Unloading HCA driver:[  OK  ]
Jul 12 05:19:02 m02.lobj.eth6.org openibd[24451]: Loading HCA driver and Access Layer:[  OK  ]
Jul 12 05:19:02 m02.lobj.eth6.org systemd[1]: Started openibd - configure Mellanox devices.
[root@m02 MLNX_OFED_LINUX-4.6-1.0.1.1-rhel7.6-x86_64]#
开启 mst
mst 可以更方便的管理网卡, 查看网卡信息.
[root@m02 MLNX_OFED_LINUX-4.6-1.0.1.1-rhel7.6-x86_64]# mst start
Starting MST (Mellanox Software Tools) driver set
[warn] mst_pci is already loaded, skipping
[warn] mst_pciconf is already loaded, skipping
Create devices
[root@m02 MLNX_OFED_LINUX-4.6-1.0.1.1-rhel7.6-x86_64]# mst status
MST modules:
------------
    MST PCI module loaded
    MST PCI configuration module loaded

MST devices:
------------
/dev/mst/mt4099_pciconf0         - PCI configuration cycles access.
                                   domain:bus:dev.fn=0000:04:00.0 addr.reg=88 data.reg=92
                                   Chip revision is: 01
/dev/mst/mt4099_pciconf1         - PCI configuration cycles access.
                                   domain:bus:dev.fn=0000:06:00.0 addr.reg=88 data.reg=92
                                   Chip revision is: 01
/dev/mst/mt4099_pci_cr0          - PCI direct access.
                                   domain:bus:dev.fn=0000:04:00.0 bar=0xdfc00000 size=0x100000
                                   Chip revision is: 01
/dev/mst/mt4099_pci_cr1          - PCI direct access.
                                   domain:bus:dev.fn=0000:06:00.0 bar=0xdfa00000 size=0x100000
                                   Chip revision is: 01
/dev/mst/mt4115_pciconf0         - PCI configuration cycles access.
                                   domain:bus:dev.fn=0000:03:00.0 addr.reg=88 data.reg=92
                                   Chip revision is: 00
可以看到这里有一堆网卡, 因为我之前的其他网卡没有拔掉, 其中 /dev/mst/mt4115_pciconf0 是 100G 网卡.
使用 ibv_devinfo 命令查看设备信息
[root@m02 MLNX_OFED_LINUX-4.6-1.0.1.1-rhel7.6-x86_64]# ibv_devinfo
hca_id: mlx5_0
  transport:          InfiniBand (0)
  fw_ver:             12.21.1000
  node_guid:          0002:c903:0021:2111
  sys_image_guid:     0002:c903:0021:2111
  vendor_id:          0x02c9
  vendor_part_id:     4115
  hw_ver:             0x0
  board_id:           MT_2180110032
  phys_port_cnt:      1
  Device ports:
    port: 1
      state:        PORT_DOWN (1)
      max_mtu:      4096 (5)
      active_mtu:   4096 (5)
      sm_lid:       0
      port_lid:     65535
      port_lmc:     0x00
      link_layer:   InfiniBand
这个命令可以方便的看到网卡端口的连接状态和协议, 我们可以看到 state: PORT_DOWN (1), 说明线没插好. link_layer: InfiniBand 说明网卡运行在 IB 模式. 我们首先测试以太网, 所以接下来我们把网卡修改成以太网模式.
修改网卡为以太网模式
[root@m02 mst]# mlxconfig -d /dev/mst/mt4115_pciconf0 set LINK_TYPE_P1=2

Device #1:
----------

Device type:    ConnectX4
Name:           N/A
Description:    N/A
Device:         /dev/mst/mt4115_pciconf0

Configurations:                              Next Boot       New
         LINK_TYPE_P1                        IB(1)           ETH(2)

 Apply new Configuration? (y/n) [n] : y
Applying... Done!
-I- Please reboot machine to load new configurations.
[root@m02 mst]#
注意这里的 -d 命令后面的参数是 mst status 看到的网卡路径 /dev/mst/mt4115_pciconf0. set LINK_TYPE_P1=2, 是把网卡设置到模式2(ETH,以太网, 模式1是IB).
然后这里我们要重启机器让配置生效.
重启之后, 连接正常的话, 两个网卡的LED就应该都显示绿色了(代表正常通信).
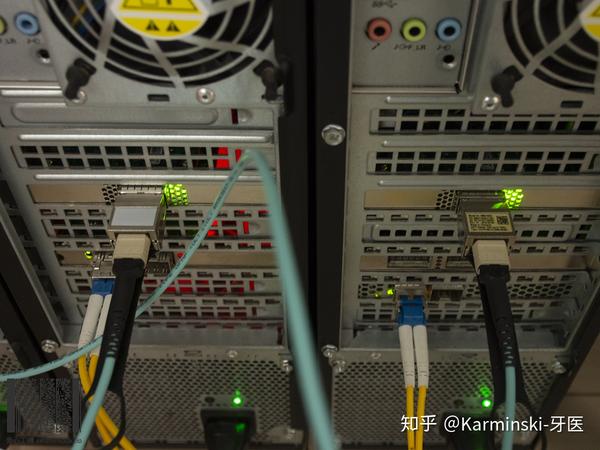

配置 IP 地址
我们把 m01 机器配置 IP 为 192.168.122.2/24 网关为 192.168.122.1, m02 机器配置 IP 为 192.168.122.1/24 网关为 192.168.122.1. 即机器A的网关是自己的IP, 机器B的网关是机器A的IP. 这样两台机器就能相互通信了.
修改的时候记得修改 MTU 以提升吞吐性能, 这个卡最多支持 9000+ 的 MTU, 一般设置到 9000 即可.
下面是用 ping 测试.
[root@m02 ~]# ping 192.168.122.2
PING 192.168.122.2 (192.168.122.2) 56(84) bytes of data.
64 bytes from 192.168.122.2: icmp_seq=1 ttl=64 time=3.17 ms
64 bytes from 192.168.122.2: icmp_seq=2 ttl=64 time=0.595 ms
64 bytes from 192.168.122.2: icmp_seq=3 ttl=64 time=0.595 ms
64 bytes from 192.168.122.2: icmp_seq=4 ttl=64 time=0.565 ms
^C
--- 192.168.122.2 ping statistics ---
4 packets transmitted, 4 received, 0% packet loss, time 3001ms
rtt min/avg/max/mdev = 0.565/1.232/3.175/1.122 ms
[root@m02 ~]#
跑分!
激动人心的跑分环节到了, 走起~
这里我们使用 iperf, 具体安装过程请直接搜索, 这里就不赘述了.
iperf 需要用 numactl 绑定 CPUID, 以避免 NUMA 访问的性能问题.
[root@m01 iperf-2.0.5]# numactl --cpunodebind=0 iperf -s -P8 -w 256K
------------------------------------------------------------
Server listening on TCP port 5001
TCP window size:  416 KByte (WARNING: requested  256 KByte)
------------------------------------------------------------
[  4] local 192.168.122.2 port 5001 connected with 192.168.122.1 port 33982
[  5] local 192.168.122.2 port 5001 connected with 192.168.122.1 port 33984
[  6] local 192.168.122.2 port 5001 connected with 192.168.122.1 port 33986
[  7] local 192.168.122.2 port 5001 connected with 192.168.122.1 port 33988
[  8] local 192.168.122.2 port 5001 connected with 192.168.122.1 port 33990
[  9] local 192.168.122.2 port 5001 connected with 192.168.122.1 port 33992
[ 10] local 192.168.122.2 port 5001 connected with 192.168.122.1 port 33994
[ 11] local 192.168.122.2 port 5001 connected with 192.168.122.1 port 33996
[ ID] Interval       Transfer     Bandwidth
[  4]  0.0-48.6 sec  37.9 GBytes  6.70 Gbits/sec
[  5]  0.0-48.6 sec  38.3 GBytes  6.77 Gbits/sec
[  6]  0.0-48.6 sec  37.9 GBytes  6.70 Gbits/sec
[  7]  0.0-48.6 sec  39.8 GBytes  7.03 Gbits/sec
[  8]  0.0-48.6 sec  39.7 GBytes  7.02 Gbits/sec
[  9]  0.0-48.6 sec  39.5 GBytes  6.98 Gbits/sec
[ 10]  0.0-48.6 sec  39.8 GBytes  7.03 Gbits/sec
[ 11]  0.0-48.6 sec  37.9 GBytes  6.71 Gbits/sec
[SUM]  0.0-48.6 sec   311 GBytes  54.9 Gbits/sec


[root@m02 iperf-2.0.5]# numactl --cpunodebind=0 iperf -c 192.168.122.2  -t 60 -P8 -w 256K
------------------------------------------------------------
Client connecting to 192.168.122.2, TCP port 5001
TCP window size:  416 KByte (WARNING: requested  256 KByte)
------------------------------------------------------------
[ 10] local 192.168.122.1 port 33996 connected with 192.168.122.2 port 5001
[  3] local 192.168.122.1 port 33982 connected with 192.168.122.2 port 5001
[  5] local 192.168.122.1 port 33984 connected with 192.168.122.2 port 5001
[  6] local 192.168.122.1 port 33986 connected with 192.168.122.2 port 5001
[  7] local 192.168.122.1 port 33988 connected with 192.168.122.2 port 5001
[  8] local 192.168.122.1 port 33990 connected with 192.168.122.2 port 5001
[  4] local 192.168.122.1 port 33992 connected with 192.168.122.2 port 5001
[  9] local 192.168.122.1 port 33994 connected with 192.168.122.2 port 5001
^C[ ID] Interval       Transfer     Bandwidth
[ 10]  0.0-48.6 sec  37.9 GBytes  6.71 Gbits/sec
[  3]  0.0-48.6 sec  37.9 GBytes  6.70 Gbits/sec
[  5]  0.0-48.6 sec  38.3 GBytes  6.77 Gbits/sec
[  6]  0.0-48.6 sec  37.9 GBytes  6.71 Gbits/sec
[  7]  0.0-48.6 sec  39.8 GBytes  7.03 Gbits/sec
[  8]  0.0-48.6 sec  39.7 GBytes  7.02 Gbits/sec
[  4]  0.0-48.6 sec  39.5 GBytes  6.98 Gbits/sec
[  9]  0.0-48.6 sec  39.8 GBytes  7.03 Gbits/sec
[SUM]  0.0-48.6 sec   311 GBytes  55.0 Gbits/sec
[root@m02 iperf-2.0.5]#
什么? 才 55G? 这是怎么回事?
debug
这时候我们就要debug了, 看看性能瓶颈在哪里.
利用 OFED 提供的 mlnx_tune 工具可以直接自动检查性能瓶颈.
[root@m02 ~]# mlnx_tune -r
2019-07-12 08:18:40,831 INFO Collecting node information
2019-07-12 08:18:40,831 INFO Collecting OS information
2019-07-12 08:18:40,835 WARNING Unknown OS [Linux,3.10.0-957.el7.x86_64,('centos', '7.6.1810', 'Core')]. Tuning might be non-optimized.
...
2019-07-12 08:18:41,278 INFO Collecting IP forwarding information
2019-07-12 08:18:41,285 INFO Collecting hyper threading information
2019-07-12 08:18:41,285 INFO Collecting IOMMU information
2019-07-12 08:18:41,288 INFO Collecting driver information
2019-07-12 08:18:41,915 INFO Collecting Mellanox devices information

Mellanox Technologies - System Report

Operation System Status
UNKNOWN
3.10.0-957.el7.x86_64

CPU Status
GenuineIntel Intel(R) Xeon(R) CPU E5-2680 v2 @ 2.80GHz Ivy Bridge
Warning: Frequency 2800.0MHz

Memory Status
Total: 125.67 GB
Free: 122.07 GB

Hugepages Status
On NUMA 1:
Transparent enabled: always
Transparent defrag: always

Hyper Threading Status
ACTIVE

IRQ Balancer Status
NOT PRESENT

Firewall Status
NOT PRESENT
IP table Status
NOT PRESENT
IPv6 table Status
NOT PRESENT

Driver Status
OK: MLNX_OFED_LINUX-4.6-1.0.1.1 (OFED-4.6-1.0.1)

ConnectX-4 Device Status on PCI 03:00.0
FW version 12.25.1020
OK: PCI Width x16
Warning: PCI Speed 5GT/s >>> PCI width status is below PCI capabilities. Check PCI configuration in BIOS.
PCI Max Payload Size 256
PCI Max Read Request 512
Local CPUs list [0, 1, 2, 3, 4, 5, 6, 7, 8, 9, 20, 21, 22, 23, 24, 25, 26, 27, 28, 29]

enp3s0 (Port 1) Status
Link Type eth
OK: Link status Up
Speed 100GbE
MTU 9000
OK: TX nocache copy 'off'

ConnectX-3 Device Status on PCI 04:00.0
FW version 2.42.5000
OK: PCI Width x8
Warning: PCI Speed 5GT/s >>> PCI width status is below PCI capabilities. Check PCI configuration in BIOS.
PCI Max Payload Size 256
PCI Max Read Request 512
Local CPUs list [0, 1, 2, 3, 4, 5, 6, 7, 8, 9, 20, 21, 22, 23, 24, 25, 26, 27, 28, 29]

ib0 (Port 1) Status
Link Type ib
Warning: Link status Down >>> Check your port configuration (Physical connection, SM, IP).
Speed N/A
MTU 4092

ib1 (Port 2) Status
Link Type ib
Warning: Link status Down >>> Check your port configuration (Physical connection, SM, IP).
Speed N/A
MTU 4092

ConnectX-3 Device Status on PCI 06:00.0
FW version 2.42.5000
Warning: PCI Width x4 >>> PCI width status is below PCI capabilities. Check PCI configuration in BIOS.
Warning: PCI Speed 5GT/s >>> PCI width status is below PCI capabilities. Check PCI configuration in BIOS.
PCI Max Payload Size 128
PCI Max Read Request 512
Local CPUs list [0, 1, 2, 3, 4, 5, 6, 7, 8, 9, 20, 21, 22, 23, 24, 25, 26, 27, 28, 29]

enp6s0 (Port 1) Status
Link Type eth
OK: Link status Up
Speed 10GbE
MTU 1500
OK: TX nocache copy 'off'

enp6s0d1 (Port 2) Status
Link Type eth
Warning: Link status Down >>> Check your port configuration (Physical connection, SM, IP).
Speed N/A
MTU 1500
OK: TX nocache copy 'off'

2019-07-12 08:18:47,246 INFO System info file: /tmp/mlnx_tune_190712_081839.log
[root@m02 ~]#
问题在这里:
ConnectX-4 Device Status on PCI 03:00.0
FW version 12.25.1020
OK: PCI Width x16
Warning: PCI Speed 5GT/s >>> PCI width status is below PCI capabilities. Check PCI configuration in BIOS.
PCI Max Payload Size 256
PCI Max Read Request 512
Local CPUs list [0, 1, 2, 3, 4, 5, 6, 7, 8, 9, 20, 21, 22, 23, 24, 25, 26, 27, 28, 29]
PCI 带宽是 x16 的没问题, 但是速度为什么只有 5GT/s? 这是 PCIe 2.0 的速度. PCIe 3.0 是 8GT/s.
一般这种问题是 BIOS 设置错误或者需要更新 BIOS, 最惨的情况是, 可能你的主板太老了根本不支持, 或者真的坏了...
再次跑分!
我们修改了 BIOS 设置后, 确认 mlnx_tune 命令没问题之后, 再次跑分:
[root@m01 ~]# iperf -s -P8
------------------------------------------------------------
Server listening on TCP port 5001
TCP window size: 85.3 KByte (default)
------------------------------------------------------------
[  4] local 192.168.122.2 port 5001 connected with 192.168.122.1 port 51298
[  5] local 192.168.122.2 port 5001 connected with 192.168.122.1 port 51302
[  6] local 192.168.122.2 port 5001 connected with 192.168.122.1 port 51300
[  7] local 192.168.122.2 port 5001 connected with 192.168.122.1 port 51304
[  8] local 192.168.122.2 port 5001 connected with 192.168.122.1 port 51306
[  9] local 192.168.122.2 port 5001 connected with 192.168.122.1 port 51308
[ 10] local 192.168.122.2 port 5001 connected with 192.168.122.1 port 51310
[ 11] local 192.168.122.2 port 5001 connected with 192.168.122.1 port 51312
[ ID] Interval       Transfer     Bandwidth
[  4]  0.0-60.0 sec  92.1 GBytes  13.2 Gbits/sec
[  5]  0.0-60.0 sec  83.7 GBytes  12.0 Gbits/sec
[  8]  0.0-60.0 sec  84.5 GBytes  12.1 Gbits/sec
[  9]  0.0-60.0 sec  76.2 GBytes  10.9 Gbits/sec
[ 10]  0.0-60.0 sec  74.7 GBytes  10.7 Gbits/sec
[  6]  0.0-60.0 sec  92.2 GBytes  13.2 Gbits/sec
[  7]  0.0-60.0 sec  86.5 GBytes  12.4 Gbits/sec
[ 11]  0.0-60.0 sec  94.0 GBytes  13.4 Gbits/sec
[SUM]  0.0-60.0 sec   684 GBytes  97.9 Gbits/sec
[root@m01 ~]#


[root@m02 ~]# iperf -c 192.168.122.2  -t 60 -P8
------------------------------------------------------------
Client connecting to 192.168.122.2, TCP port 5001
TCP window size:  325 KByte (default)
------------------------------------------------------------
[  9] local 192.168.122.1 port 51312 connected with 192.168.122.2 port 5001
[  3] local 192.168.122.1 port 51298 connected with 192.168.122.2 port 5001
[  5] local 192.168.122.1 port 51302 connected with 192.168.122.2 port 5001
[  4] local 192.168.122.1 port 51300 connected with 192.168.122.2 port 5001
[  6] local 192.168.122.1 port 51304 connected with 192.168.122.2 port 5001
[  7] local 192.168.122.1 port 51306 connected with 192.168.122.2 port 5001
[  8] local 192.168.122.1 port 51308 connected with 192.168.122.2 port 5001
[ 10] local 192.168.122.1 port 51310 connected with 192.168.122.2 port 5001
[ ID] Interval       Transfer     Bandwidth
[  3]  0.0-60.0 sec  92.1 GBytes  13.2 Gbits/sec
[  5]  0.0-60.0 sec  83.7 GBytes  12.0 Gbits/sec
[  7]  0.0-60.0 sec  84.5 GBytes  12.1 Gbits/sec
[  8]  0.0-60.0 sec  76.2 GBytes  10.9 Gbits/sec
[ 10]  0.0-60.0 sec  74.7 GBytes  10.7 Gbits/sec
[  9]  0.0-60.0 sec  94.0 GBytes  13.5 Gbits/sec
[  4]  0.0-60.0 sec  92.2 GBytes  13.2 Gbits/sec
[  6]  0.0-60.0 sec  86.5 GBytes  12.4 Gbits/sec
[SUM]  0.0-60.0 sec   684 GBytes  97.9 Gbits/sec
[root@m02 ~]#
97.9Gbits/sec 舒服了. 什么? 为啥不是 100Gbits/sec? 总要有些损耗的嘛.
Linux IB网络互通
接下来我们再测试 IB 网络的互通, 这里其实主要给大家演示如何使用 IB 网络.
切换网卡工作模式
同样, 利用 mlxconfig 命令切换并重启.
[root@m02 ~]# mlxconfig -d /dev/mst/mt4115_pciconf0 set LINK_TYPE_P1=1

Device #1:
----------

Device type:    ConnectX4
Name:           MCX455A-ECA_Ax
Description:    ConnectX-4 VPI adapter card; EDR IB (100Gb/s) and 100GbE; single-port QSFP28; PCIe3.0 x16; ROHS R6
Device:         /dev/mst/mt4115_pciconf0

Configurations:                              Next Boot       New
         LINK_TYPE_P1                        ETH(2)          IB(1)

 Apply new Configuration? (y/n) [n] : y
Applying... Done!
-I- Please reboot machine to load new configurations.
[root@m02 ~]# reboot
开启 OpenSM
这一步极其重要, IB 网络需要子网管理器, 由于我们是直连, 没有 IB 网络的子网管理硬件设备, 所以必须要在机器上开启子网管理器, IB 网络才能正常通信. 这也是为什么有人买了 IB 网卡但插上亮黄灯显示网络连接断开不能用的原因.
如图, 没开 OpenSM, 网卡会亮黄灯, 同理插到 IB 交换机上的话, 也是黄灯长亮.
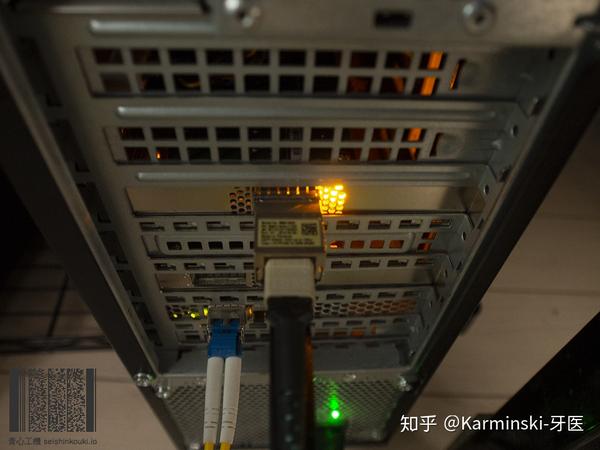

[root@m02 ~]# systemctl start opensmd如上, 开启 opensm.
查看 IB 连接信息
OFED 中提供了 iblinkinfo 命令, 可以让我们方便查看 IB 网络的拓扑信息.
[root@m02 ~]# iblinkinfo
CA: m01 HCA-3:
      0x0000000000000123      2    1[  ] ==( 4X      25.78125 Gbps Active/  LinkUp)==>       1    1[  ] "m02 HCA-1" ( )
CA: m02 HCA-1:
      0x0002c90300212111      1    1[  ] ==( 4X      25.78125 Gbps Active/  LinkUp)==>       2    1[  ] "m01 HCA-3" ( )
[root@m02 ~]#
这里简单介绍下, 方便大家以后使用.
CA: m01 HCA-3: 0x0000000000000123 2 1[ ] ==( 4X 25.78125 Gbps Active/ LinkUp)==> 1 1[ ] "m02 HCA-1" ( )- CA: m01 HCA-3 CA代表该设备是网卡, m01 HCA-3 是 m01 这台机器上的 HCA 卡 3号.
- 0x0000000000000123 是设备(网卡或交换机) 的GID, 用于全局标记设备, 全局唯一.
- 2 是 lid, 用于在子网内标记设备, 子网内唯一, 是 OpenSM 程序分配的.
- 1 是设备的端口号, 我们的网卡只有一个端口, 序号是 1.
- 4 X 25.78125 Gbps, 由于是 QSFP28 链路, 该规范可以把端口拆分成 4 个 SFP28 链路, SFP28 是 25Gbps, 我们的端口是 QSFP28, (Q代表Quad是4个xxx的意思), 所以链路是 4 X 25 Gbps, 总计 100Gbps. 你也许会问为啥小数点后面还有一堆? 这跟光传输网络有关, 想详细了解可以去查询 wikipedia.
- 刚才说到了可以拆分成 4 个 SFP28, 所以如果买一条 QSFP28 转 4 个 SFP28 的电缆, 的确可以一拖四, 交换机上也可以用这种电缆来实现更高的密度接入.
- Active/ LinkUp, Active 代表 IB 在协议层运行正常, LinkUp 代表物理层(电缆, 硬件设备)连接正常.
- ==> 1 1[ ] "m02 HCA-1" ( ) 表示当前设备连接的对端设备, 第一个是 lid, 第二个是端口号, 后面是机器名和设备号.
测试 IB 吞吐性能
OFED 提供了 ib_send_bw 命令, 可以测试 IB网络的吞吐性能.
[root@m01 ~]# ib_send_bw -a -c UD -d mlx5_0 -i 1
 Max msg size in UD is MTU 4096
 Changing to this MTU
---------------------------------------------------------------------------------------
                    Send BW Test
 Dual-port       : OFF    Device         : mlx5_0
 Number of qps   : 1    Transport type : IB
 Connection type : UD   Using SRQ      : OFF
 RX depth        : 1000
 CQ Moderation   : 100
 Mtu             : 4096[B]
 Link type       : IB
 Max inline data : 0[B]
 rdma_cm QPs   : OFF
 Data ex. method : Ethernet
---------------------------------------------------------------------------------------
 local address: LID 0x02 QPN 0x0090 PSN 0x57780b
 remote address: LID 0x01 QPN 0x008e PSN 0xec96be
---------------------------------------------------------------------------------------
 #bytes     #iterations    BW peak[MB/sec]    BW average[MB/sec]   MsgRate[Mpps]
 2          1000             0.00               6.53         3.424226
 4          1000             0.00               18.11        4.747918
 8          1000             0.00               31.74        4.160209
 16         1000             0.00               93.23        6.109701
 32         1000             0.00               177.60       5.819656
 64         1000             0.00               346.08       5.670225
 128        1000             0.00               705.65       5.780665
 256        1000             0.00               1481.36      6.067664
 512        1000             0.00               2956.48      6.054879
 1024       1000             0.00               5258.59      5.384796
 2048       1000             0.00               9157.67      4.688726
 4096       1000             0.00               9582.67      2.453164
---------------------------------------------------------------------------------------
[root@m01 ~]#
可以看到在 4096bytes 情况下 BW average[MB/sec] 9582.67, 折合约 78.5Gbps. MsgRate[Mpps] 2.453164, 每秒传输2.45百万数据包. 增大包大小(也要提升MTU), 会得到更大带宽.
测试 IB 延时性能
一些特殊的场景例如高频交易等, 对网络延时很敏感, OFED 还提供了 ib_send_lat 命令用于延时测试.
[root@m02 ~]# ib_send_lat -a -c UD -d mlx5_0 -i 1 192.168.123.1
 Max msg size in UD is MTU 4096
 Changing to this MTU
---------------------------------------------------------------------------------------
                    Send Latency Test
 Dual-port       : OFF    Device         : mlx5_0
 Number of qps   : 1    Transport type : IB
 Connection type : UD   Using SRQ      : OFF
 TX depth        : 1
 Mtu             : 4096[B]
 Link type       : IB
 Max inline data : 188[B]
 rdma_cm QPs   : OFF
 Data ex. method : Ethernet
---------------------------------------------------------------------------------------
 local address: LID 0x01 QPN 0x0091 PSN 0xe2af32
 remote address: LID 0x02 QPN 0x0093 PSN 0x98b544
---------------------------------------------------------------------------------------
 #bytes #iterations    t_min[usec]    t_max[usec]  t_typical[usec]    t_avg[usec]    t_stdev[usec]   99% percentile[usec]   99.9% percentile[usec]
 2       1000          0.79           5.30         0.81              0.82         0.12      0.84        5.30
 4       1000          0.77           3.43         0.79              0.79         0.03      0.82        3.43
 8       1000          0.76           6.64         0.78              0.79         0.26      0.80        6.64
 16      1000          0.75           6.95         0.78              0.79         0.27      0.80        6.95
 32      1000          0.82           29.77        0.84              0.87         0.43      1.31        29.77
 64      1000          0.82           7.17         0.84              0.85         0.21      0.87        7.17
 128     1000          0.84           3.89         0.87              0.87         0.08      0.90        3.89
 256     1000          1.16           5.92         1.17              1.19         0.23      1.21        5.92
 512     1000          1.22           5.03         1.25              1.25         0.13      1.28        5.03
 1024    1000          1.34           6.69         1.37              1.38         0.19      1.44        6.69
 2048    1000          1.58           6.86         1.60              1.62         0.19      1.63        6.86
 4096    1000          2.04           7.88         2.07              2.10         0.29      2.23        7.88
---------------------------------------------------------------------------------------
[root@m02 ~]#
可以看到, 64 字节的包 99% 都在 0.87 微秒完成了传输, 4096 字节的包 99% 都在 2.23 微秒完成了传输. 可以说是相当强悍, 这个数据比高频交易用的 solarflare 的大部分网卡都要强. 当然, 这是 IB 协议的情况下, 具体到以太网情况数据是没这么好看的.
Windows 10 以太网络互通
好了, 演示完毕 linux 后, 我们演示 windows. 我把 m02 linux 机器的卡拔掉, 插到我的 windows机器上.
windows 机器配置就比较辣鸡了, Intel i5-7600K, 32G DDR4. windows 10 1803.
另一个卡还是插在 m01 这台 linux 机器上.
驱动安装
同样的下载地址, 我们选择 Win_OF2 驱动安装, windows 容易弄混, ConnectX-3 及以下的卡用的是 Win_OF, ConnectX-4 及以上的卡用的是Win_OF2. 一路Next即可, 但最后要看一下, 可能会安装失败, 如图:
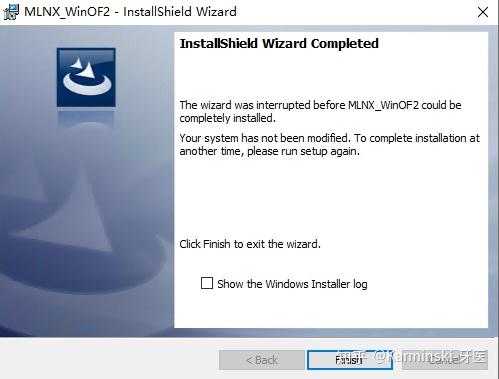

安装程序提示 "The wizard was interrupted".
这时候勾选下面的 "Show the windows installer log", 然后点击 Finish 查看日志, 拉到最后面, 应该是这个样子:
MSI (c) (E0:CC) [21:05:18:666]: Note: 1: 1729
MSI (c) (E0:CC) [21:05:18:667]: Product: MLNX_WinOF2 -- Configuration failed.

MSI (c) (E0:CC) [21:05:18:668]: Windows Installer reconfigured the product. Product Name: MLNX_WinOF2. Product Version: 2.20.50000. Product Language: 1033. Manufacturer: Mellanox Technologies. Reconfiguration success or error status: 1603.

MSI (c) (E0:CC) [21:05:18:673]: Grabbed execution mutex.
MSI (c) (E0:CC) [21:05:18:673]: Cleaning up uninstalled install packages, if any exist
MSI (c) (E0:CC) [21:05:18:679]: MainEngineThread is returning 1603
=== Verbose logging stopped: 2019/7/17  21:05:18 ===
"MainEngineThread is returning 1603", 出现这个错误需要停止 windows 的 WMI 服务再试一试.
打开 windows 的服务后, 选择Windows Management Instrumentation 然后右键选择所有任务, 停止.
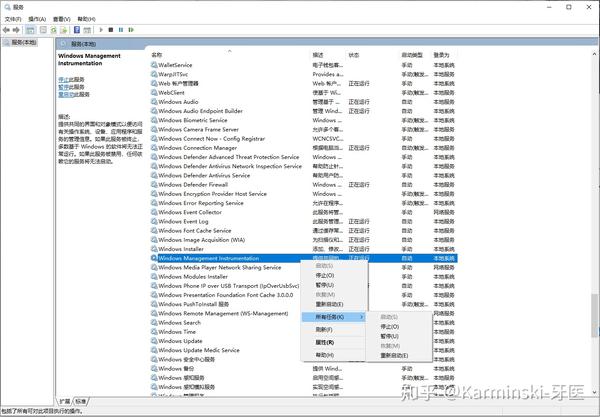

然后再次安装试一试. 如果还不行, 恭喜你, 重装系统吧.
配置 IP 地址
这个就很简单了, 正常配置就行, 不会的请自己搜索.
修改网络为以太网模式
同上, 用 CMD 先运行 mst status 来确定设备路径, 然后用 mlxconfig 修改接口运行模式. 最后重启生效.
C:\WINDOWS\system32>mst status -v
MST devices:
------------

  mt4115_pciconf0        bus:dev.fn=02:00.0

C:\WINDOWS\system32>mlxconfig -d mt4115_pciconf0 set LINK_TYPE_P1=2

Device #1:
----------

Device type:    ConnectX4
Name:           MCX455A-ECA_Ax
Description:    ConnectX-4 VPI adapter card; EDR IB (100Gb/s) and 100GbE; single-port QSFP28; PCIe3.0 x16; ROHS R6
Device:         mt4115_pciconf0

Configurations:                              Next Boot       New
         LINK_TYPE_P1                        IB(1)           ETH(2)

 Apply new Configuration? ? (y/n) [n] : y
Applying... Done!
-I- Please reboot machine to load new configurations.

C:\WINDOWS\system32>
检查工作是否正常
这里跟 linux 有些区别, 用 mlx5cmd 命令.
C:\WINDOWS\system32>mlx5cmd -stat
NIC 1:
    physical_location=Bus 2, Device 0, Function 0
    state=ENABLED
    uplink:
      BUS=PCI-E Gen3
      SPEED=8.0 GT/s
      WIDTH=x4
      CAPS=8.0*x4
    vendor_id=0x15b3
    vendor_part_id=4115
    hw_ver=0x0
    fw_ver=12.25.1020
    driver_ver=2.20.21096.0
    PSID=MT_2180110032
    system_image_guid=0002:c903:0021:2111
  Adapter 1:
      name=      interface_description=Mellanox ConnectX-4 Adapter
      physical_location:
        Bus=2
        Device=0
        Function=0
      state=ENABLED
      port_guid=0002:c903:0021:2111
      node_guid=0002:c903:0021:2111
      port_state=PORT_DOWN
      port_phys_state=DISABLED
      link_speed=14 Gbps
      link_width=1x (1)
      rate=14 Gbps
      sm_lid=0x0000
      port_lid=0xffff
      port_lmc=0x0
      max_mtu=4096 (5)
      active_mtu=4096 (5)
      link_layer=IB
      RDMA GIDs table:
        GID[0]:
          GID=fe80:0000:0000:0000:0002:c903:0021:2111
      PKEYs table:
        PKEY[0]=0xffff

C:\WINDOWS\system32>
可以看到 PCIe 版本没问题, 但是这次带宽出了问题, WIDTH=x4, 我这里插的是主板上的 PCIE x 16 口, 但我查了下, 我的辣鸡军规星主板只支持一个 x16, 因此我只能把显卡拔掉用核显, 把网卡插在原来显卡的位置.
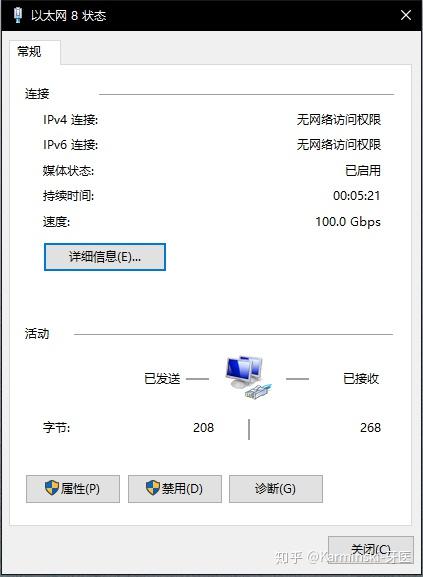
重启后:
D:\software\iperf>mlx5cmd -stat
NIC 1:
    physical_location=Bus 1, Device 0, Function 0
    state=ENABLED
    uplink:
      BUS=PCI-E Gen3
      SPEED=8.0 GT/s
      WIDTH=x16
      CAPS=8.0*x16
    vendor_id=0x15b3
    vendor_part_id=4115
    hw_ver=0x0
    fw_ver=12.25.1020
    driver_ver=2.20.21096.0
    PSID=MT_2180110032
    system_image_guid=0002:c903:0021:2111
  Adapter 1:
      name=      interface_description=Mellanox ConnectX-4 Adapter #2
      physical_location:
        Bus=1
        Device=0
        Function=0
      state=ENABLED
      port_guid=0002:c903:0021:2111
      node_guid=0002:c903:0021:2111
      port_state=PORT_UP
      port_phys_state=LINK_UP
      link_speed=100.00 Gbps
      active_mtu=1500
      default_roce_version=2.0
      roce_mtu=1024
      link_layer=Ethernet
      RDMA GIDs table:
        GID[0]:
          GID=fe80:0000:0000:0000:0202:c9ff:fe2d:d111
          RoCE_version=1.0
          vlan=no vlan
        GID[1]:
          GID=fe80:0000:0000:0000:0202:c9ff:fe2d:d111
          RoCE_version=1.0
          vlan=0
        GID[2]:
          GID=fe80:0000:0000:0000:75f8:aaa4:2bc9:0bc2
          RoCE_version=2.0
          vlan=no vlan
        GID[3]:
          GID=fe80:0000:0000:0000:75f8:aaa4:2bc9:0bc2
          RoCE_version=2.0
          vlan=0
        GID[4]:
          GID=0000:0000:0000:0000:0000:ffff:a9fe:0bc2
          RoCE_version=2.0
          vlan=no vlan
        GID[5]:
          GID=0000:0000:0000:0000:0000:ffff:a9fe:0bc2
          RoCE_version=2.0
          vlan=0

D:\software\iperf>
OK 终于正常了.
跑分!
这次我们换个跑分方式, 试试 samba 传输文件, 我在另一端的 linux 机器 m01 上开了 samba-server, 然后用 tmpfs 弄了个内存盘给samba用. windows 这边也开内存盘.


为什么! 才 1.24GB/s (折合 9.92Gb/s)! 实际上瓶颈有很多, 包括 windows 本身没有优化, samba 本身也有瓶颈. 甚至内存盘都有瓶颈(并不是内存带宽, 而是内存分配器之类的问题).
跑 iperf 试试:

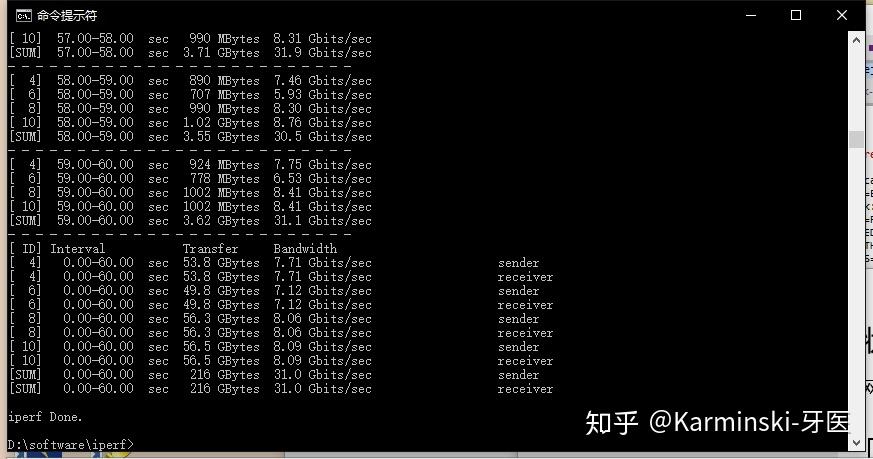
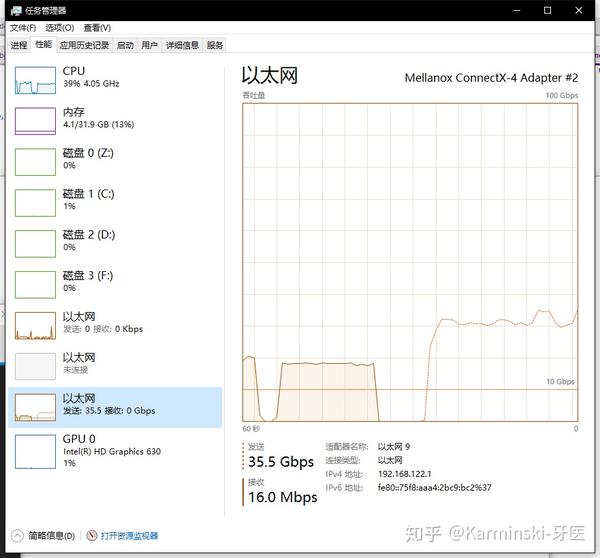

也才 30Gbps, 这是为什么? 因为 windows 下的 iperf 是 cygwin 实现的, 也有瓶颈, 而且, 机器上的 Intel i5-7600K 只有 4 核心......
总之, 要用 100G 卡跑满, 首先弄 8 个核心吧.
价格
- 100G 网卡 800块
- QSFP28 光模块 300块.
- MPO 10m OM3 光纤 100块.
总结
100GB 也有电缆, 电缆会便宜很多, 1m 100左右, 还附带模块.
注意不要把 QSFP 和 QSFP28 弄混, QSFP 是 40G 的, QSFP28 是 100G 的, 二者接口长得一样, 很容易弄混.
光模块的光端类型除了 MPO 接口的, 还有单模 LC 等类型的. 不建议买单模, 一个是贵, 另外一个是发热量巨大.
100G QSFP28 网卡接口是向下兼容的, 可以插 QSFP28, QSFP, SFP+, eSFP, SFP 等 ( 有的需要转接头). 但具体还是要看网卡的 Manual, 以及不同品牌的兼容性只能自己测. 所以如果没经验, 建议买网卡也买同样品牌的电缆或者光模块.
直连网络其实很好弄, 两台机器配置同一子网内的IP, 一个当做路由就行了.
如果准备弄高性能 NAS, 例如全 SSD NAS, 或者全 RAID0 一直爽的 NAS, 又想低成本, 可以直接买两个 10G 网卡像这样直连. 这样就省下了买 10G 交换机的开销. 垃圾佬 10G 卡比 Thunderbolt 卡便宜多了(后续文章会写用便宜的10G网卡组网).
本次内容就到这里了, 有任何疑问或建议欢迎在下面评论或私信我. 也欢迎加入垃圾佬交流群, 共同交流 50TB+ 级 NAS, CEPH, 万兆局域网, 家用服务器等.