Garry Tobiss tackles Hasegawa’s superb new-tool 1/72 Kawanishi H8K2, with extra help from Eduard aftermarket offerings
ADVANCED BUILD KAWANISHI H8K2 EMILY
Developed to a 1938 Imperial Japanese Navy Air Service requirement, and entering service in 1941, Kawanishi’s H8K (Allied codename ’Emily’) was the fastest flying boat to enter service in significant numbers during World War Two.
The H8K2 was the most numerous variant with 112 produced. Despite its large size, Allied pilots treated the Emily with great respect because the heavy defensive armament made it extremely difficult to destroy. A crew of ten manned the aircraft and the four Mitsubishi MK4Q Kasei 22 engines gave a top speed of 290mph (465km/h). Emilys were active throughout the Pacific theatre, being used for transport and reconnaissance, and were armed with bombs, depth charges or torpedoes for attack missions.
Old favourite revisited
Hasegawa first released a 1/72 Emily more than 50 years ago, and that was definitely a product of its time, with raised panel lines and limited detail compared to modern offerings…although in 1967 it was regarded as a game-changer. The firm’s announcement of a newly tooled version of this enigmatic and impressively sized aircraft, engineered with the latest moulding technology, had modellers champing at the bit. The parts were supplied on 22 styrene runners (including two clear), plus four poly caps for the propellers. A large decal sheet, together with painting masks for some of the clear parts, completed the package. As a bonus, a colour poster was included with this particular release, which showed the interior detail, although builders will need to brush up on their Kanji, Hiragana and Katakana characters…the descriptions are just in Japanese!
MODELSPEC

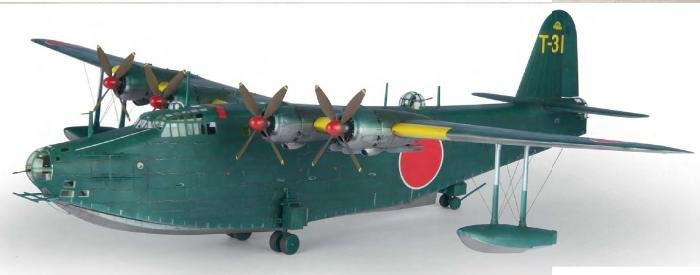
Emily markings
Three options were provided but the only difference between them was the markings on the tailfin.
• T-31, Takuma Naval Flying Group
• N-26, 802nd Naval Flying Group
• 8 01-86, 801st Naval Flying Group

Long-legged patroller
In a break with the usual sequence, the build started with the engines and wings.
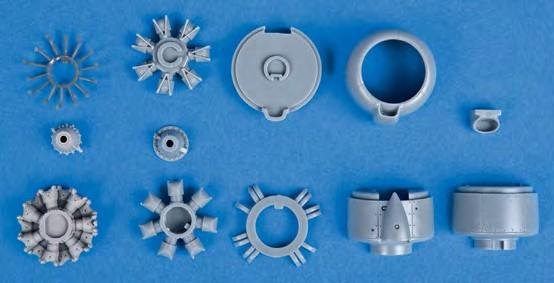
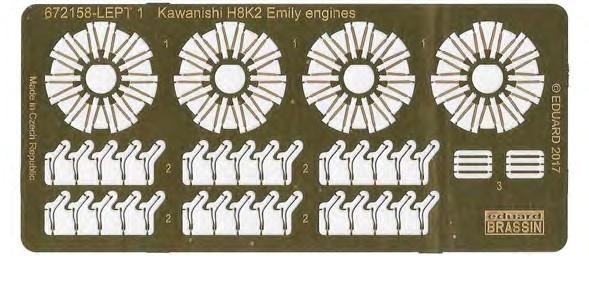
Hasegawa’s engines were acceptable, but as Eduard’s aftermarket replacements were available, these were used instead. Each unit comprised a large number of resin and PE components, including vast numbers of tiny tubes for the rear of the powerplant. As none of these minute items would be visible after assembly, they were left off, but everything else was assembled and then painted ready for their installation on the mainplanes.
There were options for the stores, namely a choice of torpedoes or bombs, which required different holes to be drilled in the wing underside for the respective pylons/adapters.
The latter was chosen for this build, after which the wings were assembled, followed by the addition of the completed engines and cowlings.


Big Ed-ons
Eduard’s (www.eduard.com) aftermarket products were used extensively during this build, and these included resin and photo-etched (PE) brass engines (672158) and machine guns (672157). It also combined a series of individual PE brass and metal sets for the interior and exterior into a substantial ’Big Ed’ pack, specifically for this model. In total, BIG72128 H8K2 Emily comprised the following:


Next came the interior. This was also relatively well detailed out of the box, but a large amount of Eduard PE was added to provide a substantial degree of enhancement. A reasonable question would be what’s the point, when virtually nothing will be seen once the aircraft is complete? Each to their own, but personally I enjoy understanding the interior of the aircraft when building, and once the brass items had been added, the innards were ready for painting.
Colours were identified with numbers from the Mr. Hobby Aqueous and Mr. Color ranges. The main colours can be mixed to obtain the correct hues or alternatively, Mr. Hobby produces a specific three-tone Mr. Color set for Kawanishi aircraft. This package (CS668) wasn’t available in the UK for this build, so was sourced from Germany; however, Albion Alloys (www.albionhobbies.com) will be importing this set to the


UK shortly. Mr. Color paints are lacquer-based, so must be treated with extreme care. The use of a respirator — ideally a full-face unit to protect the eyes — plus something for vapour extraction is essential.
Preparations began with a coat of Mr. Surfacer 1500 Gray primer from a rattle can, which blended the PE with the styrene to provide a uniform super-smooth surface.
The paints were diluted with roughly equal amounts of Mr. Leveling Thinner and, as usual for Mr. Color, these responded superbly when airbrushed. First to be applied was C384 Cockpit Color (Kawanishi), which turned out to be a light green/yellow shade. Once this had dried fully, pre-painted PE components from Eduard’s cockpit interior set (73592) were added; it would have been difficult, if not impossible to mask these items if attached prior to painting.
Checks were needed before and after the PE was added, just to ensure nothing affected the fit of the kit parts.
Employing so many aftermarket products inevitably meant there was duplication, and examples included the ammunition storage racks, which came as resin parts in the guns set (672157) and PE items in the rear interior product (72651). Back to the painting, and once the cockpit colour was applied, surface detail was then enhanced with a dark wash, before various areas were highlighted with a silver pencil.


“various areas were highlighted with a silver pencil”
A decision on how to display the waist gunner positions was needed at this point, because the glazing was attached to the inside of the fuselage. Open was chosen, so the appropriate clear parts were added and the fuselage halves were then joined, followed by adding the assembled nose area. Speaking of the crew, a very detailed set of 11 crew figures was supplied (from a total of 16, which would leave plenty of spares), but not used for this build.
The problem of how to avoid breaking the delicate resin guns during assembly meant none were added until the very last stages of the build. This meant constructing the glazed nose and rear gunner positions temporarily, so they could be painted and then removed to have the guns added later.


To PE or not to PE?
Eduard’s exterior upgrade set (72652) was substantial, but many parts weren’t used. The engine ignition wires were duplicates of those in the Brassin engine set (672158) and all the window outlines remained on the fret. This was a personal preference, because at 1/72 scale, even thin PE seemed over-scale compared to photos of the actual aircraft. One area enhanced significantly was around the main beaching gear, where various PE parts were formed to create two impressive and very visible structures. Note, surface detail on the kit fuselage had to be removed to allow the new additions to fit correctly (see photos).
Brass components were also provided to replace the moulded control surface actuators on the wings, but it was decided they provided marginal improvements for much additional work, and these were omitted. Finally, the radar aerials for the nose were also supplied; rather than supplant the styrene items entirely, these were instead used to augment the kit parts in a ’blended’ approach.
With the fuselage complete, it was time to add the tailplane and wings, with the latter designed to fit onto support brackets/spars.
Brief consideration was given to sandwiching the wings around these, because of concerns they wouldn’t slide onto the frames very easily, but this approach was rejected. The spars did need plenty of scraping and sanding to allow the wings to slide over them and position correctly, without running the risk of splitting the wing halves.


The glazing – all pre-dipped in Johnson’s Future Klear floor polish – was then added. As well as the main windscreen and turrets, this included many tiny windows, which all had be masked subsequently. Hasegawa provided masks, but so did Eduard and the reader may ask, reasonably, why? The answer was the kit offering catered for just the main areas, which left the many small fuselage and wing windows to be masked separately. Happily, Eduard filled this minor oversight with its own product (CX 493), so both were used. Patience was required during this stage, as there were 110 tiny masks in the Hasegawa set and another 43 from Eduard!
Big green blob
The Emily had a simple colour scheme, with silver undersides and dark green upper surfaces.
Primer was used for any parts of the model with PE, but this did not include the wings and fuselage. Pre-shading was also avoided, to allow experimentation with other techniques. Alclad’s ALC-305 Black Gloss was applied to the undersides first, followed by ALC- 101 Aluminium. The areas around fabric-covered parts of the wings were then masked, before they received ALC-117 Dull Aluminium.
Glazed areas were painted the interior colour and then the upper surfaces airbrushed C383 Dark Green (Kawanishi). Another masking extravaganza around the upper wing fabric sections followed. This was not identified in Hasegawa’s painting guide, but wartime photos of Emilys showed a distinct difference in weathering patterns, between the aluminium and fabric surfaces. The latter was then recreated with a lightened version of the Kawanishi green.
This also served to add visual interest to what would otherwise have been a monotone finish. Two coats of Klear were then hand-painted, with care taken to ensure brush strokes followed the direction of the airflow.
All the decals came next. Walkway decals had huge areas of clear carrier film, but it looked rather thick, so all lines were carefully cut and applied separately, to minimise the risk of silvering. This took time, but paid dividends because even small amounts of film seemed to show evidence of the dreaded silvering – produced when tiny air bubbles are trapped beneath the clear carrier film. The same technique was used for the lettering; everything was cut back to just the coloured parts.
Acrylic matt varnish covered the upper surfaces to seal everything in preparation for weathering.
Materials at a glance
Alclad II
ALC-101 Aluminium
ALC-117 Dull Aluminium
ALC-305 Gloss Black Base
Eduard
672157 H8K2 Emily Guns
672158 H8K2 Emily Engines
BIG72128 H8K2 Emily
CX 493 H8K2 Emily fuselage windows
Infini Model
IR-0701B Fine Black Lycra Rigging 70
Dernier
Mr. Hobby
CS668 Kawanishi N1K2-J Colors
Lifecolor
LC-LP03 Liquid Pigments Rain and Dust set
Ultimate Modelling Products
Dark Dirt Weathering Wash

“wartime photos of Emilys showed a distinct difference in weathering patterns”
Any thoughts of pride in the work so far were blown out of the water by helpful passing remarks from my wife – ”it looks like a big green plastic blob” – ever my fiercest critic. This merely inspired the efforts to weather the Emily. The process began with Ultimate Modelling Products’ (www.umpretail.com) acrylic ’Dark Dirt’, which is designed to be applied generously all over the model, left to dry and then any excess removed. Previous builds highlighted this can darken the entire surface, so the dirt was painted just along panel lines and other features. This particular wash didn’t adhere to the Alclad-coated surfaces so a dark oil wash was used for those areas.
Next was Lifecolor’s LPW 11 Rain Marks from the Liquid Pigments Rain and Dust set (LCLP03), which was brushed onto the green areas with random squiggles and left to dry. A wide brush was then dampened with Lifecolor’s Remover product (from the same set) and the pigments worked around the surface. The result was a realistic degraded surface appearance.


“This was a superb kit of a fascinating subject”

Panel lines were then partially picked out with a silver pencil.
A combination of dark brown and silver pencils emphasised the lines in the large Hinomaru decals, which also stopped them appearing as large red blobs. The same effect was created on the yellow leading edges. A slight disaster occurred while detailing the underside, though, when a piece of stray masking tape stuck to one of the Hinomaru and partly ripped it. Extremely careful surgery was then required to tease the decal from the masking tape and re-apply it. The moral of the tale was to keep the construction area clean and tidy! Problem solved, it was time to tackle the finishing touches.
All the masks were removed to reveal virtually no paint bleed below them, and a surprising amount of interior detail could be seen through the glazing.
Each wing float was assembled, painted and weathered in the same way as the rest of the aircraft, and the small amount of rigging created with Infini Model’s Fine Black Lycra Rigging (www.sovereignhobbies.co.uk).
The beaching undercarriage was then attached, followed by removing the nose and tail glazing to allow the guns to be added, before the clear parts were re-secured. For the waist gun positions, the weapons were positioned by passing them through the window opening on the opposite site, after which glue was applied. Final additions included the nose aerials, followed by the various antenna fittings on the fuselage top. Note, Eduard’s H8K2 maintenance platforms (72653) set was partly assembled, but not used here.
Feet wet
This was a superb kit of a fascinating subject, which filled the box admirably and was a real pleasure to build, with a very substantial model being the result. Eduard provided the usual excellent standard of both resin and PE upgrades, and this made a great kit even more detailed and impressive. The final response from the local critic was that it now looked like a proper aircraft!