Manufacturer | Honeywell |
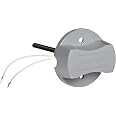
---|---|
Part Number | M847D |
Item Weight | 1.1 pounds |
Product Dimensions | 3.4 x 4.5 x 2.4 inches |
Item model number | M847D |
Is Discontinued By Manufacturer | No |
Item Package Quantity | 1 |
Number Of Pieces | 1 |
Measurement System | Imperial |
Coverage | 1 sq feet |
Included Components | Zone Valve Actuator |
Batteries Included? | No |
Batteries Required? | No |
Warranty Description | Manufacture |
Enjoy fast, free delivery, exclusive deals, and award-winning movies & TV shows with Prime
Try Prime
and start saving today with fast, free delivery
Amazon Prime includes:
Fast, FREE Delivery is available to Prime members. To join, select "Try Amazon Prime and start saving today with Fast, FREE Delivery" below the Add to Cart button.
Amazon Prime members enjoy:- Cardmembers earn 5% Back at Amazon.com with a Prime Credit Card.
- Unlimited Free Two-Day Delivery
- Streaming of thousands of movies and TV shows with limited ads on Prime Video.
- A Kindle book to borrow for free each month - with no due dates
- Listen to over 2 million songs and hundreds of playlists
- Unlimited photo storage with anywhere access
Important: Your credit card will NOT be charged when you start your free trial or if you cancel during the trial period. If you're happy with Amazon Prime, do nothing. At the end of the free trial, your membership will automatically upgrade to a monthly membership.
Honeywell M847D Zone Valve Actuator
Return this item for free
Free returns are available for the shipping address you chose. You can return the item for any reason in new and unused condition: no shipping charges
Learn more about free returns.- Go to your orders and start the return
- Select the return method
- Ship it!
Purchase options and add-ons
- Low Voltage, Spring-Return Damper Actuator
- Equipped With Anti-Rotation And Drive Shaft Extensions For Direct Mounting To 7/16 Inch Diameter Coupling Style Dampers
- Direct Replacement For M847D1004
- Brand Name: Honeywell
Frequently bought together
Similar items that may ship from close to you
- Honeywell 802360JA MotorAmazon's Choicein Electrical Motor Controls
From the manufacturer
about us
- More fuel-efficient aircraft. More direct and on-time flights. Safer skies and airports. We're found on virtually every commercial, defense and space aircraft.
- Over 100 years ago, we defined energy efficiency by making indoor comfort automatic. Today, we redefine it in 10 million buildings using our technology.
- We pioneered automation control so we understand complex industrial facilities and how to create high-quality and high-performance chemicals and materials.
- Each year, we keep over half a billion workers safer and more productive with voice-enabled software, barcode scanners, mobile computers and protective equipment.
Product information
Technical Details
Additional Information
ASIN | B01GWW9M6W |
---|---|
Customer Reviews |
4.7 out of 5 stars |
Date First Available | June 11, 2016 |
Warranty & Support
Feedback
Looking for specific info?
Videos
Videos for this product
0:54
Click to play video
Reliable Replacement, Reliable Performance
william luu
Videos for this product
0:07
Click to play video
Customer Review: upgraded zone dampner motor
Dewayne
Product Description
The M847D is a two position, 24 Vac spring return actuator designed to operate ARD, EARD and ZD zone dampers.
Customer reviews
Customer Reviews, including Product Star Ratings help customers to learn more about the product and decide whether it is the right product for them.
To calculate the overall star rating and percentage breakdown by star, we don’t use a simple average. Instead, our system considers things like how recent a review is and if the reviewer bought the item on Amazon. It also analyzed reviews to verify trustworthiness.
Learn more how customers reviews work on AmazonCustomers say
Customers like the ease of installation, performance, and value of the valve. They mention that it works well, is easy to replace, and is great value for your money. Customers also appreciate the quality, saying that it's a much nicer built unit and better than the original parts.
AI-generated from the text of customer reviews
Customers find the installation of the valve to be very easy. They mention that it has a clear step-by-step process, and the installation is simple with two wires. Some mention that connecting the damper wasn't too difficult.
"...I replaced both to be safe. Install was straightforward. YouTube is your friend. My zones are now working perfectly. Worth every penny...." Read more
"...Youtube. Andrew Rogers, How to Change an AC Damper Motor. Very clear step-by-step process. https://www.youtube.com/watch?v=KsmNq4tccPY..." Read more
"...Actual installation took minutes, and with a little adjustment for tight-close the system is once again functioning correctly...." Read more
"...First time I had done this and it was very easy and fast. I won't be calling the AC companies for this again...." Read more
Customers are satisfied with the performance of the valve. They mention that it works well, is easy to install, and works seamlessly with their Honeywell controller. Some say that the zones are now working perfectly.
"...Install was straightforward. YouTube is your friend. My zones are now working perfectly. Worth every penny...." Read more
"...I have found this Honeywell damper motor to work very well and it has a fantastic display so you know the exactly position of the damper and what..." Read more
"...went fairly straightforward as expected and so far they seem to be functioning properly. The old units were only about 5 years old so time will tell." Read more
"Very good, worked well except it is hard to see if the damper is fully open since it must be in that position when it's installed...." Read more
Customers find the replacement of the valve to be easy. They mention that it's a quick swap out from the old actuator to the new one, and it takes 5 minutes to replace. The hardware is included, and the product is an exact replacement.
"...The gear was not hard to remove - I could’ve probably just replaced the gear instead of buying a new actuator...." Read more
"...The replacement was very straight forward and was very easy to access...it only took me like 10 minutes to replace it." Read more
"...It's pretty easy to make the swap and there are plenty of videos out there to take you through it step by step...." Read more
"One of those items that is easier to replace than you would probably think...." Read more
Customers appreciate the value of the valve. They say it's great value for money, and worth it.
"...YouTube is your friend. My zones are now working perfectly. Worth every penny. Hope these last as long as the old ones (5 years)." Read more
"...I saved a bunch of money and avoided some future problems." Read more
"...the house making life better for everybody not to mention saving thousands of dollars!..." Read more
"Seller shipped right away and packaging was good. These damper actuators are expensive but much less than our AC repair company wanted to charge..." Read more
Customers are satisfied with the quality of the valve. They mention that it is a well-built unit, better than the original parts, and contains all needed components. They also appreciate the robust design and reliability. Customers also say that the valve has well-designed features and is easy to use.
"...found this Honeywell damper motor to work very well and it has a fantastic display so you know the exactly position of the damper and what it is..." Read more
"This actuator is much more robust than the plastic-geared builder cheapo unit it replaced...." Read more
"Easy to install and has been far more reliable than what the builder put in my home. I have not had any issues so far." Read more
"...Looks to be better quality. Recommend, anyone with common sense can do this replacement on their own." Read more
Customers like the fit of the valve. They mention that it fits perfectly and does the job.
"We needed to replace our old one and this one fit perfect and works great!" Read more
"everything fits well except you need more clearance than older model to mount this. Last page of manual has wiring connections...." Read more
"It fit perfectly replacing the original unit. This can be done by anyone is an allen (hex) key set. Took 5 mins to replace...." Read more
"...This newer version fit perfectly and included a convenient visual display of the valve position." Read more
Customers like the indicator lights on the valve. They say it has a visual indicator for the position of the damper. Some customers also like the status light. The red LED indicator with analog needle is available.
"...I think the indicator lights work better in the distance instead of having to get really close to it...." Read more
"...Had the unit for 2 months so far with no issues. The status light is a great to have added option...." Read more
"...It lights up to tell you its working and it has a white indicator bar that moves into position...." Read more
"...It’s works fine and red LED indicator with analog needle for operation visibility .A mechanic might charged 300$ to 900$ for this job !..." Read more
Customers are dissatisfied with the durability of the valve. They say it didn't last, has higher than expected failure rates, and is very fragile. Some say that the valve failed after 6 months and broke at the same spot.
"...Despite the quality of the product and seemingly higher than expected failure rates, that’s no slight on this seller as I still chose to order this..." Read more
"...Surprisingly both were broken at the same spot...." Read more
"...Now, the new ones (this model) have started to go. 3-4 year life...ridiculous." Read more
"...wires to the push in tabs as they are made from plastic and very fragile!" Read more
Reviews with images
-
Top reviews
Top reviews from the United States
There was a problem filtering reviews right now. Please try again later.
After I removed and dissembled the actuator, I realized the issue was caused by a stripped plastic gear inside the old actuator. The gear was not hard to remove - I could’ve probably just replaced the gear instead of buying a new actuator. However the gear was unlabeled and unbranded. It may be hard to find.
Actuator replacement process:
Equipment:
1. Honeywell M847D Zone Valve Actuator
2. 3/16 hex key (allen wrench, t-handle, etc. Any works - you need this to loosen/tighten a set screw)
3. long nose plier (or any tool with a pointy tip. You need this to push down the buttons on the new actuator to push the wires in.)
4. non-contact voltage meter (eg. Klein Tools NCVT-3, when you turn the power off on the actuator / your furnace, before you remove the old actuator, you want to use this to touch the wires connecting the old actuator to make sure there’s no power. It’s 24V, may not be the worst even if you touch it, but preferably don’t touch live wire.)
Guide:
1. Youtube. Andrew Rogers, How to Change an AC Damper Motor. Very clear step-by-step process. https://www.youtube.com/watch?v=KsmNq4tccPY
2. Medium. Ninu, How to swap out an HVAC damper actuator yourself - Honeywell M847D-ZONE. https://medium.com/@ninu/how-to-swap-out-an-hvac-damper-actuator-yourself-honeywell-m847d-zone-c99d25ca3167
3. SupplyHouse. Has > 100 useful reviews. https://www.supplyhouse.com/Honeywell-M847D-ZONE-TRUEZONE-Replacement-Actuator-for-Normally-Open-Dampers
4. Search Term: “Honeywell actuator replacement”
5. My issue was “Failed zone damper” with clicking sound, sample video from Dennis Benjamin https://www.youtube.com/watch?v=V5zQ4UQ9Iks
Some hiccups:
1. The box I got from Amazon came with a little packet of 2 set screws. One is 0.5 inch long and has a head. The other is 1.5 inches long and is a headless / socket / blind set screw. You can use either one as the set screw, or use the old set screw (1.5 inch, has a head) from the old actuator. I prefer the old set screw because it is longer, so it is more visible and my Allen wrench can reach it more easily. It also has a head so I can grab it with my fingers.
2. You should use the non-contact voltage meter to test and ensure power is off before you start removing the old actuator.
3. How to determine which wire goes to M1, M4 and M6? The short answer is whatever wire that was connected to the old actuator’s orange wire should be shoved into M1. Whatever wire that was connected to the old actuator’s yellow wire should be shoved into M6. The long answer is: I’m not using M4 (for LED indicator light). I use M1 (for common wire) and M6 (for 24 Vac wire). It seems that for AC, you can switch the wires, but it’s a good habit not to. I assumed the old actuator was wired correctly. Eg. I have two wires connecting to the old actuator’s orange wire and yellow wire respectively. say, Wire-1 —> Old Actuator Orange Wire —> M1. Wire-2 —> Old Actuator Yellow Wire —> M6. I based this on “Andrew Rogers”’s youtube guide). It works correctly in my case.
4. You may need to wiggle the wires to make them fit in M1 and M6, especially because the original wires came out twisted once you remove the wire connectors. You can use the plier to straighten the wires a bit before shoving them in M1 and <6.
5. Short wires? Beware that the wires from your home might be a bit short and might not reach the new actuator, since the new one doesn’t have connecting wires, but just buttons. You can pull on your wires to see if you can make it reach the new actuator.
6. The set screw on the old actuator may be hard to unscrew - it might be very tight. Use some force to loosen it.
Steps:
1. prepare the tools
2. make sure you know which wires should go into M1 and M6 ahead of time (See hiccup #3)
3. put the set screw onto the actuator just right - make sure you can’t see threads from inside the actuator hollow central pin, so that there’s enough space in the hollow pin to connect to the pin coming out of the damper)
4. turn power off of the furnace and the zone control (from main service panel)
5. make sure furnace won’t call for heat (this should be true since power is turned off on the furnace)
6. use non-contact voltage meter to test for no voltage on the wires coming out of the actuator
7. make sure the fan is off - no blowing air. This should be true already since the furnace is off. But just double check. If the fan were on, it may blow the damper off, no good.
8. loosen but don’t unscrew the set screw (the long screw towards the bottom right) on the old actuator. It may require some force to loosen it. If you look at the set screw head, then clockwise is to unscrew.
9. unscrew the two wire connectors and untwist the wires.
10. push the hex key to further loosen and remove the hex screw on the old actuator
11. put the set screw aside. You can use this instead (see step 2) on the new actuator, or not - your preference (See hiccup #1)
12. remove/pull the old actuator in a straight outward manner
13. check the damper is open all the way (may be hard if you don’t have opening in the duct. If that’s the case, ignore this step - your damper should be open all the way anyway, since it’s always open and power close)
14. observe the hollow central pin and the stationary pin on the new actuator
15. push the new actuator straight on
16. check the new actuator indicating it’s in the “open” position
17. tighten the set screw (it should already be on the new actuator by step 3). Tighten it all the way.
18. damper should show it’s completely open.
19. hook up the wires: M1 (common/ground) with the wire that originally connected to the orange wire on the old actuator. And M6 (24V) with the wire that originally connected to the yellow wire on the old actuator.
20. push the wires in
21. push the M1/M6 buttons down one by one. Push it down, put wire in, let go of the button, give it a wiggle to make sure the wire doesn’t come out. You should be able to shove 1/6 inch of the wire inside at least.
22. turn power back on
23. watch your actuator move when heat is called.
The new actuator arrived three days following the order. I read the directions in advance so was tools-ready when the post office delivered the new actuator. Actual installation took minutes, and with a little adjustment for tight-close the system is once again functioning correctly.
Tools required included a couple hex key "allen" wrenches (3/16" and 1/8"), and I used a small Vise-Grip pliers to adjust the position of the damper itself before placing the new actuator. I used a handy head-light for illumination since the dampers and actuators are in a basement space that's not fully illuminated.
Do take a few minutes to read and understand the installation instructions before you start. They aren't fabulous but are sufficient to get the job done for most folks.
Doing this work myself saved close to $1k in weekend service call costs from local HVAC contractors. There are times like this when, finally, learning how to use an Allen wrench and a small Vise-Grip pliers as a young teenager finally pays off 50+ years later. Even with inflation.
Top reviews from other countries
You can replace this yourself. A 3/16" allen key is all that is needed. This unit is a great improvement over the older design as it has a LED indicators showing open and closed condition and a position indicator to show the damper position. It also adds a red tab with definitive stops to adjust the air flow bleed rate in increments of 0%, 20%, 30% and 50%. It has push in terminals so no more wire nut connections are required.
My only complaint is the high cost. But if you replace it yourself then you can save on the service call to call a HVAC technician.