
Previous post

Next post


Stays. The first item you need for 18th Century costuming, and cruelly, the most complicated and time-consuming thing to make.
After much procrastination, using the size chart on the pattern envelope as a guide, I made a cereal box mock-up before cutting my fabric.
Many people who have made stays from this pattern have found it to be short-waisted. I have a long torso, so I added half an inch to the length of all the pattern pieces. The cereal box mock-up did not reflect the fit I later got with my fabric. While the length was fine, I ended up with stays that had a full 2 inches of ease at my waist and an extra inch and a half at my bust.
There are many ways you can have a long torso. Length from shoulder to bust longer than average? Or your hip-to-crotch measurement? Long rib cage? I think I have a long rib cage, but I’m not sure. More importantly, there is a really small distance between where my ribs end and my hips begin, which means where the tabs break became a bigger issue than the total length of the stays.
 Advice: If you plan to make stays from either of the American Duchess Simplicity patterns, watch the entire AD stays video before you get started. I had the tab open on my browser with the video and even started watching it, but didn’t get very far. I came back to it after I started having issues while making my stays. The video answered most of my questions, but I had already made a couple of mistakes I couldn’t undo.
I never did figure out what went wrong with sizing. I probably should have sized down from the smallest size my measurements matched with (my bust), which would have been a size 10. Instead, I picked the size that matched my 34″ bust, the size 12, and graded out to a 14 for the bottom half of the stays to accommodate a 28″ waist. The result were stays that were too big. I keep going back to the Simplicity pattern to understand what went wrong with the fabric choices. My understanding of the instructions was that I needed one layer of lining, one layer of interlining, and one outer layer.
I used canvas I already had on hand for the interlining, and used quilting cotton for the outer layer, with a beautiful voile lining.
It makes sense that both layers holding the zip tie boning need to be thick, but the instructions weren’t clear on that, and I didn’t realize until I watched the whole American Duchess video that I needed two thick layers. In fact, a number of the instructions that come with the pattern differ completely from what Lauren and Abby of AD recommend.
I was able to make many of the mods I wanted for my stays – I used an auto store chamois (“You mean a shammie?” said the guy at the auto shop. I didn’t know I needed to be able to speak French at Autozone.) to bind the edges, the seams, and to make pit patches.
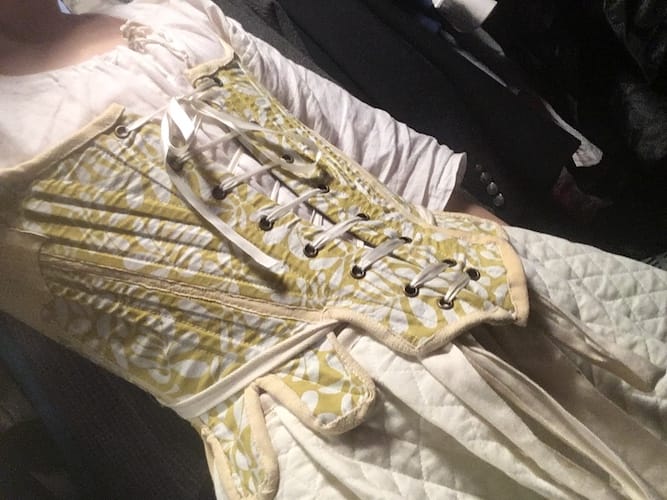
I used 3/8 in. ribbon from the craft store to lace the stays (criss-cross in the back because I prefer how it looks, spiral in front for ease and accuracy.)
Mistakes I made, by not watching the AD videos completely, or by following unclear or wrong Simplicity instructions that differed from AD recommendations, or both: I used the wrong fabric, made the wrong size, sewed my leather binding on using the wrong stitch, used a punch to make the lacing holes instead of an awl, and added the lining at the wrong time (Simplicity has you add the lining before the grommets, AD wants you to add it at the very end and whip it in.)
Frequent fittings are required, but without lacing holes, you can’t fit it properly. So I guess you need to get the grommets in way early so you can try them on right away, rather than much later, which is when the Simplicity pattern instructs you to put them in. (Or make a mock-up, and I just WON’T. I get so little free time to sew that I don’t want to spend it doing things I hate.)
I had started hand binding my lacing holes when I started finally watching the AD video. Lauren and Abby of American Duchess are all about historical accuracy, but in the video they tell you to use metal grommets. It’s a modern convenience that is just too good to skip. I actually put metal grommets over the five lacing holes I’d done by hand, with no regrets.
One note about metal grommets: I never figured out what the secret was for a clean grommet. Some of mine are perfect, and some have sharp metal edges where the grommet split. I couldn’t for the life of me figure out what I was doing differently the times it went right. (If you know how to smooth a sharp grommet edge without destroying the fabric around it, please let me know).
The night I discovered how bad the sizing was off was rough. I’d already sewn a lot of leather on (with the wrong stitch) and I was thinking I would have to completely start over to get the stays to fit.
Are you familiar with Oxytocin? The feel-good hormone that is released during orgasm, when you give birth, and also… when you hold someone? We call them Oxytocin Hugs at our house. You have to hold on to someone for a little longer than usual to get the effects, but when you hug for long enough, you’ll feel a subtle warmth spread through you and your whole body will relax into the other person. This can work on kids, partners, friends. This is science, friends, but I couldn’t find the link. I recommend finding someone to hold at your earliest convenience to get some anecdotal evidence.
This does relate to my stays. That night I knew the stays were a bust, I was stressed out and discouraged. The Chaplain was holding me before we went to sleep. After a little while, my whole body and brain relaxed as the oxytocin washed in… and I realized I didn’t have to start over with the stays. I could just take them apart and make the side pieces narrower.
Perhaps you don’t need to get an oxytocin boost that relaxes you enough to think outside of the box about your problems, but it was a powerful realization. Some of my best ideas and solutions come while I’m meditating. Sometimes, when I’m most stressed, I don’t even want to meditate, I want to use my “lower” coping mechanisms – medicating with screens, eating sweets and carbs, wallowing.
When you’re really stressed, an Oxytocin Hug (or something like it – my kids can also snap me out of it if I let them) can be the thing that frees your mind from the pointless rehashing of all the ways you are Doing Things Wrong.
When I sat back down with the stays, I had to take them almost completely apart – which allowed me to fix some of the construction differences between what Simplicity says to do and what AD recommends. I traced straight size 12 pattern pieces, and figured out how much I would need to take off of the side pieces in order to remove 1.5 inches from the top of my stays and 2 inches from the bottom. It ended up being 1/8 in. off of each edge of the two side pieces, grading out to a quarter inch at the bottom, which I did by cutting a slice up from the center bottom of my pattern piece and overlapping the piece in the center. I didn’t cut my original pieces, just traced the slimmer pattern pieces onto the originals and adjusted my seams.
The grommets were already in through all three layers, so the lining was stuck to the from and back sections. I removed the lining from the side pieces and didn’t put it back in right away, so I could follow the AD method of construction for at least part of the stays. On the side front pieces, I had to redraw the boning channels after I re-drafted.
On my original stays, I had already done the twill tape shoulder straps shown in the AD video. With my remake, I whipped down the seam allowances, which were now larger and more unwieldy from having been manipulated so much. Where the front and back pieces connected to the side, I whipped the lining down on top of the seam allowance. I sewed the chamois binding back on using the correct backstitch (instead of my original running stitch), which made them sturdier and look better.
I considered adding more boning, but through this process, I’ve realized I am not very squishy. Adding boning probably wouldn’t accomplish much other than making the stays less comfortable to wear, so I left the boning channels as they were drawn in the Simplicity pattern.
I can tell the zip ties will rip through the quilting cotton at some point, and my intention is to patch the areas where they wear through with something more sturdy than the quilting cotton I chose for the outer layer – perhaps canvas or a scrap of chamois. I am hoping the one layer of canvas will provide me with enough support.
As I was working on the stays, I used nylon cording for lacing during a test fitting. I left the lacing in while I was ironing part of the stays during the re-fitting process.
The black cord got caught under the iron and melted onto my stays and my ironing board cover. It is a permanent stain. My efforts to remove it left more brown discoloration around the existing stain.
Then, my almost five-year-old splatted a blop of mud on them one unseasonably warm day in January when I was hand stitching them outside. Miraculously, both of the stains occurred almost completely in the area that would covered by the chamois binding and the pit guards. Sewing the leather binding on the stays was not as bad as I thought it would be. I used a rubber grippy thimble and only drew blood a couple of times.
My next projects are a quilted petticoat and a split rump pad, which I anticipate will be easier than the stays were. Every time I think “rump pad,” it makes me smile.
Update: I’ve worn these stays several times for a few hours at a time. It became clear that there were fit issues. I didn’t place the holes properly for spiral lacing. The longer I wore them, the stays got progressively tighter at the waist while loosening at the bust. My whole midsection ached for a day after taking them off. I sewed the two pieces together in the back to make it a little smaller, eliminating the back lacing. I cut the tabs up a 1/2 in. higher. This helped with some of my problems. I’m still not completely pleased with the fit, but I’m not fed up enough to start on another pair.
If you know what to look for, you can see that by the time I got around to taking After pics of the stays, I’d already completed my quilted petticoat, which is visible in the top photo. I made it using the instructions in The American Duchess Guide to 18th Century Dressmaking. It is hand sewn and was an easy and satisfying make.


