In today’s fast-paced digital landscape, organizations are constantly seeking ways to optimize their IT operations and streamline infrastructure management. One approach that has gained significant traction is Infrastructure as Code (IaC). By treating infrastructure provisioning and management as code, IaC enables organizations to automate and standardize their processes, resulting in increased efficiency, scalability, and consistency.

In this blog article, we will explore the concept of Infrastructure as Code and its practical implementation using VMware Cloud Director. We will delve into the benefits and challenges of adopting IaC, highlight the features of VMware Cloud Director, and showcase how the integration of Terraform with VMware Cloud Director can revolutionize IT operations for Cloud Providers as well as customers.
What is Infrastructure as Code?
Infrastructure as Code (IaC) is a methodology that involves defining and managing infrastructure resources programmatically using code. It allows organizations to provision, configure, and manage their infrastructure resources, such as compute, network, and storage, through automated processes. By treating infrastructure as code, organizations can leverage the same software development practices, such as version control and continuous integration, to manage their infrastructure.
Benefits of Infrastructure as Code
The adoption of Infrastructure as Code brings numerous benefits to cloud providers as well as customers:
Consistency and repeatability: With IaC, infrastructure deployments become consistent and repeatable, ensuring that the same configuration is applied across different environments. This eliminates configuration drift and minimizes the risk of errors caused by manual configurations.
Efficiency and scalability: IaC enables organizations to automate their infrastructure provisioning and management processes, reducing the time and effort required for manual tasks. This allows IT teams to focus on more strategic initiatives and scale their infrastructure easily as the business demands.
Version control and collaboration: By using code repositories and version control systems, organizations can track changes made to their infrastructure configurations, roll back to previous versions if needed, and collaborate effectively across teams.
Documentation and auditability: IaC provides a clear and documented view of the infrastructure configuration, making it easier to understand the current state and history of the infrastructure. This improves auditability and compliance with regulatory requirements.
Flexibility and portability: With IaC, organizations can define their infrastructure configurations in a platform-agnostic manner, making it easier to switch between different cloud providers or on-premises environments. This provides flexibility and avoids vendor lock-in.
Challenges of Infrastructure as Code
While Infrastructure as Code offers numerous advantages, it also presents some challenges that organizations should be aware of:
Learning curve: Adopting IaC requires IT teams to acquire new skills and learn programming languages or specific tools. This initial learning curve may slow down the adoption process and require investment in training and upskilling.
Code complexity: Infrastructure code can become complex, especially for large-scale deployments. Managing and troubleshooting complex codebases can be challenging and may require additional expertise or code review processes.
Continuous maintenance: Infrastructure code needs to be continuously maintained and updated to keep up with evolving business requirements, security patches, and technology advancements. This requires ongoing investment in code management and testing processes.
Infrastructure as Code Tools
There are various tools available in the market to implement Infrastructure as Code. Some of the popular ones include:
Terraform: Terraform is an open-source tool that allows you to define and provision infrastructure resources using declarative configuration files. It supports a wide range of cloud providers, including VMware Cloud Director, and provides a consistent workflow for infrastructure management.
Chef: Chef is a powerful automation platform that enables you to define and manage infrastructure as code. It focuses on configuration management and provides a scalable solution for infrastructure provisioning and application deployment.
Puppet: Puppet is a configuration management tool that helps you define and automate infrastructure configurations. It provides a declarative language to describe the desired state of your infrastructure and ensures that the actual state matches the desired state.
Ansible: Ansible is an open-source automation tool that allows you to define and orchestrate infrastructure configurations using simple, human-readable YAML files. It emphasizes simplicity and ease of use, making it a popular choice for infrastructure automation.
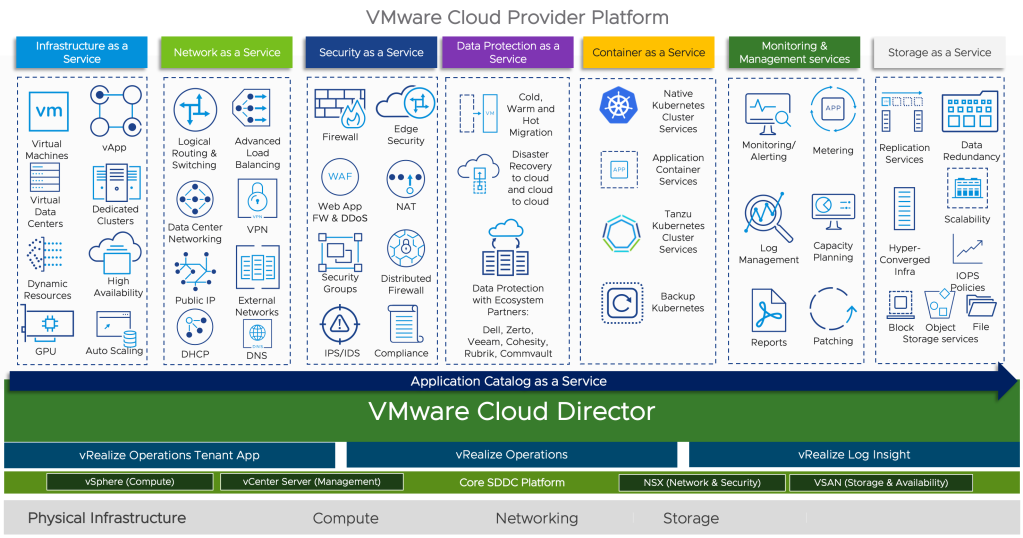
VMware Cloud Service Provider Program
The VMware Cloud Service Provider Program (CSP) allows service providers to build and operate their own cloud environments using VMware’s virtualization and cloud infrastructure technologies like VMware Cloud Director, Cloud Director availability etc… This program enables service providers to offer a wide range of cloud services, including infrastructure-as-a-service (IaaS), disaster recovery, Application as a Service, Kubernetes as a Service, DBaaS and many other managed services.
Integrating Terraform with VMware Cloud Director
To leverage the power of Infrastructure as Code in VMware Cloud Director, you can integrate it with Terraform. Terraform provides a declarative language for defining infrastructure configurations and a consistent workflow for provisioning and managing resources across different cloud providers, including VMware Cloud Director. By combining Terraform with VMware Cloud Director, Cloud Providers/Customers can:
Automate infrastructure provisioning: With Terraform, Cloud providers can define Tenant virtual data center, virtual machines, networks, and other resources as code. This allows for automated and consistent provisioning of infrastructure resources, eliminating manual configuration. I wrote a blog article on how to start with Cloud Director & Terraform which can be found here:
Ensure consistency and repeatability: Infrastructure configurations defined in Terraform files can be version controlled, allowing for easy tracking of changes and ensuring consistency across different environments.
Collaborate effectively: Terraform code can be shared and collaboratively developed within teams, enabling better collaboration and knowledge sharing among IT professionals.
Enable infrastructure as self-service: By integrating Terraform with VMware Cloud Director, organizations can provide a self-service portal for users to provision and manage their own infrastructure resources, reducing dependency on IT support.
Implementing Infrastructure as Code with VMware Cloud Director and Terraform
To begin with the Terraform configuration, create a main.tf file and specify the version of the VMware Cloud Director Terraform provider
terraform {
  required_providers {
    vcd = {
      source  = "vmware/vcd"
      version = "3.9.0"
    }
  }
}

provider "vcd" {
  url                  = "https://vcd-01a.corp.local/"
  user                 = "admin"
  password             = "******"
  org                  = "tfcloud"
  vdc                  = "tfcloud"
}
In the above configuration, replace the url, user, password, org, and vdc values with your own VMware Cloud Director details.Now, let’s define the infrastructure resources using Terraform code. Here’s an example of creating a organization in VMware Cloud Director:
#Create a new org name "tfcloud"
resource "vcd_org" "tfcloud" {
  name              = "terraform_cloud"
  full_name         = "Org created by Terraform"
  is_enabled        = "true"
  stored_vm_quota   = 50
  deployed_vm_quota = 50
  delete_force      = "true"
  delete_recursive  = "true"
  vapp_lease {
    maximum_runtime_lease_in_sec          = 0
    power_off_on_runtime_lease_expiration = false
    maximum_storage_lease_in_sec          = 0
    delete_on_storage_lease_expiration    = false
  }
  vapp_template_lease {
    maximum_storage_lease_in_sec       = 0
    delete_on_storage_lease_expiration = false
  }
}
Creating Organisation Administrator
#Create a new Organization Admin
resource "vcd_org_user" "tfcloud-admin" {
  org               = vcd_org.tfcloud.name
  name              = "tfcloud-admin"
  password          = "*********"
  role              = "Organization Administrator"
  enabled           = true
  take_ownership    = true
  provider_type     = "INTEGRATED" #INTEGRATED, SAML, OAUTH stored_vm_quota = 50 deployed_vm_quota = 50 }
Creating Org VDC
# Create Org VDC for above org
resource "vcd_org_vdc" "vdc-tfcloud" {
  name = "vdc-tfcloud"
  org  = vcd_org.tfcloud.name
  allocation_model  = "AllocationVApp"
  provider_vdc_name = "vCD-A-pVDC-01"
  network_pool_name = "vCD-VXLAN-Network-Pool"
  network_quota     = 50
  compute_capacity {
    cpu {
      limit = 0
    }
    memory {
      limit = 0
    }
  }
  storage_profile {
    name    = "*"
    enabled = true
    limit   = 0
    default = true
  }
  enabled                  = true
  enable_thin_provisioning = true
  enable_fast_provisioning = true
  delete_force             = true
  delete_recursive         = true
}
Creating Edge Gateway (NAT Gateway)
# Create Org VDC Edge for above org VDC
resource "vcd_edgegateway" "gw-tfcloud" {
  org                     = vcd_org.tfcloud.name
  vdc                     = vcd_org_vdc.vdc-tfcloud.name
  name                    = "gw-tfcloud"
  description             = "tfcloud edge gateway"
  configuration           = "compact"
  advanced                = true
  external_network {
     name = vcd_external_network.extnet-tfcloud.name
     subnet {
        ip_address            = "10.120.30.11"
        gateway               = "10.120.30.1"
        netmask               = "255.255.255.0"
        use_for_default_route = true
    }
  }
}
Here is the blog post which covers Tenant OnBoarding on Cloud Director using Terraform:
Best Practices for Infrastructure as Code with VMware Cloud Director
Implementing Infrastructure as Code with VMware Cloud Director and Terraform requires adherence to best practices to ensure efficient and reliable deployments. Here are some key best practices to consider:
Use version control: Store your Terraform code in a version control system such as Git to track changes, collaborate with teammates, and easily roll back to previous configurations if needed.
Leverage modules: Use Terraform modules to modularize your infrastructure code and promote reusability. Modules allow you to encapsulate and share common configurations, making it easier to manage and scale your infrastructure.
Implement testing and validation: Create automated tests and validations for your infrastructure code to catch any potential errors or misconfigurations before deployment. This helps ensure the reliability and stability of your infrastructure.
Implement a CI/CD pipeline: Integrate your Terraform code with a continuous integration and continuous deployment (CI/CD) pipeline to automate the testing, deployment, and management of your infrastructure. This helps in maintaining consistency and enables faster and more reliable deployments.
Use variables and parameterization: Leverage Terraform variables and parameterization techniques to make your infrastructure code more flexible and reusable. This allows you to easily customize your deployments for different environments or configurations.
Implement security best practices: Follow security best practices when defining your infrastructure code. This includes managing access controls, encrypting sensitive data, and regularly updating your infrastructure to address any security vulnerabilities.
Conclusion
Infrastructure as Code offers a transformative approach to managing infrastructure resources, enabling organizations to automate and streamline their IT operations. By integrating Terraform with VMware Cloud Director, organizations can leverage the power of Infrastructure as Code to provision, manage, and scale their infrastructure efficiently and consistently.
In this blog post, we explored the concept of Infrastructure as Code, the benefits and challenges associated with its adoption. We also provided a step-by-step guide on implementing Infrastructure as Code with VMware Cloud Director using Terraform, along with best practices.
By embracing Infrastructure as Code, Cloud providers and their Tenants can unlock the full potential of their infrastructure resources, accelerate their digital transformation journey, and ensure agility, scalability, and reliability in their IT operations.
Few More Links:
https://developer.vmware.com/samples/7210/vcd-terraform-examples
https://registry.terraform.io/providers/vmware/vcd/latest/docs


 Pre-requisite