NSX-T Upgrade from v3.2.2 to v4.1 Failed – Connection between host 473cc672-2417-4a97-b440-38ab53135d02 and NSX Controller is UNKNOWN.

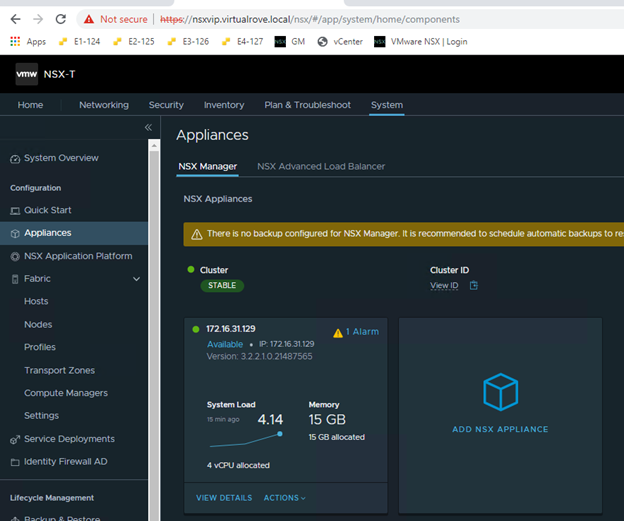
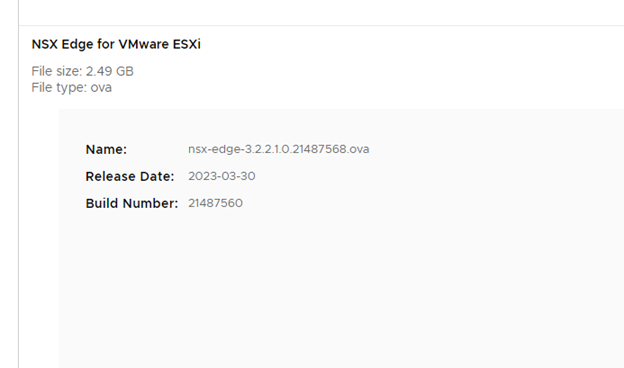
Got following error while upgrading NSX from v3.2.2 to v4.1.

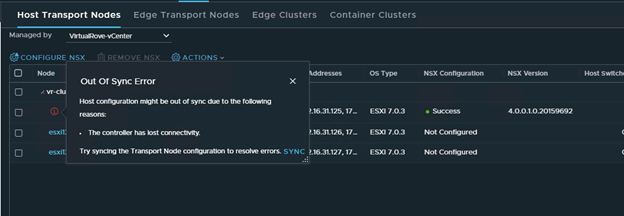
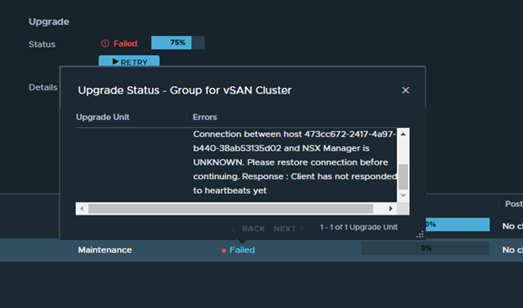
Pre-upgrade checks failed for HOST: Connection between host 473cc672-2417-4a97-b440-38ab53135d02 and NSX Controller is UNKNOWN. Response : [Lcom.vmware.nsxapi.fabricnode.dto.ControlConnStatusDto;@edbaf5b Connection between host 473cc672-2417-4a97-b440-38ab53135d02 and NSX Manager is UNKNOWN. Please restore connection before continuing. Response : Client has not responded to heartbeats yet

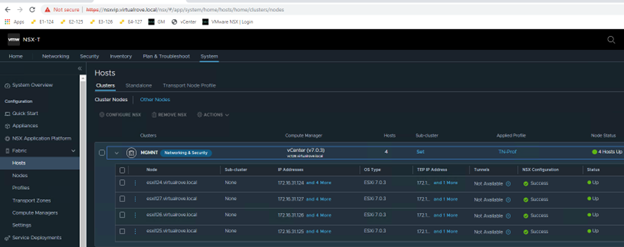
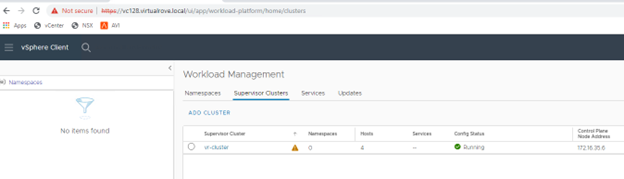
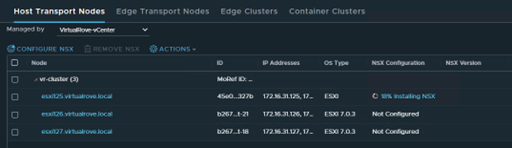
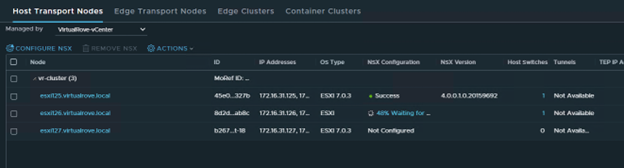
We only have 3 hosts in the cluster. For some reason, it was showing 4th host “esxi164” in host groups which does not exist in the vCenter inventory.

Click on the host group to check the details.

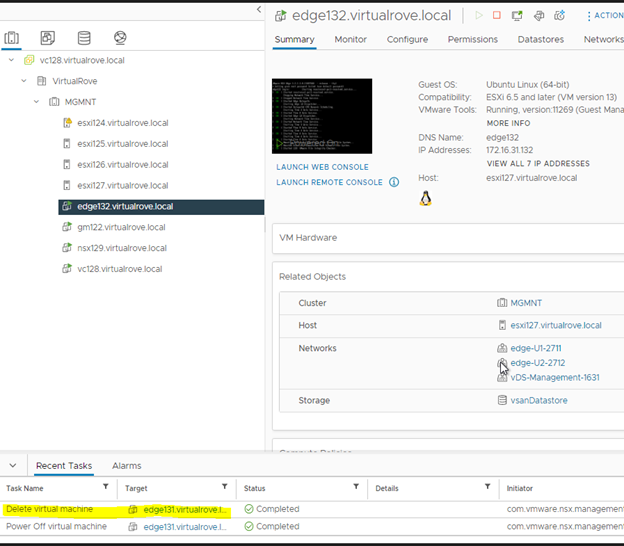
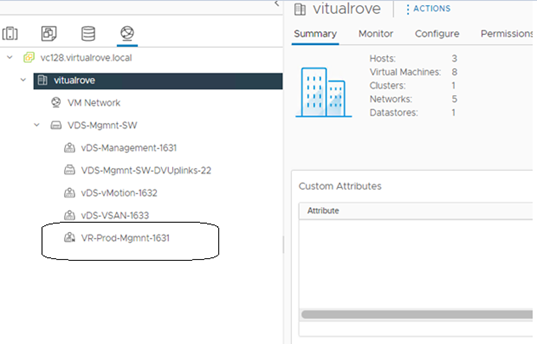
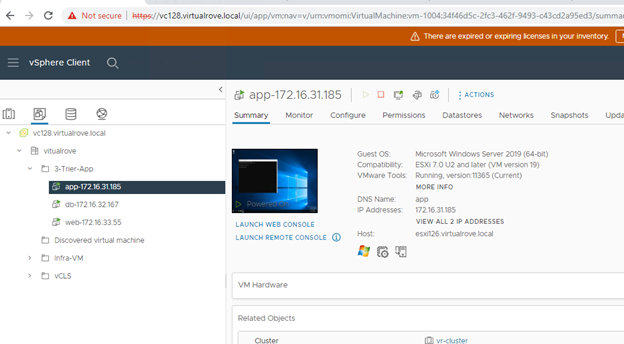
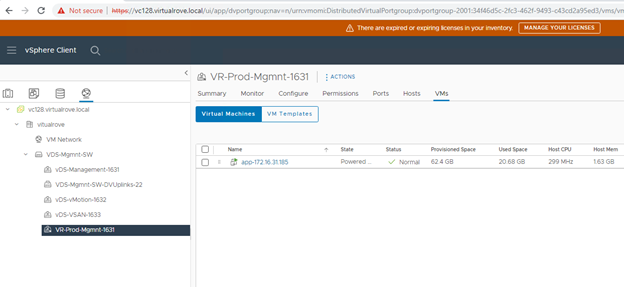
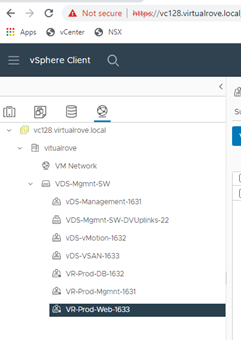
Here is my vCenter inventory,

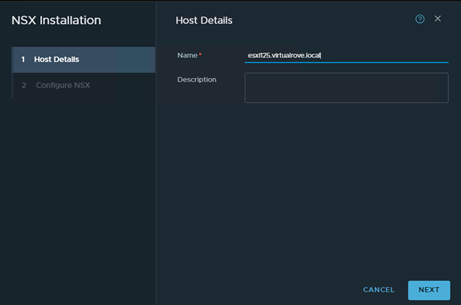
The host in the question (esxi164.virtualrove.local) was one of the old host in the cluster. It was removed from the cluster long back. However, somehow it is showing up in NSX upgrade inventory.

And as the error message says, NSX-T manager was unable to locate this to upgrade it.

“Connection between host 473cc672-2417-4a97-b440-38ab53135d02 and NSX Manager is UNKNOWN.”

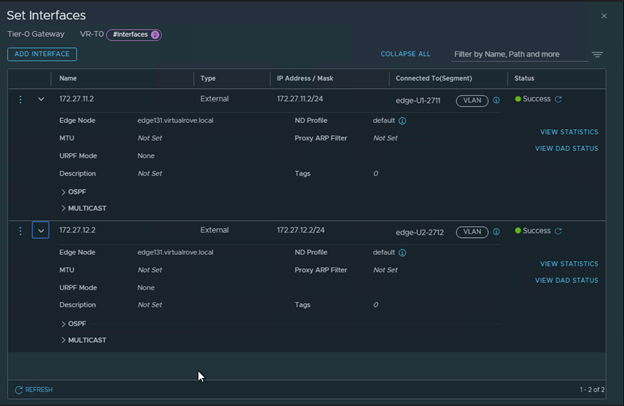
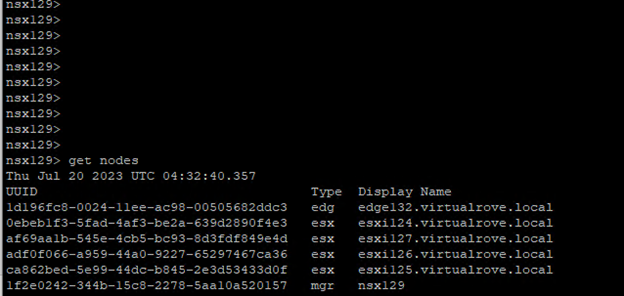
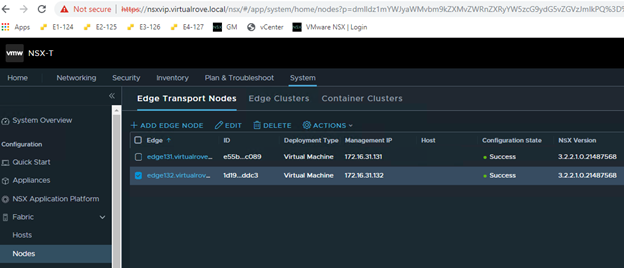
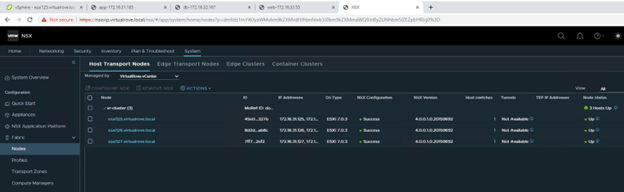
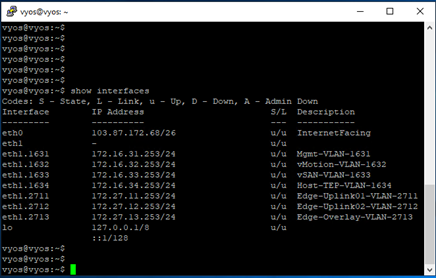
The UUID mentioned in the error message had to be for missing host (esxi164.virtualrove.local). Because the UUID was not matching with any of the host transport nodes UUID in the cluster. You can run the following command on one of the NSX manager to get the UUID’s of the nodes.

get transport-nodes status

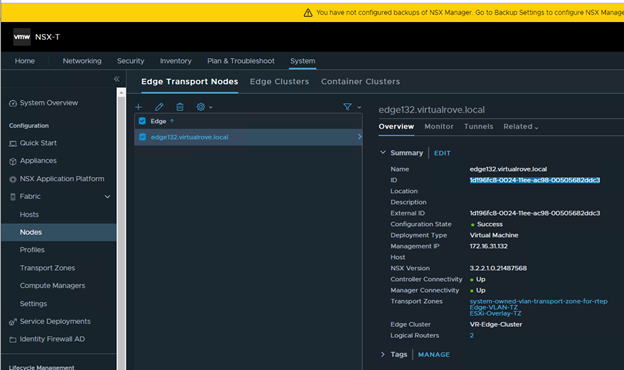
Or you can click on the TN node in NSX UI to check the UUID.

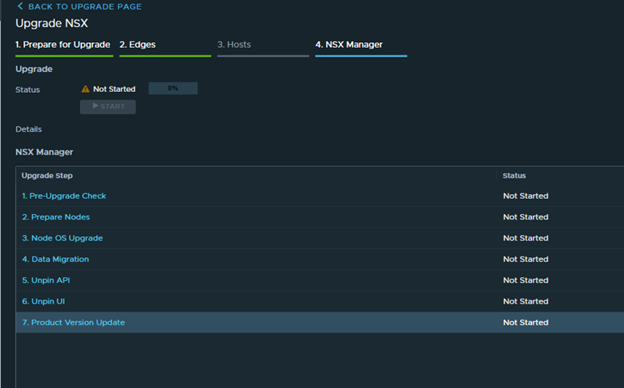
If you click next on the upgrade page, it will not let you upgrade NSX managers.

So, the possible cause for this issue is, the old host entry still exists in the NSX inventory somewhere. And it is trying to locate that host to upgrade it.

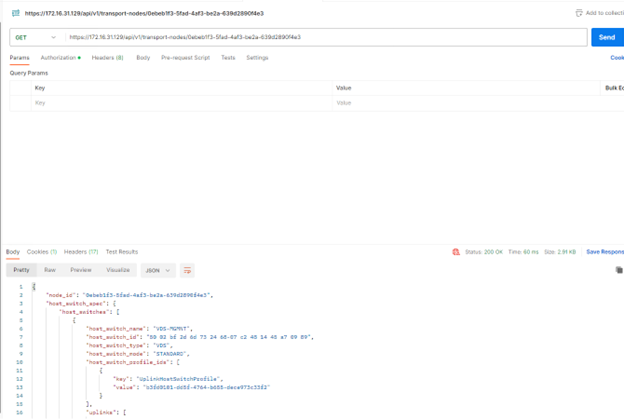
There is an API call to check the state of the host.
GET https://{{MPIP}}/api/v1/transport-nodes/<Transport-Node-UUID>/state

Replace the MPIP (NSX manager IP) and TN UUID to match with your env.
GET https://172.16.31.168/api/v1/transport-nodes/473cc672-2417-4a97-b440-38ab53135d02/state

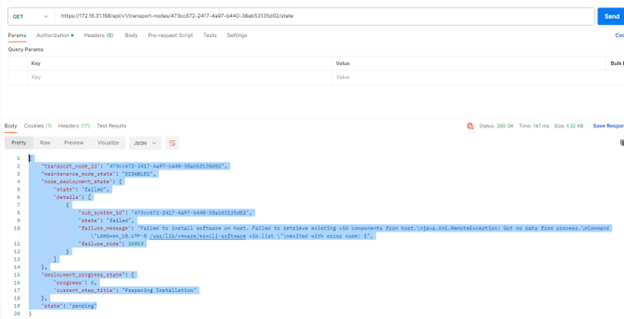
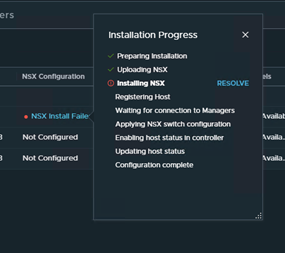
As we can see from the output, “current_step_title: Preparing Installation”. Looks like something went wrong while the host was being removed from NSX env and its state is still being marked as “state: pending” in NSX manager database.

Lets delete the host entry by using an API call,
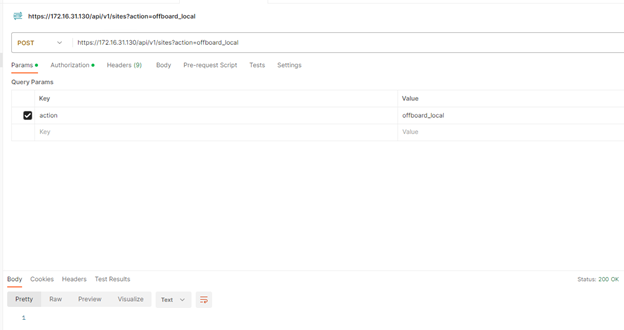
DELETE https://172.16.31.168/api/v1/transport-nodes/473cc672-2417-4a97-b440-38ab53135d02?force=true&unprepare_host=false
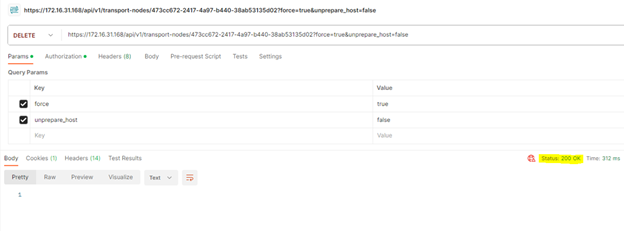
Status: 200 OK

Run the GET API again to confirm,

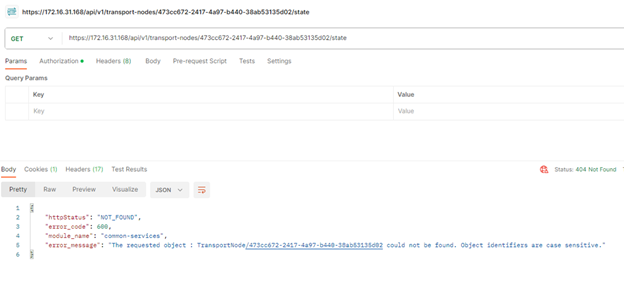
It does not show any information now.

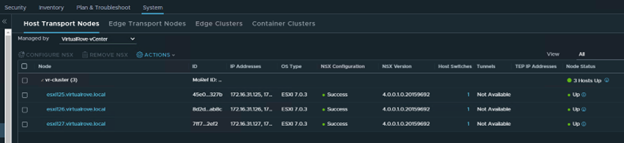
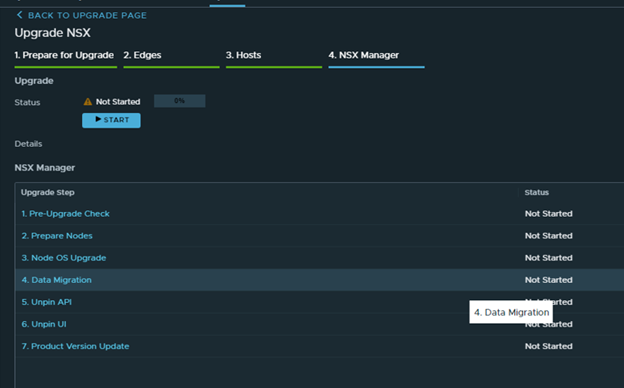
Time to check the upgrade console in NSX.

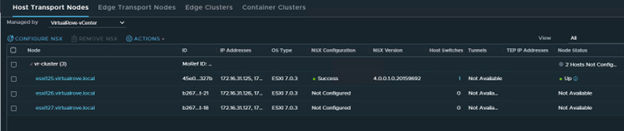
The group which was showing 1 host with an error no longer exists.

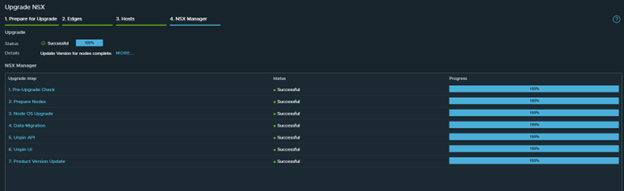
I was able to get to the next step to upgrade NSX managers.
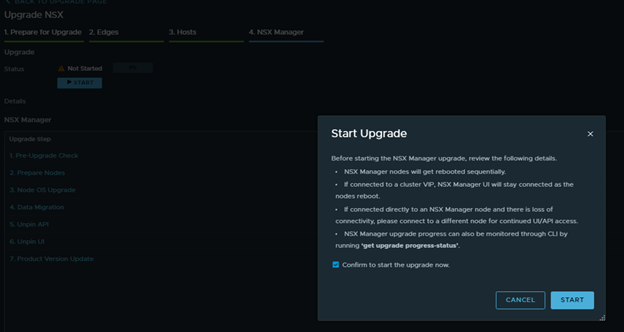
Confirm and start.

Upgrade status.

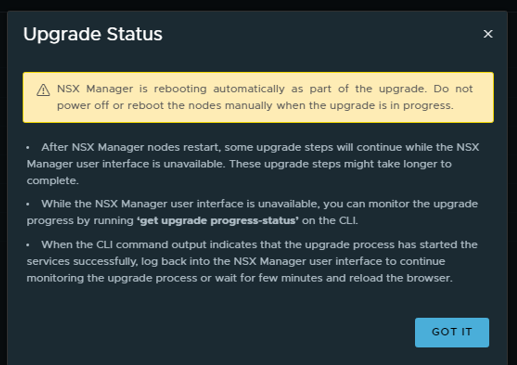
As stated in the message above, ran “get upgrade progress-status” in the cli.

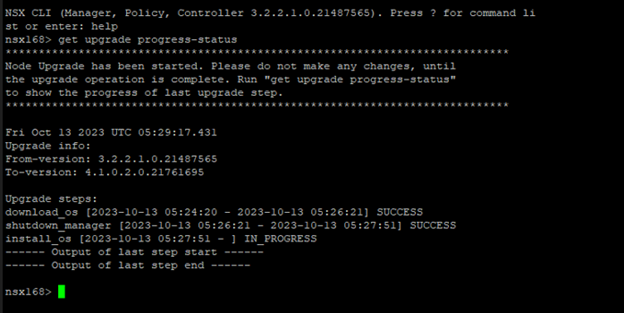
NSX upgrade to v4.1 has been successfully completed.

That’s all for this blog. Hope that the information in the blog is helpful. See you in the next blogpost. Thank You for visiting.

Are you looking out for a lab to practice VMware products…? If yes, then click here to know more about our Lab-as-a-Service (LaaS).

Leave your email address in the box below to receive notification on my new blogs.

NSX-T: Replace faulty NSX Edge Transport Node VM

I recently came across a situation where the NSX-T Edge vm in an existing cluster was having issues while loading its parameter. Routing was working fine and there was no outage as such. However, when a customer was trying to select an edge vm and edit it in NSX UI, it was showing an error. Support from VMware said that the edge in question is faulty and needs to be replaced. Again, routing was working perfectly fine.

Let’s get started to replace the faulty edge in the production environment.

Note: If the NSX Edge node to be replaced is not running, the new NSX Edge node can have the same management IP address and TEP IP address. If the NSX Edge node to be replaced is running, the new NSX Edge node must have a different management IP address and TEP IP address.

In my lab env, we will replace a running edge. Here is my existing NSX-T env…

Single NSX-T appliance,

All hosts TN have been configured,

Single edge vm (edge 131) attached to edge cluster,

One test workload overlay network. Segment Web-001 (192.168.10.0/24)

A Tier-0 gateway,

Note that the interfaces are attached to existing edge vm.

BGP config,

Lastly, my VyOS router showing all NSX BGP routes,

Start continuous ping to NSX test overlay network,

Alright, that is my existing env for this demo.

We need one more thing before we start the new edge deployment. The new edge vm parameters should match with the existing edge parameters to be able to replace it. And the existing edge showing an error when we try to open its parameters in NSX UI. The workaround here is to make an API call to existing edge vm and get the configuration.

Please follow the below link to know more about API call.

NSX-T: Edge Transport Node API call

I have copied the output to following txt file,

EdgeApi.txt

Let’s get started to configure the new edge to replace it with existing edge. Here is the link to the blogpost to deploy a standalone edge transport node.

NSX-T: Standalone Edge VM Transport Node deployment

New edge vm (edge132) is deployed and visible in NSX-T UI,

Note that the newly deployed edge (edge132) does not have TEP IP and Edge cluster associated with it. As I mentioned earlier, The new edge vm parameters should match with the existing edge parameters to be able to replace it.

Use the information collected in API call for faulty edge vm and configure the new edge vm the way you see it in the API call. Here is my new edge vm configuration looks like,

Make sure that the networks matches with the existing non working edge networks.

You should see TEP ip’s once you configure the new edge.

Click on each edge node and verify the information. All parameters should match.

Edge131

Edge132

We are all set to replace the faulty edge now.

Select the faulty edge (edge131) and click on actions,

Select “Enter NSX Maintenance Mode”

You should see Configuration State as “NSX Maintenance Mode” in the UI.

And you will lose connectivity to your NSX workload.

No BGP route on the TOR

Next, click on “Edge Clusters”, Select the edge cluster and “Action”.

Choose “Replace Edge Cluster Member”

Select appropriate edge vm’s in the wizard and Save,

As soon as the faulty edge have been replaced, you should get the connectivity to workload.

BGP route is back on the TOR.

Interface configuration on the Tier-0 shows new edge node.

Node status for faulty edge shows down,

Let’s get into the newly added edge vm and run “get logical-router” cmd,

All service routers and distributed routers have been moved to new edge.

Get into the SR and check routes to make sure that it shows all connected routes too,

We are good to delete the old edge vm.

Lets go back to edge transport node and select the faulty edge and “DELETE”

“Delete in progress”

And its gone.

It should disappear from vCenter too,

Well, that was fun.

That’s all I had to share from my recent experience. There might be several other reasons to replace / delete existing edge vm’s. This process should apply to all those use cases. Thank you for visiting. See you in the next post soon.

Are you looking out for a lab to practice VMware products…? If yes, then click here to know more about our Lab-as-a-Service (LaaS).

Leave your email address in the box below to receive notification on my new blogs.

NSX-T: Edge Transport Node API call

Welcome back techies. This is going to be the short one. This article describes the steps to make an API call to NSX edge transport node vm to get the edge configuration. At the time of writing this blog, I had to collect this information to replace the faulty edge node vm in the env.

Here is the API call,
GET https://<nsx-manager-IP>/api/v1/transport-nodes/tn-id .

Replace nsx manager ip and tn-id with your edge vm id in nsx env.

https://172.16.31.129/api/v1/transport-nodes/e55b9c84-7449-477a-be42-d20d6037c089

To get the “tn-id” for existing faulty edge, login to NSX > System> Nodes and select existing faulty edge

You should see ID on the right side,

If NSX UI is not available for any reason, ssh to nsx-t manager using admin credentials and run following command to capture the UUID / Node ID

get nodes

This is how the API call and output looks like,

Send the API call to get the output shown in the body. This output contains entire configuration of the edge vm in script format.

That’s all for this post. Thank You.

Are you looking out for a lab to practice VMware products…? If yes, then click here to know more about our Lab-as-a-Service (LaaS).

Leave your email address in the box below to receive notification on my new blogs.

NSX-T: Standalone Edge VM Transport Node deployment

There can be multiple reasons to deploy nsx-t edge vm via ova instead of deploying thought nsx-t manager. At the time of writing this blog, I had to deploy edge vm via ova to replace faulty edge vm in nsx-t env. You may be deploying one to create a Layer 2 Bridge between nsx-v and nsx-t env to migrate workload.

Alright. Let’s start deploying an edge vm without using nsx-t manager UI.

To begin with, you need to manually download edge vm ova from VMware downloads page here…

Make sure to match the version with your existing NSX-T env.

Once downloaded, login to vSphere web client and start deploying an ova template. It’s straightforward like any other generic ova deployment. Make sure to select the exact same networks that are attached to your existing faulty edge vm.

In my case, 1st vmnic is attached to management network and next 2 are attached to uplink1 & uplink2 network respectively. Rest all nic cards remains unchecked.

Next, you will need to enter the NSX-T manager information in “Customize Template” section of the deployment.

Enter the Manager IP & Credentials.
NO need to enter “Node ID”.

You also have an option to leave this blank and join it to NSX-T control plane once the appliance is up and running. For now, I am entering all these details. Will also discuss on manually attaching edge vm to nsx-t manager control plane.

To get the NSX-T manager thumbprint. SSH to NSX-T manager and run following command,

get certificate api thumbprint

You can also get the thumbprint from the following location in the UI.

Login to NSX-T manager and click on view details,

Enter remaining network properties in the deployment wizard and finish.

Once the VM is up and running, you will see it in NSX-T UI here,

You will not see newly added edge vm here If you did not enter NSX-T thumbprint information in the deployment wizard. To manually join newly created edge vm to nsx-t manger control plane, run following command on the newly created edge vm.

Edge> join management-plane <Manager-IP> thumbprint <Manager-thumbprint> username admin

Same process has been described in following VMware article.

https://docs.vmware.com/en/VMware-NSX-T-Data-Center/3.2/migration/GUID-8CC9049F-F2D3-4558-8636-1211A251DB4E.html

Next, the newly created edge vm will not have N-VDS, TEP or Tranport Zones configuration. Further configuration will be specific to individual use case.

That’s all for this post.

Are you looking out for a lab to practice VMware products…? If yes, then click here to know more about our Lab-as-a-Service (LaaS).

Leave your email address in the box below to receive notification on my new blogs.

NSX-T How to change the Cluster VIP

This is short one, but someone might spend good amount of time to search for possible solution. If you have 3 local mangers cluster and VIP has been set already. Then you realized that there was a typo and the VIP address needs to be changed.

NSX-T GUI does not allow cluster VIP to be changed or removed.

The possible solution that anyone can think of is API call. However, its simpler than that. You need to login to one of the Local Manager in a cluster to change or remove the VIP.  😊

In my case, I logged into https://172.16.31.129/nsx/#/app/home/overview

Hope that helps. Thank You.

Are you looking out for a lab to practice VMware products…? If yes, then click here to know more about our Lab-as-a-Service (LaaS).

Leave your email address in the box below to receive notification on my new blogs.

NSX-T Federation – How to remove the location from GM

We ran into a situation where we had to remove the Local Manager from Global Manager. I replicated this in the lab env. It’s straightforward. However, there are couple of points that need to be addressed before you delete / remove the Local Manager from Global Manager.

Removing location from GM removes all objects created from GM.

Here is what my existing config looks like,

I have one Tier-1 gateway created from global manager, which is specific to Site-A

A segment which is attached to above Tier-1 GW.

Some rules and policies created on the global level.

Notice that all globally created rules get a Rule ID starting from one million.

Navigate back to location manager, Click on ‘Action’ for the site to be removed and then ‘Remove’

Check the prompt,

Note: If you have any location-specific configurations created from the Global Manager for this location — such as Tier-0 gateways — you must first remove these configurations manually before proceeding.

Error: Error: Site can not be offboarded due to references [/global-infra/domains/Site-A/groups/Global-Site-A-SG/attributes/Global-Site-A-SG, /global-infra/tier-1s/Global-T1/locale-services/Site-A, /global-infra/tier-1s/Global-T1/security-config, /global-infra/domains/Site-A/groups/Global-Site-A-SG, /global-infra/segments/GM-Web-Seg_, /global-infra/tier-1s/Global-T1]. (Error code: 530024)

Basically, you want to make sure that all objects that are created from GM are deleted before you perform this operation.

I deleted all T-1’s and Segments from GM. Also, deleted region level rules and its associated groups before deleting the site.

That was easy.

However, what if Global Manager has been deleted before you take out Local Manager from it. 😊

In this case, all your LM’s would continue to try to reach out to GM for configuration sync. No worries, VMware has solutions to every possible problem / situation for its product.

Run the following API at all local mangers in the env to remove the objects,

POST https://172.16.31.130/policy/api/v1/infra/site?action=offboard

Here is the possible output that you would see,

Lets get the status of the above API call,

GET https://172.16.31.130/policy/api/v1/infra/site/offboarding-status

And then the last API is to remove Active / Standby GM from selected LM.

POST https://172.16.31.130/api/v1/sites?action=offboard_local

That’s it for this post. Thank you for reading.

Are you looking out for a lab to practice VMware products…? If yes, then click here to know more about our Lab-as-a-Service (LaaS).

Leave your email address in the box below to receive notification on my new blogs.

VMware Tanzu Supervisor Cluster Deployment Stuck at “Configuring”

Thought of sharing this with you all.

Tanzu Supervisor Cluster Deployment fails and shows “Configuring” for all 3 “SupervisorControlPlaneVM” VM’s.

If you click on (3), it shows either of the below warnings / errors.

“Customization operations of the guest OS for Master node VM with identifier vm-XXXX is pending”

In my case, it showed up for a few mins and then I saw an error.

“The control plane VM 42XXXX was unable to authenticate to the load balancer (Avi – https://172.16.31.123:443/api/cluster) with the username ‘admin’ and the supplied password. Validate the Supervisor cluster load balancer’s authentication configuration.”

Even though the supplied credentials were correct.

Looks like this is a known issue if the version of your esxi is 7.0 U3 and you are trying to use Advance Loan Balancer (AVI).

To resolve this issue, I had to change the Authentication settings in AVI.

Login to AVI and Navigate to Admin > Settings & Access Settings

Click on “Edit”

Check the box “Allow Basic Authentication”

Click “Save” and you should be good.

The “Config Status” changes to Running in couple of minutes and you should be good configure it further.

Some of the other workarounds that came across while troubleshooting this issue…

  • Nslookup to all the components in the env to make sure that it resolves to correct name.
  • Check NTP settings on all components (vCenter, ESXi, AVI and NSX) and make sure it syncs to same NTP Server.
  • Check routing between all the additional networks that you have created for Tanzu deployment.

Additionally, you can use the following command on vCenter to check the status / error of the deployment.

tail -f /var/log/vmware/wcp/wcpsvc.log

Changing authentication settings in AVI resolved the issue for me. Your issue may be related to one of the causes that I mentioned above.

Good Luck. Keep Sharing.
That’s all for this blogpost.

Are you looking out for a lab to practice VMware products…? If yes, then click here to know more about our Lab-as-a-Service (LaaS).

Leave your email address in the box below to receive notification on my new blogs.

NSX 4.0 Series Part5-Migrate workload from VDS To NSX

Welcome back readers.

Please find the links below for all posts in this series.

NSX 4.0 Series Part1-NSX Manager Installation
NSX 4.0 Series Part2-Add a Compute Manager & Configure the NSX VIP
NSX 4.0 Series Part3-Create Transport Zones & Uplink Profiles
NSX 4.0 Series Part4-Prepare Host Transport Nodes
NSX 4.0 Series Part5-Migrate workload from VDS To NSX

Our NSX env is fully functional and we are ready to migrate workload from vCenter VDS to NSX env.

It’s always a good practice to verify the NSX env before we start working on it.

Login to NSX VIP and look for Alarms,

Check the cluster status,

And then look for host transport nodes if they are showing host status as UP,

For testing purposes, I have created 3 windows vm’s. All three vm’s connects to 3 different port groups on vCenter VDS. We will move these VM’s from vCenter VDS to NSX managed segments.

Following are test VM’s with their respective vds port groups. I have named these VM’s according to PG.

Next, we need to create Segments in NSX env. A Segment is nothing but the portgroup.

Let’s have a look at the types of Segments.

VLAN Baked Segments: In this type, you will define a VLAN ID for the segments, however you also have to make sure that this vlan configure exists on your physical top of the rack switch.

Overlay Backed Segments: This segment can be configured without any configuration on the physical infrastructure. It gets attached to Overlay Transport Zone and traffic is carried by a tunnel between the hosts.

As stated earlier, we would be only focusing on VLAN backed segments in this blogpost. Visit the following blog if you are looking for overlay backed segment.

Login to NSX and navigate to Networking> Segments,

Oops, I haven’t added license yet. If you do not have a license key, please refer to my following blog to get the eval licenses.

Add the license key here,

System> Licenses,

Then we move to create a VLAN backed segment in NSX. You can create vlan backed segments for all networks that exist on your TOR (top of the rack switches). For this demo, I will be using Management-1631, vMotion-1632 and VSAN-1633 networks.

In my lab env, following networks are pre-created on the TOR.

Login to NSX VIP> Networking> Segments> Add Segment

Name: VR-Prod-Mgmnt-1631
Transport Zone: VirtualRove-VLAN-TZ (This is where our esxi host transport nodes are connected)
VLAN: 1631

SAVE

Verify that the Segment status is Success.

Once the segment is created in NSX, go back to vCenter and verify if you see the newly created segment. You will see a letter “N” for all NSX create segments.

Click on the newly created Segment.

Note that the Summary section shows more information about the segment.

We will now move a VM called “app-172.16.31.185” from VDS to NSX.

Source VDS portgroup is “vDS-Management-1631”
Destination NSX Segment is “VR-Prod-Mgmnt-1631”

Verify that it is connected to VDS portgroup.

Login to the VM and start a ping to its gateway IP.

Login to the vCenter> Networking view> Right Click the source port group>

And select “Migrate VM’s to another network”.

In the migration wizard, select newly created NSX vlan backed segment in destination network,

Select the VM that needs to be migrated into the NSX env,

Review and Finish,

Monitor the ping command if we see any drops.

All looks good. NO ping drops and I can still ping to the vm ip from other machines in the network.

We have successfully migrated a VM into the NSX env.
Verify the network name in VM settings,

Click on the NSX segment in vCenter and verify if you see the VM,

You can also verify the same from NSX side,
Login to NSX> Inventory> Virtual Machines> Click on View Details for the VM that we just migrated,

You will see port information in details section,

You will not see port information for db vm, since it has not been migrated yet.

Remaining VM’s have been moved into the NSX env. Ports column shows “1” for all segments.

We see all 3 NSX segments in vCenter networking view,

Simple ping test in cross subnets.  From App To DB,

Well, all looks good. Our workload has been successfully migrated into NSX env.

So, what is the use case here…?
Why would customer only configure vlan backed segments…?
Why No overlay…?
Why No T1, T0 and Edge…?

You will surely understand this in my next blog. Stay tuned. 😊
Hope that this blog series has valuable information.

Are you looking out for a lab to practice VMware products…? If yes, then click here to know more about our Lab-as-a-Service (LaaS).

Leave your email address in the box below to receive notification on my new blogs.

NSX 4.0 Series Part4-Prepare Host Transport Nodes

In the previous blogpost, we discussed Transport Zones & Uplink Profiles. Please find the links below for all posts in this series.

NSX 4.0 Series Part1-NSX Manager Installation
NSX 4.0 Series Part2-Add a Compute Manager & Configure the NSX VIP
NSX 4.0 Series Part3-Create Transport Zones & Uplink Profiles
NSX 4.0 Series Part4-Prepare Host Transport Nodes
NSX 4.0 Series Part5-Migrate workload from VDS To NSX

In this blogpost, I will configure the host transport node for NSX. Basically, in this process, NSX vibs are installed on the ESXi node via NSX Manager. They are also referred to as kernel module. You can see the number of installed vibs on esxi by running following command,

Open up a putty session to one of the esxi and run this command,

esxcli software vib list

Filter the one for NSX by running following command,

esxcli software vib list | grep nsx

We don’t see any since we have not configured this host for NSX yet. Let’s revisit this after the NSX installation.

Note: Preparing ESXi host for NSX does not need host reboot.

Before we prep an esxi host for NSX, check the name of VDS,
vCenter> Click on ESXi host> Configure> Virtual Switches,

Note the VDS name. We will revisit here after NSX vibs installation.

Login to NSX VIP & navigate to System >Nodes >Host Transport Nodes.
Change the “Managed by” drop down to vCenter. Notice that the ‘NSX Configuration’ column shows ‘Not Configured’.

Select the first host & click on ‘Configure NSX’

Next,

Mode: Standard
Name: Select appropriate VDS from vCenter
Transport Zone: Select VLAN TZ that we created earlier.
Uplink Profile: VR-UplinkProf-01

Scroll down to Teaming policy uplink mapping,

Select Uplink1 & Uplink2 respectively.

Here, you are mapping vCenter VDS uplinks to NSX.

Click Finish to begin the installation.

Monitor the progress.

I got an error message here,

Failed to install software on host. Failed to install software on host. esxi127.virtualrove.local : java.rmi.RemoteException: [InstallationError] Failed to create ramdisk stagebootbank: Errors: No space left on device cause = (272, ‘Cannot reserve 272 MB of memory for ramdisk stagebootbank’) Please refer to the log file for more details.

Not sure why this came up. I have enough of compute resources in that cluster. Clicked on “Resolve”

And it was a success. 😊

Next, I see another error.

“The controller has lost connectivity.”

Clicked on “SYNC” here and it was all good.

1st ESXi node has been configured and ready for NSX. Verify the NSX version and node status.

Go back to vCenter> ESXi Host> Configure> Virtual Switches,

We now see the “NSX Switch” added as a prefix to VDS name.

Let’s re-run the command,

esxcli software vib list | grep nsx

We now see all NSX vibs installed on this host.

Let’s move to the next ESXi node and configure it in same way.

All 3 ESXi hosts have been configured for NSX.

That’s all for this post.

I hope that the blog has valuable information. See you all in the next post.

Are you looking out for a lab to practice VMware products…? If yes, then click here to know more about our Lab-as-a-Service (LaaS).

Leave your email address in the box below to receive notification on my new blogs.

NSX 4.0 Series Part3-Create Transport Zones & Uplink Profiles

In the previous blogpost, we discussed on Compute Manager and NSX VIP. Please find the links below for all posts in this series.

NSX 4.0 Series Part1-NSX Manager Installation
NSX 4.0 Series Part2-Add a Compute Manager & Configure the NSX VIP
NSX 4.0 Series Part3-Create Transport Zones & Uplink Profiles
NSX 4.0 Series Part4-Prepare Host Transport Nodes
NSX 4.0 Series Part5-Migrate workload from VDS To NSX

This post will focus on Transport Zones & Uplink Profiles.

It is very important to understand Transport Zones and Uplink Profiles to configure NSX env.

Transport Zone:

All types of hypervisors (that get added to NSX env) as well as EDGE VM are called transport nodes and these transport nodes needs to be a part of transport zones to see particular networks. Collection of transport nodes that define the maximum span for logical switches. A transport zone represents a set of similarly provisioned hypervisors and the logical switches that connect VMs on those hypervisors. It also has been registered with the NSX management plane and has NSX modules installed. For a hypervisor host or NSX Edge to be part of the NSX overlay, it must be added to the NSX transport zone.

There are two types of Transport Zones. Overlay and Vlan Transport Zones. I have already written a blog on previous versions of NSX and explained Transport Zones here…

There is already a lot of information on the web regarding this topic. You can also find VMware official documentation here…

https://docs.vmware.com/en/VMware-NSX-T-Data-Center/3.2/installation/GUID-F739DC79-4358-49F4-9C58-812475F33A66.html

In this blogpost, we will be only focusing on VLAN backed segments. NO overlay, No Edge, No BGP / OSPF routing.

Visit my NSX-T 3.0 blogpost series below if you are looking to configure Overlay, Edge and BGP Routing.

Let’s get the VLAN backed env in place. It’s simple and easy to understand. Here is the small design that explains what we are trying to accomplish here…

Time to configure VLAN Transport Zone,

Login to NSX VIP and navigate to System> Transport Zones> ADD Zone

Enter the name and select VLAN under traffic type,

Verify that the TZ is created,

Time to configure Uplink Profile,

An uplink profile defines how you want your network traffic to go outside of NSX env. This helps with the consistent configuration of the network adaptors.

Navigate to System > Fabric> Profiles > Uplink Profile,

> Add Profile,

Enter the name and description. Leave the LAG’s section for now. I will write another small blog explaining the LAG configuration in NSX env. Scroll down to Teamings,

Select the default policy to “Load Balance Source”
Type “U1,U2” in Active Uplink field. Input keywords really does not matter here, you can type any name comma separated.
Transport VLAN value to remain 0 in our case.

Teaming Policy Options:

Failover Order: Select an active uplink is specified along with an optional list of standby uplinks. If the active uplink fails, the next uplink in the standby list replaces the active uplink. No actual load balancing is performed with this option.

Load Balance Source: Select a list of active uplinks. When you configure a transport node, you can pin each interface of the transport node to one active uplink. This configuration allows use of several active uplinks at the same time.

A teaming policy defines how C-VDS (Converged VDS) uses its uplink for redundancy and traffic load balancing. Wait, what is C-VDS now…?

N-VDS (NSX Managed VDS): In earlier versions (prior to version 3.0), NSX used to install an additional NSX Managed Distributed Switch. So, one VDS (or VSS) for vSphere traffic and one N-VDS for NSX-T traffic. So, technically speaking, you need 2 more additional pnics for an additional N-VDS switch.

C-VDS (Converged VDS): NSX now uses existing VDS for NSX traffic. However, C-VDS option is only available when you use NSX-T 3 or higher with vSphere 7 along with the VDS version 7.0. You do not need additional pnics in this case.

We are done with the Uplink Profile configuration. More information on Uplink Profiles can be found here,

https://docs.vmware.com/en/VMware-NSX-T-Data-Center/3.2/installation/GUID-50FDFDFB-F660-4269-9503-39AE2BBA95B4.html

Check to make sure that the Uplink Profile has been created.

That’s all for this post. We are all set to prepare esxi host transport nodes.I hope that the blog has valuable information. See you all in the next post.

Are you looking out for a lab to practice VMware products…? If yes, then click here to know more about our Lab-as-a-Service (LaaS).

Leave your email address in the box below to receive notification on my new blogs.