Patching VMware vCenter 7.0 Server Appliance Using CLI

There are a few different way’s to update to vCenter server appliance (VCSA). In this post we will be going through using CLI method to apply vCenter patches. Before updating VCSA make sure you have a current backup and take a snapshot before proceeding in case of any issues with the update.

First we need to connect to the vCenter server using SSH. I will be using the inbuilt OpenSSH feature in PowerShell but you can use what ever SSH client you prefer.

To enable SSH on vCenter logon to the management page using the vCenter URL with port 5480 (https://vcenter.domain.local:5480).

Go to Access and click edit to enable SSH Login.

vCenter Management UI

Next we need to connect to the vCenter server using ssh.

vCenter SSH Login

Next we can run the below command to view the vCenter update history

software-packages list --history
Patch List

We can use the below command. This will list the current update settings, if the vCenter server has no internet access then you could update the URL to use an internal web site that contains the update files.

update.get
Update configuration

We will be using the default URL from the update.get command when running the update

software-packages install --url https://vapp-updates.vmware.com/vai-catalog/valm/vmw/8d167796-34d5-4899-be0a-6daade4005a3/7.0.3.00100.latest/ --stage --acceptEulas

This command will download, stage the update and install.

Update staging

Once stage the update will then start to install.

Update Installing

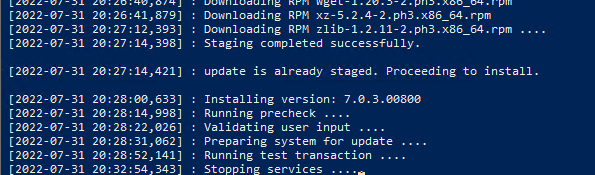
The update can take awhile to complete.

Update Completion

Once the update has completed, vCenter should reboot if required to complete the install.

When the appliance boots backup we can re-connect to confirm we are now running on the updated VCSA version.

vCenter SSH Login

Azure App Registrations Cert / Client Secret MS Graph Report

In this post we will be looking at creating a report to show what Azure App registrations have expiring client secret / certificate in the specified amount of days.

There is currently no in built way to report on expiring App registrations in the Azure portal other than checking the app registration, so we will be using Microsoft Graph SDK to automate the reporting.

First to automate the report we need to create an app registration to use for the Microsoft Graph connection. I have gone through this in a previous post.

The specific Microsoft GraphApi application permission required is Application.Read.All, this needs to be added to the App Registration that we use for Microsoft Graph.

App Registration API Permission

Next we need to connect to Microsoft Graph using.

Connect-MgGraph

To list the app registration use

Get-MgApplication
Microsoft Graph Applications

Once we have the list of apps we can use PasswordCredentials to view client secret details

(Get-MgApplication).PasswordCredentials
Application Secrets Properties

and KeyCredentials to view the certificates details

Application Certificate Properties

Once we have the required properties, we can create the script to export the app registration details.

App Registration Report

There are two parameters Reportonly which returns just the result to PowerShell window and ReportExport which will export the report to the specific folder specified.

Below is what the Reportonly should look like.

.\Get-AppRegistrationDetails.ps1 -CertificateThumbprint Thumprint -ClientId ClientID -TenantId TenantID -ReportOnly -ExpiryDate 200
Report results

When using the Reportexport

.\Get-AppRegistrationDetails.ps1 -CertificateThumbprint thumbprint -ClientId ClientID -TenantId TenantID -ReportExport C:\temp\Graph\ -ExpiryDate 200

The full script can be downloaded from the below GitHub link.

https://github.com/TheSleepyAdmin/Scripts/blob/master/MSGraph/AppRegistration/Get-AppRegistrationDetails.ps1