RISC-V


● This is an Elektor Publication. Elektor is the media brand of Elektor International Media B.V.
PO Box 11, NL-6114-ZG Susteren, The Netherlands
Phone: +31 46 4389444
● All rights reserved. No part of this book may be reproduced in any material form, including photocopying, or storing in any medium by electronic means and whether or not transiently or incidentally to some other use of this publication, without the written permission of the copyright holder except in accordance with the provisions of the Copyright Designs and Patents Act 1988 or under the terms of a licence issued by the Copyright Licencing Agency Ltd., 90 Tottenham Court Road, London, England W1P 9HE. Applications for the copyright holder's permission to reproduce any part of the publication should be addressed to the publishers.
The Author and Publisher have used their best efforts in ensuring the correctness of the information contained in this book. They do not assume, and hereby disclaim, any liability to any party for any loss or damage caused by errors or omissions in this book, whether such errors or omissions result from negligence, accident, or any other cause.
All the programs given in the book are Copyright of the Author and Elektor International Media. These programs may only be used for educational purposes. Written permission from the Author or Elektor must be obtained before any of these programs can be used for commercial purposes.
● British Library Cataloguing in Publication Data
A catalogue record for this book is available from the British Library
● ISBN 978-3-89576-525-4 Print ISBN 978-3-89576-526-1 eBook
● © Copyright 2022: Elektor International Media B.V.
Editor: Alina Neacsu
Prepress Production: D-Vision, Julian van den Berg
Elektor is part of EIM, the world's leading source of essential technical information and electronics products for pro engineers, electronics designers, and the companies seeking to engage them. Each day, our international team develops and delivers high-quality content - via a variety of media channels (including magazines, video, digital media, and social media) in several languages - relating to electronics design and DIY electronics. www.elektormagazine.com
With the availability of free and open-source C/C++ compilers today, you might wonder why someone would be interested in assembler language. What is so compelling about the RISC-V Instruction Set Architecture (ISA)? How does RISC-V differ from existing architec tures? And most importantly, how do we gain experience with the RISC-V without a major investment? Is there affordable hobbyist hardware available?
The availability of the Espressif ESP32-C3 chip provides a student with one affordable way to get hands-on experience with RISC-V. The open-sourced QEMU emulator adds a 64-bit experience in RISC-V under Linux. These are just two ways for the student and enthusiast alike to explore RISC-V in this book.

In the earliest days of computing, there was great enthusiasm in working out the mechani cal steps required to perform some computation or algorithm. The programmer was aware of every machine cycle, status bit and register available to him as resources to be exploited. In those early times debugging was often performed on a console decorated with lamps, buttons and switches. There was always great satisfaction in getting it right and making it run even faster than before.
I fear that today, we've lost some of that passion for exploiting the machine. Our CPU tower might possess only a power-on button and LED. But if we're lucky, it might provide a disk activity LED as well. Embedded systems are better, sporting multiple LEDs that can be utilized. Whether desktop or embedded device, we still program in high-level languages like C/C++. While there is still joy in that, the thrill of the hunt may be lacking for those thirsting for more. Getting that algorithm to execute even faster or more efficiently is not just a badge of honor, but a matter of pride.
One deterrent to assembly language has been the extremely cluttered instruction sets of today's architectures. The Intel and AMD instructions sets, for example, have been horri bly extended in the name of compatibility. RISC-V allows the enthusiast to sweep all that clutter aside and start over with a clean slate. This makes things so much easier because there is less to be learned.
Getting back to assembler language will bring back that thrill of the hunt that you may be pining for. At the assembly level, the programmer directs every step of the machine. You decide how the registers are allocated and apply every binary trick in your toolbox to make that process slick. While we don't have hardware debug consoles anymore, we do have powerful debugging tools like the GNU gdb debugger. There's never been a better time to do assembly language than today.
It might seem counterproductive to program in assembly language. While C/C++ languag es will continue to be used for productive development, there frequently remain opportu nities for optimizing code at the machine level. In these areas, you will be empowered to exploit the machine in otherwise difficult ways.
One attractive area is writing custom floating-point algorithms in assembly language. For each calculation, you can carefully evaluate which rounding method to use and check for special exception cases at strategic places in the code. In C/C++, the tendency is to simply code the formula.
Even if you decide that you have no need to write assembly language code, being able to read it can be extremely helpful when debugging. Compilers, often at higher optimization levels, can generate incorrect code (this happens more often than you think). Being able to verify that the generated code is correct can save you from a great deal of guessing when debugging. With a working knowledge, you can step through the code one instruction at a time in a debugger and pinpoint the problem. Once the problem is revealed, you can then decide on a work-around for the compiler or replace the errant code directly with some assembler language code.
In microcomputer solutions, performance is often paramount. Assembler language pro gramming provides more options for meeting those performance goals. Finally, it is possi ble that one day RISC-V may become one of the few standard instruction sets in general use.
Probably its most attractive feature is that it is designed to be free and open so that it is not hindered by restrictive licensing. This permits any manufacturer to create a RISC-V product without purchasing an expensive or restrictive license.
The RISC-V instruction set is also designed to be clean, unlike many existing architectures. Today's Intel ISA is a bewildering mess of adapted and extended instructions. To be fair, this was done to maintain code compatibility, but what a bewildering mess it has become.
Now that security is more important than ever, there is a pressing need for a simpler de sign.
Reduced Instruction Set Computer (RISC) architecture had its beginnings in research pro jects conducted by John L. Hennessy at Stanford University between 1981 and 1984. MIPS (Microprocessor without Interlocked Pipeline Stages) was developed with the IBM 801 and the Berkeley RISC projects. The Berkeley RISC project was led by David Patterson who coined the term RISC. The thrust of these efforts was to develop a design that was simpler and potentially faster than the CISC (Complex Instruction Set Computers) of that time.
Today, simplicity benefits the chip manufacturer in lowering the cost of chip development and verification. Simplicity means fewer transistors, which leads to lower power require ments. A simple instruction set also reduces the complexity that the software developers must face. Finally, the RISC-V ISA has provision to include vendor extensions, without requiring any special approval. This can lead to surprising innovations.
RISC-V is now a large body of work. In chapter 4, Architecture, I'll discuss base instruc tion sets and extensions to RISC-V. The focus of this book, however, will be on the RV32 and RV64 subsets of RISC-V. This permits an ample study of the ESP32-C3 device (RV32) as well as Fedora Linux under QEMU (RV64). These two environments should provide the reader with a well-rounded tutorial.
In many books applying MCU (Microprocessor Computing Units) concepts, the project builds are the focus. In them, the emphasis is placed on using GPIO (General Purpose Input/Output), I2C, SPI and other built-in peripherals to build something fun.
This book has a different focus, but it is still fun! The projects in this book are boiled down to the barest essentials to keep the assembly language concepts clear and simple. In this manner, you will have "aha!" moments rather than puzzling about something difficult. The focus of this book is on learning how to write RISC-V assembly language code without get ting bogged down. As you work your way through this tutorial, you'll build up small demon stration programs to be run and tested. Often the result is some simple printed messages to prove a concept. Once you've mastered these basic concepts, you will be well equipped to apply assembly language in larger projects.
This book uses the Espressif ESP32-C3 dev kit device for hardware. You will also emulate RISC-V in 64-bit mode using the QEMU emulator on your desktop computer. The emulator requires that you have at least 20 GB of free disk space available. For both of the ESP-IDF (ESP Integrated Development Framework) and QEMU instances, an internet connection for downloading is assumed.
A suitably modern desktop computer is required to program the ESP32-C3 and to run the QEMU emulator, running Fedora Linux. If you lack 20 GB of free disk space, then that can be remedied by plugging in a USB hard drive to add some disk space.
When purchasing hardware for use with this book, be sure to acquire the correct device type. The original ESP32 devices used the Xtensa processor and are not RISC-V devices. At the time of writing there are several types of ESP32:
• ESP32 (Xtensa dual-core and single-core 32-bit LX6 microprocessor)
• ESP32-S2 (Single-core Xtensa LX7 CPU)
• ESP32-S3 (Dual-core Xtensa LX7 CPU)
• ESP32-C3 Single-core 32-bit RISC-V (WiFi 2.4 Ghz IEEE 802.11b/g/n)
• ESP32-C6 Single-core 32-bit RISC-V
This book was developed specifically with the Espressif ESP32-C3 device (emphasis on the "C3").
When purchasing, don't make the mistake of just buying just a chip. Be sure to purchase a "devkit" that consists of a PCB with the GPIO breakouts, USB interface and the ESP32-C3 chip soldered onto it. You might also find it listed as "ESP-C3", but be careful. Make sure this refers to the ESP32-C3, and not some other ESP32 variants (using the Xtensa CPU). You'll also need an appropriate USB cable to flash and communicate with the devkit. The projects in this book can run off of the power from the USB cable.
Figure 1.1 illustrates an early ESP32-C3 dev board purchased from AliExpress. This ver sion 1 dev board cannot support JTAG. Notice that these use a USB to serial interface chip (CH340C), which can be seen in the photo. If you aren't concerned about JTAG support, then these are otherwise suitable to use.
Figure 1.1: An early version 1 dev board. Note the USB to serial chip just right of the micro USB connector.
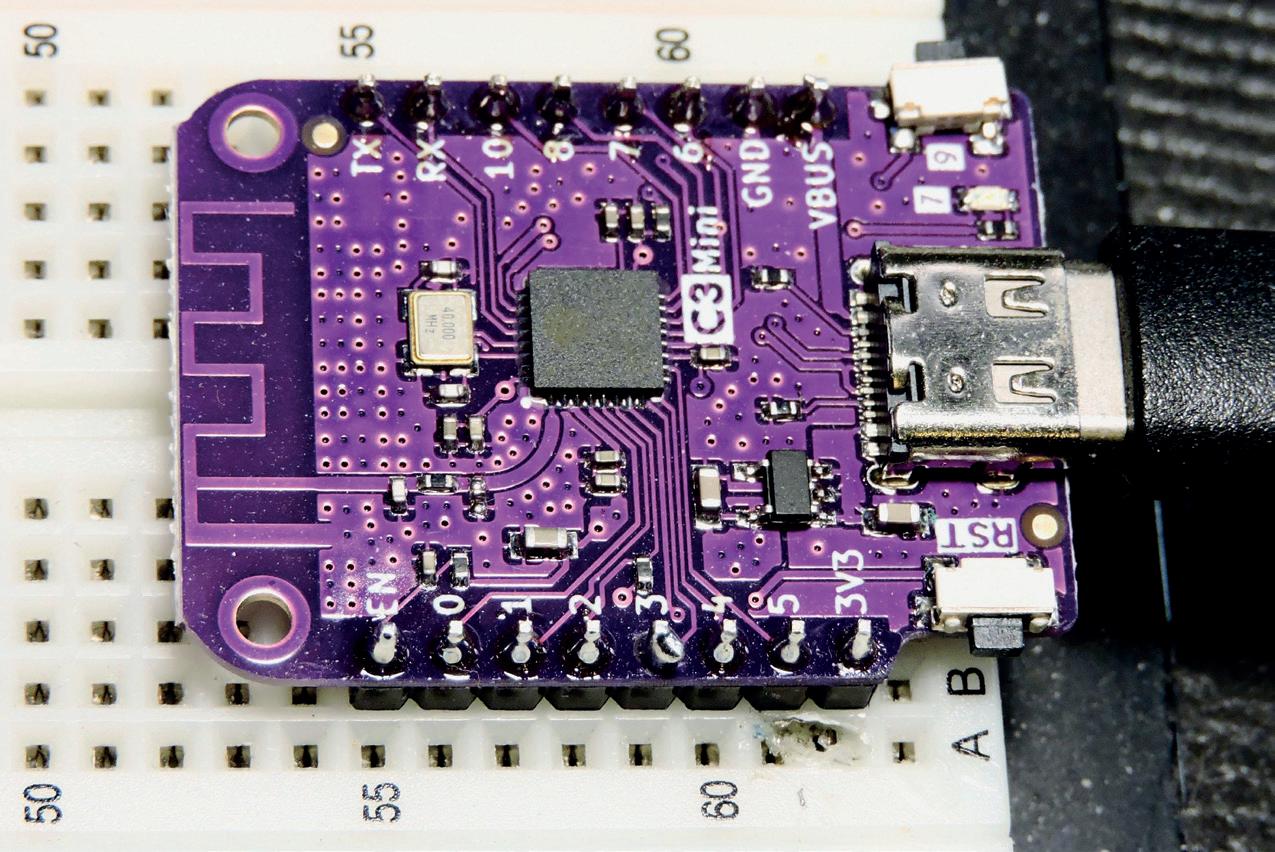
As time went on, Espressif came out with ESP32-C3 devices with JTAG support (version 3 or later). Since these connect directly from the ESP32-C3 chip to the USB port, they don't use a serial to USB converter chip. This makes it easy to identify the boards that support JTAG. With a direct connection to the USB bus, the ESP32-C3 can perform JTAG functions over the USB bus, as well as the usual serial communications. These are the preferred ESP32-C3 devkits to obtain. Figure 1.2 illustrates a JTAG-capable ESP32-C3 dev board sitting on a breadboard.
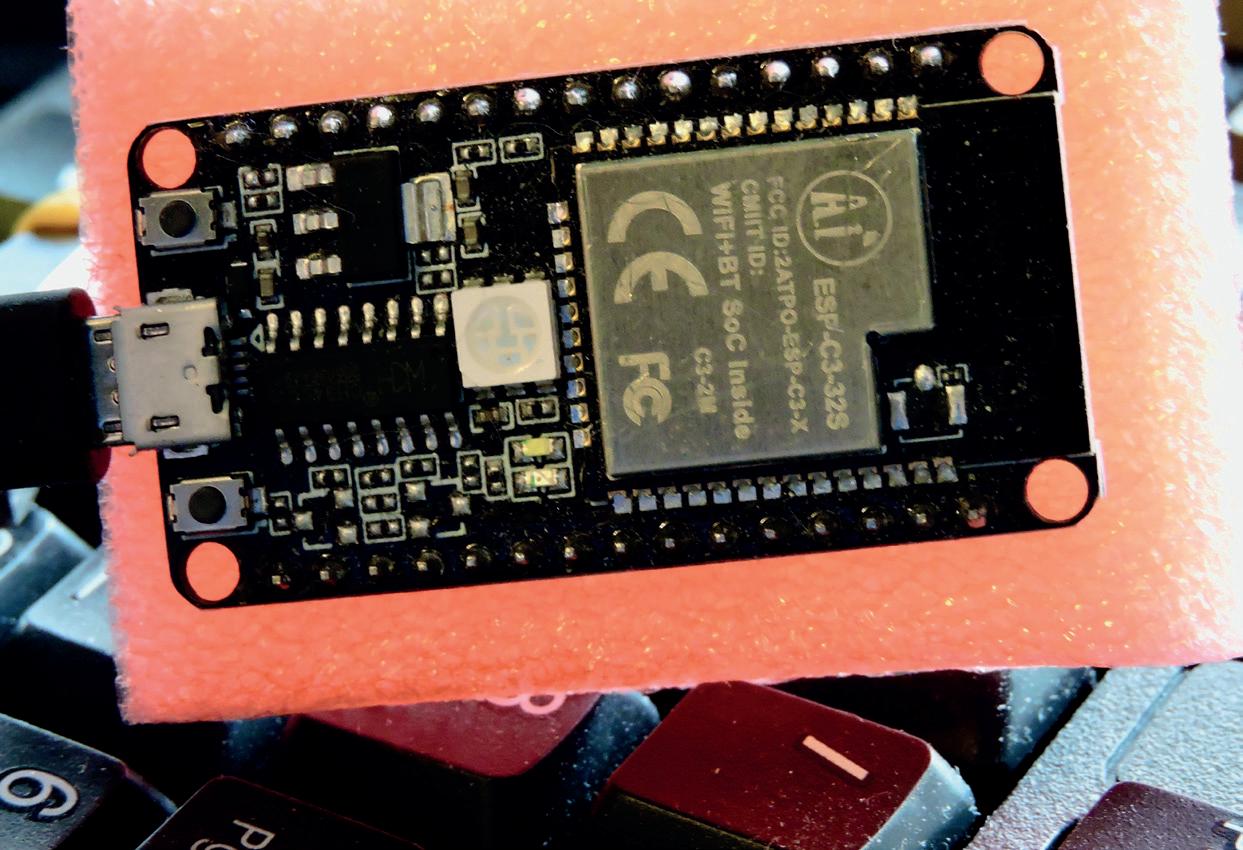
Figure 1.2: A revision 3 ESP32-C3 dev board supporting JTAG access.
The reader is assumed to have a basic understanding of what a CPU is, what registers are and the rudiments of computer memory. Assembler language and debugging require knowledge of number systems, specifically binary and hexadecimal. The reader should also be familiar with endianness. Knowing how big-endian ordering differs from little-endian will be helpful.
The reader is expected to be familiar with basic file system navigation: changing directo ries, creating directories and copying files. In some cases, the editing of a script file may be necessary. The Windows user should also be familiar with the Linux file system in this regard when using QEMU (emulating Fedora Linux).
Knowledge of the C language is assumed. Code examples will consist of a C language main program calling an assembly language function.
The QEMU examples use a RISC-V version of downloadable Fedora Linux. Consequent ly, some familiarity with the Linux command line is an asset even for Windows users. The ESP32-C3 examples will use your native desktop environment for ESP development, whether Linux, MacOS or Windows. In all cases, simple commands are issued to build and run the test programs.
Finally, the reader is expected to do some software downloading and installation. Unfortunately, there is a fair amount of this initially, but the good news is that it is all free and open software. Once installed, the reader can then focus on the RISC-V concepts presented in this book.
The next pair of chapters deal with installing your ESP-IDF (ESP Integrated Development Framework) and the QEMU emulation software. This bit of work is necessary to let the good times roll. So gather your disk space and enable your internet access and begin!
This chapter illustrates the steps necessary to get you up and running using the ESP32-C3 device. The first part of this chapter focuses on Linux and MacOS software installations. This is what Espressif calls "Manual Installation". Espressif also supports IDE installations for Eclipse or VSCode if you prefer. See their online documentation for that.
Windows users will want to skip to the later part of this chapter starting with the section heading "Windows Install". This will guide you through the use of the downloaded Espressif windows installer.
For either installation, you will need to plan for ample disk space and be connected to your internet. The ESP-IDF on the Mac (for device ESP32-C3 only) requires about 1.5 GB of disk. But the compilers and other tools will also require additional disk space as they are installed. I recommend that you allocate a minimum of 10 GB of free disk space before you proceed. The downloads are rather large and will take some time to complete. Choose a time to install where you are not rushed.
Espressif markets and sells several devices under the ESP32 moniker, so make sure you purchase the correct device in order to enjoy RISC-V adventures. If your part says ESP32 but not C3, it is not the RISC-V version of the CPU. These devices are also sold as bare modules. So be sure to get a "dev kit" form of the product. One product that I am using is a ESP32-C3-DevKitM-1 clone. By the time you read this there may be newer versions of the ESP32-C3-DevKit and those are likely your best option.
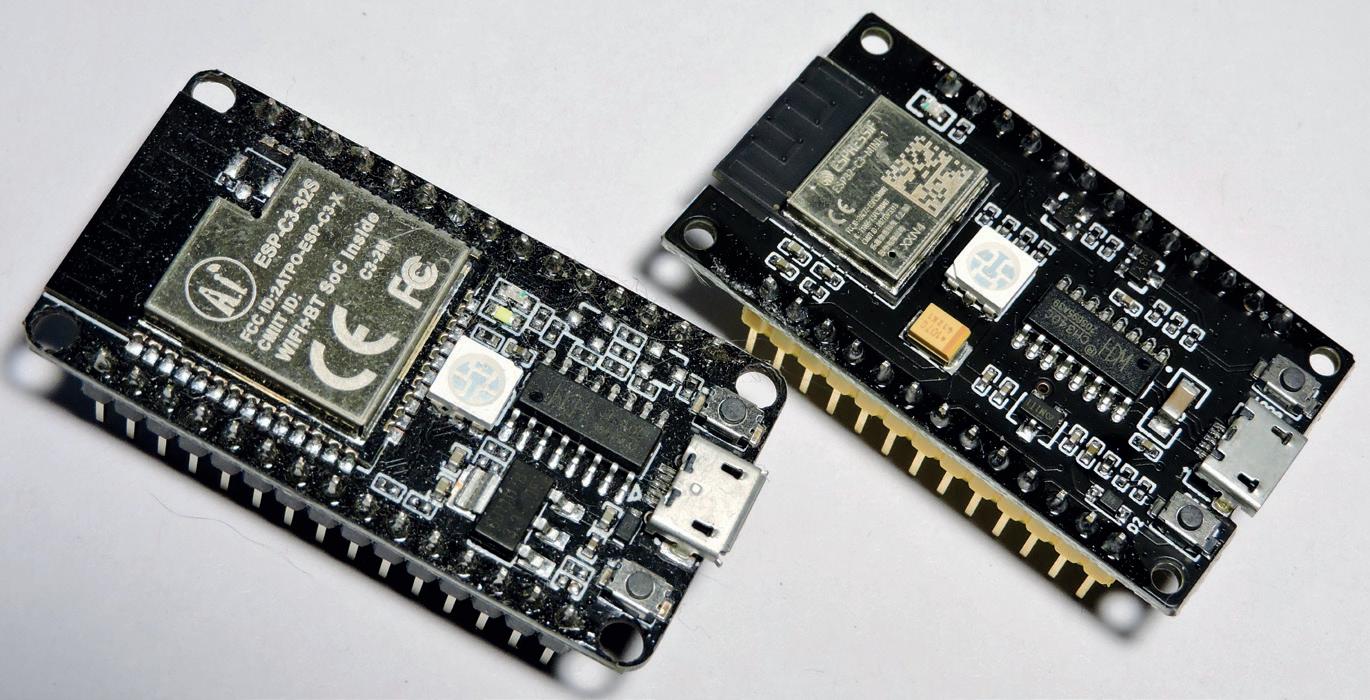
Dev kits may include a USB to serial chip (USB-UART bridge) like the CP2102. My devices used the CHG340 chip. Either bridge chip is ok, since we are only interested in the RISC-V CPU in this book. Now you can purchase dev kits with JTAG support. These devices with revision 3 or later use the USB facilities directly. Figure 2.1 illustrates two early examples of revision 1 dev boards. The CH340C USB to serial converter chip is very conspicuous.
Figure 2.1: Two ESP32-C3 devices with revision 1 PCBs (using USB to serial converters).
Locate the Espressif "Get Started" web page. If the website doesn't change too much, you should be able to arrive there directly using the following url: https://docs.espressif.com/projects/esp-idf/en/latest/esp32c3/get-started/index.html

Otherwise search for "ESP-IDF Programming Guide" with your browser.
Once you arrive at that page, don't forget to choose the product type ESP32-C3 in the upper left. Espressif supports multiple device types, and we are primarily interested in the ESP32-C3 with RISC-V support. It should look something like Figure 2.2.
Figure 2.2: Set the device selection as ESP32-C3.
Scroll down the page until you see the link "Linux and MacOS". Click on the link to open a new page of instructions.
On this page you will be guided through the following basic steps:
1. Install Prerequisites.
2. Get ESP-IDF.
3. Setup the tools.
4. Set up the environment variables.
5. First Steps for ESP-IDF.
Note:
the instructions differ at all from this text, do follow the instructions found on the website instead. Espressif may have made changes to the installation procedure by the time you read this.
The prerequisites will vary somewhat with the Linux distribution you're using. Check the Espressif website for the latest updates by distro.
For these distributions, the following packages should be installed (some may already be installed):
$ sudo apt install git wget flex bison gperf python3 python3-pip \ python3-setuptools cmake ninja-build ccache libffi-dev libssl-dev \ dfu-util libusb-1.0-0
You might wish to split these up into smaller steps, like the following:
$ sudo apt install git wget
$ sudo apt flex bison
$ sudo apt gperf python3
$ sudo apt python3-pip python3-setuptools
$ sudo apt cmake ninja-build
$ sudo apt ccache libffi-dev
$ sudo apt libssl-dev dfu-util libusb-1.0-0
CentOS uses the yum installer, and the dependencies are listed as follows:
$ sudo yum -y update && sudo yum install git wget flex bison gperf \ python3 python3-pip python3-setuptools cmake ninja-build ccache \ dfu-util libusbx
Espressif has documented the following dependencies for the Arch distro:
$ sudo pacman -S --needed gcc git make flex bison gperf python-pip \ cmake ninja ccache dfu-util libusb
Espressif notes that CMake version 3.5 or newer is required. If you're running an older distribution, you may need to update your system packages. For other Linux distributions not listed here, use the above as a hint to the package names that you may need to add or update.
MacOS users usually install HomeBrew (recommended) or the MacPorts open-source pro jects to add functionality to their Mac. If you've not done that yet, you need to do that now. Refer to the following sites for more information about this:
https://brew.sh/ (HomeBrew) https://www.macports.org/install.php (MacPorts)
Whether you use HomeBrew or MacPorts, you must install pip:
$ sudo easy_install pip
Next, CMake and Ninja are installed. For HomeBrew install:
$ brew install cmake ninja dfu-util
For MacPorts users, use:
$ sudo port install cmake ninja dfu-util
Espressif recommends that you also install ccache for faster build times. For HomeBrew, use:
$ brew install ccache
For MacPorts use:
$ sudo port install ccache
Note: Espressif indicates that if during the installation you encounter an error like the following: xcrun: error: invalid active developer path (/Library/Developer/Command LineTools), missing xcrun at: /Library/Developer/CommandLineTools/usr/bin/xcrun Then you will need to install the Apple XCode command line tools in order to continue. Install these with:
$ xcode-select --install
Check the version of python you have installed with:
$ python --version
If it is a version older than 3, or is not present, then check the following (notice that the command name is python3 this time):
$ python3 --version
If that fails, then you need to install it. For HomeBrew:
$ brew install python3
For MacPorts: $ sudo port install python38
Get ESP-IDF
At this point, you need to decide where to place your ESP-IDF software (not as root). I'm going to assume in this book, that the directory will be named ~/espc3, where the tilda (~) represents your home directory. You can choose a different directory name, by simply substituting ~/espc3 for the name you prefer.
First, create the subdirectory to house your files in (starting from your home directory):
$ mkdir -p ~/espc3 and then change to it:
$ cd ~/espc3
Now access the files from GitHub by performing:
$ git clone --recursive https://github.com/espressif/esp-idf.git
This git operation downloads several files and will take some time to complete. It is also a good opportunity to take a break for your favourite beverage.
When the git operation completes, you will have the Espressif software downloaded into the subdirectory ~/espc3/esp-idf.
Now we need to install some tools used by the ESP-IDF framework, like the compiler and Python packages.
$ cd ~/espc3/esp-idf
$ ./install.sh esp32c3
Performing this step will result in more files being downloaded and installed. This step progresses much faster than the GitHub clone operation but can still require some time. Perhaps your beverage needs a refill?
At the end of this installation, you might encounter a message like:
WARNING: You are using pip version 21.2.1; however, version 22.0.3 is available.
You should consider upgrading via the '~/.espressif/python_env/idf5.0_py3.9_env/bin/python -m pip install --upgrade pip' command.
This is optional, but I chose to do it.
At the end of the installation, your session should have completed with the message: All done! You can now run:
$ . ./export.sh
At this point, you should run this script and watch for any error messages. Some errors you might see may include:
ERROR: tool xtensa-esp32-elf has no installed versions. Please run '/Users/joe/ espc3/esp-idf/install.sh' to install it.
ERROR: tool xtensa-esp32s2-elf has no installed versions. Please run '/Users/joe/ espc3/esp-idf/install.sh' to install it.
ERROR: tool xtensa-esp32s3-elf has no installed versions. Please run '/Users/joe/ espc3/esp-idf/install.sh' to install it.
In other words, these messages complain about missing support for:
xtensa-esp32-elf
xtensa-esp32s2-elf
xtensa-esp32s3-elf
If you're only concerned about our ESP32-C3 device, which was not listed in error, you can ignore these messages. If you also want to support these other devices (regular ESP32,
ESP32-S2 and ESP32-S3), you can follow the Espressif advice and run the installation scripts suggested.
To run the Espressif tools to build your projects some environment changes must be applied each time you log in. In a fresh terminal session, you would need to do the following. Make sure that you type a space between the dot and the rest of the pathname:
$ . ~/espc3/esp-idf/export.sh
Assuming that no critical error messages are reported, this sets up your terminal session to build your ESP projects. Some users may wish to create a shorter way to do this. Espressif recommends creating an alias like get_idf as follows:
$ alias get_idf='. $HOME/espc3/esp-idf/export.sh'
Once that alias is defined, you can just type:
$ get_idf
to establish your build environment. Depending upon the shell you use for your terminal session, you might want to set the get_idf alias up in your ~/.profile or ~/.bashrc file, so that it is automatically defined each time you log in.
Once that export.sh script has run, your environment will have the variable IDF_PATH set. In this chapter, it would have the value "~/espc3/esp-idf". This allows you to use the shell value $IDF_PATH in commands and scripts if you like.
The installation procedure has covered a lot of ground so let's test it. Change to the exam ple subdirectory shown:
$ cd $IDF_PATH/examples/get-started/hello_world (or)
$ cd ~/espc3/esp-idf/examples/get-started/hello_world
In order to build for the ESP32-C3 device, we need to tell the build framework about it:
$ idf.py set-target esp32c3
This step adjusts the environment so that it knows that it is compiling for our RISC-V device (ESP32-C3). Now test the build process:
$ idf.py build
The first time this runs for a given project, it will compile a lot, but don't be concerned. Subsequent builds will not take so long. When it succeeds, the process should end with a message:
Project build complete. To flash, run this command: ....snip.... or run 'idf.py -p (PORT) flash'
Before we can flash your RISC-V (ESP32-C3), we need to find out what port it appears on when you plug its cable into a USB port. But before you plug in your device's USB cable, list the cu devices under /dev as follows:
$ ls /dev/cu* /dev/cu.Bluetooth-Incoming-Port /dev/cu.usbserial-0001
This will list some that are already present. Don't be concerned if no devices show up. Now plug in your RISC-V device's USB cable and list the files again:
$ ls /dev/cu* /dev/cu.Bluetooth-Incoming-Port /dev/cu.usbserial-0001 /dev/cu.usbserial-1430
In this example, the device /dev/cu.usbserial-1430 was added. This is the device name we need for flashing our device. Define it in the shell variable named PORT, so that you won't have to type it each time:
$ PORT=/dev/cu.usbserial-1430
$ export PORT
To flash the example program to your device, try it now (the example output has been abbreviated somewhat):
$ idf.py flash
Executing action: flash Serial port /dev/cu.usbserial-1430
Connecting....
Detecting chip type... ESP32-C3
Running ninja in directory /Users/joe/espc3/esp-idf/examples/get-started/ hello_world/build
Executing "ninja flash"...
...
Chip is ESP32-C3 (revision 3)
Features: Wi-Fi Crystal is 40MHz
MAC: 7c:df:a1:b4:44:94
Uploading stub...
Running stub...
Stub running...
Changing baud rate to 460800 Changed.
Configuring flash size...
Flash will be erased from 0x00000000 to 0x00004fff...
Flash will be erased from 0x00010000 to 0x00034fff... Flash will be erased from 0x00008000 to 0x00008fff...
Compressed 19984 bytes to 12116...
Writing at 0x00000000... (100 %)
Wrote 19984 bytes (12116 compressed) at 0x00000000 in 0.7 seconds (effective 221.1 kbit/s)...
Hash of data verified.
Compressed 151072 bytes to 81515...
Writing at 0x00010000... (20 %)
Writing at 0x00019a2e... (40 %)
Writing at 0x00020360... (60 %)
Writing at 0x00027602... (80 %)
Writing at 0x0002dada... (100 %)
Wrote 151072 bytes (81515 compressed) at 0x00010000 in 2.7 seconds (effective 443.9 kbit/s)...
Hash of data verified.
Compressed 3072 bytes to 103...
Writing at 0x00008000... (100 %)
Wrote 3072 bytes (103 compressed) at 0x00008000 in 0.1 seconds (effective 262.5 kbit/s)...
Hash of data verified.
Running idf_monitor in directory /Users/joe/espc3/esp-idf/examples/get-started/ hello_world
...
--- idf_monitor on /dev/cu.usbserial-1430 115200 ---
--- Quit: Ctrl+] | Menu: Ctrl+T | Help: Ctrl+T followed by Ctrl+H ---
ESP-ROM:esp32c3-api1-20210207
Build:Feb 7 2021
rst:0x1 (POWERON),boot:0xc (SPI_FAST_FLASH_BOOT)
SPIWP:0xee
mode:DIO, clock div:1
load:0x3fcd6100,len:0x1750
load:0x403ce000,len:0x930
load:0x403d0000,len:0x2d3c entry 0x403ce000
I (30) boot: ESP-IDF v5.0-dev-1730-g229ed08484 2nd stage bootloader
I (30) boot: compile time 19:50:12
I (30) boot: chip revision: 3
I (33) boot.esp32c3: SPI Speed : 80MHz
I (38) boot.esp32c3: SPI Mode : DIO
I (43) boot.esp32c3: SPI Flash Size : 2MB
I (48) boot: Enabling RNG early entropy source...
I (53) boot: Partition Table:
I (57) boot: ## Label Usage Type ST Offset Length
I (64) boot: 0 nvs WiFi data 01 02 00009000 00006000
I (71) boot: 1 phy_init RF data 01 01 0000f000 00001000
I (79) boot: 2 factory factory app 00 00 00010000 00100000
I (86) boot: End of partition table
...
I (145) boot: Loaded app from partition at offset 0x10000
I (148) boot: Disabling RNG early entropy source...
I (165) cpu_start: Pro cpu up.
I (173) cpu_start: Pro cpu start user code
I (173) cpu_start: cpu freq: 160000000 Hz
I (173) cpu_start: Application information:
I (176) cpu_start: Project name: hello_world
I (182) cpu_start: App version: v5.0-dev-1730-g229ed08484
I (188) cpu_start: Compile time: Mar 1 2022 19:50:05
I (194) cpu_start: ELF file SHA256: d4ad172e8078f033...
I (200) cpu_start: ESP-IDF: v5.0-dev-1730-g229ed08484
I (207) heap_init: Initializing. RAM available for dynamic allocation:
I (214) heap_init: At 3FC8C540 len 00033AC0 (206 KiB): DRAM
I (220) heap_init: At 3FCC0000 len 0001F060 (124 KiB): STACK/DRAM
I (227) heap_init: At 50000020 len 00001FE0 (7 KiB): RTCRAM
I (234) spi_flash: detected chip: generic
I (238) spi_flash: flash io: dio
I (242) sleep: Configure to isolate all GPIO pins in sleep state
I (249) sleep: Enable automatic switching of GPIO sleep configuration I (256) cpu_start: Starting scheduler.
Hello world!
This is esp32c3 chip with 1 CPU core(s), WiFi/BLE, silicon revision 3, 2MB external flash
Minimum free heap size: 328924 bytes
Restarting in 10 seconds...
Restarting in 9 seconds...
Restarting in 8 seconds... Restarting in 7 seconds...
After the device boots up, you will see the message "Starting scheduler". The next message shown is the "Hello world!" that we were waiting for. Then the program counts down and will reboot again until you terminate it. To stop monitoring, type Control-] (control plus the right square bracket) and you should be returned to your shell. Congratulations, you ran your first RISC-V program!
While it is possible to install the Windows Subsystem for Linux (WSL and WSL2) on Win dows 10 and later, you may not be able to get the Linux USB access to work with the ESP32-C3 device. For this reason, I'll document the native Windows install procedure as provided by Espressif. Espressif provides the install documentation here:
https://docs.espressif.com/projects/esp-idf/en/latest/esp32c3/get-started/ windows-setup.html
Espressif lists the following limitations:
• The installation path of ESP-IDF and ESP-IDF Tools must not be longer than 90 characters.
From their web page:
[Installation paths that are too long] might result in a failed build. The installation path of Python or ESP-IDF must not contain white spaces or parentheses. The in stallation path of Python or ESP-IDF should not contain special characters (non-AS CII) unless the operating system is configured with "Unicode UTF-8" support.
System Administrator can enable the support via Control Panel. Change date, time, or number formats - Administrative tab - Change system locale - check the option "Beta: Use Unicode UTF-8 for worldwide language support" - Ok and reboot the computer.
register 53
148
hello_world 25 HomeBrew 43
instructions sets
Binary Interface 53 apt 37
22
shift
C/C++ 81 C compiler 62 CentOS 21 cexpression 253 CHG340 chip 19 CMU extensions 216 COM port 33 CSR 186 cycle snapshot 221
IDLE thread 240 Install Prerequisites 21 Instruction Set Architecture 13
JTAG support 227
License Agreement 30 Linux USB access 29 LP64 Solaris model 62
21
Machine Performance Counter Value 225 MacOS 22 Manual Installation 19 matrix organized 164 MIPS 15 MISA register 59 MPCCR counter 222 MXL field 210
NaN-boxing 192 NULL pointer 164
30
Linux 18, 41
bits
226 OpenOCD session 230 operating privilege mode 209 overflow occurred 147
Pre-Processor 197
212
50
QEMU
SRAM 81 SSH Authentication 45 stack layout 109 Stanford University 15 subi 130
T tilda 233
U
UART0 241 Ubuntu 21 Unicode UTF-8 29 USB Serial/JTAG Controller 242 USB-UART bridge 19
V variable bcount 119
W WARL 210 X XLEN 51 XLEN-bit divisor 153 Xtensa 16
With the availability of free and open source C/C++ compilers today, you might wonder why someone would be interested in assembler language. What is so compelling about the RISC-V Instruction Set Architecture (ISA)? How does RISC-V di er from existing architectures? And most importantly, how do we gain experience with the RISC-V without a major investment? Is there a ordable hardware available?
The availability of the Espressif ESP32-C3 chip provides a way to get hands-on experience with RISC-V. The open sourced QEMU emulator adds a 64-bit experience in RISC-V under Linux. These are just two ways for the student and enthusiast alike to explore RISC-V in this book.
The projects in this book are boiled down to the barest essentials to keep the assembly language concepts clear and simple. In this manner you will have “aha!” moments rather than puzzling about something di icult. The focus in this book is about learning how to write RISC-V assembly language code without getting bogged down. As you work your way through this tutorial, you’ll build up small demonstration programs to be run and tested. Often the result is some simple printed messages to prove a concept. Once you’ve mastered these basic concepts, you will be well equipped to apply assembly language in larger projects.
Warren Gay is a datablocks.net senior software developer, writing Linux internet servers in C++. He got involved with electronics at an early age, and since then he has built microcomputers and has worked with MC68HC705, AVR, STM32, ESP32 and ARM computers, just to name a few.