The Cisco Web Security Appliance (WSA) supports authentication against Active Directory (AD) or Lightweight Directory Access Protocol (LDAP) directory service, this allows policies to be applied per user or group rather than IP address. The table below summarises the supported authentication schemes and network protocols for each directory service.
|
Directory Service |
Authentication Scheme | Supported Network Protocols |
| Active Directory | Kerberos NTLMSSP Basic |
HTTP, HTTPS, Native FTP, FTP over HTTP and SOCKS (Basic authentication) |
| LDAP | Basic | HTTP, HTTPS, Native FTP, FTP over HTTP and SOCKS |
Reference Cisco guide – https://www.cisco.com/c/en/us/td/docs/security/wsa/wsa11-0/user_guide/b_WSA_UserGuide/b_WSA_UserGuide_chapter_01001.html
The table below provides a comparison between the different Authentication Schemes.
| Authentication Scheme | |
| AD/NTLM (NT LAN Manager) | Enables single sign-on, as the user credentials are retrieved from the local computer and the user is never prompted to provide authentication credentials. |
| AD/Basic | Prompts the user to enter credentials to authenticate to the proxy. |
This post covers configuring the WSA for AD NTLM and Basic authentication.
WSA Configuration
The basic network routing, firewall and WSA configuration is not covered in this post, refer to this post about the initial WSA configuration.
Authentication Realms
The Authentication Realms define the authentication domain, server(s) and if using AD create a computer account for the WSA in the AD domain.
- Login to the Web GUI of the WSA
- Navigate to Network > Identification Services > Authentication
- Click Add Realm
- Enter an appropriate Realm Name
- From the Authentication Server Type and Scheme drop-down list, select Active Directory

- Enter the IP address or FQDN of up to three Active Directory Servers
- Specify the Active Directory Domain
- Specify the Location to create the computer object
The Active Directory computer account (machine trust account) is created during the Join Domain process. The credentials are NOT saved.
- Click Join Domain
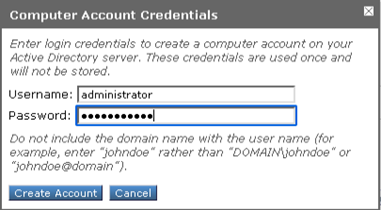
If successful, a message “Success – Computer Account <hostname>$ successfully created will be displayed at the top of the webpage.

Once the WSA is joined to the Active Directory domain, test the authentication settings.
- Click the Start Test button at the bottom of the webpage.
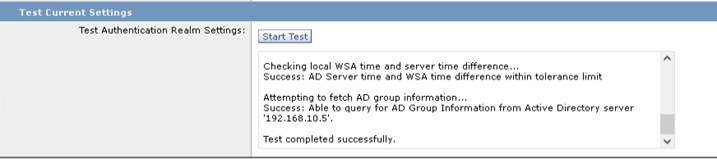
- Click Submit if successful
- Click Commit Changes
Identification Profiles
The Identification Profile will be configured to use Kerberos or NTLMSSP for initial testing.
- Navigate to Web Security Manager > Authentication > Identification Profiles
- Click Add Identification Profile
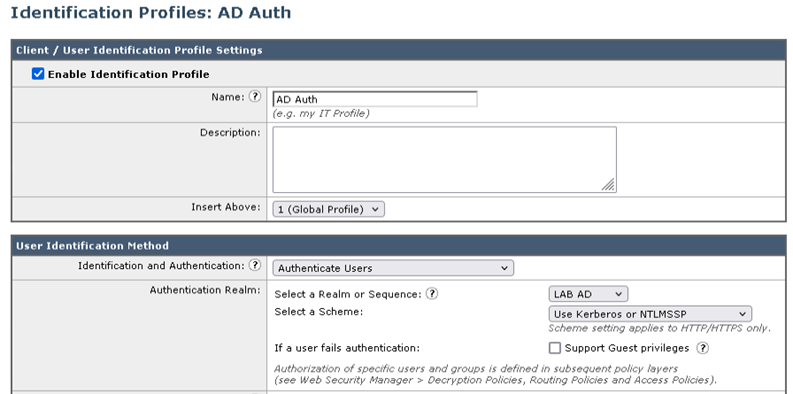
- Ensure Enable Identification Profile is selected
- Name the profile appropriately, i.e., AD Auth
- From the Identification and Authentication drop-down list, select Authenticate Users
- From the Select a Realm or Sequence drop-down list, select the realm AD AUTH (as created in the previous step).
- From the Select a Scheme drop-down list, select Use Kerberos or NTMLSSP
- Click Submit if successful
- Click Commit Changes
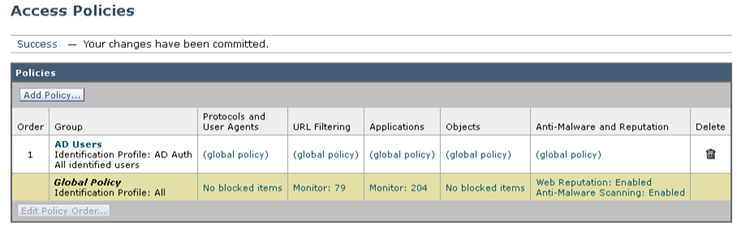
Access Policy
The Access Policy is used to match the client request-based user or group information on the AD authentication profile created in the previous step. Optionally, advanced criteria used to match on protocol, proxy ports, subnet, time range, URL categories or User Agents.
For example, users in the AD group “Finance Users” can access URL categories “Finance Applications”. Users not in the “Finance Users” AD group, will not match this Access Policy and must match another Access Policy, where “Finance Applications” may or may not be permitted.
- Navigate to Web Security Manager > Web Policies > Access Policies
- Click Add Policy
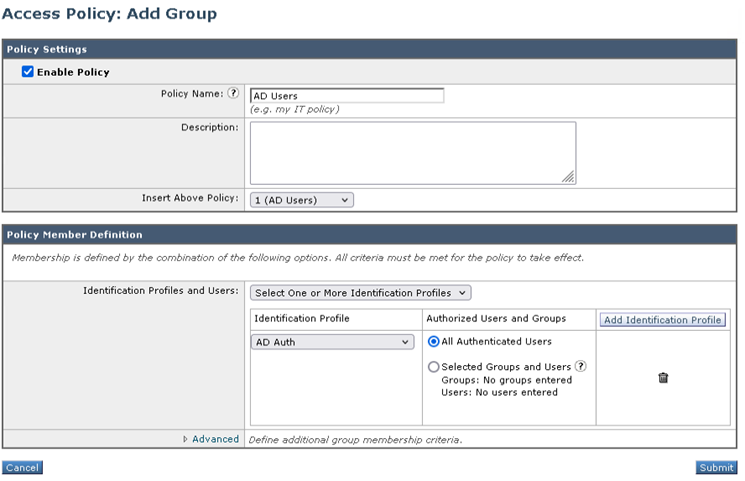
- Specify the Policy Name appropriately, i.e., AD Users
- From the Identification Profiles and Users drop-down click Select One or More Identification Profiles
- From the Identification Profile drop-down list, select AD Auth
- Optionally, click Advanced to select additional criteria
- Click Submit
- Click Commit Changes
Testing/Verification
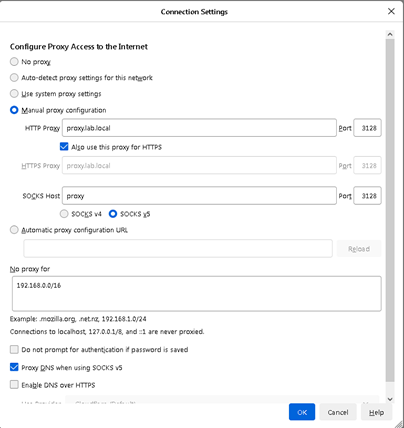
For the initial testing we will configure a test computer with explicit proxy rather than a transparent proxy and observe the different between the authentication methods NTLM/Kerberos and Basic.
NTLM Authentication
- On the test computer configure the WSA as the proxy server.
- Navigate to the website https://integratingit.wordpress.com, with NTLM/Kerberos authentication configured the website should load automatically (assuming the WSA and firewall is configured correctly).
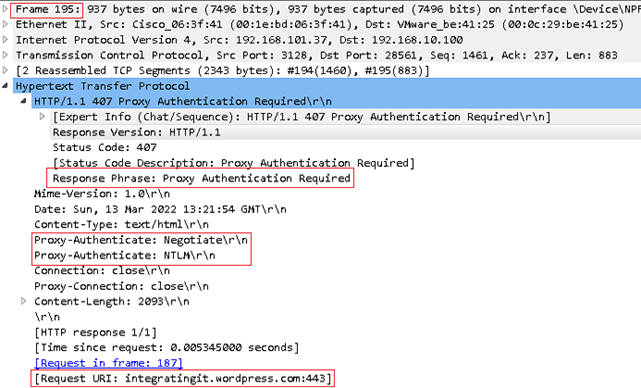
The output is of a packet capture of the connection request, taken on the local computer.

- Frame 187 is the initial connection attempt to the website integratingit.wordpress.com
- Frame 195 is a response from the WSA to the client computer (Frame 187)
with the message HTTP/1.1 407 Proxy Authentication Required
The screenshot below is a breakdown of Frame 195, we can confirm the WSA Proxy is requesting Proxy authentication Required using Negotiate/NLTM for the Request URI to integratingit.wordpress.com.
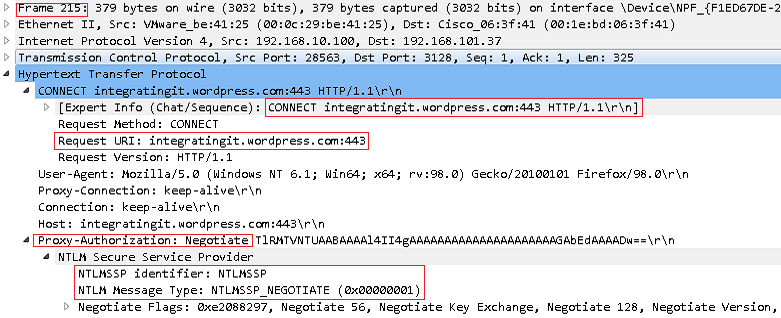
From the screenshot below, Frame 215 is where the local computer makes another connection to the website integratingit.wordpress.com, this time providing the required authentication information. We can confirm a connection request to integratingit.wordpress.com and the client computer included the Proxy-Authorization: Negotiate string, we can confirm it is using NTLMSSP. This automatically sent the logged in user credentials to single sign-on the user to the WSA and access the website transparently.
Basic Authentication
We will repeat the test with Basic authentication and observe the difference.
- On the WSA web GUI, navigate to Web Security Manager > Authentication > Identification Profiles > PROFILENAME
- Edit the profile and change Select a Scheme to Use Basic

- Click Submit and Commit Changes
- Navigate to the website https://integratingit.wordpress.com
The screenshot below is the authentication prompt on the Firefox web browser when Basic authentication is required by the WSA to authenticate the user. Unlike NTLM/Kerberos authentication, basic authentication does not provide single sign on and requires the users to manually enter the credentials.
Note – when the web browser is closed, the authentication session is ended. Opening a new web browser will require re-authentication.
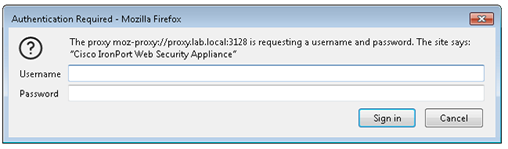
- Enter valid credentials to access the website.
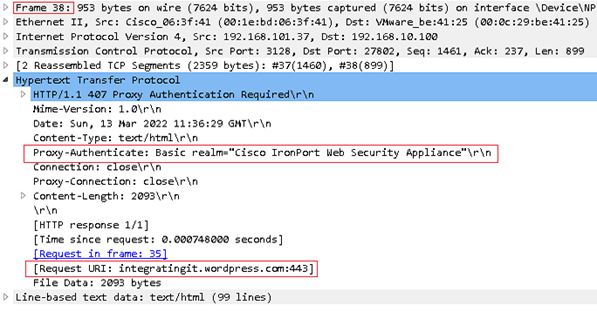
The output is of a packet capture of the connection request, taken on the local computer.

- Frame 35 is the initial connection to this website integratingit.wordpress.com
- Frame 38 is a response from the WSA to the client computer (Frame 35)
with the message HTTP/1.1 407 Proxy Authentication Required
The screenshot below is a breakdown of Frame 38, we can confirm the WSA Proxy is requesting Proxy authenticate using Basic Realm for the Request URI for integratingit.wordpress.com website.
At Frame 127 the local computer makes another connection to the website integratingit.wordpress.com, providing the required authentication information.
From the screenshot below, we can confirm a connection request to integratingit.wordpress.com, with the client computer including the Proxy-Authorization: Basic <string> which includes the information to authenticate the connection.
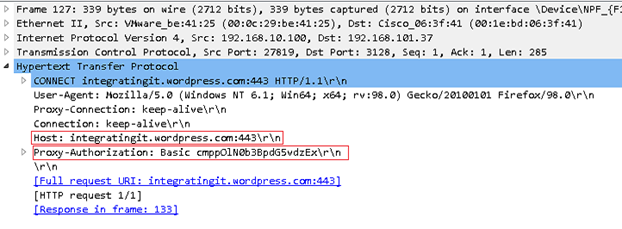
With the authentication information provided, the website will load for the user.
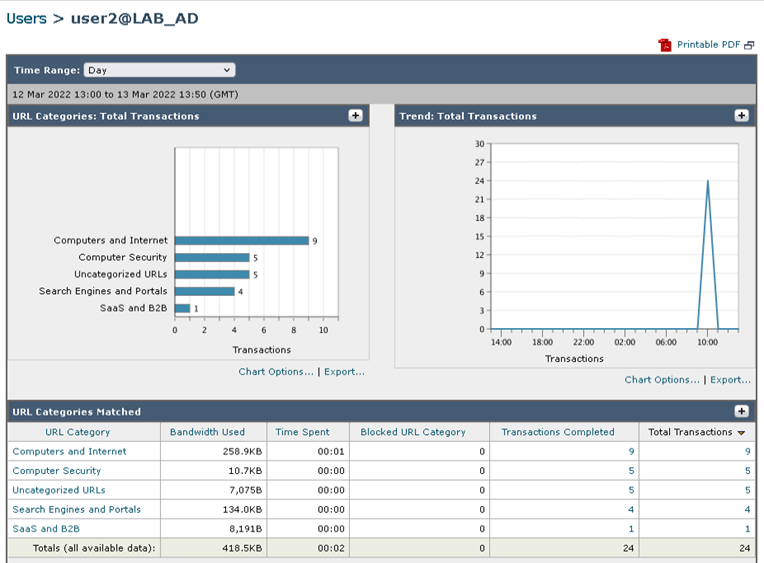
- On the Web GUI of the WSA, navigate to Reporting > Users
From the screenshot below we can determine that the WSA authenticated User2 and tracked the transactions for the user’s session.
Summary
From the basic testing, we demonstrated the different AD authentication methods with WSA and difference between them. The packet captures help to provide clarity on how the user/devices know which authentication method is required and what options are available for single sign-on.

One thought on “WSA Authentication Realms”