One of the most visible characteristics of Teamup is color-coded events. The primary color-coding system is the sub-calendars, which can be used to group people, resources, spaces, jobs, etc. Calendar administrators can create and manage sub-calendars through the calendar settings; you can also quickly create a color-coded sub-calendar structure by importing a CSV template.
Step 1: Create the CSV template
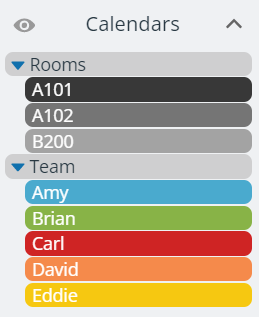
To create a calendar structure like this:
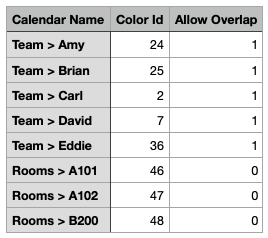
You can use a CSV template like this:
Create the template
It’s important to format the CSV file correctly for importing. See this article for details.
- Create a new CSV file with the column headings as shown above:
- Calendar Name
- Color ID
- (optional) Allow Overlap
- Add the information for each sub-calendar on a separate row: name, color, and overlap permission. list each sub-calendar on a separate row.
- You can use the > symbol to create folder hierarchies for the sub-calendars, e.g. Team > Amy.
- To allow overlapping events, put 1 (yes/true) in the column. To disallow overlapping events, put 0 (no/false) in the column.
- Set the color id for each sub-calendar (details below).
- Save the CSV file.
Assign color-coding
Teamup has 48 colors which can be assigned to sub-calendars through the color selector when managing individual sub-calendars:
Each of these colors has a corresponding color ID. To color-code the calendar structure when importing a CSV template, enter the color ID to designate the color for each sub-calendar.
Here are the color IDs: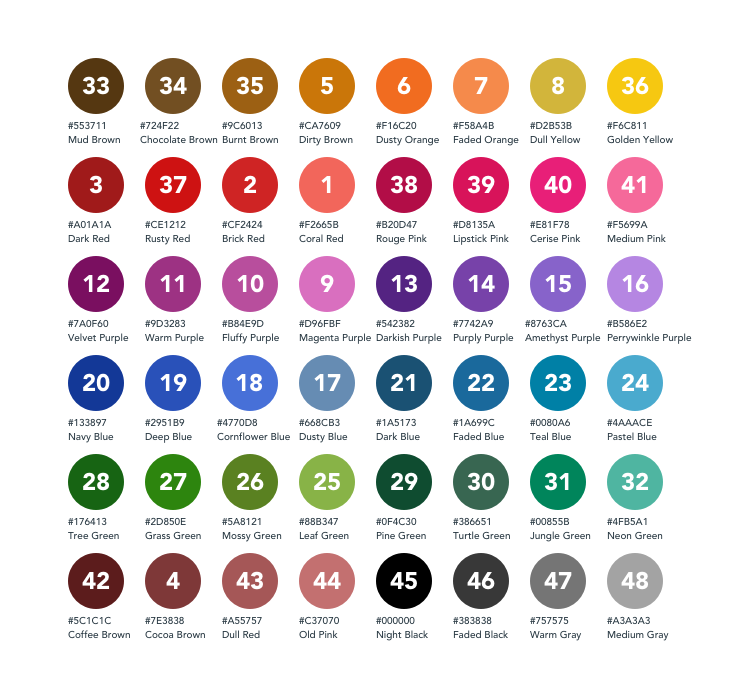
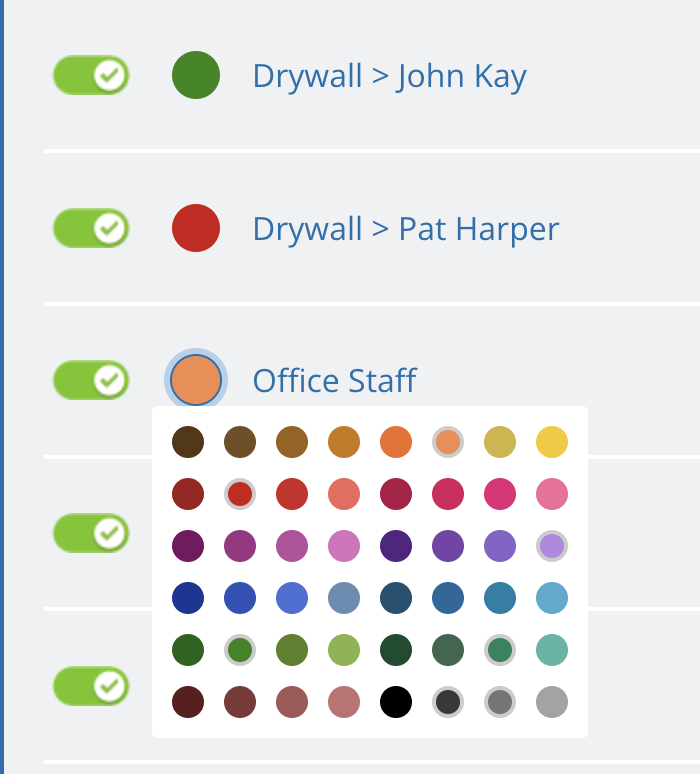
If you don’t have the color ID palette on hand or haven’t decided which colors to assign, simply put any number between 1 and 48 for each sub-calendar. Once you’ve imported the calendar structure, you can adjust the color for each sub-calendar in Settings > Calendars by using the color selector:
Step 2: Upload the CSV file
- Open the calendar where you wish to set up the color-coded calendar structure.
- If you already have sub-calendars created which you no longer want, you can delete or deactivate all but one. (You will have to leave one sub-calendar active; you can delete it after importing the CSV template if no longer needed.)
- Go to Settings > Import Events, then click sub-calendars at the top:

- Choose the CSV template you just created, upload it, then click Save:


Calendar limit error
If you upload a CSV template with more sub-calendars than currently allowed on your subscription plan, you will receive an error when uploading:

- Go to Settings > Calendars and deactivate or delete any unneeded sub-calendars.
- Go to Settings > Subscription to upgrade your plan and increase your sub-calendar amount.
Step 3: Modify as needed
Once you have completed the import, you can still make any modifications as needed:
- Change sub-calendar colors.
- Adjust sub-calendar names.
- Rearrange sub-calendars.
- Add or remove sub-calendars.
- Organize in different folders.
To make any of these changes, to go Settings > Calendars, then adjust as needed. See more about how to manage sub-calendars.
Try it out
Try it out on a live demo calendar that shows how to bulk import sub-calendars from a CSV template.
This demo calendar allows you to test how to quickly create sub-calendars from a template .csv file. You can use the CSV template on the demo calendar or make your own and test it out. Open the demo calendar.