Didier Stevens

Monday 28 December 2020

Decrypting TLS Streams With Wireshark: Part 2

Filed under: Encryption,Networking — Didier Stevens @ 0:00

In blog post “Decrypting TLS Streams With Wireshark: Part 1“, I explain how to decrypt TLS streams with a specific type of encryption (pre-master secret exchanged via RSA) using the web server’s private key.

In this blog post, we will use the client to get the necessary information to decrypt TLS streams.

We do this by setting environment variable SSLKEYLOGFILE and subsequently launching our client (Chrome, Firefox, curl, …, but not Internet Explorer).

When this environment variable is set, a compatible TLS client will write data in the text file pointed to by SSLKEYLOGFILE. This data can be used to decrypt the TLS stream.

In a first test, I set SSLKEYLOGFILE=secrets-1.txt and issue exactly the same curl command as in part 1:

curl.exe –verbose –insecure –tls-max 1.2 –ciphers AES256-SHA –dump-header 01.headers –output 01.data –trace 01.trace –trace-time https://192.168.190.130

To force a cipher suite that is based on RSA for the exchange of the pre-master secret, I use options –tls-max 1.2 and –ciphers AES256-SHA.

Here is the content of secrets-1.txt:

RSA b73e7985e324abc0 030330f29c3ac42f28d91c967ad9c4b484f625ac95f6ad1dfe4474eecb6395f8a6b607f80594ebe97b45f24cae774800
CLIENT_RANDOM 53a7bcdb320d3cc85dbb21956403da8801617a2980fb79f7b50fd6d1189d0472 cce8feba2219194646201279f1bbc551035ce3d1f8a34d3514df8297078fa80f0e5b19e5aa965adf285e93e41c93c210

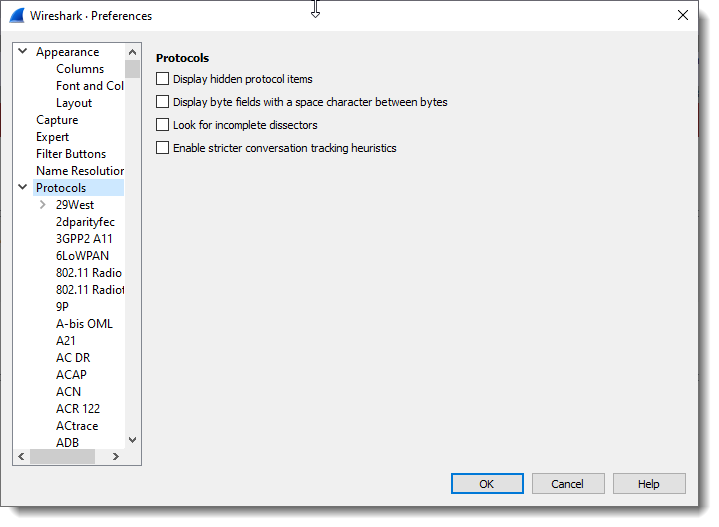
This file can be used in Wireshark to decrypt the TLS stream. Just like in part 1, we go to preferences for the TLS protocol:

I already removed the RSA private key that was set in part 1 (so that it will not influence my part 2 tests):
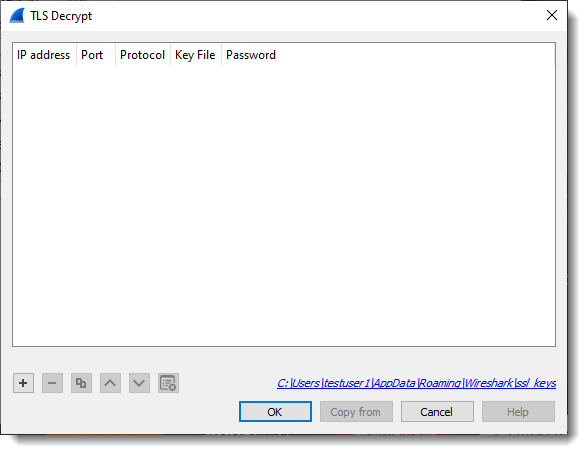
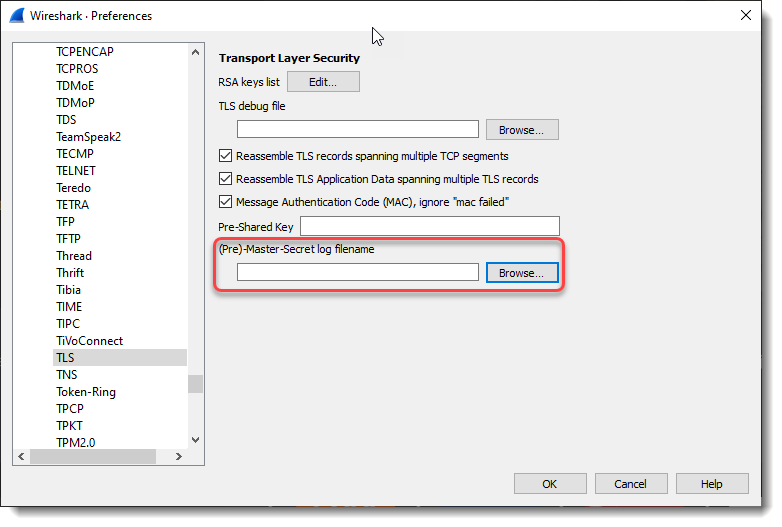
And then I set the “(Pre)-Master-Secret log filename” to secrets-1.txt, the file that was written by curl because environment variable SSLKEYLOGFILE is set to secrets-1.txt.
When this is done, the TLS data is decrypted, as can be witnessed by the appearance of (green) HTTP protocol packets:

Wireshark is able to decrypt this TLS stream because of the secrets in file secrets-1.txt. There are 2 secrets in file secrets-1.txt, and each one, by itself, contains enough information for Wireshark to do the decryption.


The first secret in secrets-1.txt is: RSA b73e7985e324abc0 030330f29c3ac42f28d91c967ad9c4b484f625ac95f6ad1dfe4474eecb6395f8a6b607f80594ebe97b45f24cae774800
This is the pre-master secret.

b73e7985e324abc0 is the start (first 8 bytes) of the encrypted pre-master secret:

And 030330f29c3ac42f28d91c967ad9c4b484f625ac95f6ad1dfe4474eecb6395f8a6b607f80594ebe97b45f24cae774800 is the unencrypted pre-master secret.

Wireshark can use this pre-master secret, together with cleartext data found inside the TLS stream (client and server random), to calculate the master secret and session keys.

This RSA entry in itself is enough for Wireshark to decrypt this TLS stream (if we only keep the RSA entry in secrets-1.txt, Wireshark can still decrypt).


The second secret in secrets-1.txt is: CLIENT_RANDOM 53a7bcdb320d3cc85dbb21956403da8801617a2980fb79f7b50fd6d1189d0472 cce8feba2219194646201279f1bbc551035ce3d1f8a34d3514df8297078fa80f0e5b19e5aa965adf285e93e41c93c210

This is the master secret.

53a7bcdb320d3cc85dbb21956403da8801617a2980fb79f7b50fd6d1189d0472 is the client random:

And cce8feba2219194646201279f1bbc551035ce3d1f8a34d3514df8297078fa80f0e5b19e5aa965adf285e93e41c93c210 is the unencrypted master secret.

Wireshark can use this master secret to calculate the session keys.

This CLIENT_RANDOM entry in itself is enough for Wireshark to decrypt this TLS stream (if we only keep the CLIENT_RANDOM entry in secrets-1.txt, Wireshark can still decrypt).


SSLKEYLOGFILE can also be used to capture the secrets necessary to decrypt TLS streams encrypted with perfect forward secrecy (e.g. not relying on the server’s private key).

In a second test, I set SSLKEYLOGFILE=secrets-2.txt and issue this curl command:

curl.exe –verbose –insecure –dump-header 01.headers –output 01.data –trace 01.trace –trace-time https://192.168.190.130

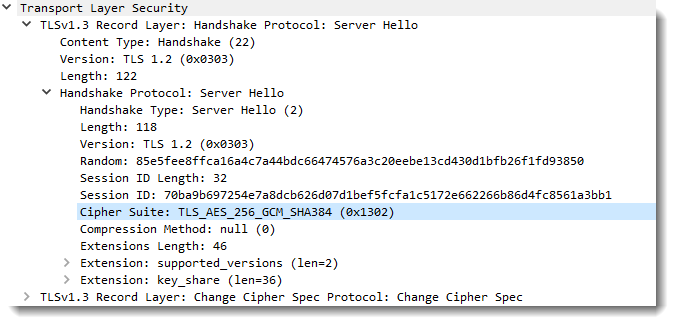
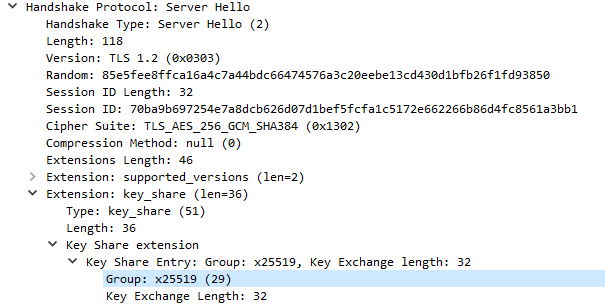
In this test, curl uses TLS 1.3 with perfect forward secrecy:

x25519 is Diffie-Helman based on elliptic curve Curve25519: we have perfect forward secrecy here that uses ephemeral Diffie-Hellman key exchange. Hence the private key of the server can not help us decrypt this TLS stream. We need the secrets saved in SSLKEYLOGFILE secrets-2.txt:

SERVER_HANDSHAKE_TRAFFIC_SECRET 3928c6ded8c2e9c251dc4c57f2a81935a3f0e5a61f3d40b25fd87d5f05db3e47 b8c81cee570a35f077664f16780017d7037adb1efacc448d05de9c806868290c32f587a1c29e577abcc7e5d1609f070b
EXPORTER_SECRET 3928c6ded8c2e9c251dc4c57f2a81935a3f0e5a61f3d40b25fd87d5f05db3e47 bc8a82770f43dc9b326cd8565b93ebfd3c6f9d9be53693510685b265980d98be7f8a7de613895b76454ec19d06e12825
SERVER_TRAFFIC_SECRET_0 3928c6ded8c2e9c251dc4c57f2a81935a3f0e5a61f3d40b25fd87d5f05db3e47 7e40bb08f33bfc281878450c08e21e1d2e92ca1214436aa8353925fee2fe39d69175710e90bd6c76940af5596862525e
CLIENT_HANDSHAKE_TRAFFIC_SECRET 3928c6ded8c2e9c251dc4c57f2a81935a3f0e5a61f3d40b25fd87d5f05db3e47 7aec5af0565c8fa05431534daf6a98da645ccf9eb791626008ebe5d9053e2e5046986e577e09b5a9f3355d4aff685111
CLIENT_TRAFFIC_SECRET_0 3928c6ded8c2e9c251dc4c57f2a81935a3f0e5a61f3d40b25fd87d5f05db3e47 7a31364a743eee1ba3ed10fc082099c1fb09ad9175fd5ec81101521a3f34e3f3ab6e83f0bd77529ce9ff3eb9f4beedad

And when I use this secrets-2.txt file with Wireshark, the TLS stream is decrypted:

If I comment-out all SSLKEYLOGFILE secrets-2.txt entries except the client secret entries, Wireshark can only decrypt data coming from the client (# is a line-comment):

And vice versa when I comment-out everything except the server secret entries:

Value 3928c6ded8c2e9c251dc4c57f2a81935a3f0e5a61f3d40b25fd87d5f05db3e47 found in each secrets-2.txt entry is the client random:
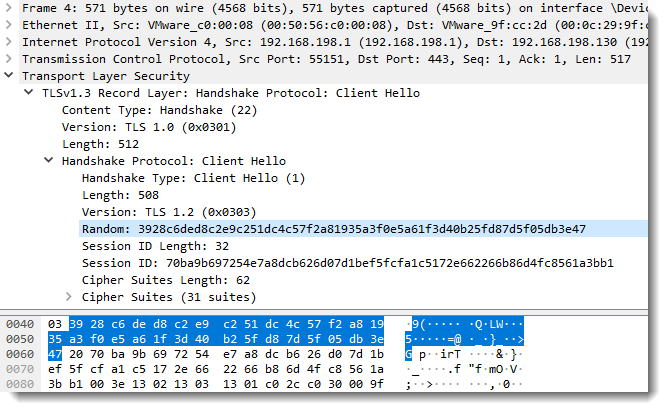
Remark that in these 2 tests, I set SSLKEYLOGFILE=secrets.txt. This makes that curl will create a file secrets.txt in its working directory. You can also use an absolute path, for example:

set SSLKEYLOGFILE=c:\demo\secrets.txt


In part 3, I’ll give some practical tips.


Previous blog post:

Decrypting TLS Streams With Wireshark: Part 1

Next blog post:

Decrypting TLS Streams With Wireshark: Part 3


The capture file, secrets, and other data used in this blog post can be downloaded here:

tls-decryption-part-2.zip (https)
MD5: 562F169A57557737D3E4B1F9CDF3B252
SHA256: 8DD27510B2F6CD58A55F42515EF756572658D2ADFE7CEA6151DD45EE5F7DB171
Monday 14 December 2020

Decrypting TLS Streams With Wireshark: Part 1

Filed under: Encryption,Networking — Didier Stevens @ 0:00

In this first example, I show how to decrypt a TLS stream with Wireshark.

I made my example as such, that the encryption in this example is done with keys derived from a master secret. This master secret is derived from a pre-master secret, which is securely exchanged between the client and server using RSA crypto.

Remark that this method will not work with modern browsers and web servers, as they use perfect forward secrecy. This will be explained in part 2.

I use my TCP honeypot to set up a web server, and curl to request a page over TLS. I use curl for Windows build with OpenSSL, and not the curl version distributed with Windows 10, that relies on schannel.

I use the following curl command with options to force a TLS encryption method that is based on a pre-master secret that is encrypted with the public RSA key of the server:

curl.exe –verbose –insecure –tls-max 1.2 –ciphers AES256-SHA –dump-header 01.headers –output 01.data –trace 01.trace –trace-time https://192.168.190.130

To force a cipher suite that is based on RSA for the exchange of the pre-master secret, I use options –tls-max 1.2 and –ciphers AES256-SHA.

Option –insecure is necessary because I’m using a self-signed certificate.

I choose the other options to produce as much information as possible: downloaded content (01.data), headers (01.headers) and a trace file (01.trace).

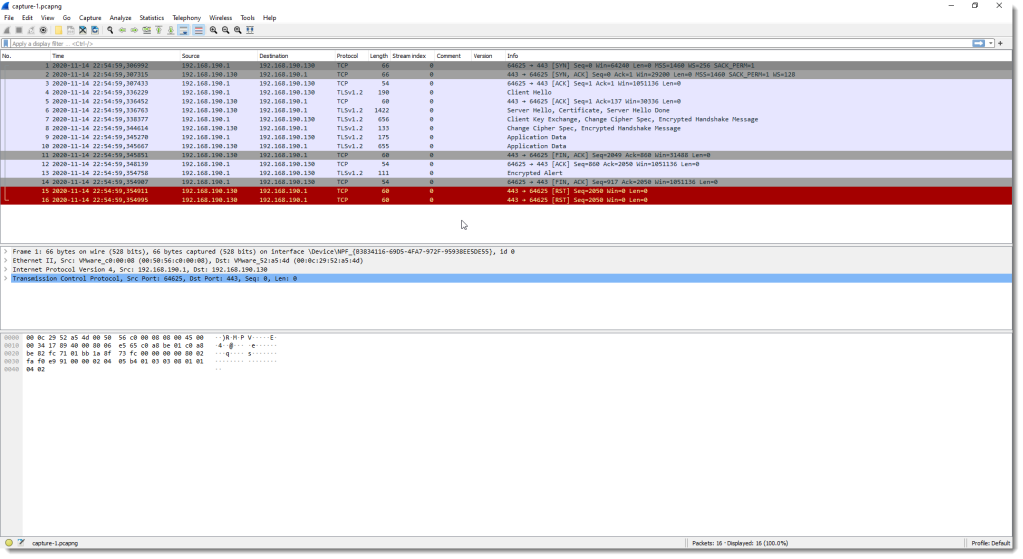
Here is a screenshot of the packet capture for this HTTPS traffic:

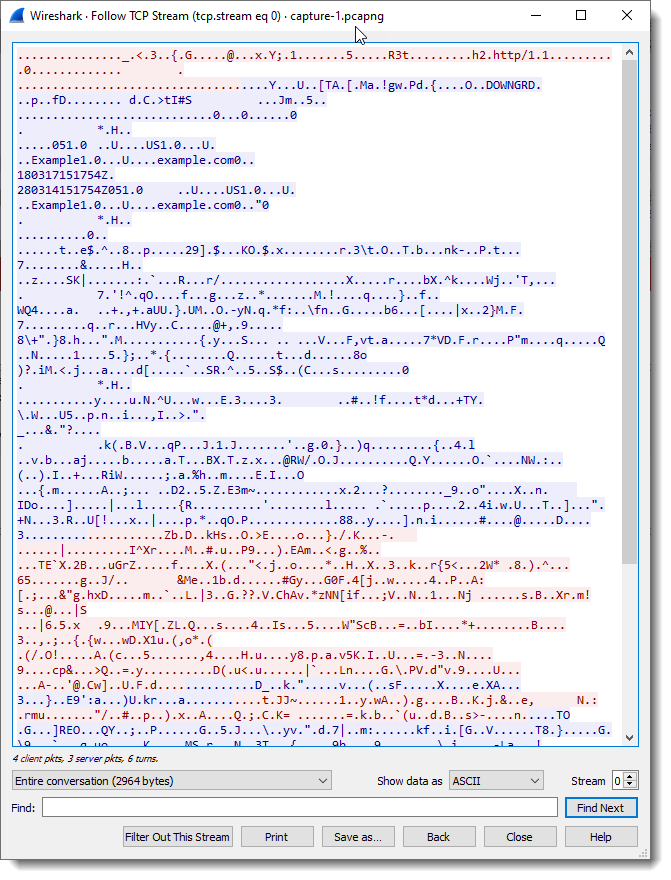
Following the TCP stream shows that the data is encrypted (except for some parts during the handshake, like the certificate):

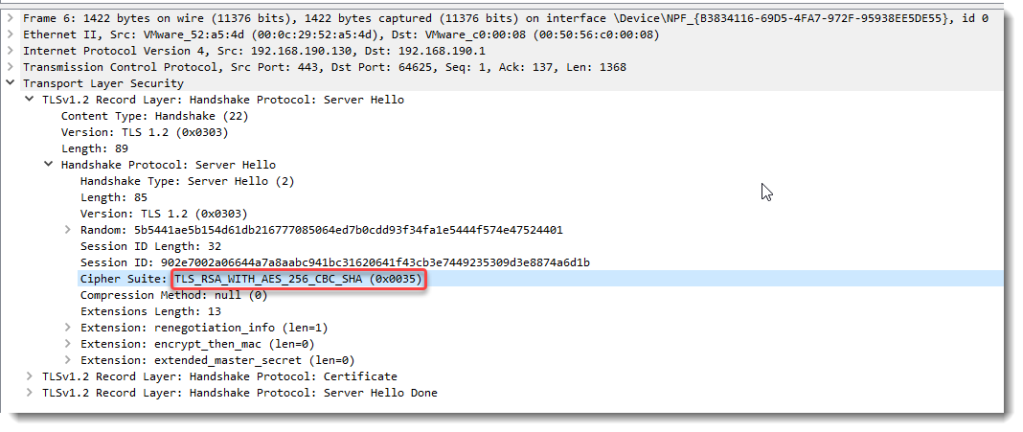
If we inspect that handshake, more precisely, looking at the Server Hello packet, we see that a cipher suite was selected that relies on RSA and AES:

Data encrypted with this cipher suite can be decrypted by Wireshark when we provide the private RSA key of the server. That’s because in this example, Wireshark needs to decrypt the pre-master secret sent by the client to the server. This pre-master secret is encrypted with the public RSA key of the server.

These are the steps to follow:

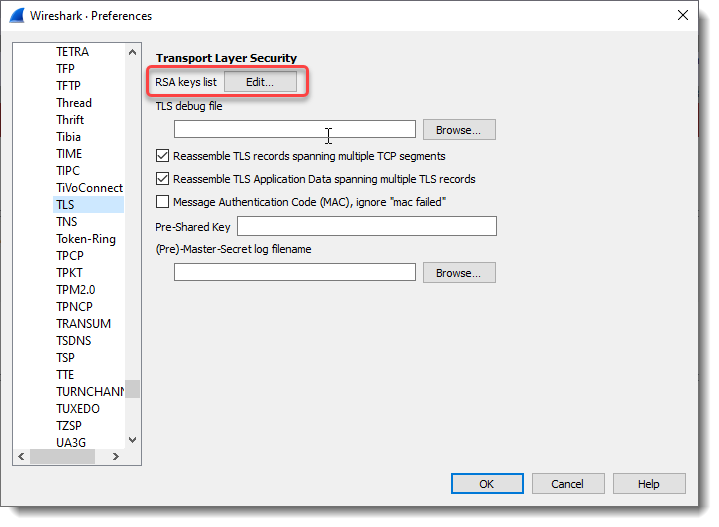
Go to preferences:

Search for the TLS protocol, and edit the RSA Keys list.

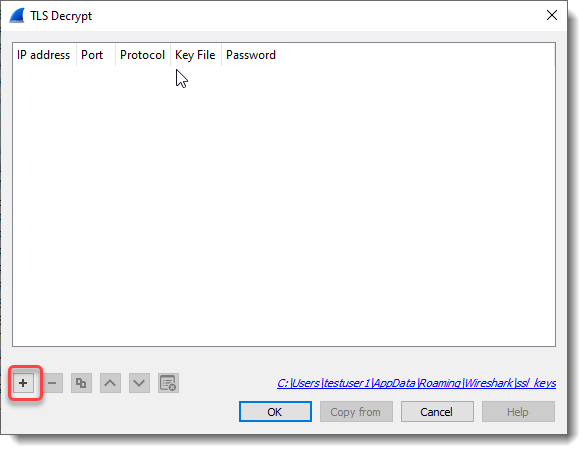
Click the + button to add a key:

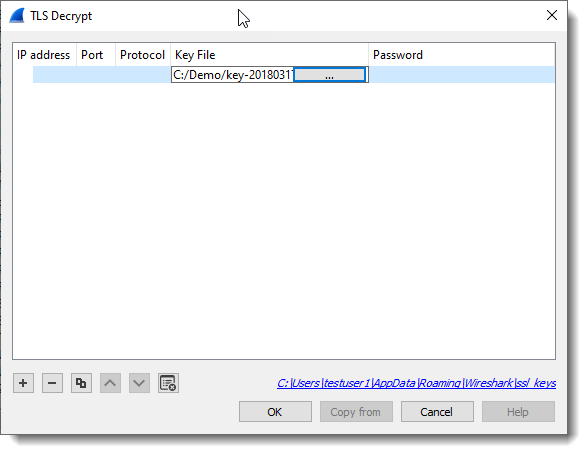
Then add the RSA private key key-20180317-161753.pem.

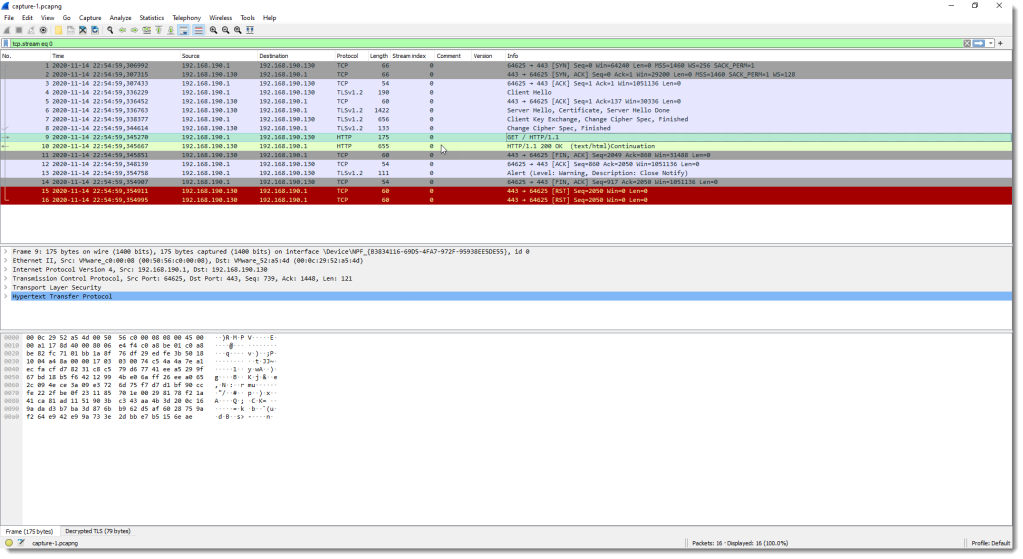
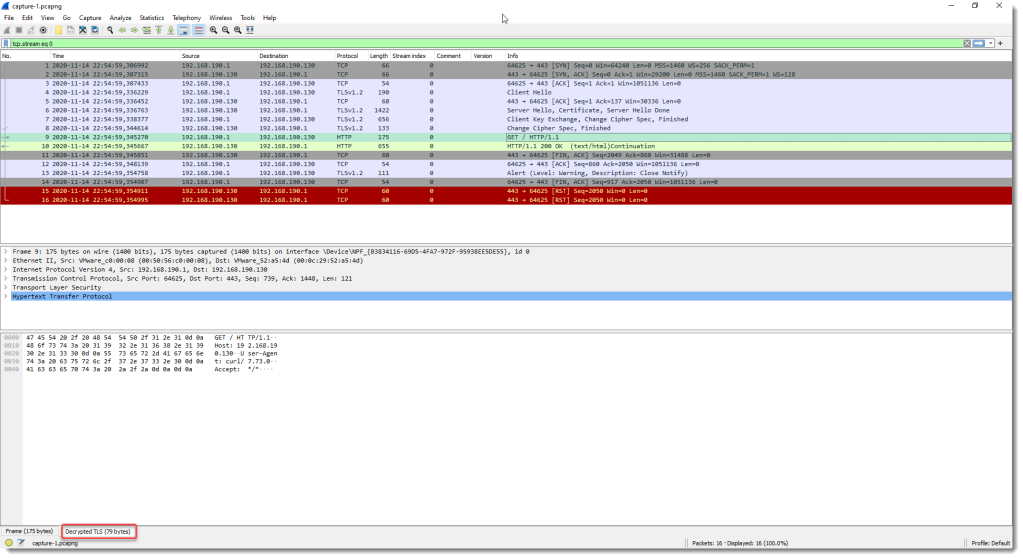
When you then close the dialogs, and the main screen regains focus, the TLS data will be decrypted:

Remark that for packets 9 and 10, the Protocol column value changed from TLSv1.2 to HTTP, and the Info column from Application Data to HTTP methods and replies.

And in the bottom view (hexadecimal & ASCII dump), a “Decrypted TLS” tab was added:

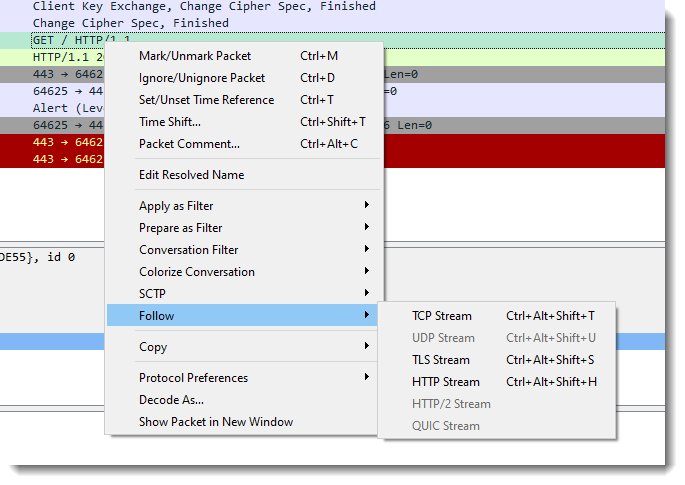
We will now try the 3 available Follow Streams commands:

When we select TCP, we still have encrypted data:

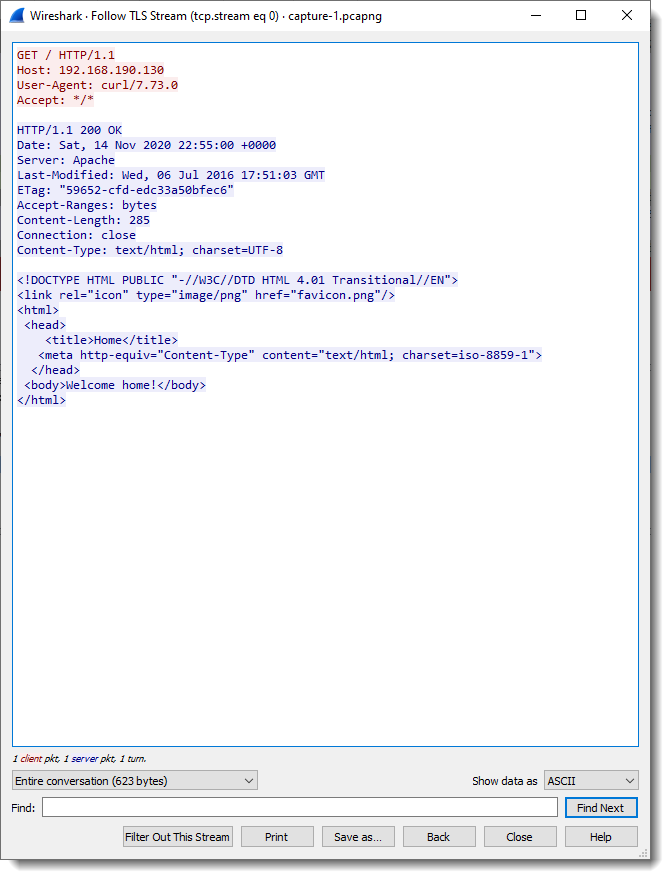
But when we select Follow TLS stream, we can now see the decrypted data:

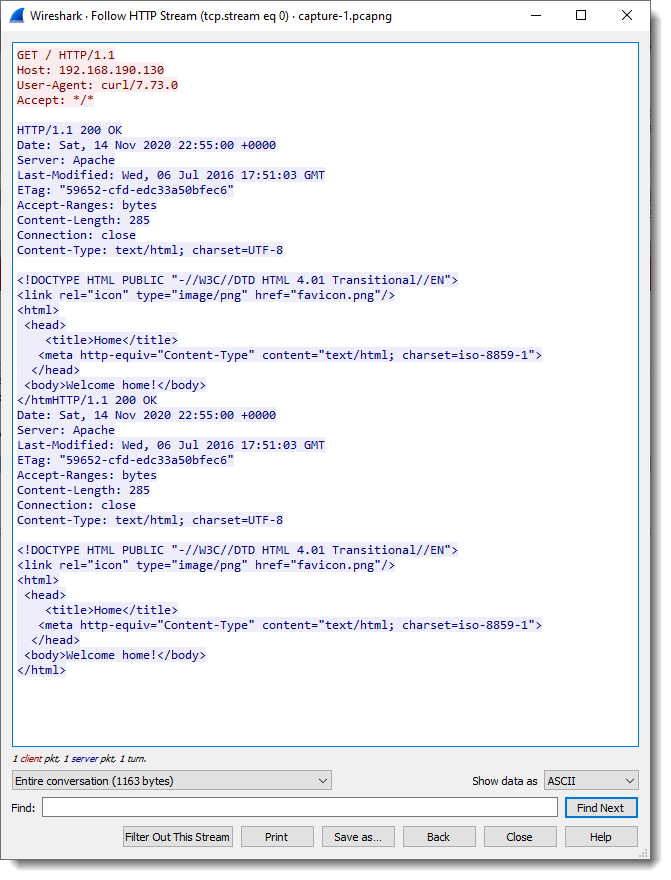
And with Follow HTTP, we also have decrypted data:

But remark that there is some data duplication, this is possibly a bug in Wireshark. To be investigated.

In part 2, we will look at the same request, but without using the server’s RSA private key, and also at an example with perfect forward secrecy.

Next blog posts:

Decrypting TLS Streams With Wireshark: Part 2
Decrypting TLS Streams With Wireshark: Part 3

The capture file, private key, and other data used in this blog post can be downloaded here:

tls-decryption-part-1.zip (https)
MD5: 905A5D3F2D0AEAA98BD3751AD5CAD9E2
SHA256: 03175A0C6EC5B451769AA7627BFA0487FFFB2485D455D467CCCA9CCD1075ACA9

Monday 7 December 2020

Quickpost: finger.exe

Filed under: Hacking,Networking,Quickpost — Didier Stevens @ 0:00

Windows 10 comes with the finger command, an ancient computer network tool.

You can still use it to lookup weather information, for example 🙂

It establishes a TCP connection to the hostname/IP address after the @ character, using destination port 79. And then it sends the text before the @ characters in ASCII, terminated with carriage return & line feed.

After that, it reads the reply, displays it, and closes the TCP connection.

finger.exe is not proxy-aware.

Port 79 is not hardcoded as an integer in finger.exe: the port is identified by service name “finger” (UNICODE), which is defined in the services list (%SystemRoot%\system32\drivers\etc\services). GetAddrInfo uses this list.

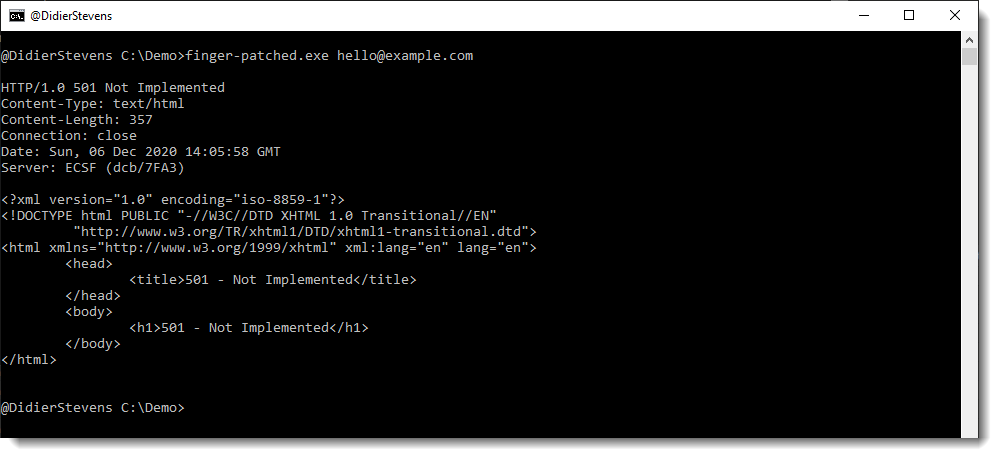
If you replace “finger” with “http\x00\x00” (UNICODE) in finger.exe (via binary patching, a shim, …), the finger command will connect to port 80:

As noted by many, finger.exe can be (ab)used to exchange information and files. Here I had my own go at it with finger.exe & Excel:


Quickpost info


Sunday 12 July 2020

Quickpost: curl

Filed under: Networking,Quickpost — Didier Stevens @ 0:00

Since I learned that Windows 10 has curl pre-installed now, I notice I use it more often.

Here are some quick notes, mainly for myself:


Using Tor:

curl --socks5-hostname 127.0.0.1:9050 http://didierstevens.com

Option socks5-hostname uses SOCKS5 protocol and does name resolution of the hostname via the SOCKS5 protocol (and not local DNS)


Removing the User-Agent header:

curl --header "User-Agent:" http://didierstevens.com

Option –header (-H) can also be used to remove a header: provide the header name with colon, provide no header value.


Using a custom User-Agent header (-A –user-agent):

curl --user-agent "Mozilla/5.0 DidierStevens" http://didierstevens.com


Saving received data:

curl --dump-header 01.headers --output 01.bin.vir --trace 01.trace --trace-time http://didierstevens.com

Option —dump-header (-D) saves the headers, option –output (-o) saves the body, –trace creates a trace file and –trace-time adds timestamps to the trace file.


Option to ignore certificate errors: -k –insecure


Putting it all together:

curl --socks5-hostname 127.0.0.1:9050 --user-agent "Mozilla/5.0 (Windows NT 10.0; Win64; x64) AppleWebKit/537.36 (KHTML, like Gecko) Chrome/83.0.4103.116 Safari/537.36" --insecure --dump-header 01.headers --output 01.data --trace 01.trace --trace-time https://didierstevens.com


Quickpost info


Saturday 30 May 2020

New Tool: simple_ip_stats.py

Filed under: My Software,Networking — Didier Stevens @ 9:50

Some time ago, I created a tool to calculate the entropy of TCP data for a colleague. And a bit later, he asked me for a tool for UDP.

I have now merged these 2 tools, and added support for other protocols transported by IPv4 and IPv6. And I will no longer maintain simple_tcp_stats.py and simple_udp_stats.py.

This new tool simple_ip_stats.py is a Python program that reads pcap files and produces simple statistics for each IP connection per protocol.

For the moment, it calculates the entropy of the data (without packet reassembling) of each connection (both directions) and reports this in a CSV file:

Protocol;ConnectionID;head;Size;Entropy
TCP;96.126.103.196:80-192.168.10.10:50236;’HTTP’;493;6.73520107812
TCP;192.168.10.10:50236-96.126.103.196:80;’GET ‘;364;5.42858024035
TCP;192.168.10.10:50235-96.126.103.196:80;’GET ‘;426;5.46464090792
UDP;192.168.10.10:56372-239.255.255.250:1900;’M-SE’;173;5.35104059717
TCP;96.126.103.196:80-192.168.10.10:50235;’HTTP’;3308;6.06151478505

simple_ip_stats_V0_0_1.zip (https)
MD5: 0482F3667E4EE6444350D9B0A146F764
SHA256: 480DCF2C82030EF996A6C1C3FEFCAAB77C000EC72DECA91329298C9BCC578BAD

Monday 18 May 2020

Quickpost: curl And SSPI Proxy Authentication

Filed under: Networking,Quickpost — Didier Stevens @ 0:00

curl with SSPI feature supports integrated authentication to a proxy: you don’t need to provide credentials.

The command is the following:

curl –proxy proxyname:8080 –proxy-ntlm -U : https://www.didierstevens.com/index.html

This curl command uses a proxy (–proxy) and authenticates to the proxy (–proxy-ntlm) without providing explicit credentials (-U :).

curl will use an SSPI to perform integrated authentication to the proxy. This is explained on curl’s man page:

If you use a Windows SSPI-enabled curl binary and do either Negotiate or NTLM authentication then you can tell curl to select the user name and password from your environment by specifying a single colon with this option: “-U :”.

curl’s SSPI feature can also be used to authenticate to an internal IIS server.

Windows’ built-in curl version supports SSPI. You can use the version option to check if your version of curl supports SSPI:


Quickpost info


Monday 23 March 2020

Quickpost: User-Agent: Microsoft Office Excel 2014

Filed under: Networking,Quickpost — Didier Stevens @ 14:25

To start: there is no version 2014 of Microsoft Office.

That’s why I was intrigued when I saw User Agent String “Microsoft Office Excel 2014” appearing in Wireshark when I did some tests with Excel’s data importing features.

With Excel 2019, when I get data from a CSV file and provide an URL (in stead of a local filename) like this:

Excel will issue several OPTIONS and HEAD requests, with different User Agent Strings:

And finally, a GET request to download the file:

Xavier Mertens has mentioned User Agent String “Microsoft Office Excel 2014” in another context: “Microsoft Apps Diverted from Their Main Use“.


Quickpost info


Tuesday 28 January 2020

etl2pcapng: Support For Process IDs

Filed under: Forensics,Networking — Didier Stevens @ 0:00

You can start a packet capture on a vanilla Windows machine with command “netsh trace start capture=yes” (and end it with “netsh trace stop”).

This packet capture file, with extension .etl, can not be opened with Wireshark. Until recently, I used Microsoft’s Message Analyzer, but this tool is no longer supported and installation files have been removed from Microsoft’s site.

In comes etl2pcapng, a new open-source utility from Microsoft that converts an .etl file to .pcapng format:

Utility that converts an .etl file containing a Windows network packet capture into .pcapng format“.

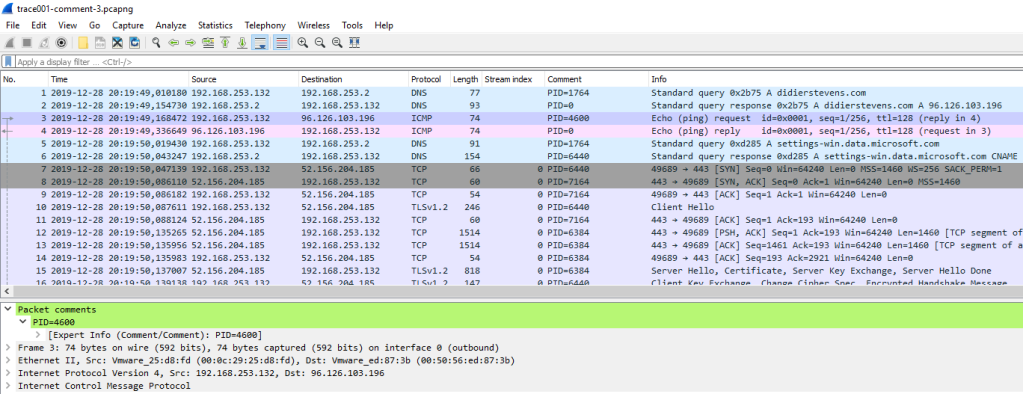
I contributed to version 1.3.0 of etl2pcapng, by adding a comment containing the Process ID to each packet. etl files contain metadata (like the PID of the process associated with the network traffic) that got lost when translating to pcapng format. As the pcapng format has no option to store the PID for each packet, but it supports packet comments, I stored the PID inside packet comments:

Notice this warning by Microsoft:

The output pcapng file will have a comment on each packet indicating the PID of the current process when the packet was logged. WARNING: this is frequently not the same as the actual PID of the process which caused the packet to be sent or to which the packet was delivered, since the packet capture provider often runs in a DPC (which runs in an arbitrary process). The user should keep this in mind when using the PID information.

Monday 18 November 2019

Update: tcp-honeypot.py Version 0.0.7

Filed under: My Software,Networking,Update — Didier Stevens @ 0:00

This new version of tcp-honeypot.py, a simple TCP honeypot and listener, brings TCP_ECHO and option -f as new features.

TCP_ECHO can be used to send back any incoming data (echo). Like this:

dListeners = {4444: {THP_LOOP: 10,THP_ECHO: None,},}

TCP_ECHO also takes a function, which’s goal is to transform the incoming data and return it. Here is an example with a lambda function that converts all lowercase letters to uppercase:

dListeners = {4444: {THP_LOOP: 10,THP_ECHO: lambda x: x.upper(),},}

If persistence is required across function calls, a custom class can also be provide. This class has to implement a method with name Process (input: incoming data, output: transformed data). Consult the man page (option -m) for more details.

And option -f (format) can be used to change the output format of data.
Possible values are: repr, x, X, a, A, b, B
The default value (repr) output’s data on a single line using Python’s repr function.
a is an ASCII/HEX dump over several lines, A is an ASCII/HEX dump too, but with duplicate lines removed.
x is an HEX dump over several lines, X is an HEX dump without whitespace.
b is a BASE64 dump over several lines, B is a BASE64 without whitespace.


Sunday 20 October 2019

New Tool: simple_tcp_stats.py

Filed under: My Software,Networking — Didier Stevens @ 10:25

My new tool simple_tcp_stats.py is a Python program that reads pcap files and produces simple statistics for each TCP connection.

For the moment, it calculates the entropy of the data (without packet reassembling) of each TCP connection (both directions) and reports this with a CSV file:

ConnectionID;head;Size;Entropy
192.168.10.10:50236-96.126.103.196:80;’GET ‘;364;5.42858024035
192.168.10.10:50235-96.126.103.196:80;’GET ‘;426;5.46464090792
96.126.103.196:80-192.168.10.10:50235;’HTTP’;3308;6.06151478505
96.126.103.196:80-192.168.10.10:50236;’HTTP’;493;6.73520107812


simple_tcp_stats_V0_0_1.zip (https)
MD5: 606DB4208BBC5908D9F32A68DDF90AC6
SHA256: 68B275C58736AE450D23BEA82CC1592936E541E00726D8ED95F5CA8ACB02B7CE

« Previous PageNext Page »

Blog at WordPress.com.