AWS Compute Blog
Running Simcenter STAR-CCM+ on AWS with AWS ParallelCluster, Elastic Fabric Adapter and Amazon FSx for Lustre
Update June 27, 2022: The latest version of the scripts referenced in this blog can be found at https://cfd-on-pcluster.workshop.aws/starccm.html.
This post is contributed by Anh Tran – Sr. HPC Specialized Solutions Architect
Introduction
AWS recently introduced many HPC services that boost the performance and scalability of Computational Fluid Dynamics (CFD) workloads on AWS. These services include: Amazon FSx for Lustre, Elastic Fabric Adapter (EFA), and AWS ParallelCluster 2.5.1. In this technical post, I walk through these three services. Additionally, I outline an example of using AWS ParallelCluster to set up an HPC system with EFA and Amazon FSx Lustre to run a CFD workload. The CFD application that you will set up during this blog post is Simcenter STAR-CCM+ – the predominant CFD application from Siemens.
Service and solution overview
Services
This blog primarily uses three services – Amazon FSx for Lustre, EFA, and AWS ParallelCluster. Let’s dig into each of these services before reviewing the solution.
Amazon FSx for Lustre
In December 2018, AWS released Amazon FSx for Lustre. This is a fully managed, high-performance file system, optimized for fast processing workloads, like HPC. Amazon FSx for Lustre allows users to access and alter data from either Amazon S3 or on-premises seamlessly and exceptionally fast. For example, you can launch and run a file system that provides low latency access to your data. Additionally, you can read and write data at speeds of up to hundreds of gigabytes per second of throughput, and millions of IOPS. This speed and low-latency unleashes innovation at an unparalleled pace. This blog post uses the latest version of Amazon FSx for Lustre which recently added a new API for moving data in and out of Amazon S3. This API also includes POSIX support, which allows files to mount with the same user id. Additionally, the latest version also includes a new backup feature that allows you to back up your files to an S3 bucket. I go into more detail of how to take advantage of this at the end of the blog.
Elastic Fabric Adapter
In April of 2019, AWS released EFA. This enables you to run applications requiring high levels of inter-node communications at scale on AWS.
AWS ParallelCluster 2.5.1.
AWS ParallelCluster is an open source cluster management tool that simplifies deploying and managing HPC clusters with Amazon FSx for Lustre, EFA, a variety of job schedulers, and the MPI library of your choice. AWS ParallelCluster simplifies cluster orchestration on AWS so that HPC environments become easy-to-use even for if you’re new to the cloud. AWS recently released AWS ParallelCluster 2.5.1 – which is the version we will use for this blog.
These three AWS HPC components are optimal for CFD applications. Together, they provide simple deployment of HPC systems on AWS, low latency network communication for MPI workloads, and a fast, parallel filesystem. Now, let’s take a look at how these services come together and seamlessly run a real CFD application: Simcenter STAR-CCM+.
Solution
AWS has a long-standing collaboration with Siemens. AWS and Siemens are dedicated to enhancing Siemens’ customer experiences when they run Simcenter STAR-CCM+ apps on AWS. I am excited to walk you through the steps and the best practices for running Simcenter STAR-CCM+, the predominant CFD application from Siemens.
The Simcenter STAR-CCM+ application runs on an HPC system. This system is optimized with EFA and Amazon FSx for Lustre — all of which is managed by AWS ParallelCluster. AWS ParallelCluster simplifies the deployment process to such an extent that you can set up your HPC cluster with a high throughput parallel file system (Amazon FSx for Lustre), a high-throughput and low-latency network interface (EFA), and high-bandwidth network interconnects (100 Gbps using C5n instances) in less than 15 minutes.
Now that you have the services and solution overviews, we can get started. This blog post includes the following steps:
- Creating an HPC infrastructure stack on AWS, which will include:
- How to set up AWS ParallelCluster for best performance
- How to enable EFA
- How to enable the Amazon FSx Lustre file system and how to use some basic Amazon FSx for Lustre for STAR-CCM+
- How to connect to a remote desktop session using NICE DCV
- Installing the Simcenter STAR-CCM+ application and how to submit a Simcenter STAR-CCM+ job to HPC cluster.
The following diagram outlines the steps
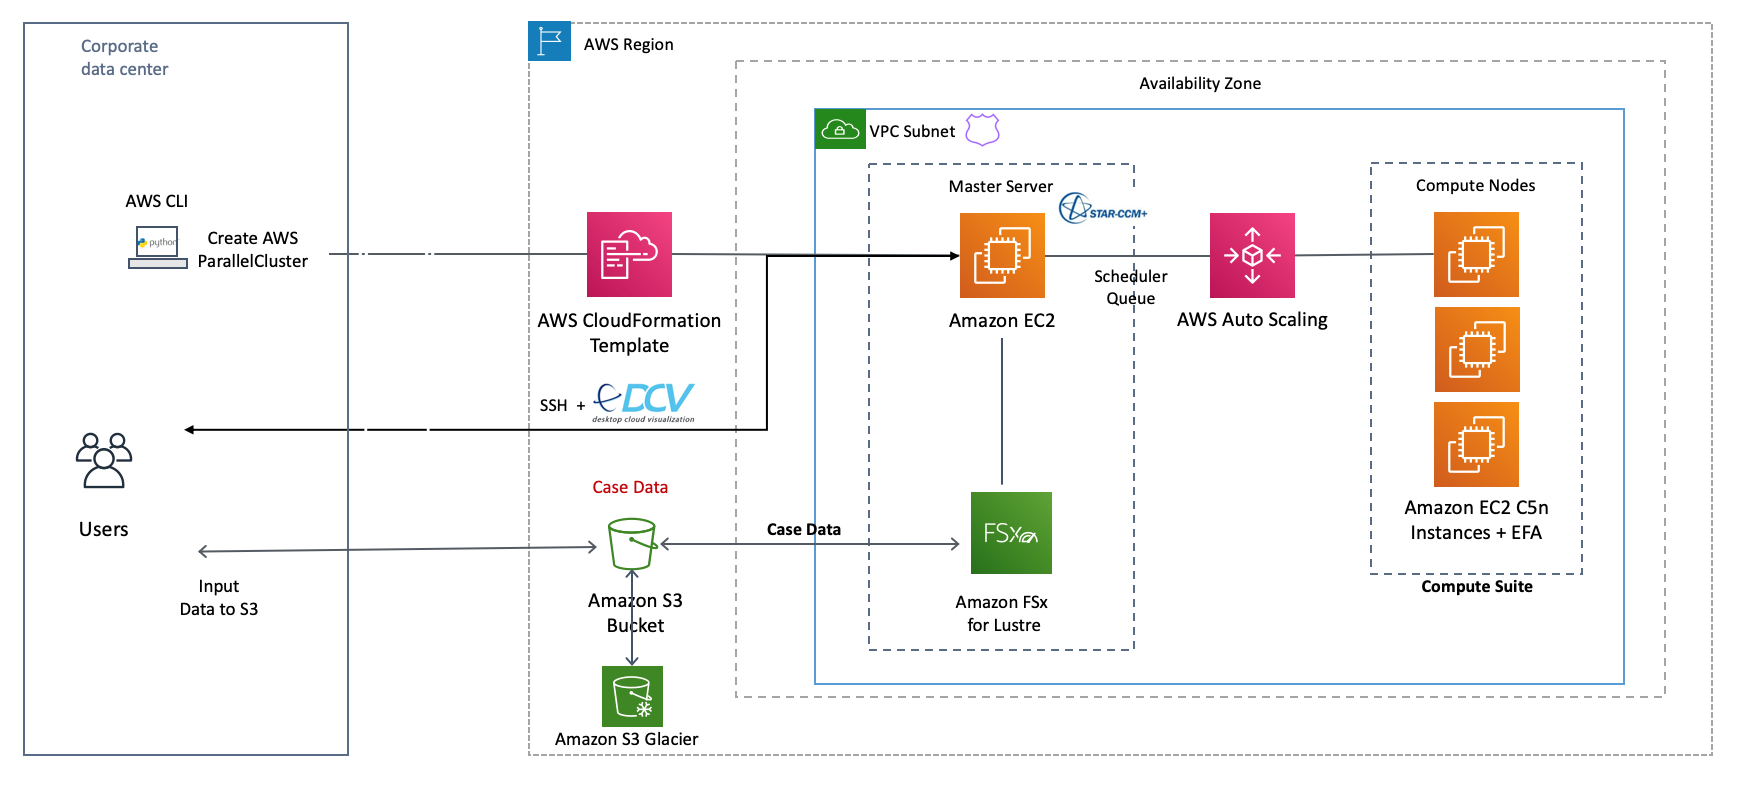
Steps
Setting up the HPC infrastructure stack
Before you can run Simcenter STAR-CCM+, you need to build an HPC cluster first. Some best practices that you should consider when setting up a cluster on AWS include:
- Turn off Hyper-Threading (HT): AWS instances have HT turned on by default.
- Use EFA and a cluster placement group for your compute fleet to minimize the latency between nodes.
- Select the right instance type for your compute fleet. Here, I use C5n.18xlarge because of its high-performance CPU, high-bandwidth bandwidth networking, and the EFA network interface capabilities.
With HPC best practices in mind, you can set up your AWS ParallelCluster
Set up AWS ParallelCluster:
- Install AWS CLI or turn on AWS Cloud9 before installing AWS Parallel Cluster. I recommend using AWS Cloud9 because of its simplicity. Follow this tutorial to set up Cloud9. To install the AWS CLI, follow the steps shown here.
- Verify that AWS Cloud9 or AWS CLI is working:
- Create an S3 bucket
*Note: As an example, I create an S3 bucket benchmark-starccm, however you should create an S3 bucket with a different name of your choice because the S3 bucket name must be globally unique.
Let’s download the STAR-CCM+ installation file and a case file, then upload them to the S3 bucket that we just created.
- Download latest Simcenter STAR-CCM+ package from the Siemens portal. It will look something like this: STAR-CCM+15.02.003_01_linux-x86_64-2.12_gnu7.1.zip
- Download the Le Mans case file. The Le Mans case is 104 Million cells, which even today is considered large for a CFD case. The file will look something like this: LeMans_104M.sim
After downloading the STAR-CCM+ software and LeMans case file, upload them to the S3 bucket created above
We will use this same S3 bucket to install the Simcenter STAR-CCM+ application later in this tutorial
With all the ground work done, we can now build our HPC cluster. For more detailed instructions, you can consult Getting Started with AWS ParallelCluster.
- Install AWS ParallelCluster
- Configure AWS ParallelCluster with some basic network information such as AWS Region ID, VPC ID, Subnet ID
pcluster configure
Modify your ~/.parallelcluster/config file to include a cluster section that minimally includes the following:
- Now, create your first HPC cluster with the name starccmby running
pcluster create starccm
Your HPC cluster should be ready in about 15 minutes.
While you’re waiting for your cluster to be ready, let’s take a deeper look at what some of the different parameters we used mean for our HPC cluster:
initial_queue_size: We will start with two compute instances after the HPC cluster is up.
max_queue_size: We will limit the maximum compute fleet to 100 instances. This allows us room to scale our jobs up to a large number of cores while putting a limit on the number of compute nodes to help control costs.
base_os: For this blog, we will select centos 7 as a base os. Currently we support Amazon Linux (alinux), Centos 7 (centos7), Ubuntu 16.04 (ubuntu1604), and Ubuntu 18.04 (ubuntu1804) with EFA.
master_instance_type: This can be any instance type. Here we choose c5.xlarge because it is inexpensive and relatively fast for the head node.
compute_instance_type: We select C5n.18xlarge because it is optimized for compute-intensive workloads and supports EFA for better scaling of HPC. Note that EFA is currently only available on c5n.18xlarge, c5n.metal, i3en.24xlarge, p3dn.24xlarge, inf1.24xlarge, m5dn.24xlarge, m5n.24xlarge, r5dn.24xlarge, r5n.24xlarge, and p3dn.24xlarge. See the docs for Currently supported instances.
placement_group: We use placement_group to ensure our instances are located as physically close to one another as possible to minimize the latency between compute nodes and take advantage of EFA’s low latency networking.
enable_efa: with just one configuration line, we can easily turn on EFA support for our HPC cluster.
dcv_settings = hpc-dcv: With AWS ParallelCluster 2.5.1 you can use NICE DCV to support your remote visualization needs.
disable_hyperthreading: This setting turns off hyper-threading on the cluster
[fsx fsxshared]: This section contains the settings to define your FSx for Lustre parallel file system, including the location where the shared directory will be mounted, the storage capacity for the filesystem, the chunk size for files to be imported, and the location from which the data will be imported. You can read more about FSx for Lustre here.
[dcv hpc-dcv]: This section contains the settings to define your remote visualization setup. You can read more about DCV with AWS ParallelCluster here.
- After you set up your config file for AWS ParallelCluster, log in and verify that you can access the cluster’s head node
- Verify the compute nodes are up. We should see two c5n.18xlarge nodes.
- Verify the EFA driver has been loaded successfully.
In order to verify if EFA is installed correctly you will need to ssh into one of compute nodes and run :
At this point, EFA is verified.
Install Simcenter STAR-CCM+ application
Now that the HPC cluster using AWS ParallelCluster is set up, it’s time to install the Simcenter STAR-CCM+ application. In the prior steps, you uploaded a Simcenter STAR-CCM+ application and a case file to S3 bucket and used that S3 bucket as a source for the Amazon FSx for Lustre /fsx storage. As soon as the cluster created, the installation file and the case file will be available in /fsx
As you can see, Amazon FSx for Lustre has already downloaded the case file from the S3 bucket to the /fsx partition, so now you can start install Simcenter STAR-CCM+ software using the following steps.
- Install Simcenter STAR-CCM+: install Simcenter STAR-CCM+ on /fsx – a 1.2TB Lustre filesystem that you configured in a previous step.
cd /fsx
sudo unzip STAR-CCM+15.02.003_01_linux-x86_64-2.12_gnu7.1.zip
cd STAR-CCM+15.02.003_01_linux-x86_64-2.12_gnu7.1
./STAR-CCM+15.02.003_01_linux-x86_64-2.12_gnu7.1.sh
Select Installation Location : /fsx/Siemens
After following all the standard installation steps from Simcenter STAR-CCM+, the application should be installed at the following location:
/fsx/Siemens/15.02.003/STAR-CCM+15.02.003/
- Test the installation
When the above code shows up, you correctly installed Simcenter STAR-CCM+, so now you can run the application.
Running Simcenter STAR-CCM+ on AWS ParallelCluster
Before I move on, let’s recap what you’ve have done so far.
- You set up an HPC cluster using AWS ParallelCluster with compute-optimized C5n instances, an Amazon FSx for Lustre filesystem, and EFA-enabled networking.
- You installed Simcenter STAR-CCM+ application
Now, let us create an SGE submission script and submit a job to the HPC cluster.
- Create an SGE job submission script :
- Submit your Simcenter STAR-CCM+ job to your HPC cluster
Now you have submitted an HPC job that requests 252 cores of c5n.18xlarge.
- Check the status of your jobs by running
Simcenter STAR-CCM+ result analysis
Here are sample scaling results for the LeMans 104M cell benchmark case. As you can see, the Simcenter STAR-CCM+ result shows exciting performance and scaling results running on AWS. The performance is fast and the simulation scales very well with EFA-based networking and great CPU performance.

Connect to a NICE DCV session
AWS ParallelCluster is now natively integrated with NICE DCV. You can configure a NICE DCV session to visualize your Simcenter STAR-CCM+ result or connect to the application remotely.
As you will recall from when we configured our AWS ParallelCluster in the previous section, I named the DCV server as hpc-dcv. To create and connect to a NICE DCV session, just run:
After you connect to NICE DCV session, you will be able to access to a Linux desktop to work with STAR-CCM+ application.
Backup SIMCENTER STAR-CCM+ result to S3 bucket
After you finish your Simcenter STAR-CCM+ simulation, you can backup data in /fsx to your S3 bucket that you created from running your application. You can now use Data Repository Tasks. Data Repository Tasks represent bulk operations between your Amazon FSx for Lustre file system and your S3 bucket. One of the jobs is to export your changed file system contents back to its linked S3 bucket.
*Note: in order to use new Amazon FSx for Lustre feature, you will need to have AWS CLI version 1.16.309 or above.
In this case, I select to export the STAR-CCM+ application directory Siemens as an example.
- Exit the HPC head node, and go back to your laptop or Cloud9 environment where you have configured your AWS CLI. Find out your Amazon FSx Lustre ID by running:
- After you find the Amazon FSx for Lustre ID, which looks simiar to fs-0d72d520f620d765a, create a backup of the data by running:
Explanation:
–file-system-id: your file system ID
–type EXPORT_TO_REPOSITORY: we will export the data back to the S3 bucket
–paths Siemens,testfsx: the directories you want to export to S3 bucket
Format=REPORT_CSV_20191124: note this is only name the Amazon FSx Lustre supports. Please keep it the same.
- Check the status of the backup by running describe-create-data-repository-task
As you can see, I can now use FSx for Lustre to install the Simcenter STAR-CCM+ application, and seamlessly move case data between on-premise to Amazon S3 and AWS HPC system. I can create a file system linked to a S3 bucket, create a FSx for Lustre filesystem, and export data back to their S3 bucket after running the CFD app.
Conclusion
Give it a try, set up an HPC environment, and let us know how it goes! If you need more information about running CFD and HPC cases on AWS you can find it on our HPC home page. Please feel free to contact us with questions that you might have.