
You also want an ePaper? Increase the reach of your titles
YUMPU automatically turns print PDFs into web optimized ePapers that Google loves.
<strong>Type</strong> B <strong>Vital</strong> <strong>Relays</strong><br />
Copyright © 1995, 1996, 2001, 2003, 2004, 2006, 2007<br />
<strong>Alstom</strong> Signaling Inc.<br />
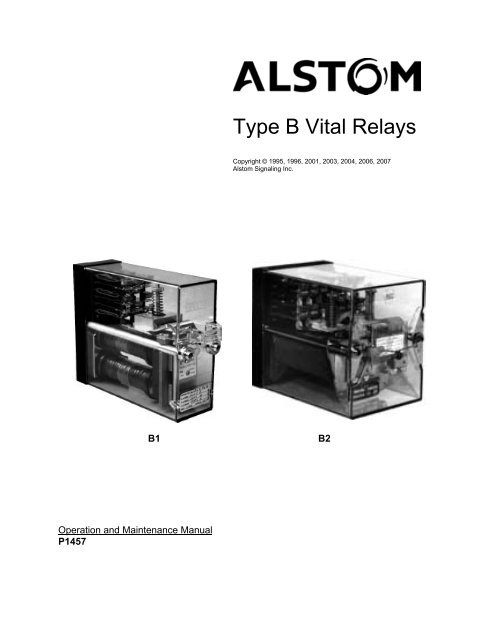
B1<br />
B2<br />
Operation and Maintenance Manual<br />
P1457
<strong>Type</strong> B <strong>Vital</strong> <strong>Relays</strong><br />
Copyright © 1995, 1996, 2001, 2003, 2004, 2006, 2007<br />
<strong>Alstom</strong> Signaling Inc.<br />
B1<br />
B2<br />
Operation and Maintenance Manual<br />
<strong>Alstom</strong> Signaling Inc.<br />
P1457, Rev. November 2007, Printed in U.S.A.
LIST OF EFFECTIVE PAGES<br />
P1457, <strong>Type</strong> B <strong>Vital</strong> <strong>Relays</strong> Operation and Maintenance Manual<br />
ORIGINAL ISSUE DATE: May 1995<br />
CURRENT REVISION AND DATE: November 2007<br />
CURRENT CHANGE AND DATE: November 2007<br />
− Update Biased-Neutral Relay Test Procedure<br />
PAGE<br />
Cover<br />
Title page<br />
Preface<br />
i thru viii<br />
CHANGE OR REVISION LEVEL<br />
Nov/07<br />
Nov/07<br />
Nov/07<br />
Nov/07<br />
1–1 thru 1–16 Nov/07<br />
2–1 thru 2–50 Nov/07<br />
3–1 thru 3–16 Nov/07<br />
4–1 thru 4–22 Nov/07<br />
5–1 thru 5–10 Nov/07<br />
6–1 thru 6–28 Nov/07<br />
7–1 thru 7–68 Nov/07<br />
A–1 thru A–16 Nov/07<br />
B–1 thru B–4 Nov/07<br />
C–1 thru C–8 Nov/07<br />
P1457, Rev. Nov/07 <strong>Alstom</strong> Signaling Inc.
THIS PAGE INTENTIONALLY LEFT BLANK.<br />
P1457, Rev. Nov/07 <strong>Alstom</strong> Signaling Inc.
PREFACE<br />
NOTICE OF CONFIDENTIAL INFORMATION<br />
Information contained herein is confidential and is the property of <strong>Alstom</strong><br />
Signaling Incorporated. Where furnished with a proposal, the recipient<br />
shall use it solely to evaluate the proposal. Where furnished to customer, it<br />
shall be used solely for the purposes of inspection, installation or<br />
maintenance. Where furnished to a supplier, it shall be used solely in the<br />
performance of the contract. The information shall not be used or<br />
disclosed by the recipient for any other purposes whatsoever.<br />
FOR QUESTIONS AND INQUIRIES, CONTACT CUSTOMER SERVICE AT<br />
1–800–717–4477<br />
OR<br />
WWW.ALSTOMSIGNALINGSOLUTIONS.COM<br />
ALSTOM SIGNALING INC.<br />
1025 JOHN STREET<br />
WEST HENRIETTA, NY 14586<br />
REVISION LOG<br />
Revision Date Description By Checked Approved<br />
0 May 1995 Original Issue<br />
1 March 1996 Update illustrations JF RD NI<br />
2 October 2001 Update illustrations JF RD NI<br />
3 September 2003 Update parts TS RD NI<br />
4 April 2004 Update style MAS RD NI<br />
5 September 2006 Update Installation<br />
Procedure, Appendix<br />
A, Parts Catalog and<br />
style; add AC<br />
Microchron II Timer<br />
Relay and Appendix C<br />
MAS RD<br />
JP<br />
NI<br />
6 November 2007 Update Biased-Neutral<br />
Relay Test Procedure<br />
MAS MR NI<br />
P1457, Rev. Nov/07 <strong>Alstom</strong> Signaling Inc.
THIS PAGE INTENTIONALLY LEFT BLANK.<br />
P1457, Rev. Nov/07 <strong>Alstom</strong> Signaling Inc.
ABOUT THE MANUAL<br />
This manual is intended to provide the necessary information to maintain and ensure<br />
proper operation of <strong>Alstom</strong> <strong>Type</strong> B <strong>Vital</strong> <strong>Relays</strong>.<br />
The information in this manual is arranged into sections. The title and a brief description<br />
of each section follow:<br />
Section 1 – GENERAL DESCRIPTION: This section gives general information on the<br />
components of <strong>Alstom</strong> <strong>Type</strong> B <strong>Vital</strong> <strong>Relays</strong>.<br />
Section 2 – THEORY OF OPERATION: This section gives general information on the<br />
operation of <strong>Alstom</strong> <strong>Type</strong> B <strong>Vital</strong> <strong>Relays</strong>.<br />
Section 3 – INSTALLATION: This section describes the field installation and setup of<br />
<strong>Alstom</strong> <strong>Type</strong> B <strong>Vital</strong> <strong>Relays</strong>.<br />
Section 4 – PREVENTIVE MAINTENANCE: This section describes the preventive<br />
maintenance procedures performed on <strong>Alstom</strong> <strong>Type</strong> B <strong>Vital</strong> <strong>Relays</strong>.<br />
Section 5 – TROUBLESHOOTING: This section describes possible failures/symptoms<br />
along with the corrective action for <strong>Alstom</strong> <strong>Type</strong> B <strong>Vital</strong> <strong>Relays</strong>.<br />
Section 6 – PREVENTIVE MAINTENANCE: This section describes the testing and<br />
adjustment procedures associated with corrective maintenance of <strong>Alstom</strong> <strong>Type</strong> B <strong>Vital</strong><br />
<strong>Relays</strong>.<br />
Section 7 – PARTS CATALOG: This section identifies and lists the spare parts<br />
associated with <strong>Alstom</strong> <strong>Type</strong> B <strong>Vital</strong> <strong>Relays</strong>.<br />
Appendix A – RELAY ENGINEERING DATA (ED) SHEET LIST: This section identifies<br />
the engineering data sheets for <strong>Alstom</strong> <strong>Type</strong> B <strong>Vital</strong> <strong>Relays</strong>.<br />
Appendix B – GLOSSARY: This section contains a glossary of terms used in this<br />
manual.<br />
Appendix C – TOOLS AND KITS: This section summarizes the tools and tool kit used<br />
for B relay installation, maintenance, and troubleshooting.<br />
P1457, Rev. Nov/07 <strong>Alstom</strong> Signaling Inc.
THIS PAGE INTENTIONALLY LEFT BLANK.<br />
P1457, Rev. Nov/07 <strong>Alstom</strong> Signaling Inc.
MANUAL SPECIAL NOTATIONS<br />
In the <strong>Alstom</strong> manuals, there are three methods used to convey special informational<br />
notations to the reader. These notations are warnings, cautions, and notes. Both<br />
warnings and cautions are readily noticeable by boldface type two lines beneath the<br />
caption.<br />
Warning<br />
A warning is the most important notation to heed. A warning is used to tell the reader<br />
that special attention needs to be paid to the message because if the instructions or<br />
advice is not followed when working on the equipment then the result could be either<br />
serious harm or death. The sudden, unexpected operation of a switch machine, for<br />
example, or the technician contacting the third rail could lead to personal injury or death.<br />
An example of a typical warning notice follows:<br />
Caution<br />
WARNING<br />
DISCONNECT MOTOR ENERGY WHENEVER WORKING ON SWITCH<br />
LAYOUT OR SWITCH MACHINE. UNEXPECTED OPERATION OF<br />
MACHINE COULD CAUSE INJURY FROM OPEN GEARS, ELECTRICAL<br />
SHOCK, OR MOVING SWITCH POINTS.<br />
A caution statement is used when an operating or maintenance procedure, practice,<br />
condition, or statement, which if not strictly adhered to, could result in damage to or<br />
destruction of equipment. A typical caution found in a manual is as follows:<br />
Note<br />
CAUTION<br />
Turn power off before attempting to remove or insert circuit boards into a<br />
module. Boards can be damaged if power is not turned off.<br />
A note is normally used to provide minor additional information to the reader to explain<br />
the reason for a given step in a test procedure or to provide a background detail. An<br />
example of the use of a note follows:<br />
NOTE<br />
A capacitor may be mounted on the circuit board with a RTV adhesive.<br />
Use the same color RTV.<br />
P1457, Rev. Nov/07 <strong>Alstom</strong> Signaling Inc.
THIS PAGE INTENTIONALLY LEFT BLANK.<br />
P1457, Rev. Nov/07 <strong>Alstom</strong> Signaling Inc.
Topic<br />
TABLE OF CONTENTS<br />
Page<br />
1. SECTION 1 – GENERAL DESCRIPTION ........................................................1–1<br />
1.1. INTRODUCTION TO VITAL RELAYS .........................................................1–1<br />
1.2. RELAY CHARACTERISTICS AND COMPONENTS...................................1–2<br />
1.2.1. Size .........................................................................................................1–2<br />
1.2.2. Identification ............................................................................................1–3<br />
1.2.3. Relay Prongs and Plugboard...................................................................1–5<br />
1.2.4. Mounting..................................................................................................1–7<br />
1.2.5. Registration .............................................................................................1–8<br />
1.2.6. Insulators.................................................................................................1–9<br />
1.2.7. Terminals...............................................................................................1–10<br />
1.2.8. Guide Rods............................................................................................1–14<br />
1.2.9. Wiring ....................................................................................................1–14<br />
1.2.10. Relay Contacts ......................................................................................1–15<br />
1.2.11. Coils ......................................................................................................1–15<br />
2. SECTION 2 – THEORY OF OPERATION........................................................2–1<br />
2.1. GENERAL ...................................................................................................2–1<br />
2.2. RELAY CONTACTS AND COILS................................................................2–3<br />
2.2.1. Definitions................................................................................................2–3<br />
2.2.2. Contact Groups .......................................................................................2–3<br />
2.2.3. Coils ........................................................................................................2–9<br />
2.3. BIASED-NEUTRAL TRACK RELAYS .......................................................2–13<br />
2.4. DC LINE RELAYS .....................................................................................2–15<br />
2.4.1. Neutral Line Relay .................................................................................2–15<br />
2.4.2. Biased-Neutral Line Relay.....................................................................2–16<br />
2.4.3. Magnetic-Stick Line Relay .....................................................................2–18<br />
2.4.4. Microchron II Timer <strong>Relays</strong>....................................................................2–21<br />
2.5. DC SPECIAL PURPOSE RELAYS............................................................2–29<br />
2.5.1. Highway Crossing Signal Flasher Relay................................................2–29<br />
2.5.2. Power-Transfer Relay............................................................................2–30<br />
2.5.3. Lamp-Control Relay...............................................................................2–32<br />
2.5.4. Switch-Overload Relay ..........................................................................2–33<br />
2.5.5. Code-Responsive Relay........................................................................2–34<br />
2.5.6. Code Rate Transmitter Relay ................................................................2–37<br />
2.5.7. Code-Following, VTB Relay...................................................................2–39<br />
2.6. AC TRACK RELAYS .................................................................................2–44<br />
2.6.1. Vane Relay............................................................................................2–44<br />
3. SECTION 3 – INSTALLATION.........................................................................3–1<br />
3.1. GENERAL ...................................................................................................3–1<br />
3.2. RELAY INSTALLATION TOOLS AND SUPPLIES ......................................3–1<br />
3.3. INSPECTION...............................................................................................3–1<br />
3.4. INSTALLATION ...........................................................................................3–2<br />
P1457, Rev. Nov/07 i <strong>Alstom</strong> Signaling Inc.
Topic<br />
TABLE OF CONTENTS (CONT.)<br />
Page<br />
4. SECTION 4 – PREVENTIVE MAINTENANCE .................................................4–1<br />
4.1. GENERAL ...................................................................................................4–1<br />
4.2. PREVENTIVE MAINTENANCE INTERVALS ..............................................4–2<br />
4.3. PREVENTIVE MAINTENANCE TOOLS......................................................4–3<br />
4.4. RELAY INSPECTION..................................................................................4–3<br />
4.5. ELECTRICAL TESTS..................................................................................4–9<br />
4.5.1. AC Light-Out Relay Test........................................................................4–11<br />
4.5.2. AC Vane Relay Test ..............................................................................4–12<br />
4.5.3. Biased-Neutral Relay Test.....................................................................4–13<br />
4.5.4. Code-Responsive Relay Test ................................................................4–14<br />
4.5.5. Code Rate Transmitter Relay Test ........................................................4–15<br />
4.5.6. Magnetic-Stick Relay Test.....................................................................4–16<br />
4.5.7. Microchron II Timer Relay Test..............................................................4–17<br />
4.5.8. Neutral Relay Test.................................................................................4–18<br />
4.5.9. Polarized Relay Test .............................................................................4–19<br />
4.5.10. Power-Transfer Relay Test....................................................................4–20<br />
4.5.11. Switch-Overload Relay Test ..................................................................4–21<br />
4.6. TIMING TESTS .........................................................................................4–22<br />
4.6.1. Code Rate Transmitter Relay Timing Test ............................................4–22<br />
4.6.2. Microchron II Timer Relay (DC) Timing Test .........................................4–22<br />
4.6.3. AC Microchron II Timer Relay Timing Test............................................4–22<br />
5. SECTION 5 – TROUBLESHOOTING...............................................................5–1<br />
5.1. GENERAL PHILOSOPHY ...........................................................................5–1<br />
5.2. GENERAL TROUBLESHOOTING ..............................................................5–1<br />
5.3. RELAY TROUBLESHOOTING TOOLS.......................................................5–1<br />
5.4. FIELD TROUBLESHOOTING .....................................................................5–2<br />
5.4.1. DC Relay Troubleshooting.......................................................................5–4<br />
5.4.2. AC Vane Relay Troubleshooting .............................................................5–6<br />
5.4.3. Microchron II Timer Relay Troubleshooting.............................................5–8<br />
6. SECTION 6 – CORRECTIVE MAINTENANCE ................................................6–1<br />
6.1. GENERAL PURPOSE.................................................................................6–1<br />
6.2. CORRECTIVE MAINTENANCE TOOLS.....................................................6–2<br />
6.3. REMOVAL AND REPLACEMENT PROCEDURES.....................................6–2<br />
6.3.1. B Relay Removal and Replacement........................................................6–2<br />
6.4. WIRING AND PLUGBOARD CHANGES.....................................................6–6<br />
6.4.1. Terminal Removal and Installation ..........................................................6–6<br />
6.4.2. Terminal Wiring .......................................................................................6–8<br />
6.4.3. Insulator Removal and Installation.........................................................6–10<br />
6.4.4. Current Test Terminal Wiring.................................................................6–11<br />
6.4.5. Voltage Test Terminal Wiring ................................................................6–12<br />
P1457, Rev. Nov/07 ii <strong>Alstom</strong> Signaling Inc.
Topic<br />
TABLE OF CONTENTS (CONT.)<br />
Page<br />
6.5. MECHANICAL TEST PROCEDURES.......................................................6–13<br />
6.5.1. Relay Structure Inspection ....................................................................6–14<br />
6.5.2. Mechanical Test and Adjustment Procedure .........................................6–17<br />
6.5.3. Microchron II Timer Relay Electronics Removal and Replacement .......6–23<br />
7. SECTION 7 – PARTS CATALOG ....................................................................7–1<br />
7.1. GENERAL ...................................................................................................7–1<br />
7.2. PARTS LIST................................................................................................7–1<br />
7.3. B1 NEUTRAL RELAYS ...............................................................................7–2<br />
7.4. B1 BIASED-NEUTRAL RELAYS .................................................................7–3<br />
7.5. B1 CODE-RESPONSIVE RELAY................................................................7–7<br />
7.6. B1 SLOW PICKUP, SLOW-RELEASE AND QUICK CROSSOVER<br />
RELAYS ....................................................................................................7–14<br />
7.7. B1 ELECTRONICALLY DRIVEN HIGHWAY CROSSING RELAY AND FLASHER<br />
MODULE ...................................................................................................7–15<br />
7.8. B2 NEUTRAL RELAY................................................................................7–18<br />
7.9. B2 BIASED-NEUTRAL RELAY .................................................................7–21<br />
7.10. B2 AC VANE RELAY, 2F-2B, TWO POSITION.........................................7–24<br />
7.11. B2 AC VANE RELAY, 4F-4B, TWO POSITION.........................................7–27<br />
7.12. B2 CODE RATE TRANSMITTER RELAY .................................................7–30<br />
7.13. B2 MICROCHRON II TIMER RELAY (DC)................................................7–36<br />
7.14. B2 AC MICROCHRON II TIMER RELAY ..................................................7–41<br />
7.15. TYPE VTB POLAR-BIASED RELAY .........................................................7–45<br />
7.16. B RELAY CONTACT GROUPS.................................................................7–54<br />
7.17. B RELAY PLUGBOARDS AND INSTALLATION SUPPLIES ....................7–58<br />
7.18. B RELAY REGISTRATION PLATES AND GASKETS...............................7–65<br />
A. APPENDIX A – RELAY ENGINEERING DATA (ED) SHEET LIST ................ A–1<br />
A.1. GENERAL ...................................................................................................A–1<br />
B. APPENDIX B - GLOSSARY............................................................................ B–1<br />
B.1. CONTACT DEFINITIONS............................................................................B–1<br />
B.2. GENERAL DEFINITIONS............................................................................B–2<br />
C. APPENDIX C – TOOLS AND KITS................................................................. C–1<br />
C.1. GENERAL .................................................................................................. C–1<br />
C.2. CORRECTIVE MAINTENANCE TOOLS AND TOOL KITS........................ C–1<br />
C.3. SHOP TEST RACK .................................................................................... C–5<br />
C.4. VANE RELAY TEST UNIT.......................................................................... C–6<br />
P1457, Rev. Nov/07 iii <strong>Alstom</strong> Signaling Inc.
Description<br />
LIST OF FIGURES<br />
Page<br />
Figure 1–1. <strong>Alstom</strong> <strong>Type</strong> B1 and <strong>Type</strong> B2 <strong>Type</strong> <strong>Vital</strong> <strong>Relays</strong>..................................... 1–1<br />
Figure 1–2. B1 Relay Nameplate, Nametag and Test Data Form .............................. 1–3<br />
Figure 1–3. Example B1 Relay Test Data Form......................................................... 1–4<br />
Figure 1–4. Plug Connection...................................................................................... 1–5<br />
Figure 1–5. B1 Plugboard .......................................................................................... 1–6<br />
Figure 1–6. <strong>Type</strong> B Plug Connections........................................................................ 1–7<br />
Figure 1–7. Registration Plates .................................................................................. 1–8<br />
Figure 1–8. Latching Insulator.................................................................................... 1–9<br />
Figure 1–9. Insulator Separates One Contact Terminal From the Other.................. 1–10<br />
Figure 1–10. Current Test Terminal ......................................................................... 1–11<br />
Figure 1–11. Voltage Test Terminal ......................................................................... 1–11<br />
Figure 1–12. Terminal Numbering of <strong>Type</strong> B, Size 1 (B1) DC <strong>Relays</strong>...................... 1–12<br />
Figure 1–13. Terminal Numbering of <strong>Type</strong> B, Size 2 (B2) DC <strong>Relays</strong>...................... 1–13<br />
Figure 1–14. B1 Relay showing Guide Rods and Nuts ............................................ 1–14<br />
Figure 1–15. Relay Contact Components ................................................................ 1–15<br />
Figure 1–16. Coil Terminal Numbers, B1 and B2 Relay (Rear View) ....................... 1–16<br />
Figure 2–1. Typical B1 Relay Components ................................................................ 2–2<br />
Figure 2–2. Heel Contact Engaging Pusher ............................................................... 2–4<br />
Figure 2–3. Three Different Contact Combinations .................................................... 2–4<br />
Figure 2–4. 2 Front (F) and 1 Back (B) Independent Regular Contacts ..................... 2–6<br />
Figure 2–5. 2 Front-Back (FB) Dependent Regular Contacts..................................... 2–6<br />
Figure 2–6. 2 Front-Back (FB) Dependent Heavy-Duty Contacts .............................. 2–7<br />
Figure 2–7. One Front and One Back Independent Heavy-Duty Contacts with Magnetic<br />
Blowouts................................................................................................................ 2–8<br />
Figure 2–8. Coil Construction, One Winding .............................................................. 2–9<br />
Figure 2–9. Coil Construction, Two Windings ............................................................ 2–9<br />
Figure 2–10. <strong>Type</strong> B1 Biased-Neutral Relay, Pre-1991 Cover................................. 2–13<br />
Figure 2–11. <strong>Type</strong> B1 Biased-Neutral Relay, Post-1991 Cover ............................... 2–13<br />
Figure 2–12. Typical B1 Track Relay Wiring ............................................................ 2–14<br />
Figure 2–13. B1 and B2 Neutral Line <strong>Relays</strong> Wiring ................................................ 2–15<br />
Figure 2–14. Voltage of Right Polarity Applied......................................................... 2–16<br />
Figure 2–15. No Voltage Applied.............................................................................. 2–17<br />
Figure 2–16. Voltage of Wrong Polarity Applied....................................................... 2–17<br />
Figure 2–17. Magnetic-Stick Relay, Reverse Position.............................................. 2–18<br />
Figure 2–18. Armature Picked Up with Normal Polarity ........................................... 2–19<br />
Figure 2–19. Armature Held Up By Permanent Magnet's Attraction ........................ 2–19<br />
Figure 2–20. Armature Knocked Down with Reverse Polarity.................................. 2–20<br />
Figure 2–21. B1 Magnetic-Stick Relay Wiring .......................................................... 2–20<br />
Figure 2–22. Microchron II Timer Relay Cover......................................................... 2–21<br />
Figure 2–23. Relay Contacts, Front View................................................................. 2–25<br />
Figure 2–24. AC Microchron II Timer Relay Schematic............................................ 2–25<br />
Figure 2–25. AC Motor Timer Plugboard Wiring Diagram ........................................ 2–27<br />
Figure 2–26. Electronically-Driven Flasher Relay Wiring ......................................... 2–29<br />
P1457, Rev. Nov/07 iv <strong>Alstom</strong> Signaling Inc.
Description<br />
LIST OF FIGURES (CONT.)<br />
Page<br />
Figure 2–27. <strong>Type</strong> S1/4 Half-Wave Rectifier for Power-Transfer Relay ................... 2–30<br />
Figure 2–28. Power-Transfer Relay Wiring .............................................................. 2–31<br />
Figure 2–29. Lamp-Control Relay Wiring ................................................................. 2–32<br />
Figure 2–30. Switch-Overload Relay Wiring............................................................. 2–33<br />
Figure 2–31. Code-Responsive Relay De-energized ............................................... 2–34<br />
Figure 2–32. Code-Responsive Relay Energized..................................................... 2–35<br />
Figure 2–33. Code-Responsive Relay Wiring .......................................................... 2–36<br />
Figure 2–34. Code Rate Transmitter Relay Operation ............................................. 2–37<br />
Figure 2–35. Code Rate Transmitter Relay Wiring................................................... 2–38<br />
Figure 2–36. VTB Plugboard.................................................................................... 2–39<br />
Figure 2–37. Polar-Biased Single Armature Relay................................................... 2–40<br />
Figure 2–38. VTB Relay Energized.......................................................................... 2–41<br />
Figure 2–39. VTB Relay, Two Armatures De-energized .......................................... 2–41<br />
Figure 2–40. VTB Relay, Two Armatures Energized................................................ 2–42<br />
Figure 2–41. VTB Relay Wiring................................................................................ 2–43<br />
Figure 2–42. Vane Relay Structure .......................................................................... 2–44<br />
Figure 2–43. Vane Relay Components .................................................................... 2–45<br />
Figure 2–44. Magnet Movement Drags the Metal Disc ............................................ 2–46<br />
Figure 2–45. Eddy Current Induction by Permanent Magnet ................................... 2–47<br />
Figure 2–46. Local and Track Current Cycles .......................................................... 2–48<br />
Figure 2–47. Parallel Hookup of Windings ............................................................... 2–49<br />
Figure 2–48. Series Hookup of Windings ................................................................. 2–50<br />
Figure 2–49. AC Vane Relay.................................................................................... 2–50<br />
Figure 4–1. Spanner Nut Wrench............................................................................... 4–3<br />
Figure 5–1. DC Relay Does Not Pick ......................................................................... 5–4<br />
Figure 5–2. DC Relay Does Not Release................................................................... 5–5<br />
Figure 5–3. AC Vane Relay Does Not Pick ................................................................ 5–6<br />
Figure 5–4. AC Vane Relay Does Not Release.......................................................... 5–7<br />
Figure 5–5. Microchron II Timer Relay (AC or DC) Does Not Pick............................. 5–9<br />
Figure 5–6. Microchron II Timer Relay (AC or DC) Does Not Release..................... 5–10<br />
Figure 7–1. B1 Neutral <strong>Relays</strong> ................................................................................... 7–2<br />
Figure 7–2. B1 Biased-Neutral <strong>Relays</strong> ....................................................................... 7–3<br />
Figure 7–3. B1 Code-Responsive Relay .................................................................... 7–7<br />
Figure 7–4. B1 Slow Pickup, Slow-Release and Quick Crossover........................... 7–14<br />
Figure 7–5. B1 Electronically Driven Highway Crossing Relay and Flasher Module 7–15<br />
Figure 7–6. B2 Neutral Relay ................................................................................... 7–18<br />
Figure 7–7. B2 Biased-Neutral Relay ....................................................................... 7–21<br />
Figure 7–8. B2 AC Vane Relay, 2F-2B, Two Position .............................................. 7–24<br />
Figure 7–9. B2 AC Vane Relay, 4F-4B, Two Position .............................................. 7–27<br />
Figure 7–10. B2 Code Rate Transmitter Relay ........................................................ 7–30<br />
Figure 7–11. B2 Microchron II Timer Relay (DC) ..................................................... 7–36<br />
P1457, Rev. Nov/07 v <strong>Alstom</strong> Signaling Inc.
Description<br />
LIST OF FIGURES (CONT)<br />
Page<br />
Figure 7–12. B2 AC Microchron II Timer Relay........................................................ 7–41<br />
Figure 7–13. <strong>Type</strong> VTB Polar-Biased Relay............................................................. 7–45<br />
Figure 7–14. B Relay Contact Groups...................................................................... 7–54<br />
Figure 7–15. B Relay Extra Heavy-Duty (EHD) Contact Group Magnet Detail ........ 7–55<br />
Figure 7–16. B Relay Plugboards and Installation Supplies..................................... 7–59<br />
Figure 7–17. Example Installation Supplies ............................................................. 7–60<br />
Figure 7–18. B Relay Registration Plates and Gaskets............................................ 7–66<br />
Figure C–1. <strong>Alstom</strong> B Relay Tools .............................................................................C–3<br />
Figure C–2. Shop Test Rack ......................................................................................C–5<br />
Figure C–3. Vane Relay Test Unit, Front Panel .........................................................C–6<br />
Figure C–4. Vane Relay Test Unit Circuit with Relay .................................................C–7<br />
P1457, Rev. Nov/07 vi <strong>Alstom</strong> Signaling Inc.
Description<br />
LIST OF TABLES<br />
Page<br />
Table 1–1. Relay Sizes and Weights.......................................................................... 1–2<br />
Table 1–2. Plugboard Dimensions ............................................................................. 1–5<br />
Table 2–1. Typical Relay Contact Combinations........................................................ 2–5<br />
Table 2–2. Coil Connections and Timing Characteristics ......................................... 2–11<br />
Table 2–3. AC Microchron II Timer Relay Operating Characteristics ....................... 2–26<br />
Table 2–4. Replaceable AC Motor Timers ............................................................... 2–28<br />
Table 3–1. B Relay Pre-Installation Inspection Procedure ......................................... 3–1<br />
Table 3–2. B Relay Installation Procedure ................................................................. 3–3<br />
Table 3–3. Microchron II Timer Relay (DC) Installation Procedure ............................ 3–7<br />
Table 3–4. Microchron II Timer Relay (DC) Surge Protection Installation<br />
Procedure............................................................................................................ 3–12<br />
Table 3–5. AC Microchron II Timer Relay Installation Procedure............................. 3–13<br />
Table 4–1. Preventive Maintenance Intervals ............................................................ 4–2<br />
Table 4–2. Typical B1 Relay Visual Inspection Procedure ......................................... 4–4<br />
Table 4–3. Vane Relay Visual Inspection Procedure ................................................. 4–6<br />
Table 4–3. Vane Relay Visual Inspection Procedure (Cont.) ..................................... 4–7<br />
Table 4–4. Microchron II Timer Relay Visual Inspection Procedure........................... 4–7<br />
Table 4–5. Miscellaneous Relay Visual Inspection Procedure ................................... 4–8<br />
Table 4–6. Electrical Test Procedures...................................................................... 4–10<br />
Table 4–7. AC Light-Out Relay Test Procedure ....................................................... 4–11<br />
Table 4–8. AC Vane Relay Test Procedure ............................................................. 4–12<br />
Table 4–9. Biased-Neutral Relay Test Procedure .................................................... 4–13<br />
Table 4–10. Code-Responsive Relay Test Procedure ............................................. 4–14<br />
Table 4–11. Code Rate Transmitter Relay Test Procedure...................................... 4–15<br />
Table 4–12. Magnetic-Stick Relay Test Procedure .................................................. 4–16<br />
Table 4–13. Microchron II Timer Relay Test Procedure........................................... 4–17<br />
Table 4–14. Neutral Relay Test Procedure .............................................................. 4–18<br />
Table 4–15. Polarized Relay Test Procedure........................................................... 4–19<br />
Table 4–16. Power-Transfer Relay Test Procedure ................................................. 4–20<br />
Table 4–17. Switch-Overload Relay Test Procedure................................................ 4–21<br />
Table 5–1. Troubleshooting Symbols ......................................................................... 5–3<br />
Table 6–1. Corrective Maintenance Procedures ........................................................ 6–1<br />
Table 6–2. B Relay Removal and Replacement Procedure ....................................... 6–2<br />
Table 6–3. Terminal Removal Procedure................................................................... 6–6<br />
Table 6–4. Terminal Installation Procedure................................................................ 6–7<br />
Table 6–5. Terminal Soldering Procedure.................................................................. 6–8<br />
Table 6–6. Terminal Crimping Procedure................................................................... 6–9<br />
Table 6–7. Insulator Removal and Installation Procedure ........................................ 6–10<br />
Table 6–8. Current Test Terminal Wiring Procedure................................................ 6–11<br />
P1457, Rev. Nov/07 vii <strong>Alstom</strong> Signaling Inc.
Description<br />
LIST OF TABLES (CONT.)<br />
Page<br />
Table 6–9. Voltage Test Terminal Wiring Procedure................................................ 6–12<br />
Table 6–10. Relay Structure Inspection Procedure.................................................. 6–14<br />
Table 6–11. Mechanical Test and Adjustment Procedure ........................................ 6–17<br />
Table 6–12. Microchron II Timer Electronics Removal Procedure ........................... 6–24<br />
Table 6–13. Microchron II Timer Electronics Replacement Procedure..................... 6–27<br />
Table 7–1. B Relay Drawings and Parts Lists ............................................................ 7–1<br />
Table 7–2. B1 Neutral and Biased-Neutral Relay Part Numbers................................ 7–4<br />
Table 7–3. B1 Code-Responsive Relay Part Numbers ............................................ 7–10<br />
Table 7–4. B1 Slow Pickup, Slow-Release, and Quick-Crossover and Electronically<br />
Driven Highway Crossing Relay and Flasher Part Numbers ............................... 7–16<br />
Table 7–5. B2 Neutral Relay Part Numbers ............................................................. 7–19<br />
Table 7–6. B2 Biased-Neutral Relay Part Numbers ................................................. 7–22<br />
Table 7–7. B2 Vane Relay, 2F-2B, Two Position Part Numbers .............................. 7–25<br />
Table 7–8. B2 Vane Relay, 4F-4B, Two Position Part Numbers .............................. 7–28<br />
Table 7–9. B2 Code Rate Transmitter Relay Part Numbers..................................... 7–32<br />
Table 7–10. B2 Microchron II Timer Relay Part Numbers ........................................ 7–38<br />
Table 7–11. B2 AC Microchron II Timer Relay Part Numbers .................................. 7–42<br />
Table 7–12. VTB Polar Biased Relay Part Numbers................................................ 7–46<br />
Table 7–13. B Relay Coil and Compression Spring Part Numbers .......................... 7–50<br />
Table 7–14. B Relay Contact Group Part Numbers ................................................. 7–56<br />
Table 7–15. B Relay Contact Group Pusher and Clip Part Numbers ....................... 7–57<br />
Table 7–16. B Relay Plugboard and Terminal Board Part Numbers ........................ 7–60<br />
Table 7–17. B Relay Registration Plate and Gasket Part Numbers ......................... 7–67<br />
Table A–1. ED sheets Listed By Catalog Number......................................................A–2<br />
Table A–2. ED sheets Listed By Drawing Number.....................................................A–9<br />
Table C–1. <strong>Alstom</strong> B Relay Tools...............................................................................C–1<br />
Table C–2. B Relay Tools Not Available From <strong>Alstom</strong> ...............................................C–4<br />
P1457, Rev. Nov/07 viii <strong>Alstom</strong> Signaling Inc.
General Description<br />
1. SECTION 1 – GENERAL DESCRIPTION<br />
1.1. INTRODUCTION TO VITAL RELAYS<br />
For over 70 years, <strong>Alstom</strong> Signaling, Inc. has continually perfected the <strong>Type</strong> B relays.<br />
They are the standard relay of the signaling industry. <strong>Type</strong>s B and VTB plug-in relays<br />
meet applicable manual parts of American Railway Engineering and Maintenance of<br />
Way Association (AREMA).<br />
<strong>Alstom</strong> <strong>Type</strong> B plug-in relays are used in vital circuits, and are rack-installed in<br />
equipment rooms and in wayside cases and housings. These relays are divided into two<br />
sizes, B1 and B2, as shown in Figure 1–1. Some B relays are energized by DC voltage,<br />
others by AC voltage. A vital relay is designed so that the probability of its failing to<br />
return to a prescribed state when it is de-energized is so low that for all practical<br />
purposes it is considered to be nonexistent.<br />
ALS<br />
ALS<br />
B1 RELAY<br />
B2 RELAY<br />
Figure 1–1. <strong>Alstom</strong> <strong>Type</strong> B1 and <strong>Type</strong> B2 <strong>Type</strong> <strong>Vital</strong> <strong>Relays</strong><br />
There are more than a dozen types of <strong>Type</strong> B relays, available in about 200<br />
configurations. They are designed to meet the important requirements of safety,<br />
reliability, low maintenance and long operating life. Replacement parts for relays<br />
decades old may still be available should it become necessary to extend their operating<br />
life. <strong>Alstom</strong> furnishes its customers relay application and adjustment instructions, either<br />
as part of a contract or upon request.<br />
P1457, Rev. Nov/07 1–1 <strong>Alstom</strong> Signaling Inc.
General Description<br />
1.2. RELAY CHARACTERISTICS AND COMPONENTS<br />
1.2.1. Size<br />
<strong>Type</strong> B relays are made in two sizes, Size 1 and 2, and are referred to as B1 and B2<br />
relays. Two Size 1 relays occupy the same space as one Size 2 relay. Additionally,<br />
there is a special size relay, <strong>Type</strong> VTB code-responsive, which occupies the plugboard<br />
space for a B2 relay, but is not the same depth. Table 1–1 provides exact sizes and<br />
weights.<br />
Table 1–1. Relay Sizes and Weights<br />
Dimensions and Weights Size 1 Size 2 VTB<br />
Height of relay 6-5/16 in. 6-5/16 in. 7-11/16 in.<br />
Width of relay 2-7/16 in. 4-15/16 in. 4-15/16 in.<br />
Depth without plugboard 8-9/16 in. 8-9/16 in. 6-7/16 in.<br />
Depth including plugboard fully wired<br />
(approx.)<br />
15-1/2 in. 15-1/2 in. 13-3/8 in.<br />
Weight of relay with plugboard (weight of<br />
wiring not included)<br />
7 to 10 lbs. 10 to 15 lbs. 6 to 7 lbs.<br />
Weight of plugboard alone without wiring 1 lb. 2 lbs. 2 lbs.<br />
P1457, Rev. Nov/07 1–2 <strong>Alstom</strong> Signaling Inc.
General Description<br />
1.2.2. Identification<br />
All <strong>Type</strong> B relays carry nameplates that contain the drawing number (part number) and<br />
catalog number of the relay. Relay drawing number is also shown on the registration<br />
plates of the relay. When inquiring about a particular relay, always provide the catalog<br />
or drawing number.<br />
The drawing and catalog numbers can be used with the tables in Appendix A to look up<br />
the relay's Engineering Data (ED) Sheet number. The ED sheet contains technical<br />
specifications referenced during some maintenance procedures.<br />
Each B2 Relay has a Test Data Form on the cover and a name plate located inside the<br />
relay, visible from the front of the cover.<br />
Each B1 relay cover contains two recesses to allow attachment of two metalized<br />
polyester film or mylar tags with permanent adhesive:<br />
• a tag for relay operating and testing data<br />
• a tag for circuit nomenclature<br />
B1 <strong>Relays</strong> manufactured prior to 1991 have a different cover than those relays<br />
manufactured after 1991. The most obvious difference is the handle on the front of the<br />
relay. B1 relay nameplate, nametag and test data form locations for relays<br />
manufactured pre and post 1991 are shown in Figure 1–2.<br />
2 PIECE METAL<br />
HANDLE<br />
PLASTIC HANDLE<br />
MOLDED TO COVER<br />
NAMEPLATE<br />
NAMETAG<br />
TEST DATA<br />
FORM<br />
PRE 1991 STYLE<br />
POST 1991 STYLE<br />
Figure 1–2. B1 Relay Nameplate, Nametag and Test Data Form<br />
P1457, Rev. Nov/07 1–3 <strong>Alstom</strong> Signaling Inc.
General Description<br />
The information provided on the test data form includes the relay serial number, data<br />
from the specification sheet for the relay, the initials of the <strong>Alstom</strong> employee who tested<br />
the relay, and the date the form was completed.<br />
An example B1 relay test data form is shown in Figure 1–3. This example form includes<br />
the following:<br />
• Space 1 - The serial number as shown on relay nameplate.<br />
• Space 2 - The minimum DROP AWAY (D.A.) value from specification sheet in Amps<br />
for a DC relay or Volts for an AC relay. For example, on a 921-09 relay the space<br />
contains 0.077A for the minimum DROP AWAY. An "A" for Amps should be added<br />
or "VAC" for AC relays.<br />
• Space 3 - The maximum PICKUP (P.U.) value from specification sheet in the same<br />
style as in Space 2.<br />
• Space 4 - The maximum WORKING Current (W.C.) value from specification sheet in<br />
the same style as in Space 2.<br />
• Space 5 - The initials of the <strong>Alstom</strong> employee who tested the relay.<br />
• Space 6 - The date the form was completed in Month/Day/Year format (for example<br />
7/26/94).<br />
SERIAL NO.<br />
D.A.(MIN)<br />
P.U. (MAX)<br />
W.C. (MAX)<br />
INSP.<br />
1<br />
2<br />
3<br />
4<br />
5 6<br />
DATE<br />
Figure 1–3. Example B1 Relay Test Data Form<br />
P1457, Rev. Nov/07 1–4 <strong>Alstom</strong> Signaling Inc.
General Description<br />
1.2.3. Relay Prongs and Plugboard<br />
All <strong>Type</strong> B relays plug onto plugboards. Relay contacts and coil(s) are brought out<br />
through the base of the relay as prongs. The plugboard has wedge shaped plug<br />
insulators. There are two terminals per insulator, one on each side. The terminals are<br />
installed from behind the plugboard. See Figure 1–4 for a simplified mating diagram. For<br />
exact dimensions, see Table 1–2.<br />
TOP TERMINAL<br />
PLUGBOARD<br />
RELAY<br />
CONTACT<br />
BLOCK<br />
WIRES TO<br />
WIRE HARNESS<br />
RELAY<br />
SPRINGS<br />
INSULATOR<br />
SLIDING<br />
CONTACT<br />
BOTTOM<br />
PRONGS<br />
TERMINAL<br />
Figure 1–4. Plug Connection<br />
Table 1–2. Plugboard Dimensions<br />
Dimension B1 B2<br />
Overall Height 9-7/16 in. 9-7/16 in.<br />
Overall Width 2-1/2 in. 5 in.<br />
Overall Depth 10-1/2 in. 10-1/2 in.<br />
Diameter of mounting holes (clearance for 1/4 in. bolt) 9/32 in. 9/32 in.<br />
Vertical distance between centerlines of mounting holes 8-13/16 in. 8-13/16 in.<br />
There should be about a 5-inch clearance behind a plugboard to give room for wire<br />
distribution in a relay rack.<br />
P1457, Rev. Nov/07 1–5 <strong>Alstom</strong> Signaling Inc.
General Description<br />
When a relay is plugged in, two relay guide rods align the relay so that all prongs<br />
properly align with their corresponding insulators. The prongs slide onto their respective<br />
plugboard terminals, thus making contact. Figure 1–5 shows a B1 plugboard; including<br />
the location of the relay guide rods.<br />
Because plugboard terminals are connected to the wires in cables behind the<br />
plugboard, no wiring changes are necessary when replacing a <strong>Type</strong> B relay.<br />
TOP WIRE<br />
TERMINAL<br />
16<br />
15<br />
26<br />
25<br />
36<br />
35<br />
36<br />
35<br />
26<br />
25<br />
16<br />
15<br />
6<br />
5<br />
INSULATOR<br />
RELAY<br />
GUIDE<br />
RODS<br />
14<br />
13<br />
12<br />
11<br />
24<br />
23<br />
22<br />
21<br />
34<br />
33<br />
32<br />
31<br />
CONTACT<br />
TERMINALS<br />
34<br />
33<br />
32<br />
31<br />
3<br />
24<br />
23<br />
22<br />
21<br />
2<br />
14<br />
13<br />
12<br />
11<br />
1<br />
4<br />
3<br />
2<br />
1<br />
BOTTOM<br />
WIRE<br />
TERMINAL<br />
MALE<br />
REGISTRATION<br />
PLATE<br />
3A<br />
3B<br />
3C<br />
COIL<br />
TERMINALS<br />
3B<br />
3A<br />
3C<br />
3D<br />
3D<br />
1E<br />
3E<br />
TEST<br />
TERMINALS<br />
3E<br />
1E<br />
FRONT VIEW<br />
REAR VIEW<br />
Figure 1–5. B1 Plugboard<br />
P1457, Rev. Nov/07 1–6 <strong>Alstom</strong> Signaling Inc.
General Description<br />
1.2.4. Mounting<br />
The B relays plug on to plugboards. The contacts and the coil terminals of the relay<br />
protrude through the base of the relay as prongs. The plugboard has wedge-shaped<br />
plug insulators with flat metal terminals on the two faces of the wedge. Two rods guide a<br />
relay being plugged in, allowing the pairs of relay prongs to meet with corresponding<br />
wedges, spreading the prongs apart. The prongs slide onto the respective plugboard<br />
terminals making contact as shown in Figure 1–6.<br />
CONTACT BLOCK<br />
IN RELAY<br />
PLUGBOARD<br />
CONTACT PRONGS<br />
TERMINAL<br />
Figure 1–6. <strong>Type</strong> B Plug Connections<br />
P1457, Rev. Nov/07 1–7 <strong>Alstom</strong> Signaling Inc.
General Description<br />
1.2.5. Registration<br />
Registration plates prevent plugging a relay into the wrong place in a rack or module.<br />
Figure 1–7 shows two registration plates, one with holes, the other with pins. The plate<br />
with holes is attached to the base of the relay. The plate with pins is attached to the<br />
plugboard. If a relay that does not belong on the plugboard should be slipped on the<br />
guide rods, it is prevented from making contact with the terminals in the plugboard<br />
because the registration pins and holes do not correspond with one another.<br />
16<br />
15<br />
14<br />
13<br />
12<br />
11<br />
26<br />
25<br />
24<br />
23<br />
22<br />
21<br />
36<br />
35<br />
34<br />
33<br />
32<br />
31<br />
MALE<br />
REGISTRATION<br />
PLATE<br />
3A<br />
3B<br />
3C<br />
3D<br />
FEMALE<br />
REGISTRATION<br />
FEMALE<br />
REGISTRATION PLATE<br />
PLATE<br />
RELAY<br />
1E<br />
3E<br />
PLUGBOARD<br />
Figure 1–7. Registration Plates<br />
P1457, Rev. Nov/07 1–8 <strong>Alstom</strong> Signaling Inc.
General Description<br />
The registration feature takes care of six important differences in relays:<br />
• Differences in timing<br />
• Differences in contact arrangement<br />
• Differences in contact opening<br />
• Differences between track and line relays<br />
• Differences in coil resistance<br />
• Differences in coil arrangement<br />
1.2.6. Insulators<br />
Insulators are made of molded plastic and fit into slots in the plugboard. Each insulator<br />
is held in place by a locking latch molded into a spring beam on one side of the insulator<br />
as shown in Figure 1–8. An extractor tool must be used to remove the terminals prior to<br />
removing the insulators. To release the insulator so that it can be pulled out of the<br />
plugboard, squeeze the spring beam and push the insulator towards the front of the<br />
plugboard.<br />
There are 11 insulators in a B1 plugboard and up to 20 in a B2 plugboard.<br />
PLUGBOARD<br />
SPRING BEAM<br />
SQUEEZE TOWARDS<br />
INSULATOR TO RELEASE<br />
INSULATOR<br />
INSULATORS<br />
EXTRACTOR<br />
CRIMP WIRES TO<br />
TERMINAL CONNECTIONS<br />
Figure 1–8. Latching Insulator<br />
NOTE<br />
An integral beam latch secures the insulator to the plugboard.<br />
P1457, Rev. Nov/07 1–9 <strong>Alstom</strong> Signaling Inc.
General Description<br />
1.2.7. Terminals<br />
B relay plugboards contain contact terminals, coil terminals and test terminals as shown<br />
in Figure 1–5. There are two types of terminals, solder terminals and crimp terminals.<br />
Refer to Section 3, Installation, for installation supplies.<br />
1.2.7.1. Contact Terminals<br />
There are two contact terminals per insulator, one on the top and one on the bottom as<br />
shown in Figure 1–9. Each terminal is completely insulated from the adjacent one, by<br />
either the insulator or the wall of plastic material that surrounds each insulator and<br />
terminal assembly.<br />
TOP TERMINAL<br />
(SOLDER TYPE)<br />
RELAY CONTACT END<br />
TOP TERMINAL<br />
(CRIMP TYPE)<br />
INSULATOR<br />
WIRE CONNECTOR END<br />
BOTTOM TERMINAL<br />
(SOLDER TYPE)<br />
BOTTOM TERMINAL<br />
(CRIMP TYPE)<br />
Figure 1–9. Insulator Separates One Contact Terminal From the Other<br />
The terminal slips into place from behind the plugboard. First, the wire is connected to<br />
the terminal; then the terminal is pushed into the proper slot in the plugboard.<br />
On B1 plugboards, there are slots for 18 contact terminals for circuits through relay<br />
contacts and 4 for circuits through the coils. On B2 plugboards, there are slots for 36<br />
contact terminals and 4 coil terminals.<br />
P1457, Rev. Nov/07 1–10 <strong>Alstom</strong> Signaling Inc.
General Description<br />
1.2.7.2. Test Terminals<br />
A current test terminal is provided on the plugboard directly under the relay, as shown in<br />
Figure 1–10, to allow the checking of current flow through the relay coils.<br />
NOTE<br />
Not all relay plugboards are equipped with a current and voltage test<br />
terminal.<br />
FRONT<br />
PLUGBOARD<br />
HALF<br />
NUT<br />
TO CABLE<br />
HARNESS<br />
B2<br />
PLUGBOARD<br />
1E<br />
6E<br />
INSULATING<br />
BUSHING<br />
TERMINAL<br />
POST<br />
SPANNER<br />
NUT<br />
B1<br />
PLUGBOARD<br />
1E<br />
3E<br />
CURRENT TEST<br />
TERMINALS<br />
COPPER<br />
STRAP<br />
CURRENT TEST TERMINAL<br />
TO RELAY<br />
COIL TERMINAL<br />
CIRCUIT SYMBOL<br />
Figure 1–10. Current Test Terminal<br />
A voltage test terminal is provided on the plugboard next to the current test terminal, as<br />
shown in Figure 1–11, to allow the checking of voltage across the relay coils.<br />
FRONT<br />
TO CABLE<br />
HARNESS<br />
1E<br />
6E<br />
B2 PLUGBOARD<br />
TO COIL<br />
TERMINAL<br />
B1 PLUGBOARD<br />
1E<br />
3E<br />
VOLTAGE TEST TERMINAL<br />
CIRCUIT SYMBOL<br />
VOLTAGE TEST<br />
TERMINAL<br />
Figure 1–11. Voltage Test Terminal<br />
P1457, Rev. Nov/07 1–11 <strong>Alstom</strong> Signaling Inc.
General Description<br />
1.2.7.3. Numbering of Contacts and Plugboard Terminals<br />
From the front of the relay, the vertical columns of contacts and their plugboard<br />
terminals are numbered 1, 2, 3, etc. from left to right. The contact springs in each row<br />
are numbered from bottom to top 1, 2, 3, etc. These numbers are molded into the<br />
plugboard adjacent to the slots. Thus, all contact terminal numbers contain two digits,<br />
as shown in Figures 1–12 and 1–13. The first digit indicates the column; the second<br />
indicates the row. For example, terminal 36 is the third column from the left, sixth row<br />
from the bottom. The terminal 23 is the second column from the left, third row from the<br />
bottom.<br />
Only the springs with contacts are numbered. The stops and pressure plate springs are<br />
not numbered.<br />
16<br />
26<br />
36<br />
36<br />
26<br />
16<br />
6<br />
15<br />
25<br />
35<br />
35<br />
25<br />
15<br />
5<br />
14<br />
24<br />
34<br />
34<br />
24<br />
14<br />
4<br />
13<br />
12<br />
23<br />
22<br />
33<br />
32<br />
33<br />
32<br />
23<br />
22<br />
13<br />
12<br />
3<br />
2<br />
11<br />
21<br />
31<br />
31<br />
3<br />
21<br />
2<br />
11<br />
1<br />
1<br />
MALE<br />
REGISTRATION<br />
PLATE<br />
3A<br />
3B<br />
3C<br />
3B<br />
3A<br />
3C<br />
3D<br />
3D<br />
1E<br />
3E<br />
3E<br />
1E<br />
FRONT VIEW<br />
REAR VIEW<br />
Figure 1–12. Terminal Numbering of <strong>Type</strong> B, Size 1 (B1) DC <strong>Relays</strong><br />
P1457, Rev. Nov/07 1–12 <strong>Alstom</strong> Signaling Inc.
General Description<br />
16<br />
26<br />
36<br />
46<br />
56<br />
66<br />
66<br />
56<br />
46<br />
36<br />
26<br />
16<br />
15<br />
14<br />
25<br />
24<br />
35<br />
34<br />
45<br />
44<br />
55<br />
54<br />
65<br />
64<br />
65<br />
64<br />
55<br />
54<br />
45<br />
44<br />
35<br />
34<br />
25<br />
24<br />
15<br />
14<br />
13<br />
23<br />
33<br />
43<br />
53<br />
63<br />
63<br />
53<br />
43<br />
33<br />
23<br />
13<br />
12<br />
22<br />
32<br />
42<br />
52<br />
62<br />
62<br />
52<br />
42<br />
32<br />
22<br />
12<br />
11<br />
21<br />
31<br />
41<br />
51<br />
61<br />
61<br />
51<br />
41<br />
31<br />
21<br />
11<br />
1C<br />
MALE<br />
REGISTRATION<br />
PLATE<br />
6C<br />
6C<br />
1C<br />
1D<br />
6D<br />
6D<br />
1D<br />
1E<br />
3E<br />
4E<br />
6E<br />
6E<br />
4E<br />
3E<br />
1E<br />
FRONT VIEW<br />
REAR VIEW<br />
Figure 1–13. Terminal Numbering of <strong>Type</strong> B, Size 2 (B2) DC <strong>Relays</strong><br />
P1457, Rev. Nov/07 1–13 <strong>Alstom</strong> Signaling Inc.
General Description<br />
1.2.8. Guide Rods<br />
Two guide rods, which extend from the face of the plugboard 8-1/2 inches, help guide<br />
the relay into alignment with the insulators on the plugboard.<br />
Each rod has a knurled nut and a lock nut to secure the relay on its plugboard, as<br />
shown in Figure 1–14.<br />
LOCK NUTS<br />
GUIDE RODS<br />
KNURLED<br />
NUTS<br />
Figure 1–14. B1 Relay showing Guide Rods and Nuts<br />
1.2.9. Wiring<br />
Wires strapped together in cable form are supported behind the plugboard. Each wire is<br />
identified with a tag and then connected to its terminal. The terminal is pushed into its<br />
slot in the plugboard and locked in place.<br />
The plugboard back can accommodate the mounting of a two-post terminal block as<br />
shown in Figure 1–16. This can be used to terminate coil leads where coils in a relay<br />
are circuited independent of one another.<br />
P1457, Rev. Nov/07 1–14 <strong>Alstom</strong> Signaling Inc.
General Description<br />
1.2.10. Relay Contacts<br />
<strong>Relays</strong> are furnished with specific contact arrangements. In all relays, the contacts are<br />
leaf springs molded in blocks. Each block is called a contact group. One end of the<br />
spring is formed into a prong, which makes contact with the plugboard terminal. The<br />
other end has a contact. Figure 1–15 shows a typical configuration of the relay contact<br />
components.<br />
FRONT<br />
CONTACT<br />
PRESSURE<br />
PLATE<br />
PLUGBOARD<br />
CONTACTS<br />
HEEL<br />
STOP<br />
PLATE<br />
Figure 1–15. Relay Contact Components<br />
1.2.11. Coils<br />
On B1 and B2 DC relays, there is space enough on each of the two cores for one fulllength<br />
coil, approximately 4 inches long. Coils shorter than this are used when the cores<br />
are partly filled with copper or aluminum washers or slugs for use in slow-acting relays.<br />
1.2.11.1. Identifying Coil Leads<br />
The two leads of a coil are designated as "in" and "out" leads. From the prong end of a<br />
coil, the IN lead is attached to the prong that is closer to the center of the coil. The OUT<br />
lead is attached to the prong furthest from the center.<br />
If a coil has two windings, the winding nearer the prongs is connected to the prongs.<br />
Leads of the second winding are tagged and have terminals applied.<br />
P1457, Rev. Nov/07 1–15 <strong>Alstom</strong> Signaling Inc.
General Description<br />
1.2.11.2. Numbering of Coil Terminals<br />
Two digit coil terminal identifiers consisting of a number and a letter are molded in the<br />
phenolic plugboard. The number is taken from the vertical row in which the terminal is<br />
located. The letter shows its position in that row. Letter A is given to the highest<br />
terminal, letter D to the lowest terminal for B relays. Letter E is use to designate test<br />
terminals. See Figure 1–16.<br />
3A<br />
1C<br />
COIL<br />
TERMINALS<br />
3B<br />
3D<br />
3C<br />
1D<br />
SPARE TERMINAL<br />
BLOCK<br />
(P/N 46048-053-01)<br />
IF SO EQUIPPED<br />
6D<br />
6C<br />
1C<br />
1D<br />
COIL<br />
TERMINALS<br />
3E<br />
1E<br />
TEST<br />
TERMINALS<br />
6E<br />
1E<br />
TEST<br />
TERMINALS<br />
B1<br />
B2<br />
Figure 1–16. Coil Terminal Numbers, B1 and B2 Relay (Rear View)<br />
P1457, Rev. Nov/07 1–16 <strong>Alstom</strong> Signaling Inc.
Theory of Operation<br />
2. SECTION 2 – THEORY OF OPERATION<br />
2.1. GENERAL<br />
This section covers the functions of <strong>Alstom</strong> <strong>Type</strong> B relays.<br />
B relays contain various arrangements of contacts and coils. Information is presented<br />
as follows:<br />
• Relay Contacts and Coils<br />
• B1 <strong>Relays</strong><br />
• B2 <strong>Relays</strong><br />
Figure 2–1 identifies typical B1 relay components. Some type B2 relays look very<br />
similar to the typical B1 relay shown, others do not. See the B2 relay discussions for<br />
relay descriptions.<br />
P1457, Rev. Nov/07 2–1 <strong>Alstom</strong> Signaling Inc.
Theory of Operation<br />
COMPRESSION SPRING<br />
COVER<br />
COIL SPRING STUD<br />
ARMATURE STOP SCREW<br />
BRIDGE OR ARM. EXTENSION<br />
PUSHER<br />
BACK CONTACT<br />
HEEL CONTACT<br />
FRONT CONTACT<br />
CONTACT PRONGS<br />
BASE<br />
CONTACT GROUP<br />
PRESSURE PLATES<br />
STOP PLATES<br />
PUSHER JAW<br />
PUSHER RETAINING CLIPS<br />
ROLLER ON FINGER<br />
ARMATURE<br />
ARMATURE<br />
RETAINING<br />
PLATE<br />
ADJ. NUT<br />
LOCK NUT<br />
YOKE<br />
NUT<br />
ARMATURE<br />
BEARING<br />
PLATE<br />
NAME<br />
PLATE<br />
SAFETY<br />
PIN<br />
COIL<br />
REGISTRATION COIL<br />
PLATES PRONGS<br />
ADJUSTABLE RESIDUAL SCREW<br />
CORE<br />
NOTE: SOME PARTS MAY DIFFER IN DETAIL FROM THOSE SHOWN ABOVE BUT NAME<br />
DESIGNATION REMAINS THE SAME.<br />
Figure 2–1. Typical B1 Relay Components<br />
P1457, Rev. Nov/07 2–2 <strong>Alstom</strong> Signaling Inc.
Theory of Operation<br />
2.2. RELAY CONTACTS AND COILS<br />
2.2.1. Definitions<br />
The following terms are used in the descriptions of how relay contacts operate:<br />
• Front -Relay contact that is open when relay is de-energized.<br />
• Heel - Contact that is driven by pusher.<br />
• Back - Relay contact that is made when relay is de-energized (normally closed).<br />
• Make - Specified dimension that will cause all front or back contacts to be just made<br />
(closed) when a gauge of the specific dimension is inserted between the armature<br />
residual screw and core face with the relay energized.<br />
• Break - All front or back contacts are just open when a gauge of a specific<br />
dimension is inserted between the armature residual screw and the core face with<br />
the relay de-energized.<br />
• Break-before-make - In a dependent front-heel-back contact, the back contact will<br />
break before the front contact makes as the relay is energized.<br />
• Makes-before-break - In a dependent front-heel-back contact, the front contact will<br />
make before the back contact breaks.<br />
A complete glossary of terms used in this manual is available in Appendix B.<br />
2.2.2. Contact Groups<br />
There are typically six springs per contact group, furnished in various combinations of<br />
contacts. The AC Vane Relay contact groups contain four springs.<br />
Springs are furnished for each group in various combinations of contacts. For example,<br />
a contact group can have two dependent front-back (FB) contacts or three independent<br />
contacts (front or back).<br />
• A dependent FB contact uses three springs, one for the stationary front (F), one for<br />
the stationary back (B), and one for the movable heel.<br />
• An independent contact uses two springs, one for the stationary contact (front or<br />
back), and one for the movable heel.<br />
P1457, Rev. Nov/07 2–3 <strong>Alstom</strong> Signaling Inc.
Theory of Operation<br />
The relay armature, as shown in Figure 2–2, has a bridge attached to it, which engages<br />
a pusher. The pusher engages a roller on the heel contact to move the heel contact up<br />
or down in response to the movement of the relay armature.<br />
HEEL CONTACT<br />
ROLLER<br />
ARMATURE<br />
BRIDGE<br />
PUSHER<br />
Figure 2–2. Heel Contact Engaging Pusher<br />
Typical contact groups are shown in Figure 2–3.<br />
2 Front-Back (FB) Dependent Contacts 1 Front (F) 2 Back (B) Independent Contacts<br />
3 Back (B) Independent Contacts<br />
Figure 2–3. Three Different Contact Combinations<br />
P1457, Rev. Nov/07 2–4 <strong>Alstom</strong> Signaling Inc.
Theory of Operation<br />
2.2.2.1. Contact Combinations<br />
A B1 relay has space for three contact groups. For example, a relay with 6 front-back<br />
dependent contacts has three groups, each with 2 front-back contacts. A relay with 4<br />
front-back dependent contacts and 2 front and 1 back independent contacts also has<br />
three groups, two with 2 front-back dependent contacts, and one with 2 front and 1 back<br />
independent contacts.<br />
A typical B2 relay has space for six contact groups. For example, a relay with 12 frontback<br />
contacts has six groups, each with 2 front-back contacts. The B2 AC Vane relay<br />
has a different configuration with space for four contact groups.<br />
Table 2–1 shows the contact combinations normally furnished with B relays. For the<br />
configuration of specific arrangements, see Section 7.<br />
Table 2–1. Typical Relay Contact Combinations<br />
<strong>Type</strong><br />
B1 <strong>Relays</strong><br />
(3 Contact Groups)<br />
B2 <strong>Relays</strong><br />
(6 Contact Groups)<br />
B2 Vane <strong>Relays</strong><br />
(4 Contact Groups)<br />
Neutral 2FB, 4FB, 4F-2B, 12FB<br />
4FB-2F-1B, 6FB<br />
Biased-Neutral 4FB-2F-1B, 6FB 8FB-4F-2B, 12FB<br />
Magnetic-Stick 4 NR<br />
Power-Transfer 2FB, 6FB<br />
Light-Out 4FB, 4F-2B, 6FB<br />
AC Vane<br />
2FB, 4FB<br />
FB<br />
Front-Back Dependent Contact<br />
F<br />
Front Independent Contact<br />
B<br />
Back Independent Contact<br />
NR<br />
Normal-Reverse Dependent Contact<br />
P1457, Rev. Nov/07 2–5 <strong>Alstom</strong> Signaling Inc.
Theory of Operation<br />
2.2.2.2. Regular Contacts<br />
Contacts for regular service are rated for a resistance load of 4 amperes continuously.<br />
Front contacts are silver-impregnated-carbon to silver; back contacts are silver to silver.<br />
See Figures 2–4 and 2–5.<br />
FRONT CONTACT SILVER<br />
IMPREGNATED CARBON<br />
HEEL SILVER<br />
BACK CONTACT SILVER<br />
Figure 2–4. 2 Front (F) and 1 Back (B) Independent Regular Contacts<br />
Figure 2–5. 2 Front-Back (FB) Dependent Regular Contacts<br />
P1457, Rev. Nov/07 2–6 <strong>Alstom</strong> Signaling Inc.
Theory of Operation<br />
2.2.2.3. Heavy-Duty Contacts<br />
Heavy-duty contacts, shown in Figure 2–6, are commonly used in circuits of the first and<br />
second voltage ranges where the continuous resistive load current is more than four<br />
amperes. The first voltage range is 30 volts or less; the second voltage range is over 30<br />
volts to 175 volts inclusive. Front contacts are usually Silver-Impregnated-Carbon to<br />
Silver; back contacts are Silver to Silver.<br />
For the rating of contacts on relays containing heavy-duty (HD) contacts consult the<br />
specific relay's Engineering Data (ED) sheet.<br />
Figure 2–6. 2 Front-Back (FB) Dependent Heavy-Duty Contacts<br />
P1457, Rev. Nov/07 2–7 <strong>Alstom</strong> Signaling Inc.
Theory of Operation<br />
2.2.2.4. Contacts with Magnetic Blowouts<br />
Heavy-duty contacts equipped with magnetic blowouts, shown in Figure 2–7, are<br />
generally used in d-c circuits carrying inductive loads where the continuous current is<br />
more than four amperes and where operation is in the second or third voltage ranges.<br />
The third voltage range is over 175 volts to 250 volts inclusive.<br />
For the rating of contacts on relays containing heavy-duty contacts with blowout<br />
magnets (XHD) consult the specific relay's Engineering Data (ED) sheet.<br />
MAGNETIC<br />
BLOWOUT<br />
MAGNETIC<br />
BLOWOUT<br />
Figure 2–7. One Front and One Back Independent Heavy-Duty Contacts<br />
with Magnetic Blowouts<br />
Both front and back contacts are the heavy-duty type just described. Magnets are held<br />
in clips close to the contacts. The effect is to "blow" or disperse the electric arc before it<br />
has a chance to grow and burn. The front contact opening is usually 0.125” minimum for<br />
this type of contact.<br />
Using magnetic blowout contacts sacrifices the space of one contact group in the relay.<br />
P1457, Rev. Nov/07 2–8 <strong>Alstom</strong> Signaling Inc.
Theory of Operation<br />
2.2.3. Coils<br />
A coil may be made up of one or more separate windings, leads from these windings<br />
being fastened to prongs that engage with the plugboard terminals or to terminals that<br />
go on a binding post within the relay. See Figures 2–8 and 2–9.<br />
A typical coil is wound on a phenolic spool that slips over one core of the relay. Every<br />
coil is identified with its drawing number and nominal resistance.<br />
IN<br />
WINDING DIAGRAM<br />
OUT<br />
IN<br />
OUT<br />
CAP REMOVED<br />
CAP<br />
Figure 2–8. Coil Construction, One Winding<br />
"IN" FOR "A" WINDING<br />
"A"<br />
"B"<br />
"IN" FOR "B" WINDING<br />
"OUT" FOR "A" WINDING<br />
"OUT" FOR "B" WINDING<br />
"A"<br />
WINDING<br />
"B"<br />
WINDING<br />
WINDING DIAGRAM<br />
CAP<br />
IN<br />
OUT<br />
LEADS FOR "B" WDG.<br />
CAP REMOVED<br />
Figure 2–9. Coil Construction, Two Windings<br />
P1457, Rev. Nov/07 2–9 <strong>Alstom</strong> Signaling Inc.
Theory of Operation<br />
2.2.3.1. One-Coil <strong>Relays</strong> (Slow Acting <strong>Relays</strong>)<br />
One core of a relay can be completely filled with copper washers or a slug of aluminum<br />
or copper to make the relay slow acting. In this case, only one coil is used to operate<br />
the relay. The more washers used, or the longer the slug, the slower the relay operates.<br />
If the relay is to be slightly slow acting, short coils on the cores usually provide enough<br />
room for the required number of washers or a short slug. If the relay is to be slower<br />
acting, one coil is put on the lower core and a slug is put on the upper core.<br />
The circuit of a one-coil B1 relay is shown in Table 2–2 (3A and 3B). The IN lead of the<br />
coil is connected to the 3C terminal on the plugboard; the OUT lead is connected to the<br />
3D terminal. Positive energy is applied through the current test terminal 3E to terminal<br />
3C.<br />
The circuit for a one-coil B2 relay is shown in Table 2–2 (3A and 3B). The IN lead of the<br />
coil is in contact with the 6C terminal on the plugboard; the OUT lead contacts the 6D<br />
terminal. Positive energy is applied through the current test terminal 6E to terminal 6C.<br />
B2 neutral relays with slugs are rarely used, as there is seldom the need for B2 slowrelease<br />
relays with such large contact capacity.<br />
2.2.3.2. Two-Coil <strong>Relays</strong><br />
In two-coil B1 relays, the upper coil plugs onto terminals 3A and 3B of the plugboard,<br />
the lower coil onto terminals 3C and 3D. Connections between the coils are made on<br />
the back of the plugboard for series, parallel, or single coil operation. The circuits in<br />
Table 2–2 show these possibilities.<br />
In two-coil B2 relays, from the front of the relay, the left-hand coil plugs onto terminals<br />
1C and 1D, the right-hand coil onto terminals 6C and 6D. See Table 2–2 for a brief<br />
explanation of circuit description, timing characteristics and application notes.<br />
P1457, Rev. Nov/07 2–10 <strong>Alstom</strong> Signaling Inc.
P1457, Rev. Nov/07 2–11 <strong>Alstom</strong> Signaling Inc.<br />
1<br />
Circuit<br />
B1 Relay B2 Relay<br />
E = 2 RI<br />
I<br />
–<br />
3A<br />
R<br />
R<br />
3D<br />
2<br />
3B<br />
3C<br />
E = (1/2r)(2I)<br />
2I<br />
– r<br />
3A<br />
r<br />
3B<br />
3D 3C<br />
3A<br />
–<br />
3B<br />
4<br />
–<br />
–<br />
3E<br />
3E<br />
3D 3C 3E + –<br />
3D 3C 3E<br />
3A<br />
3D<br />
3B<br />
3C<br />
3E<br />
+<br />
+<br />
+ –<br />
+<br />
–<br />
1C R<br />
R<br />
6D<br />
– r<br />
1C r<br />
6D<br />
–<br />
Table 2–2. Coil Connections and Timing Characteristics<br />
1D<br />
6C<br />
1D<br />
6C<br />
6E<br />
6E<br />
6D 6C 6E<br />
+<br />
6D 6C 6E<br />
1C<br />
6D<br />
1D<br />
6C<br />
+<br />
+<br />
+<br />
+<br />
6E<br />
Circuit<br />
Description<br />
Series<br />
Multiple<br />
One coil<br />
separating slugs<br />
on other core<br />
One coil<br />
separating slugs<br />
on other core<br />
Series with<br />
rectifier shunted<br />
across coils<br />
Timing<br />
Characteristics<br />
Pickup normal<br />
Release normal<br />
Pickup fast<br />
Release normal<br />
Release slow: up<br />
to as high as<br />
three (3) seconds<br />
Pickup slow: up<br />
to as high as<br />
three (3) seconds<br />
Pickup normal<br />
Release slow,<br />
but less slow<br />
than 3A or 3B<br />
Notes<br />
I = WORKING current<br />
R = resistance of one coil<br />
E = voltage required to get<br />
full pressure on the front<br />
contact<br />
Voltage across coils is one<br />
half (1/2) the voltage across<br />
the coils of item 1 above<br />
Timing is affected when<br />
controlled over line because<br />
of line drop<br />
Timing is affected when<br />
controlled over line because<br />
of line drop<br />
Do not use in circuits<br />
subject to lightning<br />
Do not energize from a<br />
battery whose other circuits<br />
are subject to lightning<br />
Theory of Operation
P1457, Rev. Nov/07 2–12 <strong>Alstom</strong> Signaling Inc.<br />
5<br />
6<br />
–<br />
–<br />
7<br />
–<br />
8<br />
9<br />
–<br />
–<br />
Circuit<br />
B1 Relay B2 Relay<br />
3A<br />
3D<br />
3A<br />
3D<br />
3A<br />
3D<br />
3A<br />
3D<br />
3A<br />
3D<br />
3B<br />
3C<br />
3B<br />
3C<br />
3B<br />
3C<br />
3B<br />
3C<br />
3B<br />
3C<br />
3E<br />
3E<br />
3E<br />
+<br />
+<br />
+<br />
+<br />
3E<br />
+<br />
3E<br />
–<br />
–<br />
–<br />
–<br />
–<br />
Table 2–2. Coil Connections and Timing Characteristics (Cont.)<br />
1C<br />
6D<br />
6D<br />
1C<br />
6D<br />
1C<br />
1C<br />
6D<br />
1C<br />
6D<br />
1D<br />
+<br />
6C 6E<br />
6C<br />
1D<br />
6C<br />
1D<br />
1D<br />
6C<br />
1D<br />
6C<br />
6E<br />
6E<br />
+<br />
+<br />
+<br />
6E<br />
+<br />
6E<br />
Circuit<br />
Description<br />
Multiple with<br />
rectifier shunted<br />
across coils<br />
One coil<br />
operating, one<br />
coil shunted<br />
One coil<br />
operating, one<br />
coil shunted<br />
when armature<br />
is picked up<br />
Series with<br />
resistor shunted<br />
across coils<br />
Series with<br />
resistor and<br />
capacitor<br />
shunted across<br />
coils<br />
Timing<br />
Characteristics<br />
Pickup fast<br />
Release slow,<br />
but less slow<br />
than 4<br />
Pickup slow<br />
Release slow,<br />
but less slow<br />
than 4<br />
Pickup normal<br />
Release slow,<br />
but less slow<br />
than 3A, 3B, or 4<br />
Pickup normal<br />
Release slow,<br />
but less slow<br />
than 3A, 3B, or 4<br />
Pickup normal<br />
Release slow,<br />
slower than 3A or<br />
3B, up to ten (10)<br />
seconds<br />
Notes<br />
Do not use in circuits<br />
subject to lightning<br />
Shunt should be applied to<br />
the lower coil of B1 relays to<br />
get the maximum slow<br />
release effect<br />
The lower the resistor, the<br />
slower the relay; takes more<br />
current, will therefore affect<br />
operation of any relays in<br />
series<br />
The greater the capacity of<br />
the capacitor, the slower the<br />
relay; a resistor should<br />
always be used in series in<br />
case the capacitor shorts<br />
Theory of Operation
Theory of Operation<br />
2.3. BIASED-NEUTRAL TRACK RELAYS<br />
All biased-neutral track relays (B1 and B2) have normal pickup and release timing<br />
characteristics. Figures 2–10 and 2–11 illustrate typical B1 biased-neutral relays.<br />
Figure 2–10. <strong>Type</strong> B1 Biased-Neutral Relay, Pre-1991 Cover<br />
Figure 2–11. <strong>Type</strong> B1 Biased-Neutral Relay, Post-1991 Cover<br />
P1457, Rev. Nov/07 2–13 <strong>Alstom</strong> Signaling Inc.
Theory of Operation<br />
Figure 2–12 shows typical B1 relay wiring.<br />
2 WINDINGS IN PARALLEL<br />
(FRONT VIEW)<br />
16<br />
15<br />
14<br />
13<br />
12<br />
11<br />
26<br />
25<br />
24<br />
23<br />
22<br />
21<br />
36<br />
35<br />
34<br />
33<br />
32<br />
31<br />
UPPER COIL<br />
LOWER COIL<br />
I<br />
O<br />
I<br />
O<br />
3A<br />
3B<br />
3C<br />
3D<br />
(-)<br />
1E<br />
(+)<br />
3E<br />
PLUGBOARD JUMPERS<br />
TO PARALLEL COILS<br />
THICK WIRING IS PLUGBOARD WIRING.<br />
THIN WIRING IS RELAY WIRING.<br />
I ="IN" LEAD<br />
O = "OUT" LEAD<br />
Figure 2–12. Typical B1 Track Relay Wiring<br />
Another application of the biased-neutral function is in the DC high percentage release<br />
track relay that can be used in track circuits up to 20,000 feet long. With its low nominal<br />
resistance of 0.5 ohm (with coils connected in parallel), this B1 relay provides fast, high<br />
shunting sensitivity under poor ballast conditions while giving excellent protection<br />
against foreign current. In addition, this relay will not pick up when 50 times reverse<br />
polarity WORKING current is applied.<br />
The operation of a biased-neutral line relay is discussed under Heading 2.4.2.<br />
P1457, Rev. Nov/07 2–14 <strong>Alstom</strong> Signaling Inc.
Theory of Operation<br />
2.4. DC LINE RELAYS<br />
2.4.1. Neutral Line Relay<br />
<strong>Type</strong> B neutral line relays are made in both Size 1 and Size 2. They have normal pickup<br />
and release, are available as slow-release, slow pickup, and slow pickup and release.<br />
In the normal pickup and release relays, the coils are full length. In slow-release and<br />
slow pickup relays, coils of shorter lengths are used to make room for slugs on the<br />
cores. In relays where one coil only is used (a full-length slug being on the other core),<br />
the coil is usually placed on the lower core. Figure 2–13 shows coil connections.<br />
2 COILS IN SERIES<br />
B1 NEUTRAL<br />
(FRONT VIEW)<br />
2 COILS IN SERIES<br />
B2 NEUTRAL<br />
(FRONT VIEW)<br />
12 FRONT<br />
BACK SETS<br />
OF CONTACTS<br />
UPPER COIL<br />
LOWER COIL<br />
I<br />
O<br />
I<br />
O<br />
3A<br />
3B<br />
3C<br />
3D<br />
3E<br />
(–)<br />
1C<br />
(–) I<br />
1D<br />
PLUGBOARD<br />
O<br />
JUMPER<br />
TO SERIES COILS<br />
(+)<br />
I<br />
O<br />
6E<br />
6C<br />
6D<br />
(+)<br />
THICK WIRING IS PLUGBOARD WIRING<br />
THIN WIRING IS RELAY WIRING.<br />
I = "IN" LEAD<br />
O = "OUT" LEAD<br />
Figure 2–13. B1 and B2 Neutral Line <strong>Relays</strong> Wiring<br />
Various resistances are available, but the nominal 500-ohm relay is recommended for<br />
most purposes.<br />
P1457, Rev. Nov/07 2–15 <strong>Alstom</strong> Signaling Inc.
Theory of Operation<br />
2.4.2. Biased-Neutral Line Relay<br />
The biased-neutral line relay is basically a relay with a neutral structure. It is, however,<br />
equipped with a permanent magnet and a leakage strip bridging the cores and placed<br />
between the coils and the armature. The effect on the operation is to allow the relay to<br />
pick up only if voltage of the proper polarity is applied.<br />
In other respects, the relay is essentially like a regular neutral relay. It is built in Sizes 1<br />
and 2.<br />
Figures 2–14 through 2–16 how the relay works.<br />
-<br />
S<br />
VOLTAGE OF<br />
CORRECT<br />
POLARITY<br />
+<br />
N<br />
ARMATURE<br />
PICKS UP<br />
Figure 2–14. Voltage of Right Polarity Applied<br />
P1457, Rev. Nov/07 2–16 <strong>Alstom</strong> Signaling Inc.
Theory of Operation<br />
S<br />
NO VOLTAGE<br />
N<br />
ARMATURE<br />
DOES NOT<br />
PICK UP<br />
Figure 2–15. No Voltage Applied<br />
+<br />
S<br />
VOLTAGE OF<br />
WRONG<br />
POLARITY<br />
-<br />
N<br />
ARMATURE<br />
DOES NOT<br />
PICK UP<br />
Figure 2–16. Voltage of Wrong Polarity Applied<br />
P1457, Rev. Nov/07 2–17 <strong>Alstom</strong> Signaling Inc.
Theory of Operation<br />
2.4.3. Magnetic-Stick Line Relay<br />
Magnetic-stick relays are commonly used in switch control and indication circuits.<br />
Magnetic-stick or "polar stick" relays operate by responding to a change in the direction<br />
of the current flow through their coils. The armature stays in its last operated position<br />
when energy is cut off.<br />
The armature is polarized by two permanent magnets. Internal nominal 150-ohm<br />
resistors can be connected by plugboard jumpers for operation on 2, 10 or 20 volts.<br />
Figures 2–17 through 2–20 show relay operation and different contact closures resulting<br />
from armature movement. Figure 2–21 depicts the normal wiring connections.<br />
R<br />
PUSHER<br />
N<br />
NORMAL<br />
CONTACTS<br />
OPEN<br />
S<br />
N<br />
NO VOLTAGE<br />
ARMATURE<br />
Figure 2–17. Magnetic-Stick Relay, Reverse Position<br />
P1457, Rev. Nov/07 2–18 <strong>Alstom</strong> Signaling Inc.
Theory of Operation<br />
R<br />
N<br />
NORMAL<br />
CONTACTS<br />
CLOSED<br />
S<br />
N<br />
RECOMMENDED<br />
VOLTAGE TO<br />
POSITION RELAY<br />
NORMAL<br />
Figure 2–18. Armature Picked Up with Normal Polarity<br />
NORMAL<br />
CONTACTS<br />
CLOSED<br />
R<br />
N<br />
S<br />
N<br />
NO VOLTAGE<br />
Figure 2–19. Armature Held Up By Permanent Magnet's Attraction<br />
P1457, Rev. Nov/07 2–19 <strong>Alstom</strong> Signaling Inc.
Theory of Operation<br />
R<br />
N<br />
REVERSE<br />
CONTACTS<br />
CLOSED<br />
S<br />
N<br />
RECOMMENDED<br />
VOLTAGE TO<br />
POSITION RELAY<br />
REVERSE<br />
Figure 2–20. Armature Knocked Down with Reverse Polarity<br />
(FRONT VIEW)<br />
16 26 36<br />
25<br />
24<br />
14 34<br />
13 23 33<br />
22<br />
21<br />
11 31<br />
NORMAL CONTACTS ARE 13, 16, 33 AND 36<br />
REVERSE CONTACTS ARE 11, 14, 31 AND 34<br />
FOR SERIES COIL CONFIGURATION AT 10 VOLTS,<br />
WITH + ON 21 AND - ON 26 AND 23 & 25 JUMPERED<br />
THE NORMAL CONTACTS CLOSE.<br />
WITH - ON 21 AND + ON 26 AND 23 & 25 JUMPERED<br />
THE REVERSE CONTACTS CLOSE.<br />
I<br />
O<br />
I<br />
O<br />
3E<br />
THICK WIRING IS PLUGBOARD WIRING.<br />
THIN WIRING IS INTERNAL RELAY WIRING.<br />
I = "IN" LEAD<br />
O = "OUT" LEAD<br />
Figure 2–21. B1 Magnetic-Stick Relay Wiring<br />
P1457, Rev. Nov/07 2–20 <strong>Alstom</strong> Signaling Inc.
Theory of Operation<br />
2.4.4. Microchron II Timer <strong>Relays</strong><br />
The ‘Microchron II® Timer’ is a timing relay mechanism consisting of a timing package<br />
and a relay assembly housed within a B2 relay enclosure. See Figure 2–22.<br />
abcd<br />
LED LOCATION<br />
(DC TIMER)<br />
Handle<br />
PCB SLOT<br />
LED LOCATION<br />
(AC TIMER)<br />
DC TIMER<br />
THUMBWHEEL CUTOUT<br />
AC TIMER<br />
THUMBWHEEL CUTOUT<br />
Figure 2–22. Microchron II Timer Relay Cover<br />
The <strong>Alstom</strong> relay identified as "Microchron II Timer Relay" is a DC relay. <strong>Alstom</strong> also<br />
manufactures the "AC Microchron II Timer Relay," an AC version.<br />
2.4.4.1. Fail-Safe Performance<br />
The <strong>Vital</strong> design of the Microchron II Timer Relay ensures that a time delay interval<br />
shorter than that selected cannot be performed. Component degradation or failure can<br />
only lead to a longer than selected time delay.<br />
P1457, Rev. Nov/07 2–21 <strong>Alstom</strong> Signaling Inc.
Theory of Operation<br />
2.4.4.2. Microchron II Timer Relay (DC)<br />
Designed to replace existing DC motor timers, the Microchron II Timer Relay possesses<br />
a delay range from 1 second to 19 minute and 59 seconds. The range is adjustable in 1-<br />
second increments. Delay is initiated once input power is applied.<br />
The timing package consists of two printed circuit boards that perform time select and<br />
voltage regulation/relay driver and delay processing operations. The front edge of the<br />
delay processor provides visual indications of the delay sequencing. Those provided<br />
include ‘DELAY COMPLETE’ and ‘TIMING/POWER ON’. The time selection is<br />
accomplished by removing the cover from in front of the thumbwheel select switch<br />
assembly and placing the thumbwheels in the desired position.<br />
Four wires run external to the timer assembly: two wires for input power, that are<br />
terminated on the relay contact block and two wires that are connected to the B relay<br />
coils on the relay assembly. Connections between the timer and relay assemblies are<br />
accomplished using pin and socket type connectors.<br />
The relay mechanism consists of a B1 neutral relay with two series connected coils<br />
each with a nominal DC resistance of 250 ohms. Contact configuration is 3 fronts (silver<br />
impregnated carbon to silver), 2 backs (silver to silver impregnated carbon), and 2 frontback<br />
(silver impregnated carbon to silver, silver to silver).<br />
The Microchron II Timer is normally de-energized. Once power is applied, the<br />
microprocessor begins the vital program. Initially vital functions are tested and data<br />
memory is checked for failures. Next, the time selected on the thumbwheel switches is<br />
scanned and appropriate delay counters are initialized. The delay sequence then<br />
begins. The ‘TIMING/POWER ON’ indicator flashes at one-second intervals as the<br />
delay proceeds. A signature analysis following completion of the delay is a final check<br />
that all operations have been properly performed. Successful performance of the<br />
signature analysis allows the program to enter the vital output routine that provides a 10<br />
kHz signal needed to energize the B relay. The indicator ‘DELAY COMPLETE’ is<br />
illuminated at that time. Slight illumination of the ‘TIMING/POWER ON’ indicator<br />
provides visual indication that power is being applied to the unit.<br />
2.4.4.2.1. Operating Specifications<br />
• Input voltage (DC) : 8V to 31.5 VDC<br />
• Maximum Current Draw: 0.100 Amps @ 15VDC Input<br />
• Relay Maximum PICKUP and WORKING Current: 0.0121 Amps<br />
• Relay Coil Resistance (series connected coils): 500 ohms (Nominal)<br />
• Operating Temperature: -40°C to +70°C<br />
P1457, Rev. Nov/07 2–22 <strong>Alstom</strong> Signaling Inc.
Theory of Operation<br />
2.4.4.2.2. Application Considerations<br />
Because the Microchron II timer design is different from that of the DC motor-operated<br />
timer, it always returns to the off position when energy is removed. Thus, it provides full<br />
“set” time from the instant energy is applied. Because of this characteristic, no backcheck<br />
contacts are required.<br />
The Microchron II timer, however, with back-check contacts facilitates its use as a<br />
replacement for the types B2 and KB motor timers without wiring changes. Two backcheck<br />
contacts are in plugboard positions 43-44 and 53-54, as on the <strong>Type</strong> B2 motoroperated<br />
timer. Two front contacts in plugboard positions 45-46 and 55-56, as on the<br />
<strong>Type</strong> B2 motor timer, also permit the Microchron II timer to be a replacement for <strong>Type</strong>s<br />
B2 and KB timer relays if the following WARNING is obeyed:<br />
WARNING<br />
THE MICROCHRON II TIMER MAY NOT BE INTERCHANGEABLE WITH<br />
A MOTOR OPERATED TIMER IN EVERY CIRCUIT APPLICATION.<br />
DIFFERENCES IN OPERATION OF THE MOTOR TIMER BACK<br />
CONTACT REQUIRE CONSIDERATION OF THE CHECK CONTACT<br />
OPERATION IN THE SPECIFIC APPLICATION TO ENSURE THAT THE<br />
SAFETY PERFORMANCE OF THE CIRCUIT IS NOT COMPROMISED.<br />
BACK CONTACTS, OR CHECK CONTACTS, ON THE TYPE B2 AND KB<br />
MOTOR TIMERS OPEN AT THE BEGINNING OF THE TIMING CYCLE.<br />
BACK CONTACTS ON THE MICROCHRON II TIMER RELAY OPEN AT<br />
THE END OF THE TIMING CYCLE.<br />
WHILE IT IS DOUBTFUL THAT THERE IS A PROBLEM WITH THE<br />
MAJORITY OF CIRCUITS IN USE, AS AN ADDED SAFETY<br />
PRECAUTION TO PREVENT AN INADVERTENT SUBSTITUTION, THE<br />
MICROCHRON II TIMER RELAY HAS A REGISTRATION PLATE<br />
DIFFERENT FROM ANY OTHER TYPE B2 DC MOTOR TIMER.<br />
P1457, Rev. Nov/07 2–23 <strong>Alstom</strong> Signaling Inc.
Theory of Operation<br />
2.4.4.3. AC Microchron II Timer Relay<br />
The <strong>Alstom</strong> AC Microchron II Timer Relay is a vital time element relay unit consisting of<br />
a standard vital neutral relay structure and a solid-state timer. There are two versions of<br />
this unit. One version operates at 60 Hz and the other version operates at 25 Hz. This<br />
relay is referenced as the 25 Hz version in this manual.<br />
• The 60 Hz unit operates from a nominal 110 Volts root mean square (Vrms) AC at<br />
60 Hz power.<br />
• The 25 Hz unit operates from a nominal 55 Volts root mean square (Vrms) AC at 25<br />
Hz power.<br />
NOTE<br />
To assure safe application of the AC Microchron II Timer Relay 60 Hz unit,<br />
all application circuits must be reviewed by <strong>Alstom</strong> engineering before it<br />
will be approved for use.<br />
For both units, the timing range can be set from 1.0 seconds to 19 minutes 59.9<br />
seconds in 0.1-second increments, with accuracy held to +0.1% of the setting plus a<br />
maximum delay of 0.75 seconds. Normal operating temperature ranges between -40°C<br />
to 70°C (-40°F to 160°F). The primary components of the AC Microchron II Timer Relay<br />
are the same for all B relays, including both the 25 Hz and 60 Hz versions of this relay,<br />
see Figure 2–1.<br />
The timer module contains a microcontroller and Complementary Metal Oxide<br />
Semiconductor (CMOS) technology integrated circuits. The timer and relay structure are<br />
housed in a standard <strong>Alstom</strong> <strong>Type</strong> B2 relay enclosure. The unit plugs onto a B2<br />
plugboard.<br />
The vital relay structure of the unit has two series-connected coils. The contacts<br />
available for external use include one front-back 26-25-24 (silver impregnated-carbon to<br />
silver and silver to silver), three fronts 13-14, 15-16, 35-36 (silver impregnated-carbon to<br />
silver), and one back check circuit connected to contacts 11-12 (silver to silver). The<br />
remaining contacts are not available for external use due to the requirement for<br />
backward compatibility with AC Motor Timers and the common registration plate. The<br />
relay contacts are the same for both the 25 Hz and 60 Hz versions of the relay. Figure<br />
2–23 shows a front view of the relay contacts.<br />
P1457, Rev. Nov/07 2–24 <strong>Alstom</strong> Signaling Inc.
Theory of Operation<br />
Group Space- Front View<br />
6<br />
5<br />
4<br />
3<br />
2<br />
1<br />
1 2 3<br />
Make-before-<br />
Break Contact<br />
Contact read as (Column,Row)<br />
AC in<br />
(Start)<br />
Electrical<br />
Short<br />
4 5 6<br />
Safety<br />
Contacts<br />
Medium Duty<br />
Contacts<br />
Figure 2–23. Relay Contacts, Front View<br />
The unit contains two circuit boards, the Thumbwheel Switch Board and a Timer<br />
Processor Board. The Thumbwheel Switch Board contains a five-section thumbwheel<br />
switch to set the time and an AC to DC converter circuit. The Timer Processor Board<br />
contains a vitally programmed 8-bit microcontroller, low voltage shutdown and<br />
reset/watchdog Integrated Chip (IC), DC to DC converter, secondary reference clock<br />
and vital relay driver. Figure 2–24 is a schematic of relay component interaction.<br />
Relay Contact<br />
Block Assembly<br />
AC input<br />
55<br />
#18 WHITE<br />
56<br />
#18 BLACK<br />
BLACK<br />
OUT<br />
OUT<br />
Top Coil<br />
Bottom Coil<br />
Thumbwheel Switch Board<br />
IN -<br />
RED<br />
IN + RED<br />
3<br />
Timer Processor<br />
Board<br />
1<br />
1<br />
J2-<br />
J2-<br />
2<br />
2<br />
31166-299-01<br />
(110 Vrms/60 Hz)<br />
or<br />
31166-299-02<br />
(55 Vrms/25 Hz)<br />
Unregulated<br />
31166-300-01<br />
DC<br />
3 (110 Vrms/60 Hz) + #18 WHITE<br />
2<br />
or<br />
P2- 31166-353-01 P2-<br />
P2-<br />
P2-- #18 BLACK<br />
1 (55 Vrms/25 Hz) 4<br />
J2-<br />
J2-<br />
4<br />
Figure 2–24. AC Microchron II Timer Relay Schematic<br />
P1457, Rev. Nov/07 2–25 <strong>Alstom</strong> Signaling Inc.
Theory of Operation<br />
Table 2–3 summarizes the AC Microchron II Timer Relay operating characteristics.<br />
Table 2–3. AC Microchron II Timer Relay Operating Characteristics<br />
Relay 50800-103-01 50800-104-01<br />
Input Voltage<br />
Range<br />
Input Power While<br />
Timing<br />
88 to 135 Vrms, 60 Hz AC 44 to 66 Vrms, 25 Hz AC<br />
11 mA rms at 88 Vrms<br />
18 mA rms at 110 Vrms<br />
44 mA rms at 135 Vrms<br />
23 mA rms at 44 Vrms<br />
54 mA rms at 55 Vrms<br />
161 mA rms at 66 Vrms<br />
Input Power After<br />
Timing with Relay<br />
Energized<br />
26 mA rms at 88 Vrms<br />
27 mA rms at 110 Vrms<br />
45 mA rms at 135 Vrms<br />
52 mA rms at 44 Vrms<br />
61 mA rms at 55 Vrms<br />
148 mA rms at 66 Vrms<br />
The Timer Processor Board interfaces with the Thumbwheel Switch Board through a PC<br />
edge connector. The four-wire connector on the Thumbwheel Switch Board is used to<br />
provide AC power to the AC to DC converter (two wires), and route unregulated DC<br />
power to the Timer Processor Board (two wires).<br />
<strong>Vital</strong> software verifications continuously check the result of the microcontroller’s and<br />
supporting hardware’s functions. The microcontroller electronically energizes the relay<br />
coils after a set time delay interval has been reached. Any interruption of power to the<br />
relay causes the unit to reset and immediately return to the beginning of the timing<br />
interval.<br />
Indicators on the unit include a red LED that pulses during the timing cycle and<br />
becomes steady when the timing cycle is complete. A green LED illuminates at the<br />
completion of the timing cycle.<br />
P1457, Rev. Nov/07 2–26 <strong>Alstom</strong> Signaling Inc.
Theory of Operation<br />
2.4.4.3.1. Application Considerations<br />
The AC Microchron II Timer Relay has a common registration plate to the AC Motor<br />
Timer. The timer is designed to replace the AC Motor Timers listed in Table 2–4. The<br />
application of the AC Motor Timer used a check circuit wired between contacts 12 and<br />
53. This circuit consisted of two sets of contacts wired in series. The first set of relay<br />
contacts, 11 and 12, is a back check contact of the relay structure. The second set of<br />
contacts, 53 and 63 constitute a back check contact of the motor structure.<br />
Figure 2–25 shows a wiring diagram for the AC Motor Timer Plugboard with the two<br />
sets of contacts wired in series so that if one of them is open, the circuit opens.<br />
Verifying the closure of both sets of contacts verifies the timer has reset and a full timing<br />
cycle runs the next time power is supplied.<br />
NOTE 1: Thin lines represent internal wiring of Relay.<br />
Thick lines represent external Plugboard wiring.<br />
Control<br />
3E<br />
4E<br />
Test Terminal<br />
Check Circuit<br />
Plug Terminals<br />
TIME<br />
16<br />
15<br />
14<br />
13<br />
12<br />
11<br />
MBB<br />
26<br />
25<br />
24<br />
23<br />
22<br />
21<br />
36<br />
35<br />
34<br />
33<br />
32<br />
31<br />
46<br />
45<br />
44<br />
43<br />
M<br />
Motor<br />
56<br />
55<br />
54<br />
53<br />
+<br />
Clutch<br />
-<br />
CHECK<br />
66<br />
65<br />
64<br />
63<br />
-<br />
+<br />
Upper Coil<br />
(Slow Release)<br />
Lower Coil<br />
(Operating)<br />
+<br />
-<br />
IN<br />
OUT<br />
IN<br />
OUT<br />
Plugboard Wiring<br />
Figure 2–25. AC Motor Timer Plugboard Wiring Diagram<br />
P1457, Rev. Nov/07 2–27 <strong>Alstom</strong> Signaling Inc.
Theory of Operation<br />
A jumper on the AC Microchron II Timer Relay has replaced the motor back check<br />
contact that existed between contacts 53 and 63 in the AC Motor Timer. The new AC<br />
Microchron II Timer Relay inherently provides full “set” time from the instant energy is<br />
applied; therefore, no “motor” back check contact is required for this function.<br />
2.4.4.3.2. Replaceable AC Motor Timers<br />
With proper installation, the AC Microchron II Timer Relay can replace certain AC Motor<br />
Timers. Table 2–4 shows the AC Motor Timers it can replace.<br />
WARNING<br />
THE AC MICROCHRON II TIMER RELAY MAY NOT BE<br />
INTERCHANGEABLE WITH A MOTOR-OPERATED TIMER IN EVERY<br />
CIRCUIT APPLICATION BECAUSE OF THE FOLLOWING DIFFERENCE<br />
BETWEEN THE TWO TIMERS:<br />
• AC MICROCHRON II TIMER RELAY - CHECK CIRCUIT OPENS<br />
AFTER TIME DELAY HAS EXPIRED, AND CLOSES WHEN POWER<br />
IS REMOVED<br />
• AC MOTOR TIMER - CHECK CIRCUIT OPENS AT BEGINNING OF<br />
TIME DELAY AND CLOSES WHEN POWER IS REMOVED<br />
Table 2–4. Replaceable AC Motor Timers<br />
AC Microchron II Timer Relay Part Number<br />
50800-103-01 (60 HZ operation)<br />
50800-104-01 (25 Hz operation)<br />
AC Motor Timer Part Number<br />
56007-050-01<br />
56007-051-01<br />
56007-060-01<br />
56007-061-01<br />
56007-066-01<br />
56007-067-01<br />
56007-067-02<br />
56007-068-01<br />
56007-068-02<br />
56007-062-01<br />
56007-063-01<br />
56007-065-01<br />
56007-069-01<br />
56007-070-01<br />
P1457, Rev. Nov/07 2–28 <strong>Alstom</strong> Signaling Inc.
Theory of Operation<br />
2.5. DC SPECIAL PURPOSE RELAYS<br />
2.5.1. Highway Crossing Signal Flasher Relay<br />
The electronically driven highway crossing flasher consists of a <strong>Type</strong> B1 neutral relay<br />
and a solid-state flasher module. The flasher module, attached to energy terminals on<br />
the back of the relays plugboard, establishes and maintains a flashing rate of 48 to 54<br />
flashes per minute (fpm) for highway crossing signals or 56 to 64 fpm for flashing<br />
wayside signal aspects. The drawing number of the flasher module determines the flash<br />
rate. Wiring is shown by Figure 2–26.<br />
(FRONT VIEW)<br />
16<br />
26<br />
36<br />
15<br />
25<br />
35<br />
14<br />
13<br />
12<br />
24<br />
23<br />
22<br />
34<br />
33<br />
32<br />
THICK WIRING IS PLUGBOARD WIRING.<br />
THIN WIRING IS RELAY WIRING.<br />
I ="IN" LEAD<br />
O = "OUT" LEAD<br />
11<br />
21<br />
31<br />
I<br />
O<br />
3C<br />
3D<br />
R+<br />
-<br />
+<br />
1E<br />
3E<br />
(-) (+)<br />
Figure 2–26. Electronically-Driven Flasher Relay Wiring<br />
The flasher module drives the <strong>Type</strong> B1 neutral relay that has four dependent front-back,<br />
heavy-duty, lamp-control contacts. Full back contact pressure is maintained while the<br />
relay is not operating.<br />
P1457, Rev. Nov/07 2–29 <strong>Alstom</strong> Signaling Inc.
Theory of Operation<br />
2.5.2. Power-Transfer Relay<br />
A <strong>Type</strong> B power-transfer relay, built in Size 1 only, is essentially a DC neutral line relay<br />
operating on rectified alternating current. The rectifier (P/N 59899-005-03) is shown in<br />
Figure 2–27.<br />
B RELAY 1E POST<br />
RECTIFIER<br />
B RELAY 1E POST<br />
FRONT<br />
PLUGBOARD<br />
Figure 2–27. <strong>Type</strong> S1/4 Half-Wave Rectifier for Power-Transfer Relay<br />
While AC energy is on, the relay stays energized. If AC energy fails the relay armature<br />
drops and automatically transfers the circuits to local battery. The percent of release<br />
voltage, found by dividing the DROP AWAY voltage by the PICKUP voltage, is about 75<br />
percent at 70 degrees F. Power-transfer relay coil wiring is shown in Figure 2–28.<br />
P1457, Rev. Nov/07 2–30 <strong>Alstom</strong> Signaling Inc.
Theory of Operation<br />
(FRONT VIEW)<br />
1E<br />
16 26 36<br />
15 25 35<br />
14 24 34<br />
13 23 33<br />
12 22 32<br />
11 21 31<br />
I<br />
O<br />
I<br />
O<br />
3A<br />
3B<br />
3C<br />
3D<br />
3E<br />
6<br />
(-)<br />
5<br />
4<br />
3<br />
(+)<br />
2<br />
1<br />
(-)<br />
12-24 VAC<br />
THICK WIRING IS PLUGBOARD WIRING.<br />
THIN WIRING IS RELAY WIRING.<br />
I = "IN" LEAD<br />
O = "OUT" LEAD<br />
Figure 2–28. Power-Transfer Relay Wiring<br />
P1457, Rev. Nov/07 2–31 <strong>Alstom</strong> Signaling Inc.
Theory of Operation<br />
2.5.3. Lamp-Control Relay<br />
<strong>Type</strong> B lamp-control relays, made in Size 1 only, regulate lamp circuits at highway<br />
grade crossings protected by flashing lights. The lamp-control contacts in space 1<br />
handle up to 15 amperes at 12 volts. The regular duty contacts in space 3 are for other<br />
circuits.<br />
When the relay is deenergized, the contact pusher in space 1 drops away from the<br />
lamp-control contact fingers. With this design, oscillations of the armature due to its<br />
striking the stop are not transmitted to the contacts when the relay is de-energized. The<br />
armature is completely disconnected from the contact fingers.<br />
Coil resistance is lower than the resistance of regular line relays to obtain fast pickup,<br />
opening the back contacts as rapidly as possible. Figure 2–29 shows standard wiring<br />
connections.<br />
(FRONT VIEW)<br />
36<br />
LAMP<br />
CONTROL<br />
CONTACTS<br />
15<br />
14<br />
13<br />
12<br />
35<br />
34<br />
33<br />
32<br />
REGULAR<br />
FRONT-BACK<br />
CONTACTS<br />
31<br />
I<br />
O<br />
I<br />
O<br />
3A<br />
3B<br />
3C<br />
3D<br />
(–)<br />
3E<br />
(+)<br />
THICK WIRING IS PLUGBOARD WIRING.<br />
THIN WIRING IS RELAY WIRING.<br />
I = "IN" LEAD<br />
O = "OUT" LEAD<br />
Figure 2–29. Lamp-Control Relay Wiring<br />
P1457, Rev. Nov/07 2–32 <strong>Alstom</strong> Signaling Inc.
Theory of Operation<br />
2.5.4. Switch-Overload Relay<br />
The <strong>Type</strong> B1 switch-overload relay picks up on motor overload current through its lowresistance<br />
coil, and sticks up on control circuit energy through its high-resistance coil.<br />
See Figure 2–30 for an example of relay wiring.<br />
(FRONT VIEW)<br />
26<br />
25<br />
24<br />
23<br />
22<br />
21<br />
I<br />
O<br />
I<br />
O<br />
3A<br />
3B<br />
3C<br />
3D<br />
(–)<br />
(+)<br />
(+)<br />
(–)<br />
HOLD COIL<br />
PICK COIL<br />
THICK WIRING IS PLUGBOARD WIRING.<br />
THIN WIRING IS RELAY WIRING.<br />
I = "IN" LEAD<br />
O = "OUT" LEAD<br />
Figure 2–30. Switch-Overload Relay Wiring<br />
Pickup of the relay releases the switch control relays, thus removing energy from the<br />
switch machine motor. When the polarity is reversed, the stick circuit opens and the<br />
overload relay releases, permitting reversal of the switch movement.<br />
Built-in thermal slow pickup characteristics prevent the relay from operating on normal<br />
starting surges of the switch motor. This feature also permits repeated switch operation<br />
that may dislodge the switch obstruction that is causing the overload.<br />
Switch-overload relays are available for low- or high-voltage switch machines.<br />
P1457, Rev. Nov/07 2–33 <strong>Alstom</strong> Signaling Inc.
Theory of Operation<br />
2.5.5. Code-Responsive Relay<br />
<strong>Type</strong> B code-responsive relays are built in Size 1 only. They are made with a light<br />
armature and contact structure so that they respond quickly to pulses of coded energy,<br />
even when the pulse frequency is as high as four pulses per second.<br />
Two types of structures are available. One structure has a maximum of two dependent<br />
front-back contacts and the other has a maximum of four dependent front-back<br />
contacts. The four-contact structure is usually supplied for heavy service, as the contact<br />
design provides more effective non-bounce characteristics.<br />
The relay armature is polarized by two permanent magnets so arranged as to allow the<br />
front contacts to close only if the proper polarity is applied. When the relay is deenergized,<br />
a bias spring, together with magnetic bias, returns the armature to the deenergized<br />
position to close the back contacts. Figures 2–31 and 2–32 show how the<br />
relay works.<br />
TRACK CIRCUIT DEENERGIZED<br />
+ –<br />
CODE TRANSMITTER<br />
SHUNTING RAILS<br />
N<br />
S<br />
Figure 2–31. Code-Responsive Relay De-energized<br />
P1457, Rev. Nov/07 2–34 <strong>Alstom</strong> Signaling Inc.
Theory of Operation<br />
TRACK CIRCUIT ENERGIZED<br />
+ –<br />
CODE TRANSMITTER<br />
APPLYING BATTERY<br />
TO RAILS<br />
FRONT<br />
CONTACTS<br />
CLOSED<br />
N<br />
S<br />
Figure 2–32. Code-Responsive Relay Energized<br />
Figure 2–33 shows positive energy is connected to 3A and negative to 3C. All other B1<br />
relays have positive on 3C and negative on 3A. Each contact is connected internally to<br />
the terminal in the base for plug-in connection. Plugboard connections may be on 1 or 2<br />
terminals, depending on current values.<br />
P1457, Rev. Nov/07 2–35 <strong>Alstom</strong> Signaling Inc.
Theory of Operation<br />
(FRONT VIEW)<br />
16<br />
15<br />
14<br />
13<br />
26<br />
25<br />
24<br />
23<br />
12<br />
11<br />
22<br />
21<br />
I<br />
O<br />
I<br />
O<br />
3A<br />
3B<br />
3C<br />
3D<br />
(–)<br />
3E<br />
(+)<br />
THICK WIRING IS PLUGBOARD WIRING.<br />
THIN WIRING IS RELAY WIRING.<br />
I = "IN" LEAD<br />
O = "OUT" LEAD<br />
Figure 2–33. Code-Responsive Relay Wiring<br />
P1457, Rev. Nov/07 2–36 <strong>Alstom</strong> Signaling Inc.
Theory of Operation<br />
2.5.6. Code Rate Transmitter Relay<br />
<strong>Type</strong> B code rate transmitter relays are built only in Size 2. This relay has an oscillating<br />
armature secured to a vertical shaft that is supported at both ends by bearings. Affixed<br />
to the upper part of the shaft is one cam. The cam opens and closes sets of contacts.<br />
Below the cam is an armature positioned between two pole pieces. Below the armature<br />
is a spiral spring. These parts form the rotor for the relay.<br />
COIL<br />
D-C VOLTAGE<br />
APPLIED HERE<br />
COIL CONTACT<br />
BACK CODING<br />
CONTACTS<br />
CLOSED ON<br />
POWER STROKE<br />
LOWER CAM<br />
POLE PIECES<br />
UPPER CAM<br />
SHAFT<br />
FRONT CODING<br />
CONTACTS<br />
CLOSED ON<br />
BACK STROKE<br />
WEIGHT DISC<br />
ARMATURE<br />
POSTION<br />
(POWER<br />
STROKE)<br />
ARMATURE POSITION<br />
(BACK STROKE)<br />
ARMATURE<br />
IN DEENERGIZED<br />
POSITION<br />
SPIRAL COIL<br />
SPRING<br />
POWER STROKE<br />
(COUNTERCLOCKWISE)<br />
BACKSTROKE<br />
(CLOCKWISE)<br />
Figure 2–34. Code Rate Transmitter Relay Operation<br />
P1457, Rev. Nov/07 2–37 <strong>Alstom</strong> Signaling Inc.
Theory of Operation<br />
The lower cam actuates contacts on either side of the cam to alternately open and close<br />
once for each rotor oscillation. Rate of armature oscillation depends on the mass of the<br />
armature and the length of the spiral spring. <strong>Relays</strong> with nominal rates of 50, 75, 120,<br />
180, 220 and 270 cycles per minute are available.<br />
CAUTION<br />
Code rate transmitter relays are shipped with a locked rotor. This lock<br />
must be released before the relay is placed in service. For more<br />
information, see "INSPECTION AND INSTALLATION," Section 3.<br />
Code rate transmitter relays have a single nominal 150-ohm resistance coil that<br />
operates in a 10-volt circuit. A nominal 1000-ohm resistance is shunted across the coil<br />
to absorb the inductive voltage surge, which occurs each time the contact opens the coil<br />
circuit.<br />
In addition, a 0.25 mfd capacitor and a 150-ohm resistor form an RC network that is<br />
shunted across the coil contact to suppress arcing and eliminate electro-magnetic<br />
interference. See Figure 2–35.<br />
FRONT OF RELAY<br />
( - )<br />
16 26 36 46 56 66<br />
11 21 31 41 51 61<br />
- +<br />
1B 1H 2B 2H<br />
5H 5F 6H 6F<br />
6E<br />
( + )<br />
THICK WIRING IS PLUGBOARD WIRING.<br />
THIN WIRING IS RELAY WIRING.<br />
Figure 2–35. Code Rate Transmitter Relay Wiring<br />
P1457, Rev. Nov/07 2–38 <strong>Alstom</strong> Signaling Inc.
Theory of Operation<br />
2.5.7. Code-Following, VTB Relay<br />
<strong>Type</strong> VTB code-following relays are used in coded track circuits and coded line circuits<br />
for signal control. It is used as a two position polar-biased relay.<br />
The relay occupies the plugboard space of a B2 relay and has one or two armatures,<br />
depending upon circuit application. The VTB relay plugboard, Figure 2–36, bolts on a B<br />
relay rack. Both plugboard and current test terminals are standard design. Optional<br />
voltage test terminals are designed for a clip-on meter lead.<br />
10<br />
9<br />
10<br />
9<br />
8<br />
7<br />
6<br />
5<br />
FEMALE<br />
REGISTRATION<br />
PLATE<br />
8<br />
7<br />
6<br />
5<br />
CONTACT<br />
TERMINALS<br />
4<br />
3<br />
4<br />
3<br />
2<br />
1<br />
2<br />
1<br />
6<br />
1<br />
6C<br />
6D<br />
6E 4E 3E 1E<br />
1C<br />
1D<br />
COIL<br />
TERMINALS<br />
TEST<br />
TERMINALS<br />
Figure 2–36. VTB Plugboard<br />
A simplified operating diagram of the polar-biased single armature relay is shown in<br />
Figure 2–37. The armature support spring is bent to provide a mechanical bias, thus,<br />
together with the permanent magnet, holding the armature against the left pole face<br />
when the relay is de-energized.<br />
P1457, Rev. Nov/07 2–39 <strong>Alstom</strong> Signaling Inc.
Theory of Operation<br />
FRAME<br />
MAGNET<br />
ARMATURE<br />
CORE<br />
Figure 2–37. Polar-Biased Single Armature Relay<br />
The following describes the two position polar-biased assembly. Both cores are<br />
connected by a yoke strap and bolted to the relay frame, forming a U-shaped structure.<br />
The armature is polarized by an alnico permanent magnet, which is mounted directly<br />
above the armature on the relay frame. The frame completes the magnetic circuit to the<br />
cores.<br />
The armature is supported at the center by two springs, which act as a trunnionless<br />
bearing. Vertical armature support springs are fastened at the bottom to the yoke.<br />
Horizontal guide springs are fastened at one end beyond either the right or left pole<br />
faces. In the double armature relay, each armature can be operated independently but<br />
not simultaneously. Contact actuation arms are riveted to the armature at the junction of<br />
the vertical and horizontal support springs. The vertical armature spring supports the<br />
armature and provides a torque bias to return the armature to the de-energized position.<br />
With energy applied to the coils in the direction indicated in Figure 2–38, the armature is<br />
attracted to the right pole piece, overcoming the bias of the armature support spring.<br />
Magnetic flux is now concentrated in the right core. When energy is removed from the<br />
relay, the armature, because of biasing, returns to the left pole piece, Figure 2–39.<br />
P1457, Rev. Nov/07 2–40 <strong>Alstom</strong> Signaling Inc.
Theory of Operation<br />
Figure 2–38. VTB Relay Energized<br />
A simplified operating diagram of a VTB polar-biased relay with two armatures is shown<br />
in Figure 2–39.<br />
COIL B<br />
CORE B<br />
COIL A<br />
CORE A<br />
Figure 2–39. VTB Relay, Two Armatures De-energized<br />
These armatures are biased in opposite directions, armature A against the left-handed<br />
pole piece, and armature B against the right-hand pole piece. This provides a<br />
symmetrical magnetic path. The permanent magnet flux divides equally between the<br />
two armatures and cores and reinforces the effect of the biasing springs on both<br />
armatures.<br />
P1457, Rev. Nov/07 2–41 <strong>Alstom</strong> Signaling Inc.
Theory of Operation<br />
If coil B is energized in the direction shown in Figures 2–40, the flux through core B<br />
increases greatly.<br />
N<br />
A<br />
B<br />
+<br />
COIL B<br />
-<br />
CORE B<br />
S<br />
COIL A<br />
CORE A<br />
Figure 2–40. VTB Relay, Two Armatures Energized<br />
As a result, the spring bias and permanent magnet flux acting on armature B are<br />
overcome and the armature is attracted to the left-hand pole piece. If, instead, coil A is<br />
energized to produce the proper direction of magnetic flux, armature B remains in its<br />
biased position and armature A is attracted to the right pole piece.<br />
P1457, Rev. Nov/07 2–42 <strong>Alstom</strong> Signaling Inc.
Theory of Operation<br />
Figure 2–41 shows typical VTB relay wiring.<br />
110<br />
610<br />
6 FRONT BACK CONTACT<br />
SETS SHOWN.<br />
CONTACT ARRANGEMENT<br />
DEPENDS ON VTB RELAY<br />
ORDERED.<br />
CONTACTS IN ROW 1<br />
OPERATED BY NORMAL COIL,<br />
IN ROW 6 BY REVERSE COIL.<br />
12<br />
1C<br />
1D<br />
I<br />
O<br />
REVERSE<br />
I<br />
O<br />
NORMAL<br />
62<br />
6C<br />
6D<br />
THICK WIRING IS PLUGBOARD WIRING.<br />
THIN WIRING IS RELAY WIRING.<br />
I = "IN" LEAD<br />
O = "OUT" LEAD<br />
(–)<br />
1E<br />
(+) (–) (+)<br />
3E<br />
4E 6E<br />
LINE RELAY<br />
INDEPENDENT COILS<br />
1C<br />
1D<br />
I<br />
O<br />
I<br />
O<br />
6C<br />
6D<br />
1C<br />
1D<br />
I<br />
–<br />
O<br />
I<br />
+<br />
O<br />
6C<br />
6D<br />
(–) (+)<br />
4E 6E<br />
LINE RELAY<br />
SERIES COILS<br />
TRACK RELAY<br />
SERIES COILS<br />
Figure 2–41. VTB Relay Wiring<br />
P1457, Rev. Nov/07 2–43 <strong>Alstom</strong> Signaling Inc.
Theory of Operation<br />
2.6. AC TRACK RELAYS<br />
2.6.1. Vane Relay<br />
<strong>Type</strong> B2 vane relays are used in AC track circuits. They are high efficiency two position<br />
relays requiring low wattage in the track element for operation.<br />
A vane of an aluminum alloy is secured to a horizontal shaft, with a trunnion at each<br />
end, which is supported by jewel bearings. They accurately position the vane in the airgap<br />
between the two magnetic field structures with ample working clearance as shown<br />
in Figure 2–42.<br />
BOTTOM VIEW OF<br />
VANE AND COILS<br />
TOP VIEW OF<br />
VANE AND COILS<br />
COUNTER<br />
WEIGHT<br />
SHAFT<br />
TRUNNION<br />
Winding<br />
Core<br />
Winding<br />
VANE<br />
LOCAL COIL<br />
Winding<br />
TRACK COIL<br />
Winding<br />
LOCAL COIL<br />
VANE<br />
TRACK COIL<br />
Core<br />
Core<br />
RELAY BASE<br />
Figure 2–42. Vane Relay Structure<br />
The local and track windings are fastened to the base of the relay, thus providing<br />
conduction of heat from the coils and laminations to the outside air. Both the vane and<br />
magnetic structure are compact, yet are designed for correct distribution of mass and<br />
magnetic flux. See Figure 2–43 for an illustration of relay components with the relay<br />
energized.<br />
Pushers of insulated material transmit the movement of the vane shaft to the contacts.<br />
These contacts are similar to the ones used in DC relays, being flat springs molded in a<br />
phenolic block.<br />
P1457, Rev. Nov/07 2–44 <strong>Alstom</strong> Signaling Inc.
Theory of Operation<br />
VANE<br />
CONTACTS<br />
PUSHER<br />
(FOR CONTACTS)<br />
RELAY BASE<br />
LOCAL COIL<br />
WINDING<br />
STOP<br />
ROLLER<br />
SHAFT<br />
BEARING<br />
COUNTERWEIGHT<br />
Figure 2–43. Vane Relay Components<br />
The local coil may be double-wound so that the two windings can be hooked up in<br />
series or in parallel. When connected in parallel, each winding operates at half-voltage,<br />
and it becomes possible to connect a phase-shifting device, should track operating<br />
conditions make it necessary. Track windings are furnished the same way.<br />
Examples of phase shifting devices are:<br />
• track filter (P/N 58496-117-01)<br />
• local filter (P/N 58496-118-01)<br />
The local filter is a combined two-section series tuned and parallel tuned filter. The track<br />
filter contains a fuse, a capacitor, and a variable inductor.<br />
The local and track filters are used to prevent line induced noise and traction energy<br />
from interfering with track circuit performance. The filter acts as a partial phase shifter to<br />
help establish a 90 degree phase shift between the track and local windings of the track<br />
relay. This is especially important at minimum ballast conditions.<br />
P1457, Rev. Nov/07 2–45 <strong>Alstom</strong> Signaling Inc.
Theory of Operation<br />
Figure 2–44 shows the operation of the vane relay. An aluminum disc with a shaft<br />
through the center is supported so that it is free to rotate. If a permanent magnet is<br />
rotated about the disc shaft in such a way that the magnetic lines of force cut through<br />
and across the disc, the disc will start to rotate in the same direction as the permanent<br />
magnet, and at a slightly slower speed.<br />
MOVEMENT OF<br />
NON-MAGNETIC DISC<br />
N<br />
N<br />
S<br />
S<br />
MOVEMENT OF<br />
PERMANENT MAGNET<br />
Figure 2–44. Magnet Movement Drags the Metal Disc<br />
Figure 2–45 is an enlarged view of a section of the disc showing what occurs. When the<br />
permanent magnet is rotated, the magnetic lines of force cut the disc and produce a<br />
voltage between two points on the disc. A current, commonly known as an "eddy"<br />
current, flows between these points and back to its origin by the shortest path. These<br />
eddy currents produce small magnetic forces that react with the magnetic force of the<br />
permanent magnet, producing rotation.<br />
P1457, Rev. Nov/07 2–46 <strong>Alstom</strong> Signaling Inc.
Theory of Operation<br />
EDDY CURRENT INDUCED BY<br />
PERMANENT MAGNET IN<br />
NON-MAGNETIC DISC<br />
N<br />
DISC<br />
S<br />
Figure 2–45. Eddy Current Induction by Permanent Magnet<br />
In the vane relay, two electromagnets are constantly energized while the relay is picked<br />
up, but the magnetism produced by one of the electro-magnets lags in time with respect<br />
to the other. The reaction on the vane relay of the two independent magnetisms, which<br />
are out of phase, produces rotation, the same as that produced by the moving<br />
permanent magnet in Figure 2–45.<br />
Figure 2–46 shows a complete cycle of local track currents plotted with the track current<br />
lagging the local current. The alternating current produces a lateral movement of flux in<br />
the air gap, as shown. Reference lines A, B, C, D, etc., divide the complete alternating<br />
current cycle into eighths, and the small figures represent instantaneous pictures or<br />
"snapshots" of what occurs in the relay magnetic circuit.<br />
P1457, Rev. Nov/07 2–47 <strong>Alstom</strong> Signaling Inc.
Theory of Operation<br />
A<br />
C<br />
E<br />
G<br />
A'<br />
+<br />
LOCAL<br />
-<br />
LOCAL<br />
-<br />
LOCAL<br />
+<br />
LOCAL<br />
+<br />
LOCAL<br />
-<br />
TRACK<br />
+<br />
TRACK<br />
-<br />
B<br />
TRACK<br />
D<br />
-<br />
TRACK<br />
+<br />
F<br />
TRACK<br />
H<br />
+<br />
LOCAL<br />
-<br />
-<br />
LOCAL<br />
+<br />
-<br />
LOCAL<br />
+<br />
+<br />
LOCAL<br />
-<br />
+<br />
TRACK<br />
-<br />
+<br />
TRACK<br />
-<br />
-<br />
TRACK<br />
+<br />
-<br />
TRACK<br />
+<br />
LOCAL<br />
CURRENT<br />
TRACK<br />
CURRENT<br />
TRACK CURRENT LAGS LOCAL CURRENT BY 90°<br />
A B C D E F G H A'<br />
Figure 2–46. Local and Track Current Cycles<br />
At A and A', the local current is at a positive maximum value and the track current is<br />
zero. The local winding is producing all the magnetic lines of force and their paths are<br />
shown by the dotted lines.<br />
P1457, Rev. Nov/07 2–48 <strong>Alstom</strong> Signaling Inc.
Theory of Operation<br />
In each snapshot, notice the solid arrow, which is accentuated merely for reference and<br />
not because the lines of force are concentrated in that particular path. Compare the<br />
position of this arrow in snapshots B, C, D, and E. See how the arrow moves across the<br />
whole length of the air gap, cutting through and across the vane, much the same as the<br />
magnetic lines of force of the permanent magnet in Figure 2–45. All the other arrows do<br />
the same. Here, then, is the counterpart of the moving permanent magnet, except that,<br />
in this case, the magnetic structures are stationary, and the alternating current produces<br />
the magnetic flux motion.<br />
For the relay to produce maximum torque with the minimum power input, the local and<br />
track current must be out of step by a quarter of a cycle or 90 degrees. Track relays,<br />
under adverse track conditions, may require a phase-shifting device inserted in the local<br />
phase to approximate the ideal current relationship.<br />
Figures 2–47 and 2–48 show the parallel and series hookup of local and track windings,<br />
while Figure 2–49 shows relay and plugboard wiring along with some vane relay<br />
supporting components.<br />
PARALLEL HOOKUP<br />
LO1–<br />
14<br />
T1–<br />
64<br />
LO2–<br />
13<br />
LO1+<br />
12<br />
T2–<br />
63<br />
T1+<br />
62<br />
LO2+<br />
11<br />
61<br />
HEAVY LINES ARE<br />
PLUGBOARD WIRING<br />
T2+<br />
T = TRACK WINDING<br />
LO = LOCAL WINDING<br />
Figure 2–47. Parallel Hookup of Windings<br />
P1457, Rev. Nov/07 2–49 <strong>Alstom</strong> Signaling Inc.
Theory of Operation<br />
SERIES HOOKUP<br />
LO1–<br />
14<br />
T1–<br />
64<br />
LO2–<br />
13<br />
LO1+<br />
12<br />
T2–<br />
63<br />
T1+<br />
62<br />
LO2+<br />
11<br />
T2+<br />
61<br />
HEAVY LINES ARE<br />
PLUGBOARD WIRING<br />
T = TRACK WINDING<br />
LO = LOCAL WINDING<br />
Figure 2–48. Series Hookup of Windings<br />
NX55<br />
BX55<br />
14<br />
13<br />
12<br />
11<br />
2 FRONT<br />
2 BACK<br />
64<br />
63<br />
62<br />
61<br />
NX110<br />
BX110<br />
14<br />
13<br />
12<br />
11<br />
2 FRONT<br />
2 BACK<br />
64<br />
63<br />
62<br />
61<br />
LOCAL WINDING<br />
IN PARALLEL<br />
LOCAL WINDING<br />
IN SERIES<br />
1E 6E 1E 6E<br />
TAPPED RESISTOR<br />
BALANCE IMPEDANCE<br />
(P/N 42960-002-02)<br />
FIXED RESISTANCE<br />
RNX<br />
RBX<br />
TAPPED RESISTOR<br />
NON-ELECTRIFIED RAILROADS<br />
HEAVY LINES ARE<br />
PLUGBOARD WIRING<br />
RNX<br />
ELECTRIFIED RAILROADS<br />
RBX<br />
Figure 2–49. AC Vane Relay<br />
P1457, Rev. Nov/07 2–50 <strong>Alstom</strong> Signaling Inc.
Installation<br />
3. SECTION 3 – INSTALLATION<br />
3.1. GENERAL<br />
This section contains general installation procedures for <strong>Type</strong> B relays. Included is a<br />
procedure for inspecting each relay prior to installation, followed by the installation and<br />
adjustment procedure.<br />
3.2. RELAY INSTALLATION TOOLS AND SUPPLIES<br />
See Appendix C for a summary of B relay tools. See Section 7 for a listing of installation<br />
plugboards and supplies.<br />
3.3. INSPECTION<br />
Upon receipt of a shipment of <strong>Type</strong> B relays, inspect them for cleanliness and overall<br />
condition. Also, always verify the operating characteristics of the relay before installing it<br />
in a particular circuit.<br />
Prior to installing a <strong>Type</strong> B relay, follow the inspection procedure provided in Table<br />
3–1. Refer to section 2, Figure 2–1 for an illustration identifying the basic B relay<br />
components.<br />
Table 3–1. B Relay Pre-Installation Inspection Procedure<br />
Step<br />
Procedure<br />
1 Check that the relay cover and seal are not damaged.<br />
WARNING<br />
BREAKING THE RELAY COVER SEAL VOIDS THE WARRANTY<br />
ON THE RELAY.<br />
2 Verify that the relay prong surfaces are clean and not bent.<br />
While the prongs of the relay that engage with the terminals in the plugboard are<br />
clean and adjusted when they leave the factory, there is always the chance that<br />
they may become dirty or bent in handling. If prongs are dirty, clean by<br />
burnishing.<br />
3 When relay racks complete with plugboards are received, verify they are clean<br />
and not broken or cracked. The terminals should lie close to the insulators. The<br />
guide rods should be straight and at right angles to the plugboard.<br />
P1457, Rev. Nov/07 3–1 <strong>Alstom</strong> Signaling Inc.
Installation<br />
3.4. INSTALLATION<br />
The B relay plugs into a plugboard assembly mounted on rack support bars. Plugboard<br />
assemblies:<br />
• are available in either B1 or B2 sizes<br />
• use insulators for separating the solder or crimp type terminals<br />
• hold the guide rods for alignment and securing the relay<br />
• hold the registration plates<br />
• can be provided with current or voltage test posts<br />
For a listing of plugboards, specialty parts, and mounting hardware refer to Section<br />
7.17., B Relay Plugboards and Terminal Boards.<br />
Most B relays are installed using the procedure provided in Table 3–2.<br />
Microchron II Timer Relay installation includes setting the timer. Follow the steps in<br />
Table 3–3 in the order provided to install a Microchron II Timer Relay (DC) or the steps<br />
in Table 3–5 to install an AC Microchron II Timer Relay.<br />
Built-in surge circuitry in the Microchron II Timer Relay provides adequate protection<br />
from transients on the power leads for circuits confined to a bungalow or train control<br />
relay room containing an installed Microchron II Timer Relay. If the energy circuit has<br />
contacts remote from the bungalow, follow the procedure in Table 3–4 to provide<br />
additional surge protection.<br />
NOTE<br />
To assure safe application of the AC Microchron II Timer Relay, all<br />
application circuits must be reviewed by <strong>Alstom</strong> engineering before it will<br />
be approved for use.<br />
P1457, Rev. Nov/07 3–2 <strong>Alstom</strong> Signaling Inc.
Installation<br />
Table 3–2. B Relay Installation Procedure<br />
Step<br />
Procedure<br />
1 Verify the relay cover and seal are not damaged.<br />
2 Verify the surfaces of the relay prongs that engage with the terminals in the<br />
plugboards are clean and not bent.<br />
While the relay prongs are clean and adjusted when they leave the factory, they<br />
may become dirty or bent during storage and handling.<br />
• If prongs are dirty, clean by burnishing.<br />
• If prongs are bent, bend them back into position so the make contact when<br />
the relay is installed.<br />
3 Select the proper relay by checking the order reference number provided on the<br />
nameplate on the front of the relay. This number also appears on the detailed<br />
plans furnished with the installation and on the plugboard registration plate.<br />
REGISTRATION<br />
PLATE NUMBER<br />
NAME<br />
PLATE<br />
NAMETAG<br />
4 Slide the relay Nametag into slot.<br />
TEST DATA<br />
FORM<br />
P1457, Rev. Nov/07 3–3 <strong>Alstom</strong> Signaling Inc.
Installation<br />
Table 3–2. B Relay Installation Procedure (Cont.)<br />
Step<br />
Procedure<br />
5 Code rate transmitter relays are shipped with the rotor locked to prevent<br />
damage to the relay.<br />
Before placing the relay into service the rotor must be unlocked by moving the<br />
arm on the back of the relay as shown below.<br />
ROTOR LOCKED FOR SHIPMENT<br />
Arm is located at back of transmitter.<br />
TO UNLOCK ROTOR FOR SERVICE<br />
Slide arm at back of transmitter to<br />
the position shown below<br />
Arm<br />
Arm<br />
Back of Transmitter<br />
Back of Transmitter<br />
A visual examination of the relay should also be performed to verify that with the<br />
arm in the unlocked position the rotor lock does not contact the rotor in any<br />
position of the rotor.<br />
After the relay is installed to its plugboard, the code rate of the relay should be<br />
verified to ensure it is correct.<br />
P1457, Rev. Nov/07 3–4 <strong>Alstom</strong> Signaling Inc.
Installation<br />
Table 3–2. B Relay Installation Procedure (Cont.)<br />
Step<br />
Procedure<br />
6 Grasp the relay on the top and bottom of the cover; slide it onto the guide rods.<br />
If adjacent relay prohibits grasping of relay on top and bottom, use the handle<br />
on the front to push the relay along the guides.<br />
7 Press the relay firmly into place so that the back of the relay is snug against its<br />
plugboard.<br />
PLUGBOARD<br />
RELAY<br />
BASE<br />
CAUTION<br />
Do not exert excessive pressure on the relay. Pressure greater<br />
than finger pressure could damage the relay or plugboard.<br />
P1457, Rev. Nov/07 3–5 <strong>Alstom</strong> Signaling Inc.
Installation<br />
Table 3–2. B Relay Installation Procedure (Cont.)<br />
Step<br />
Procedure<br />
8 Hold the relay in this position with one hand while putting on the knurled<br />
retaining nuts. The nuts should be tightened only until they just touch the end of<br />
the tube, but do not exert pressure against the relay.<br />
TUBE<br />
GUIDE ROD<br />
KNURLED<br />
NUTS<br />
KNURLED<br />
NUTS<br />
CAUTION<br />
DO NOT use the retaining nuts to pull the insulators and prongs<br />
into engagement.<br />
9 Screw on the lock nuts, holding the retaining nuts with the fingers to prevent their<br />
turning while tightening the lock nuts with an AAR wrench.<br />
LOCK NUTS<br />
P1457, Rev. Nov/07 3–6 <strong>Alstom</strong> Signaling Inc.
Installation<br />
Table 3–3. Microchron II Timer Relay (DC) Installation Procedure<br />
Step<br />
Procedure<br />
1 Verify the relay cover and seal are not damaged.<br />
2 Verify the surfaces of the relay prongs that engage with the terminals in the<br />
plugboards are clean and not bent.<br />
While the relay prongs are clean and adjusted when they leave the factory, they<br />
may become dirty or bent during storage and handling.<br />
• If prongs are dirty, clean by burnishing.<br />
• If prongs are bent, bend them back into position so the make contact when<br />
the relay is installed.<br />
3 Consider the operating characteristics of the Microchron II Timer Relay before<br />
installing any in a particular circuit.<br />
Select the proper relay by verifying relay characteristics:<br />
• Input Range is 8-31.5 VDC<br />
• Maximum Current Draw is 100 mA max at 15 Volts<br />
• Input Power required is regulated DC battery or an extremely well filtered<br />
rectified AC battery<br />
WARNING<br />
THE MICROCHRON II TIMER RELAY MAY NOT BE INTERCHANGEABLE<br />
WITH A MOTOR OPERATED TIMER IN EVERY CIRCUIT APPLICATION.<br />
DIFFERENCES IN OPERATION OF THE MOTOR TIMER BACK CONTACT<br />
REQUIRE CONSIDERATION OF THE CHECK CONTACT OPERATION IN<br />
THE SPECIFIC APPLICATION TO ENSURE THAT THE SAFETY<br />
PERFORMANCE OF THE CIRCUIT IS NOT COMPROMISED. BACK<br />
CONTACTS, OR CHECK CONTACTS, ON THE TYPE B2 AND KB MOTOR<br />
TIMERS OPEN AT THE BEGINNING OF THE TIMING CYCLE. BACK<br />
CONTACTS ON THE MICROCHRON II TIMER RELAY OPEN AT THE END<br />
OF THE TIMING CYCLE.<br />
WHILE IT IS DOUBTFUL THAT THERE IS A PROBLEM WITH THE MAJORITY<br />
OF CIRCUITS IN USE, AS AN ADDED SAFETY PRECAUTION TO PREVENT<br />
AN INADVERTENT SUBSTITUTION, THE MICROCHRON II TIMER RELAY<br />
HAS A REGISTRATION PLATE DIFFERENT FROM ANY OTHER TYPE B2<br />
MOTOR TIMER.<br />
P1457, Rev. Nov/07 3–7 <strong>Alstom</strong> Signaling Inc.
Installation<br />
Table 3–3. Microchron II Timer Relay (DC) Installation Procedure (Cont.)<br />
Step<br />
Procedure<br />
4 CAUTION<br />
To prevent possible damage to the Microchron II Timer Relay, it is<br />
necessary to use a filter unit when the timer is to be operated from<br />
unfiltered full-wave, rectified AC, unless there are standby<br />
batteries. If the timer is powered with unfiltered, rectified AC<br />
voltage without a filter unit, it will not operate and could possibly<br />
damage the timer.<br />
If the power source is unfiltered AC, then follow Step 5 to install a filter unit on<br />
the relay.<br />
For filtered DC or filtered rectified AC, go to step 6.<br />
5 Install a filter board onto the relay plugboard as shown:<br />
(+)<br />
6E<br />
3E<br />
52 51<br />
TE<br />
R1<br />
A<br />
CR1<br />
+<br />
C1<br />
TYPICAL CIRCUIT<br />
4E<br />
(–)<br />
66<br />
56<br />
46<br />
65<br />
55<br />
45<br />
64<br />
54<br />
44<br />
63<br />
53<br />
43<br />
62<br />
52<br />
42<br />
FILTER BOARD 58496-116-01<br />
includes 3E-4E mounting<br />
hardware and 3 connectors<br />
61<br />
51<br />
41<br />
CR1 A TO 52<br />
6D<br />
6C<br />
C1<br />
R1<br />
1C<br />
1D<br />
TO 51<br />
4E<br />
3E<br />
TO 6E<br />
SOLDERTAB<br />
SIDE VIEW<br />
REAR VIEW<br />
6E<br />
4E<br />
3E<br />
1E<br />
NOTE:<br />
PLUGBOARD KITS<br />
P/N 59686-007-14 FOR CRIMP TERMINALS<br />
P/N 59686-007-12 FOR SOLDER TERMINALS<br />
P1457, Rev. Nov/07 3–8 <strong>Alstom</strong> Signaling Inc.
Installation<br />
Table 3–3. Microchron II Timer Relay (DC) Installation Procedure (Cont.)<br />
Step<br />
Procedure<br />
6 For a new installation, install the plugboard in the <strong>Type</strong> B relay rack, connect the<br />
power as shown, and wire the contacts as required by the external circuits.<br />
(FRONT VIEW)<br />
46 56 66<br />
(FRONT VIEW)<br />
46 56 66<br />
64<br />
63<br />
43 53<br />
42<br />
52<br />
51<br />
61<br />
(–)<br />
A<br />
FILTER<br />
64<br />
63<br />
43 53<br />
42<br />
52<br />
51<br />
61<br />
TIMER<br />
ASSEMBLY<br />
TIMER<br />
ASSEMBLY<br />
I<br />
O<br />
I<br />
O<br />
I<br />
O<br />
I<br />
O<br />
6E<br />
(+)<br />
(–)<br />
3E<br />
4E<br />
6E<br />
(+)<br />
WIRING OF MICROCHRON TIMER FOR DC OPERATION<br />
WIRING OF MICROCHRON TIMER FOR OPERATION ON<br />
UNFILTERED FULL-WAVE RECTIFIED AC<br />
THICK WIRING IS PLUGBOARD WIRING .<br />
THIN WIRING IS WIRING WITHIN THE RELAY.<br />
I = "IN" LEAD<br />
O = "OUT" LEAD<br />
7 Attach the mating registration plate (packed with the Microchron II Timer Relay)<br />
to the plugboard and plug in the timer.<br />
P1457, Rev. Nov/07 3–9 <strong>Alstom</strong> Signaling Inc.
Installation<br />
Table 3–3. Microchron II Timer Relay (DC) Installation Procedure (Cont.)<br />
Step<br />
Procedure<br />
8 For a timer with a tamper evident color seal, remove the plastic seal. For a timer<br />
with a lead seal, remove seal, thumbnuts, and cover to expose the thumbwheel<br />
switches.<br />
GREEN LED<br />
RED LED<br />
THUMBWHEEL<br />
SWITCHES<br />
1 0 2 0<br />
TAMPER EVIDENT COLOR SEAL<br />
(P/N 37947-059-00, RED TINT)<br />
(P/N 37947-058-00, GREEN TINT)<br />
9 Adjust the thumbwheel switches to the desired timing interval.<br />
NOTE<br />
Certain switches contain “stops” and only rotate between<br />
allowable settings. For example, the “Tens of Minutes” switch can<br />
only rotate between the “0” and “1” positions and the “Tens of<br />
Seconds” switch can only rotate between the “0” and “5” positions.<br />
P1457, Rev. Nov/07 3–10 <strong>Alstom</strong> Signaling Inc.
Installation<br />
Table 3–3. Microchron II Timer Relay (DC) Installation Procedure (Cont.)<br />
Step<br />
Procedure<br />
10 When setting the time, use the standard representation.<br />
Tens<br />
Minutes<br />
Unit<br />
Minutes<br />
Tens<br />
Seconds<br />
Unit<br />
Seconds<br />
1 9 5 9<br />
This example shows a setting of 19 minutes and 59 seconds. A time set at 89<br />
seconds would read 01:29.<br />
11 Energize the timer and verify the elapsed time with an external timing device<br />
from the instant energy is applied until the relay front contacts close.<br />
The operational relay timing must be within ±0.1% of the time pre-selected by<br />
the thumbwheel switches plus a maximum delay of 0.75 seconds.<br />
If the timing is not within acceptable limits, remove and replace the relay.<br />
Then perform the mechanical and electrical tests provided in Section 6,<br />
Corrective Maintenance, on the malfunctioning relay.<br />
12 For timers with a tamper evident color seal (see figure in Step 8), replace the<br />
plastic seal. For relays with a tamper evident lead seal (P/N 35285-000-00),<br />
replace switch cover, thumbnuts, seal, and crimp seal.<br />
13 Verify the time setting.<br />
P1457, Rev. Nov/07 3–11 <strong>Alstom</strong> Signaling Inc.
Installation<br />
Table 3–4. Microchron II Timer Relay (DC) Surge Protection Installation Procedure<br />
Step<br />
Procedure<br />
1 Install an equalizer (<strong>Alstom</strong> P/N 56937-021-00) across the power leads ahead of<br />
where the leads will be wired to the Microchron II Timer Relay.<br />
REMOTE<br />
CONTACTS<br />
LOCAL<br />
CONTACTS<br />
6E 52 51 TE<br />
REMOTE<br />
SIGNAL BATTERY<br />
MICROCHRON II<br />
TIMER<br />
EQUALIZER<br />
PART NO. 56937-021-00 AND<br />
TERMINAL BLOCK 46048-022-08<br />
Electrical parameters of this equalizer are 1000 ohms minimum at 1.5 volts DC<br />
and breakdown range of 75 to 150 volts DC, not to exceed 150 volts DC.<br />
P1457, Rev. Nov/07 3–12 <strong>Alstom</strong> Signaling Inc.
Installation<br />
Table 3–5. AC Microchron II Timer Relay Installation Procedure<br />
Step<br />
Procedure<br />
1 Check that the relay cover and seal are not damaged.<br />
2 Verify that the relay prong surfaces are clean and not bent.<br />
While the prongs of the relay that engage with the terminals in the plugboards<br />
are clean and adjusted when they leave the factory, there is always the chance<br />
that they may become dirty or bent in handling.<br />
• If prongs are dirty, clean by burnishing.<br />
• If prongs are bent, bend them back into position so they make contact when<br />
the relay is installed.<br />
3 Review the operating characteristics of the relay and verify the appropriate relay<br />
is being installed before proceeding.<br />
Relay 50800-103-01 50800-104-01<br />
Input Voltage Range<br />
Input Power While Timing<br />
Input Power After Timing<br />
with Relay Energized<br />
88 to 135 Vrms, 60 Hz<br />
AC<br />
11 mA rms at 88 Vrms<br />
18 mA rms at 110 Vrms<br />
44 mA rms at 135 Vrms<br />
26 mA rms at 88 Vrms<br />
27 mA rms at 110 Vrms<br />
45 mA rms at 135 Vrms<br />
WARNING<br />
44 to 66 Vrms, 25 Hz AC<br />
23 mA rms at 44 Vrms<br />
54 mA rms at 55 Vrms<br />
161 mA rms at 66 Vrms<br />
52 mA rms at 44 Vrms<br />
61 mA rms at 55 Vrms<br />
148 mA rms at 66 Vrms<br />
THE AC MICROCHRON II TIMER RELAY MAY NOT BE<br />
INTERCHANGEABLE WITH A MOTOR-OPERATED TIMER IN<br />
EVERY CIRCUIT APPLICATION BECAUSE OF THE<br />
FOLLOWING DIFFERENCE BETWEEN THE TWO TIMERS:<br />
• AC MICROCHRON II TIMER RELAY - CHECK CIRCUIT<br />
OPENS AFTER TIME DELAY HAS EXPIRED, AND CLOSES<br />
WHEN POWER IS REMOVED<br />
• AC MOTOR TIMER - CHECK CIRCUIT OPENS AT<br />
BEGINNING OF TIME DELAY AND CLOSES WHEN POWER<br />
IS REMOVED<br />
4 For a new installation, check plugboard to ensure proper connections; refer to<br />
ED50800-103-01 for the 60 Hz relay or ED50800-104-01 for the 25 Hz relay.<br />
P1457, Rev. Nov/07 3–13 <strong>Alstom</strong> Signaling Inc.
Installation<br />
Table 3–5. AC Microchron II Timer Relay Installation Procedure (Cont.)<br />
Step<br />
Procedure<br />
5 Attach the mating registration plate (packed with the AC Microchron II Timer<br />
Relay) to the plugboard and plug in the relay.<br />
6 Detach the cover that seals access to the thumbwheel switches by removing the<br />
tamper evident lead seal, two thumbnuts, and sliding the clear plastic cover off<br />
the studs.<br />
COVER<br />
1 2 3 4<br />
5<br />
THUMBWHEEL SWITCHES<br />
7 Adjust the thumbwheel switches to the desired timing interval.<br />
NOTE<br />
Certain switches contain “stops” and only rotate between<br />
allowable settings. For example, the “Tens of Minutes” switch can<br />
only rotate between the “0” and “1” positions and the “Tens of<br />
Seconds” switch can only rotate between the “0” and “5” positions.<br />
P1457, Rev. Nov/07 3–14 <strong>Alstom</strong> Signaling Inc.
Installation<br />
Table 3–5. AC Microchron II Timer Relay Installation Procedure (Cont.)<br />
Step<br />
Procedure<br />
8 When setting the time, use the standard representation.<br />
Tens<br />
Minutes<br />
Unit<br />
Minutes<br />
Tens<br />
Seconds<br />
Unit<br />
Seconds<br />
Tenth of<br />
Seconds<br />
1 9 5 9 9<br />
This example shows a setting of 19 minutes and 59.9 seconds. A time set at<br />
89.9 seconds would read 01:29.9.<br />
9 Energize the timer and verify the elapsed time with an external timing device<br />
from the instant energy is applied until the relay front contacts close.<br />
A red LED illuminates when power is first applied; it blinks until the delay set on<br />
the switches has expired.<br />
Then, a green LED illuminates to indicate that the delay has expired.<br />
The operational relay timing must be within ±0.1% of the time pre-selected by<br />
the thumbwheel switches plus a maximum delay of 0.75 seconds.<br />
If the timing is not within acceptable limits, remove and replace the relay.<br />
Then perform the mechanical and electrical tests provided in Section 6,<br />
Corrective Maintenance, on the malfunctioning relay.<br />
10 Reseal access to the thumbwheel switches by sliding the clear plastic cover<br />
over the two studs and securing it in place with the two thumbnuts. Install a new<br />
tamper evident lead seal (P/N 35285-000-00), using the holes in the studs, and<br />
crimp securely.<br />
11 Verify the time setting.<br />
P1457, Rev. Nov/07 3–15 <strong>Alstom</strong> Signaling Inc.
Installation<br />
THIS PAGE INTENTIONALLY LEFT BLANK.<br />
P1457, Rev. Nov/07 3–16 <strong>Alstom</strong> Signaling Inc.
Preventive Maintenance<br />
4. SECTION 4 – PREVENTIVE MAINTENANCE<br />
4.1. GENERAL<br />
This section includes the preventive maintenance procedures associated with proper<br />
<strong>Type</strong> B relay operation. These procedures are provided as a minimum requirement, and<br />
may need to be modified due to local operational conditions or requirements.<br />
Tests and inspections must include the following: measurement of PICKUP current and<br />
DROPAWAY current, timing of slow operating and timing relays, and visual inspection<br />
of contacts for damage or misalignment, corrosion or other contamination of parts, loose<br />
parts inside cover, broken seal, cracked, broken or discolored covers and wear particles<br />
on inside of cover.<br />
WARNING<br />
NOTIFY AND OBTAIN PERMISSION FROM CENTRAL CONTROL<br />
PRIOR TO PERFORMING ANY ELECTRICAL TESTS ON RELAYS.<br />
DURING THE ELECTRICAL TESTS RELAYS ARE INTENTIONALLY,<br />
MANUALLY ACTIVATED. THIS ACTIVATION AFFECTS THE RELAY<br />
CIRCUIT(S) AND POSES A POTENTIAL THREAT TO RAIL SAFETY. IT<br />
MAY PROVIDE FALSE INFORMATION, INTERRUPT OPERATION, AND<br />
CAUSE ALARMS TO INADVERTENTLY SOUND AND/OR BE<br />
DISPLAYED. TAKE ALL STEPS NECESSARY TO ENSURE THE SAFE<br />
PASSAGE OF TRAFFIC IS MAINTAINED.<br />
NOTIFY CENTRAL CONTROL WHEN TESTING IS COMPLETE AND<br />
THE RELAY IS BACK IN OPERATION.<br />
B relays identified as not passing inspection or meeting defined tolerances during the<br />
relay electrical test must be removed from service. To return a relay to service, the<br />
mechanical tests and adjustments provided in Section 6, Corrective Maintenance must<br />
be performed, followed by electrical tests to verify relay performance.<br />
The following test and adjustment procedures require qualified maintenance personnel<br />
to test the relay portion of <strong>Type</strong> B relays.<br />
Specifications for testing and inspecting all <strong>Alstom</strong> relays are given on relay Engineering<br />
Data (ED) sheets. Relay drawing and catalog numbers can be used with Appendix A to<br />
look up the Engineering Data (ED) Sheet number. To determine a relay's drawing or<br />
catalog number, refer to Heading 1.2.2., Identification. For copies of ED sheets, consult<br />
your <strong>Alstom</strong> Sales Representative or <strong>Alstom</strong> Customer Service.<br />
Troubleshooting procedures are provided in Section 5, Troubleshooting. Mechanical<br />
tests and relay replacement procedures are provided in Section 6, Corrective<br />
Maintenance.<br />
P1457, Rev. Nov/07 4–1 <strong>Alstom</strong> Signaling Inc.
Preventive Maintenance<br />
4.2. PREVENTIVE MAINTENANCE INTERVALS<br />
Preventive maintenance procedures are performed on B relays with the covers on and<br />
sealed. The tests are a good check on the overall performance of the relay, and are<br />
completed easily and quickly.<br />
Preventive maintenance consists of three procedures:<br />
• Visual Inspection<br />
• Electrical Test<br />
• Timing Test, where applicable<br />
Table 4–1 shows the recommended preventive maintenance time intervals.<br />
Table 4–1. Preventive Maintenance Intervals<br />
Relay <strong>Type</strong><br />
Preventive Maintenance Interval<br />
Carborne <strong>Relays</strong><br />
Every 6 years<br />
<strong>Vital</strong> Wayside <strong>Relays</strong><br />
Every 4 years<br />
DC Polar and Vane <strong>Relays</strong><br />
Every 2 years<br />
Master (or Primary) <strong>Relays</strong>, spring tension*<br />
Every 2 years<br />
Microchron II Timer <strong>Relays</strong><br />
Every year<br />
* Any master or primary relay of the torque type, that depends on spring tension to return contacts to the<br />
de-energized position in noncoded continuous inductive automatic train stop or train control systems.<br />
<strong>Vital</strong> wayside, DC Polar and Vane <strong>Relays</strong> can be inspected and tested while installed in<br />
racks or they may be removed from service and plugged on a shop test board for<br />
preventive maintenance. Electrical tests of relays in the relay racks are limited to<br />
measuring operating values and comparing the values to the specifications provided in<br />
the Engineering Data (ED) sheets. Relay drawing and catalog numbers can be used<br />
with Appendix A to look up the Engineering Data (ED) Sheet number. To determine a<br />
relay's drawing or catalog number, refer to Heading 1.2.2., Identification.<br />
Carborne and Master <strong>Relays</strong> must be removed from service for inspection and testing.<br />
Relay removal and installation procedures are provided in Section 6, Corrective<br />
maintenance.<br />
NOTE<br />
<strong>Relays</strong> not passing any of the preventive maintenance tests or inspections<br />
must be replaced and not returned to service until the operating<br />
characteristics and conditions are in accordance with <strong>Alstom</strong> Engineering<br />
Data (ED) sheet specifications.<br />
P1457, Rev. Nov/07 4–2 <strong>Alstom</strong> Signaling Inc.
Preventive Maintenance<br />
4.3. PREVENTIVE MAINTENANCE TOOLS<br />
See Appendix C for a summary of B relay tools.<br />
A specific wrench is used to turn the terminal nut on the current test post to open the<br />
coil circuit. Figure 4–1 shows a Spanner Nut Wrench (also called the "E" post wrench,<br />
P/N 55393-003-01).<br />
Figure 4–1. Spanner Nut Wrench<br />
The Shop Test Rack, P/N 56573-002-01, is used to test relays in the shop. See<br />
Appendix C for details about the Shop Test Rack.<br />
Electrical tests for operating values on <strong>Type</strong> B2 two element vane relays are made with<br />
the Vane Relay Test Unit, P/N 20182-111-01. See Appendix C for details about this test<br />
unit.<br />
4.4. RELAY INSPECTION<br />
All <strong>Type</strong> B relays must be visually inspected prior to performing electrical tests. Each<br />
<strong>Type</strong> B relay is in a clear plastic case and the parts to be inspected can be seen with<br />
the cover installed and sealed.<br />
WARNING<br />
BREAKING THE RELAY COVER SEAL VOIDS THE WARRANTY ON<br />
THE RELAY.<br />
Visual inspection includes checking contacts for damage or misalignment, corrosion or<br />
other contamination of parts, loose parts inside cover, broken seal, cracked, broken or<br />
discolored covers and wear particles on inside of cover. The inspection procedure<br />
provided in Table 4–2 describes how to inspect a typical B1 relay. Table 4–3 describes<br />
how to inspect a vane relay. Table 4–4 is a general relay inspection procedure<br />
applicable to all other relays.<br />
NOTE<br />
If any damage is detected, the relay must be removed from service and<br />
replaced.<br />
P1457, Rev. Nov/07 4–3 <strong>Alstom</strong> Signaling Inc.
Preventive Maintenance<br />
Table 4–2. Typical B1 Relay Visual Inspection Procedure<br />
Step<br />
Procedure<br />
1 Check that the relay cover and seal are not cracked, broken or discolored.<br />
2 Verify that relay components are not loose inside the cover.<br />
COMPRESSION SPRING<br />
COVER<br />
COIL SPRING STUD<br />
ARMATURE STOP SCREW<br />
BRIDGE OR ARM. EXTENSION<br />
PUSHER<br />
BACK CONTACT<br />
HEEL CONTACT<br />
FRONT CONTACT<br />
CONTACT PRONGS<br />
BASE<br />
CONTACT GROUP<br />
PRESSURE PLATES<br />
STOP PLATES<br />
PUSHER JAW<br />
PUSHER RETAINING CLIPS<br />
ROLLER ON FINGER<br />
ARMATURE<br />
ARMATURE<br />
RETAINING<br />
PLATE<br />
ADJ. NUT<br />
LOCK NUT<br />
YOKE<br />
NUT<br />
ARMATURE<br />
BEARING<br />
PLATE<br />
NAME<br />
PLATE<br />
SAFETY<br />
PIN<br />
COIL<br />
REGISTRATION COIL<br />
PLATES PRONGS<br />
ADJUSTABLE RESIDUAL SCREW<br />
3 Verify the contacting surfaces are clean, smooth, and not bent or mis-aligned.<br />
CORE<br />
P1457, Rev. Nov/07 4–4 <strong>Alstom</strong> Signaling Inc.
Preventive Maintenance<br />
Table 4–2. Typical B1 Relay Visual Inspection Procedure (Cont.)<br />
Step<br />
Procedure<br />
4 Verify that normally open co-acting contacts meet squarely and simultaneously<br />
when relay is energized. Contacts should have wipe as armature goes through<br />
to its front stop.<br />
When relay is deenergized, normally closed contacts should meet squarely and<br />
simultaneously. Contacts should have wipe as armature goes to its backstop.<br />
During pick up and drop away, armature must move freely on its bearing plate.<br />
5 If components inside the cover are loose, mis-aligned, or required cleaning,<br />
remove and replace the relay.<br />
6 If a relay is removed for any reason during the inspection procedure, the<br />
mechanical tests in Section 6 may be performed as specified. The relay may not<br />
be returned to service until the operating characteristics and conditions are in<br />
accordance with <strong>Alstom</strong> ED sheet specifications.<br />
P1457, Rev. Nov/07 4–5 <strong>Alstom</strong> Signaling Inc.
Preventive Maintenance<br />
Table 4–3. Vane Relay Visual Inspection Procedure<br />
Step<br />
Procedure<br />
1 Check that the relay cover and seal are not cracked, broken or discolored.<br />
2 Verify that relay components are not loose inside the cover.<br />
PUSHER<br />
BACK CONTACT<br />
HEEL CONTACT<br />
FRONT CONTACT<br />
CONTACT PRONGS<br />
BASE<br />
CONTACT GROUP<br />
PRESSURE PLATES<br />
STOP PLATES<br />
SHOCK INDICATOR<br />
SHAFT BEARING<br />
COUNTER WEIGHT<br />
VANE<br />
LOCAL COIL WINDING<br />
3 Verify the contacting surfaces are clean, smooth, and not bent or mis-aligned.<br />
Relay vane must not contact either local or track lamina in any position of the<br />
vane.<br />
4 Verify that normally open co-acting contacts meet squarely and simultaneously<br />
when relay is energized. Contacts should have wipe as vane goes through to its<br />
front stop.<br />
When relay is deenergized, normally closed contacts should meet squarely and<br />
simultaneously. Contacts should have wipe as vane meets its backstop.<br />
During pick up and drop away, vane must move freely in its jewel bearings.<br />
There should be no indication of friction or binding in the bearings.<br />
If any friction or binding is observed the relay must be removed and replaced.<br />
P1457, Rev. Nov/07 4–6 <strong>Alstom</strong> Signaling Inc.
Preventive Maintenance<br />
Table 4–3. Vane Relay Visual Inspection Procedure (Cont.)<br />
Step<br />
Procedure<br />
5 If components inside the cover are loose, mis-aligned, or required cleaning,<br />
remove and replace the relay.<br />
6 If a relay is removed for any reason during the inspection procedure, the<br />
mechanical tests in Section 6 may be performed as specified. The relay may not<br />
be returned to service until the operating characteristics and conditions are in<br />
accordance with <strong>Alstom</strong> ED sheet specifications.<br />
Table 4–4. Microchron II Timer Relay Visual Inspection Procedure<br />
Step<br />
Procedure<br />
1 Check that the relay cover and seal are not cracked, broken or discolored. If<br />
any damage is detected, the relay must be removed from service and replaced.<br />
2 Verify that relay components are not loose inside the cover.<br />
3 See that the contacting surfaces are clean, not bent or mis-aligned.<br />
4 If prongs are dirty, clean by burnishing,<br />
5 If components inside the cover are loose, mis-aligned, or require cleaning,<br />
remove and replace the relay.<br />
If a relay is removed for any reason during the inspection procedure, the<br />
corrective maintenance in Section 6 must be performed as specified.<br />
P1457, Rev. Nov/07 4–7 <strong>Alstom</strong> Signaling Inc.
Preventive Maintenance<br />
Table 4–5. Miscellaneous Relay Visual Inspection Procedure<br />
Step<br />
Procedure<br />
1 Check that the relay cover and seal are not cracked, broken or discolored.<br />
2 Verify that relay components are not loose inside the cover.<br />
Many components are common to all B1 and B2 relays, reference Section 7 for<br />
drawings of specific relay components.<br />
3 Verify any contacting surfaces are clean, smooth, and not bent or mis-aligned.<br />
4 For relays with flexible connectors, the connectors must be intact and must not<br />
touch any adjacent parts.<br />
Any coils must be secured in place and in good condition.<br />
5 Verify that normally open co-acting contacts meet squarely and simultaneously<br />
when relay is energized. Contacts should have wipe as armature goes through<br />
to its front stop.<br />
When relay is deenergized, normally closed contacts should meet squarely and<br />
simultaneously. Contacts should have wipe as armature goes to its backstop.<br />
During pick up and drop away, armature must move freely on its bearing plate.<br />
6 If components inside the cover are loose, mis-aligned, or required cleaning,<br />
remove and replace the relay.<br />
7 If a relay is removed for any reason during the inspection procedure, the<br />
mechanical tests in Section 6 may be performed as specified. The relay may not<br />
be returned to service until the operating characteristics and conditions are in<br />
accordance with <strong>Alstom</strong> ED sheet specifications.<br />
P1457, Rev. Nov/07 4–8 <strong>Alstom</strong> Signaling Inc.
Preventive Maintenance<br />
4.5. ELECTRICAL TESTS<br />
Electrical tests are made to verify the operating current values and to check contact<br />
resistances of the relay. If the relay does not operate at the proper values, readjust the<br />
relay to the readjustment values specified on the relay ED sheets. Relay drawing and<br />
catalog numbers can be used with Appendix A to look up the Engineering Data (ED)<br />
Sheet number. To determine a relay's drawing or catalog number, refer to Heading<br />
1.2.2., Identification.<br />
See Table 4–6 for a summary of relay specific electrical test procedures included in this<br />
manual.<br />
WARNING<br />
NOTIFY AND OBTAIN PERMISSION FROM CENTRAL CONTROL<br />
PRIOR TO PERFORMING ANY ELECTRICAL TESTS ON RELAYS.<br />
DURING THE ELECTRICAL TESTS RELAYS ARE INTENTIONALLY,<br />
MANUALLY ACTIVATED. THIS ACTIVATION AFFECTS THE RELAY<br />
CIRCUIT(S) AND POSES A POTENTIAL THREAT TO RAIL SAFETY. IT<br />
MAY PROVIDE FALSE INFORMATION, INTERRUPT OPERATION, AND<br />
CAUSE ALARMS TO INADVERTENTLY SOUND AND/OR BE<br />
DISPLAYED. TAKE ALL STEPS NECESSARY TO ENSURE THE SAFE<br />
PASSAGE OF TRAFFIC IS MAINTAINED.<br />
NOTIFY CENTRAL CONTROL WHEN TESTING IS COMPLETE AND<br />
THE RELAY IS BACK IN OPERATION.<br />
To power most B1relays, apply a variable current source to the coil leads, refer to the<br />
specific relay wiring diagram in Section 2. To power an AC vane relay, see Table 4–8.<br />
P1457, Rev. Nov/07 4–9 <strong>Alstom</strong> Signaling Inc.
Preventive Maintenance<br />
Table 4–6. Electrical Test Procedures<br />
Electrical Test Procedure<br />
Table<br />
AC Light-Out Relay Test Procedure 4–7<br />
AC Vane Relay Test Procedure 4–8<br />
Biased-Neutral Relay Test Procedure 4–9<br />
Code-Responsive Relay Test Procedure 4–10<br />
Code Rate Transmitter Relay Test Procedure 4–11<br />
Magnetic-Stick Relay Test Procedure 4–12<br />
Microchron II Timer Relay Test Procedure 4–13<br />
Neutral Relay Test Procedure 4–14<br />
Polarized Relay Test Procedure 4–15<br />
Power-Transfer Relay Test Procedure 4–16<br />
Switch-Overload Relay Test Procedure 4–17<br />
P1457, Rev. Nov/07 4–10 <strong>Alstom</strong> Signaling Inc.
Preventive Maintenance<br />
4.5.1. AC Light-Out Relay Test<br />
The AC Light-Out Relay is available in two coil configurations:<br />
• A pair of low resistance coils wired in series<br />
• A low resistance coil and high resistance coil<br />
To obtain DROPAWAY, PICKUP, and WORKING current values follow the procedure in<br />
Table 4–7.<br />
Table 4–7. AC Light-Out Relay Test Procedure<br />
Step<br />
Procedure<br />
1 Perform the visual inspection procedure in Table 4–2.<br />
2 Saturate the relay coils with current at the value shown on the <strong>Relays</strong> ED sheet.<br />
Coils are connected in series unless otherwise indicated.<br />
3 Slowly decrease current and obtain DROPAWAY, which is the value at which<br />
the back contacts just make.<br />
4 Open circuit.<br />
5 Close circuit and slowly increase the current to obtain PICKUP, which is the<br />
value at which the front contacts just make.<br />
6 Continue to slowly increase the current to obtain WORKING current, which is<br />
the value at which the armature is against the front stop. Frequently the PICKUP<br />
and WORKING current values are the same.<br />
P1457, Rev. Nov/07 4–11 <strong>Alstom</strong> Signaling Inc.
Preventive Maintenance<br />
4.5.2. AC Vane Relay Test<br />
To test a two-element vane relay follow the procedure provided in Table 4–8. To<br />
operate the text fixture see Appendix C.<br />
Table 4–8. AC Vane Relay Test Procedure<br />
Step<br />
Procedure<br />
1 Perform the visual inspection procedure in Table 4–3.<br />
2 Connect the relay, meters and transformer, if required, to the Vane Relay Test<br />
Unit.<br />
LINE<br />
EARTH<br />
NEUTRAL<br />
POWER<br />
12 11<br />
SW1<br />
FUSE<br />
2A<br />
TP1<br />
SW2<br />
12<br />
11<br />
LINE/TRACK<br />
POWER<br />
Rs<br />
FINE<br />
100 OHMS<br />
AC SUPPLY LINE<br />
SW-1<br />
POWER<br />
ON<br />
LINE/TRACK<br />
POWER<br />
Rp<br />
COURSE<br />
250 OHMS<br />
R1<br />
50 OHMS<br />
22<br />
21 SHUNT<br />
12 11<br />
SW3<br />
SHUNT<br />
11 12<br />
SW4<br />
CURRENT<br />
VOLTS<br />
COIL<br />
2 ELEMENT VANE RELAY<br />
COIL<br />
VOLTS<br />
CURRENT<br />
– + + – – + + – – + + -<br />
AMMETER<br />
0-250 mA<br />
VOLTMETER<br />
0-150 VOLTS<br />
11<br />
14<br />
12<br />
13<br />
LOCAL<br />
R<br />
TRACK<br />
61<br />
64<br />
62<br />
63<br />
VOLTMETER<br />
0-150 VOLTS<br />
AMMETER<br />
0-2 AMPS<br />
LOCAL<br />
TRACK<br />
3 Carefully adjust supply voltage (a tapped transformer is one means) so that the<br />
local element of the relay has the rated voltage imposed.<br />
Stabilize relay for at least one hour before taking electrical values with nominal<br />
voltage on the local element.<br />
Make allowance for the voltage drop across the milliammeter. Obtain local<br />
element readings.<br />
4 Shunt the local milliammeter and adjust the local element voltage so that the<br />
rated voltage is impressed. Hold this value constant during test.<br />
5 No voltmeter is required for the track element, as DROPAWAY, DROPAWAY to<br />
stop, PICKUP, and WORKING are expressed in current values.<br />
6 While holding the voltage on the local element constant at its rated value and<br />
with the relay in its normal position, vary the track element current by moving<br />
the slider on the potentiometer or adjustable resistor. Determine the<br />
DROPAWAY, DROPAWAY to stop, PICKUP, and WORKING current values for<br />
the track element.<br />
P1457, Rev. Nov/07 4–12 <strong>Alstom</strong> Signaling Inc.
Preventive Maintenance<br />
4.5.3. Biased-Neutral Relay Test<br />
Use the procedure in Table 4–9 to verify biased-neutral relay performance.<br />
Table 4–9. Biased-Neutral Relay Test Procedure<br />
Step<br />
Procedure<br />
1 Perform the B1 relay visual inspection procedure in Table 4–2.<br />
2 Saturate the relay coils with current at the value shown on the <strong>Relays</strong> ED sheet.<br />
Coils are connected in series unless otherwise indicated.<br />
3 Slowly decrease current and obtain DROPAWAY, which is the value at which<br />
the back contacts just make.<br />
4 Open circuit.<br />
5 Close circuit and slowly increase the current to obtain PICKUP, which is the<br />
value at which the front contacts just make.<br />
6 Continue to slowly increase the current to obtain WORKING current, which is<br />
the value at which the armature is against the front stop. Frequently the PICKUP<br />
and WORKING current values are the same.<br />
7 All biased-neutral relays are designed to ensure that they will not pick up when<br />
50 times normal WORKING voltage is applied in the reverse direction.<br />
Apply 50 times the normal WORKING voltage in the reverse direction. Relay<br />
should not pick up.<br />
If the relay picks up, remove it from service.<br />
P1457, Rev. Nov/07 4–13 <strong>Alstom</strong> Signaling Inc.
Preventive Maintenance<br />
4.5.4. Code-Responsive Relay Test<br />
To obtain operating values for the code-responsive relay follow the procedure in<br />
Table 4–10.<br />
Table 4–10. Code-Responsive Relay Test Procedure<br />
Step<br />
Procedure<br />
1 Perform the visual inspection procedure in Table 4–5.<br />
2 Saturate relay coils at current value specified on specific ED sheet.<br />
3 Operate relay several times by opening and closing circuit.<br />
4 Slowly reduce current to obtain DROPAWAY value. Two readings of<br />
DROPAWAY values should be taken, one to close back contacts and the other<br />
to allow the armature to touch its backstop pin.<br />
5 Open the circuit, close the circuit, and then slowly increase the current to obtain<br />
PICKUP and WORKING values. PICKUP is the current value at which the front<br />
contacts just close. WORKING is the current value at which the armature in the<br />
fully energized position is up against the stop.<br />
P1457, Rev. Nov/07 4–14 <strong>Alstom</strong> Signaling Inc.
Preventive Maintenance<br />
4.5.5. Code Rate Transmitter Relay Test<br />
To verify the code rate transmission in Cycles Per Minute (CPM), also referred to as the<br />
timing test, follow the procedure in Table 4–11.<br />
Table 4–11. Code Rate Transmitter Relay Test Procedure<br />
Step<br />
Procedure<br />
1 Perform the visual inspection procedure in Table 4–5.<br />
2 Apply power to the relay: connect the electric counter through one set of<br />
contacts, operating the code rate transmitter relay at rated voltage (refer to the<br />
relay ED sheet).<br />
IN<br />
10V<br />
DC<br />
+<br />
CONTACT ON<br />
CODE TRANSMITTER<br />
–<br />
PR1<br />
ELECTRIC COUNTER<br />
3 Connect a timer or oscilloscope to the time contacts. Verify that the time<br />
contacts remain closed at least 25.5 seconds during a one-minute run (42.5%<br />
min.).<br />
3 Determine the number of times the circuit is closed during one minute, this value<br />
is the code rate.<br />
4 With voltage at normal voltage, 10 percent below and 20 percent over normal<br />
rated voltage, and at 75% of rated voltage the code rate in Cycles Per Minute<br />
(CPM) must be held within the following limits unless the associated ED sheet<br />
indicates otherwise.<br />
Nominal Code<br />
Rate<br />
At Normal Volts At 10% Under or 20%<br />
over Normal Volts<br />
At 75% of Rated<br />
Volts<br />
50 ±1 ±2 ±5<br />
75 ±2 ±3 ±5<br />
120 ±2 ±3 ±5<br />
180 ±2 ±3 ±5<br />
220 ±2 ±3 ±5<br />
270 ±2 ±3 ±5<br />
6 To check starting voltage, gradually increase the voltage across the coil<br />
terminals and note the voltage when the rotor begins oscillation. This voltage<br />
should be within the ED sheet limit.<br />
P1457, Rev. Nov/07 4–15 <strong>Alstom</strong> Signaling Inc.
Preventive Maintenance<br />
4.5.6. Magnetic-Stick Relay Test<br />
To verify the performance of the magnetic-stick relay, follow the procedure in<br />
Table 4–12.<br />
Table 4–12. Magnetic-Stick Relay Test Procedure<br />
Step<br />
Procedure<br />
1 Perform the visual inspection procedure in Table 4–5.<br />
2 Stabilize relay by operating 5 to 10 times, alternately from NORMAL to<br />
REVERSE, at the saturation value specified on relays specific ED sheet.<br />
3 Saturate Reverse at value specified on ED sheet.<br />
4 Gradually reduce current to zero.<br />
5 Reverse polarity and gradually increase current to point where armature moves<br />
to normal contacts. Without further increase in current, armature must proceed<br />
through to full normal position against stop. This is the NORMAL PICKUP and<br />
WORKING current and must be within the limits specified on ED sheet.<br />
6 Saturate normal at value specified on ED sheet.<br />
7 Gradually reduce current to zero.<br />
8 Reverse polarity and gradually increase current to point where armature moves<br />
to Reverse contacts. Without further increase in current, armature must proceed<br />
through to full reverse position against stop. This is the REVERSE PICKUP and<br />
WORKING current and must be within the limits specified on the ED sheet.<br />
P1457, Rev. Nov/07 4–16 <strong>Alstom</strong> Signaling Inc.
Preventive Maintenance<br />
4.5.7. Microchron II Timer Relay Test<br />
Follow the procedure in Table 4–13 to perform the electrical test on either the AC<br />
Microchron II Timer Relay or the Microchron II Timer (DC) Relay.<br />
Table 4–13. Microchron II Timer Relay Test Procedure<br />
Step<br />
Procedure<br />
1 Perform the visual inspection procedure in Table 4–4.<br />
2 Remove the timer electronics by following the procedure provided in<br />
Table 6–12.<br />
3 To power the relay, apply a variable current source to the coil leads (one coming<br />
from each relay coil), utilizing a meter tip plug to interface the current source<br />
with the female cap connectors on the coil leads.<br />
4 Apply saturation current as listed on the ED sheet for the relay.<br />
5 Slowly decrease current to relay to find the DROPAWAY value. This is visually<br />
determined by seeing the back contacts just make. Record this current value.<br />
6 Remove relay power.<br />
7 Reapply relay power and increase the output from the current source until the<br />
relay just makes its front contacts. Read the PICKUP value. Record this current<br />
value, this is the WORKING current.<br />
NOTE<br />
At this current value, the stop screw (residual screw) in the<br />
armature should continue to move until it hits the core surface.<br />
8 Compare measured values of the two currents with the ED sheet readjustment<br />
value. If these values are within the limits of the ED sheet, the relay is properly<br />
adjusted. If not, recheck adjustments against the foregoing instructions and<br />
retest the relay as per Steps 3 through 7.<br />
9 After the relay is checked and/or readjusted, reassemble the timer electronics<br />
by following the procedure provided in Table 6–13.<br />
P1457, Rev. Nov/07 4–17 <strong>Alstom</strong> Signaling Inc.
Preventive Maintenance<br />
4.5.8. Neutral Relay Test<br />
To obtain DROPAWAY, PICKUP, and WORKING current values follow the procedure<br />
provided in Table 4–14.<br />
Table 4–14. Neutral Relay Test Procedure<br />
Step<br />
Procedure<br />
1 Perform the visual inspection procedure in Table 4–2.<br />
2 Saturate the relay coils with current at the value shown on the <strong>Relays</strong> ED sheet.<br />
Coils are connected in series unless otherwise indicated.<br />
3 Slowly decrease current and obtain DROPAWAY, which is the value at which<br />
the back contacts just make.<br />
4 Open circuit.<br />
5 Close circuit and slowly increase the current to obtain PICKUP, which is the<br />
value at which the front contacts just make.<br />
6 Continue to slowly increase the current to obtain WORKING current, which is<br />
the value at which the armature is against the front stop. Frequently the PICKUP<br />
and WORKING current values are the same.<br />
P1457, Rev. Nov/07 4–18 <strong>Alstom</strong> Signaling Inc.
Preventive Maintenance<br />
4.5.9. Polarized Relay Test<br />
To obtain the operating values of polarized relays follow the procedure provided in<br />
Table 4–15.<br />
Table 4–15. Polarized Relay Test Procedure<br />
Step<br />
Procedure<br />
1 Perform the visual inspection procedure in Table 4–2.<br />
2 Stabilize relay by operating 5 to 10 times, alternately from Normal to Reverse, at<br />
the saturation value specified on relays specific ED sheet.<br />
3 Saturate Reverse at value specified on ED sheet.<br />
4 Gradually reduce current to zero.<br />
5 Reverse polarity and gradually increase current to point where armature moves<br />
to normal contacts. Without further increase in current, armature must proceed<br />
through to full normal position against stop. This is the NORMAL PICKUP and<br />
WORKING current and must be within the limits specified on ED sheet.<br />
6 Saturate Normal at value specified on ED sheet.<br />
7 Gradually reduce current to zero.<br />
8 Reverse polarity and gradually increase current to point where armature moves<br />
to reverse contacts. Without further increase in current, armature must proceed<br />
through to full reverse position against stop. This is the REVERSE PICKUP and<br />
WORKING current and must be within the limits specified on the ED sheet.<br />
P1457, Rev. Nov/07 4–19 <strong>Alstom</strong> Signaling Inc.
Preventive Maintenance<br />
4.5.10. Power-Transfer Relay Test<br />
Follow the procedure in Table 4–16 to test a Power-Transfer Relay. See specific ED<br />
sheet for exact details.<br />
Table 4–16. Power-Transfer Relay Test Procedure<br />
Step<br />
Procedure<br />
1 Perform the visual inspection procedure in Table 4–2.<br />
2 Apply power to the relay.<br />
3 Use this circuit for testing power-transfer relays:<br />
110 V<br />
60 Hz<br />
12 V<br />
MAX.<br />
0-15 V<br />
AC<br />
V<br />
RELAY UNDER TEST<br />
3B<br />
3A<br />
3C<br />
3D<br />
RECTIFIER<br />
Drawing No. 59899-005-03<br />
4 See specific ED sheet for specifications.<br />
P1457, Rev. Nov/07 4–20 <strong>Alstom</strong> Signaling Inc.
Preventive Maintenance<br />
4.5.11. Switch-Overload Relay Test<br />
The switch-overload relay requires special adjustment. See specific ED sheet for exact<br />
details and operating values.<br />
Table 4–17. Switch-Overload Relay Test Procedure<br />
Step<br />
Procedure<br />
1 Perform the visual inspection procedure in Table 4–2.<br />
2 See specific ED sheet for specifications.<br />
3 Apply the minimum specified operating current to the terminals of the pick up<br />
winding (low resistance) with positive energy on 3C and negative energy on 3D.<br />
After 1½ minutes back off overpressure spring until relay picks. Lock spring at<br />
this setting.<br />
4 Allow relay to cool at least 10 minutes.<br />
5 Apply the minimum specified operating current to the terminals of the pick up<br />
winding for 1½ minutes. Relay must not pick. After 1½ minutes, quickly increase<br />
current to maximum pick up current. Relay must pick up. Remove power.<br />
6 Check high resistance winding to insure the PICKUP and WORKING current<br />
value is within specified limits.<br />
P1457, Rev. Nov/07 4–21 <strong>Alstom</strong> Signaling Inc.
Preventive Maintenance<br />
4.6. TIMING TESTS<br />
4.6.1. Code Rate Transmitter Relay Timing Test<br />
The Code rate Transmitter Relay Timing Test is performed to check that the code rate<br />
transmitter relay contacts remain closed for the proper length of time. This test is<br />
included in Table 4–11, Code Rate Transmitter Relay Test Procedure.<br />
4.6.2. Microchron II Timer Relay (DC) Timing Test<br />
The Microchron II Timer Relay (DC) Timing Test is performed during the Microchron II<br />
Timer Relay (DC) installation procedure in Table 3–3.<br />
To verify that the relay timing is within limits, see Step 10 to determine the pre-selected<br />
relay timing by inspecting the thumbwheel settings and follow Step 11 to perform the<br />
test.<br />
4.6.3. AC Microchron II Timer Relay Timing Test<br />
The AC Microchron II Timer Relay Timing Test is performed during the AC Microchron II<br />
Timer Relay installation procedure in Table 3–5.<br />
To verify that the relay timing is within limits, see Step 8 to determine the pre-selected<br />
relay timing by inspecting the thumbwheel settings and follow Step 9 to perform the test.<br />
P1457, Rev. Nov/07 4–22 <strong>Alstom</strong> Signaling Inc.
Troubleshooting<br />
5. SECTION 5 – TROUBLESHOOTING<br />
5.1. GENERAL PHILOSOPHY<br />
Troubleshooting helps to determine defective parts of equipment requiring repair or<br />
replacement. This is done through fault isolation diagrams and special instructions.<br />
5.2. GENERAL TROUBLESHOOTING<br />
General troubleshooting can be summarized as follows:<br />
• Understand and define the problem.<br />
• Confirm the problem.<br />
• Isolate the fault.<br />
• Perform corrective action.<br />
• Verify system operation.<br />
Standard troubleshooting, such as verifying wiring and energy, can be used to identify a<br />
failure.<br />
It is recommended that the following items be checked when troubleshooting a <strong>Type</strong> B<br />
relay problem:<br />
• Current Test Post (E Post) - check for tightness of spanner nut (if present, not all B<br />
relays have this post)<br />
• Plugboard Contacts - check that relay is properly seated<br />
• Voltage – check that it is provided to the coil<br />
5.3. RELAY TROUBLESHOOTING TOOLS<br />
See Appendix C for a summary of B relay tools.<br />
P1457, Rev. Nov/07 5–1 <strong>Alstom</strong> Signaling Inc.
Troubleshooting<br />
5.4. FIELD TROUBLESHOOTING<br />
Troubleshooting procedures are provided in a logical order. The procedures must be<br />
performed in the given order to be correct. Any deviation from the order can result in an<br />
incorrect diagnosis or indication. This section covers only those troubles most frequently<br />
encountered during equipment operation. If a specific concern occurs that does not<br />
appear in this section, refer to the appropriate functional description in Section 2, and<br />
isolate the problem to a listed functional area or to a defective assembly or<br />
subassembly.<br />
Troubleshooting diagrams, in the form of fault isolation diagrams begin with a<br />
malfunction symptom. Then, based on observation/tests by the maintainer, the<br />
diagrams branch out to isolate probable causes of the malfunction. When a malfunction<br />
is external, a reference is given to refer the maintainer to the probable fault area for<br />
further troubleshooting.<br />
NOTE<br />
After performing replacements, repairs, or adjustments the maintainer<br />
must repeat the troubleshooting procedure.<br />
Troubleshooting symbols are described in Table 5–1. Fault isolation diagrams are<br />
provided as follows:<br />
• Figure 5–1, DC Relay Does Not Pick<br />
• Figure 5–2, DC Relay Does Not Release<br />
• Figure 5–3, AC Vane Relay Does Not Pick<br />
• Figure 5–4, AC Vane Relay Does Not Release<br />
• Figure 5–5, Microchron II Timer Relay (DC or AC) Does Not Pick<br />
• Figure 5–6, Microchron II Timer Relay (DC or AC) Does Not Pick<br />
P1457, Rev. Nov/07 5–2 <strong>Alstom</strong> Signaling Inc.
Troubleshooting<br />
Table 5–1. Troubleshooting Symbols<br />
Symbol<br />
Explanation<br />
Malfunction statement as derived from operator's report.<br />
Basic instruction for preparation of a test, procedure, or<br />
observation. The action taken results in a diagnostic<br />
decision.<br />
Result from previous action, which is answered yes or no. If<br />
result is within tolerance, answer yes. If not, answer no. Do<br />
not consider any gray areas between yes and no.<br />
Final step of instructions involving corrective measures.<br />
Reference publication indicates suspected problem area.<br />
Special instruction for continuation of troubleshooting<br />
diagram at referenced location.<br />
P1457, Rev. Nov/07 5–3 <strong>Alstom</strong> Signaling Inc.
Troubleshooting<br />
5.4.1. DC Relay Troubleshooting<br />
DC RELAY DOES<br />
NOT PICK UP<br />
CHECK FOR CORRECT<br />
VOLTAGE AT RELAY<br />
TEST TERMINALS<br />
(SEE WIRING DIAGRAM)<br />
YES<br />
OK?<br />
NO<br />
DOES<br />
RELAY HAVE<br />
SUPRESSOR UNIT?<br />
NO<br />
CHECK BOOK OF<br />
PLANS FOR<br />
RELAY LOGIC<br />
CIRCUITRY<br />
YES<br />
REPLACE SUPPRESSOR<br />
UNIT AND CHECK<br />
THAT RELAY PICKS UP<br />
YES<br />
OK?<br />
NO<br />
FAULT<br />
CORRECTED<br />
CHECK FOR CORRECT<br />
VOLTAGE AT RELAY<br />
COIL TERMINALS<br />
(I.E. 3D, 3C, 3B, 3A, SEE<br />
WIRING DIAGRAM))<br />
YES<br />
OK?<br />
NO<br />
REPLACE<br />
RELAY<br />
REPAIR RELAY<br />
PLUGBOARD<br />
WIRING<br />
Figure 5–1. DC Relay Does Not Pick<br />
P1457, Rev. Nov/07 5–4 <strong>Alstom</strong> Signaling Inc.
Troubleshooting<br />
DC RELAY DOES<br />
NOT RELEASE<br />
CHECK FOR VOLTAGE<br />
PRESENT AT RELAY<br />
TEST TERMINALS<br />
(SEE WIRING DIAGRAM)<br />
YES<br />
OK?<br />
NO<br />
REFER TO<br />
BOOK OF PLANS<br />
FOR RELAY<br />
LOGIC<br />
CIRCUITRY<br />
REPLACE<br />
RELAY<br />
Figure 5–2. DC Relay Does Not Release<br />
NOTE<br />
Failure of a DC Relay to release with no voltage applied to the terminals<br />
could indicate a potential safety failure. Record the conditions and notify<br />
<strong>Alstom</strong> Signaling customer service as soon as possible.<br />
P1457, Rev. Nov/07 5–5 <strong>Alstom</strong> Signaling Inc.
Troubleshooting<br />
5.4.2. AC Vane Relay Troubleshooting<br />
AC VANE RELAY<br />
DOES NOT PICK UP<br />
CHECK FOR<br />
SPECIFIED TRACK<br />
VOLTAGE<br />
OK?<br />
NO<br />
REFER TO<br />
BOOK OF PLANS<br />
FOR RELAY<br />
LOGIC<br />
CIRCUITRY<br />
YES<br />
REMOVE RELAY FROM<br />
PLUG BOARD AND CHECK<br />
FOR SPECIFIED<br />
LOCAL VOLTAGE<br />
YES<br />
OK?<br />
NO<br />
REPLACE<br />
RELAY<br />
REPAIR<br />
PLUGBOARD<br />
WIRING<br />
Figure 5–3. AC Vane Relay Does Not Pick<br />
P1457, Rev. Nov/07 5–6 <strong>Alstom</strong> Signaling Inc.
Troubleshooting<br />
AC VANE RELAY<br />
DOES NOT<br />
RELEASE<br />
VOLTAGE<br />
PRESENT<br />
BETWEEN<br />
TERMINALS 1E<br />
AND 6E<br />
YES<br />
RELAY OPERATION<br />
IS NORMAL;<br />
REFER TO BOOK OF<br />
PLANS FOR RELAY<br />
LOGIC CIRCUITRY<br />
NO<br />
REPLACE<br />
RELAY<br />
Figure 5–4. AC Vane Relay Does Not Release<br />
NOTE<br />
Failure of an AC Relay to release with no voltage applied to the terminals<br />
could indicate a potential safety failure. Record the conditions and notify<br />
<strong>Alstom</strong> Signaling customer service as soon as possible.<br />
P1457, Rev. Nov/07 5–7 <strong>Alstom</strong> Signaling Inc.
Troubleshooting<br />
5.4.3. Microchron II Timer Relay Troubleshooting<br />
Both the AC and DC versions of the Microchron II Timer Relay contain a red LED and a<br />
green LED.<br />
The Red LED indicator is the TIMING/POWER ON indicator. It is lit when power is first<br />
applied. It will begin blinking OFF/ON at 1.0 second intervals until the delay set on the<br />
switches has expired. On the AC Microchron II Timer Relay, the final blink will be slightly<br />
quicker or longer depending on the tenth of second switch setting. Then the Red LED<br />
illuminates steady when the timing cycle is complete and power remains supplied.<br />
The Green LED indicator is the DELAY COMPLETE indicator. It is lit at the end of a<br />
delay. Once the delay has expired, the power that is driven through the <strong>Vital</strong> Relay<br />
Driver (VRD) tuned circuit to the vital relay also drives the Green LED to indicate the<br />
end of the delay.<br />
NOTE<br />
If the Microchron II Timer Relay completes its time cycle and the green<br />
LED illuminates, but the relay does not pick, check the relay coil<br />
connections.<br />
Failure of the green LED to illuminate, combined with a lack of relay<br />
energy following a correct timing interval could indicate a failure of the vital<br />
driver circuit.<br />
P1457, Rev. Nov/07 5–8 <strong>Alstom</strong> Signaling Inc.
Troubleshooting<br />
MICROCHRON II<br />
TIMER RELAY DOES<br />
NOT PICK UP<br />
DOES GREEN LED<br />
ILLUMINATE<br />
(OR BLINK)?<br />
YES<br />
DOES RED LED<br />
ILLUMINATE WHEN<br />
TIMING CYCLE IS<br />
COMPLETE AND POWER<br />
REMAINS SUPPLIED?<br />
OK?<br />
NO<br />
CHECK FOR CORRECT<br />
VOLTAGE AT TEST<br />
TERMINALS<br />
(SEE WIRING DIAGRAM)<br />
YES<br />
OK?<br />
NO NO<br />
OK?<br />
YES<br />
YES<br />
DID POWER<br />
REMAIN<br />
SUPPLIED?<br />
NO<br />
NO<br />
DOES RELAY<br />
HAVE FILTER<br />
UNIT?<br />
YES<br />
REPLACE FILTER<br />
UNIT AND CHECK<br />
RELAY PICKS AFTER<br />
DELAY<br />
CHECK BOOK OF<br />
PLANS FOR<br />
RELAY LOGIC<br />
CIRCUITRY<br />
CHECK FOR CORRECT<br />
VOLTAGE AT RELAY<br />
COIL TERMINALS<br />
(I.E. 51, 52, SEE WIRING<br />
DIAGRAM)<br />
YES<br />
OK?<br />
NO<br />
NO<br />
NO<br />
OK?<br />
YES<br />
REPLACE<br />
RELAY<br />
REPAIR RELAY<br />
PLUGBOARD<br />
WIRING<br />
FAULT<br />
CORRECTED<br />
Figure 5–5. Microchron II Timer Relay (AC or DC) Does Not Pick<br />
P1457, Rev. Nov/07 5–9 <strong>Alstom</strong> Signaling Inc.
Troubleshooting<br />
MICROCHRON II<br />
TIMER RELAY DOES<br />
NOT RELEASE<br />
NO<br />
IS RED LED<br />
ILLUMINATED?<br />
YES<br />
CHECK FOR VOLTAGE<br />
PRESENT AT RELAY<br />
TEST TERMINALS<br />
(SEE WIRING DIAGRAM)<br />
NO<br />
OK?<br />
YES<br />
REPLACE<br />
RELAY<br />
REFER TO BOOK OF<br />
PLANS FOR<br />
RELAY LOGIC<br />
CIRCUITRY<br />
Figure 5–6. Microchron II Timer Relay (AC or DC) Does Not Release<br />
NOTE<br />
Failure of a Microchron II Timer Relay to release with no voltage applied to<br />
the terminals could indicate a potential safety failure. Record the<br />
conditions and notify <strong>Alstom</strong> Signaling customer service as soon as<br />
possible.<br />
P1457, Rev. Nov/07 5–10 <strong>Alstom</strong> Signaling Inc.
Corrective Maintenance<br />
6. SECTION 6 – CORRECTIVE MAINTENANCE<br />
6.1. GENERAL PURPOSE<br />
This section describes corrective maintenance procedures for <strong>Type</strong> B relays. Corrective<br />
maintenance is intended to restore malfunctioning equipment to an operable condition<br />
as quickly as possible. The procedures included in this section include:<br />
• Relay Removal and Replacement Procedures to remove relays not meeting<br />
inspection or electrical criteria<br />
• Relay Wiring Change Procedures for plugboards and terminals<br />
• Mechanical Test and Adjustment Procedures for relays removed from service<br />
Specifications for testing and inspecting all <strong>Alstom</strong> relays are given on relay Engineering<br />
Data (ED) sheets. Relay drawing and catalog numbers can be used with Appendix A to<br />
look up the Engineering Data (ED) Sheet number. To determine a relay's drawing or<br />
catalog number, refer to Heading 1.2.2., Identification For copies of ED sheets, consult<br />
your <strong>Alstom</strong> Sales Representative or <strong>Alstom</strong> Customer Service.<br />
Table 6–1. Corrective Maintenance Procedures<br />
Description<br />
Table<br />
B Relay Removal and Replacement Procedure 6–2<br />
Terminal Removal Procedure 6–3<br />
Terminal Installation Procedure 6–4<br />
Terminal Soldering Procedure 6–5<br />
Terminal Crimping Procedure 6–6<br />
Insulator Removal and Installation Procedure 6–7<br />
Current Test Terminal Wiring Procedure 6–8<br />
Voltage Test Terminal Wiring Procedure 6–9<br />
Relay Structure Inspection Procedure 6–10<br />
Mechanical Test and Adjustment Procedure (for standard B1 and<br />
B2 relays)<br />
6–11<br />
Microchron II Timer Electronics Removal Procedure 6–12<br />
Microchron II Timer Electronics Replacement Procedure 6–13<br />
P1457, Rev. Nov/07 6–1 <strong>Alstom</strong> Signaling Inc.
Corrective Maintenance<br />
6.2. CORRECTIVE MAINTENANCE TOOLS<br />
See Appendix C for a summary of B relay tools.<br />
The Shop Test Rack, P/N 56573-002-01, is used to test relays in the shop. See<br />
Appendix C for details about the Shop Test Rack.<br />
6.3. REMOVAL AND REPLACEMENT PROCEDURES<br />
6.3.1. B Relay Removal and Replacement<br />
Table 6–2. B Relay Removal and Replacement Procedure<br />
Step<br />
Procedure<br />
1 To remove the B relay, loosen and remove two lock nuts from two guide rods.<br />
LOCK NUTS<br />
GUIDE RODS<br />
KNURLED<br />
NUTS<br />
2 Loosen and remove two knurled nuts from two guide rods.<br />
3 Grasping relay top and bottom with both hands, rock slightly from side to side to<br />
release the relay from plug connection. Remove relay.<br />
If an adjacent relay prohibits grasping the relay on top and bottom, use handle<br />
on front to pull relay along guide rods.<br />
P1457, Rev. Nov/07 6–2 <strong>Alstom</strong> Signaling Inc.
Corrective Maintenance<br />
Table 6–2. B Relay Removal and Replacement Procedure (Cont.)<br />
Step<br />
Procedure<br />
4 Check that the replacement relay is correct by verifying that the part number on<br />
the nameplate of relay matches the number on the plugboard registration plate.<br />
Remove nametag from defective relay and install on replacement relay.<br />
REGISTRATION<br />
PLATE NUMBER<br />
NAME<br />
PLATE<br />
NAMETAG<br />
TEST DATA<br />
FORM<br />
5 To replace the B relay, grasp the relay by the top and bottom of the cover; slide<br />
it onto the guide rods.<br />
If adjacent relay prohibits grasping of relay on top and bottom, use the handle<br />
on the front to push the relay along the guides.<br />
P1457, Rev. Nov/07 6–3 <strong>Alstom</strong> Signaling Inc.
Corrective Maintenance<br />
Table 6–2. B Relay Removal and Replacement Procedure (Cont.)<br />
Step<br />
Procedure<br />
6 Press the relay firmly into place so that the back of the relay is snug against its<br />
plugboard.<br />
PLUGBOARD<br />
RELAY<br />
BASE<br />
CAUTION<br />
Do not exert excessive pressure on the relay. Pressure greater<br />
than finger pressure could damage relay or plugboard.<br />
7 Hold the relay in this position with one hand while putting on the knurled<br />
retaining nuts. The nuts should be tightened only until they just touch the end of<br />
the tube, but do not exert pressure against the relay.<br />
TUBE<br />
GUIDE ROD<br />
KNURLED<br />
NUTS<br />
KNURLED<br />
NUTS<br />
CAUTION<br />
DO NOT use the retaining nuts to pull the insulators and prongs<br />
into engagement.<br />
P1457, Rev. Nov/07 6–4 <strong>Alstom</strong> Signaling Inc.
Corrective Maintenance<br />
Table 6–2. B Relay Removal and Replacement Procedure (Cont.)<br />
Step<br />
Procedure<br />
8 Screw on the lock nuts, holding the retaining nuts with the fingers to prevent<br />
their turning while tightening the lock nuts with an AAR wrench.<br />
LOCK NUTS<br />
P1457, Rev. Nov/07 6–5 <strong>Alstom</strong> Signaling Inc.
Corrective Maintenance<br />
6.4. WIRING AND PLUGBOARD CHANGES<br />
6.4.1. Terminal Removal and Installation<br />
To remove a terminal, follow the procedure in Table 6–3 in the order provided.<br />
Follow the procedure in Table 6–4 to install a terminal.<br />
Table 6–3. Terminal Removal Procedure<br />
Step<br />
Procedure<br />
1 Insert extractor P/N 59688-000-00 to raise the lock tab of the terminal so that it<br />
clears the shoulder on the insulator.<br />
SPRING BEAM<br />
SQUEEZE TOWARDS<br />
INSULATOR TO RELEASE<br />
EXTRACTOR<br />
INSULATOR<br />
LOCKING TAB<br />
LOCKING SHOULDER<br />
2 Pull on wire that is connected to terminal and withdraw terminal from plugboard.<br />
EXTRACTOR<br />
INSULATOR (P/N 59688-000-00)<br />
3 If no wire is attached to terminal, use long-nose pliers to extract terminal.<br />
P1457, Rev. Nov/07 6–6 <strong>Alstom</strong> Signaling Inc.
Corrective Maintenance<br />
Table 6–4. Terminal Installation Procedure<br />
Step<br />
Procedure<br />
1 Determine in which plugboard slot the terminal belongs.<br />
2 Insert terminal with lock tab against insulator.<br />
SPRING BEAM<br />
SQUEEZE TOWARDS<br />
INSULATOR TO RELEASE<br />
EXTRACTOR<br />
TERMINAL<br />
INSULATOR<br />
LOCKING TAB<br />
LOCKING SHOULDER<br />
Press in until lock tab clicks into place behind shoulder on insulator.<br />
3 Pull on wire to see if terminal is properly locked. This check is particularly<br />
important when using No. 10 wire.<br />
TERMINAL<br />
P1457, Rev. Nov/07 6–7 <strong>Alstom</strong> Signaling Inc.
Corrective Maintenance<br />
6.4.2. Terminal Wiring<br />
To wire a solder terminal, follow the procedure in Table 6–5.<br />
Follow the procedure in Table 6–6 to wire a crimped terminal.<br />
Table 6–5. Terminal Soldering Procedure<br />
Step<br />
Procedure<br />
1 Ring out the circuit for the right wire. Tag the wire.<br />
2 Strip wire insulation to expose 1/4 inch of bare wire. For wire sizes with outside<br />
diameters between 0.230 - .260 inches, strip off approximately 7/8 inch of the<br />
insulation and slide on rubber sleeve, P/N 35189-033-00, as shown:<br />
ROSIN<br />
CORE<br />
SOLDER<br />
INSULATION<br />
CLAMP<br />
WIRE<br />
CLAMP<br />
SLEEVE<br />
3 Clamp insulated portion of wire in one lug of terminal 55871-019-00.<br />
4 Clamp bare wire in the other lug.<br />
WARNING<br />
MAKE SURE THAT ALL STRANDS OF THE WIRE ARE<br />
CLAMPED UNDER THE LUG. LOOSE STRANDS EXTENDING<br />
THROUGH THE INSULATOR’S SPRING BEAM SLOT COULD<br />
CAUSE A SHORT CIRCUIT TO THE TERMINAL ON THE<br />
OPPOSITE SIDE OF THE INSULATOR.<br />
5 Heat the terminal at the bare wire until a small amount of solder flows to bond<br />
end of bare wire to terminal. Be aware that too much solder will jam lock tab.<br />
6 Proceed the same way to attach a second wire to the same terminal (if<br />
required).<br />
7 Inspect terminal to ensure no loose strands of wire are outside terminal lugs.<br />
P1457, Rev. Nov/07 6–8 <strong>Alstom</strong> Signaling Inc.
Corrective Maintenance<br />
NOTE<br />
For detailed instruction on use of crimp tool P/N 24745-148-00, including<br />
wire strip length, refer to Instructions Sheet 408-9904, produced by AMP,<br />
the tool manufacturer.<br />
Table 6–6. Terminal Crimping Procedure<br />
Step<br />
Procedure<br />
1 Strip wire insulation to expose bare wire to the length specified in the crimp<br />
tool's instruction sheet. Ring out circuit for this wire. Tag the wire.<br />
2 Select terminal 55871-098-00 for 10 - 14 AWG wire; use terminal 55871-074-00<br />
for 16 - 20 AWG wire.<br />
3 Place terminal in crimp tool P/N 24745-148-00, centering the terminal over<br />
correct crimp for AWG wire.<br />
4 Insert bare wire into terminal, keeping all strands inside barrel.<br />
WIRE CRIMP<br />
5 Crimp wire in terminal.<br />
CRIMP TERMINAL<br />
6 Repeat Steps 1 through 5 to attach a second wire to other terminal barrel (if<br />
required).<br />
7 Inspect crimps to ensure no loose strands of wire are outside the barrel of the<br />
terminal.<br />
P1457, Rev. Nov/07 6–9 <strong>Alstom</strong> Signaling Inc.
Corrective Maintenance<br />
6.4.3. Insulator Removal and Installation<br />
To remove and replace an insulator, follow the steps in Table 6–7 in the order provided.<br />
Table 6–7. Insulator Removal and Installation Procedure<br />
Step<br />
Procedure<br />
1 From the rear of the plugboard, squeeze the locking tab toward the insulator<br />
and push the insulator forward.<br />
LOCKING<br />
TAB<br />
SQUEEZE<br />
TOWARD<br />
INSULATOR<br />
2 Remove the insulator from the front of the plugboard.<br />
3 From the front of the plugboard, insert the new insulator end with the locking tab<br />
first. Push until the insulator is seated and the locking tab engages. The locking<br />
tab clicks when it engages.<br />
4 From the front of the plugboard, tug on the insulator to verify that the locking tab<br />
has engaged.<br />
P1457, Rev. Nov/07 6–10 <strong>Alstom</strong> Signaling Inc.
Corrective Maintenance<br />
6.4.4. Current Test Terminal Wiring<br />
To wire a current test terminal follow the procedure provided in Table 6–8.<br />
Table 6–8. Current Test Terminal Wiring Procedure<br />
Step<br />
Procedure<br />
1 Solder a wire jumper about eight inches long to connector.<br />
2 Pass wire from front of plugboard through hole next to current test terminal. On<br />
B1 plugboards this hole is to the right and below the one marked 3E. On B2<br />
plugboards, it is to the left and below the one marked 6E.<br />
3 Assemble current test terminal as shown:<br />
CONNECTOR<br />
04906-126-00<br />
SPANNER<br />
NUT<br />
TO CABLE<br />
WIRE JUMPER ABOUT<br />
8 INCHES LONG<br />
SOLDER WIRE JUMPER<br />
TO CONNECTOR<br />
TO COIL<br />
TERMINAL<br />
BEND AFTER WIRE<br />
IS ATTACHED<br />
ROSIN CORE SOLDER,<br />
SOLDER HERE<br />
DETAIL OF SOLDERED CONNECTION<br />
4 Slide connector into insulating bushing and at the same time push wire through<br />
hole.<br />
5 Tighten spanner nut with spanner nut wrench, P/N 55393-003-01, for B Relay<br />
Current Test Post (E Post).<br />
6 Bend end of connector against plugboard.<br />
7 Cut jumper wire to proper length and connect it to plugboard terminal. Refer to<br />
the detailed wiring plan.<br />
8 Put a terminal on the wire that comes from the cable and goes to that part of the<br />
test terminal that extends toward the back of plugboard. Connect them as<br />
shown in Step 3.<br />
P1457, Rev. Nov/07 6–11 <strong>Alstom</strong> Signaling Inc.
Corrective Maintenance<br />
6.4.5. Voltage Test Terminal Wiring<br />
To wire a voltage test terminal follow the procedure provided in Table 6–9.<br />
Table 6–9. Voltage Test Terminal Wiring Procedure<br />
Step<br />
Procedure<br />
1 Pass a wire jumper about eight inches long from front of plugboard through hole<br />
next to voltage test terminal. On B1 and B2 plugboards this hole is to the right<br />
and below the one marked 1E. Note that the space is provided on B2<br />
plugboards for more than one test terminal in cases where the coils in a relay<br />
have independent circuits.<br />
2 Put AAR ring terminals on wire and assemble to coil terminal as shown:<br />
TO CABLE<br />
TO COIL<br />
TERMINAL<br />
TO COIL<br />
TERMINAL<br />
WIRE JUMPER ABOUT<br />
8 INCHES LONG<br />
3 Cut jumper wire to proper length and connect it to plugboard terminal. Refer to<br />
the detailed wiring plan.<br />
4 Put terminals on the wires that come from cable and go to that part of test<br />
terminal that extends toward back of the plugboard. Connect them as shown.<br />
P1457, Rev. Nov/07 6–12 <strong>Alstom</strong> Signaling Inc.
Corrective Maintenance<br />
6.5. MECHANICAL TEST PROCEDURES<br />
The mechanical test procedures are performed to ensure that the relay structure is<br />
properly adjusted. Table 6–10 provides the Relay Structure Inspection Procedure. Table<br />
6–11 provides the Mechanical Test and Adjustment Procedure.<br />
The mechanical test and adjustment procedures take place with the B relay cover<br />
removed. These procedures include verification of armature air gap, bridge travel and<br />
contact group measurements. Components identified as not meeting defined tolerances<br />
during the relay mechanical test are adjusted during the test procedure. Mechanical<br />
adjustments must be followed by electrical tests to verify relay performance.<br />
WARNING<br />
BREAKING THE RELAY COVER SEAL VOIDS THE WARRANTY ON<br />
THE RELAY.<br />
P1457, Rev. Nov/07 6–13 <strong>Alstom</strong> Signaling Inc.
Corrective Maintenance<br />
6.5.1. Relay Structure Inspection<br />
Before performing any adjustments or tests on a relay, the relay structure must be<br />
visually inspected. Section 7, Parts List, provides a comprehensive list and illustrations<br />
for all of the components of the typical B relay. This procedure applies to typical B<br />
relays and Microchron II Timer relays.<br />
Table 6–10. Relay Structure Inspection Procedure<br />
Step<br />
Procedure<br />
1 If any of the following conditions are not met, take note of the problem and<br />
correct it during the mechanical test.<br />
NOTE<br />
This procedure includes correcting identified problems. This<br />
procedure must be followed by relay mechanical and electrical<br />
tests.<br />
2 Check that the relay cover and seal are not cracked, broken or discolored.<br />
3 Break the cover seal and unscrew the knurled nuts.<br />
WARNING<br />
BREAKING THE RELAY COVER SEAL VOIDS THE WARRANTY<br />
ON THE RELAY.<br />
GUIDE ROD<br />
TUBE<br />
4 Remove the two round rubber washers and the cover.<br />
KNURLED<br />
NUTS<br />
P1457, Rev. Nov/07 6–14 <strong>Alstom</strong> Signaling Inc.
Corrective Maintenance<br />
Table 6–10. Relay Structure Inspection Procedure (Cont.)<br />
Step<br />
Procedure<br />
5 Remove contact group dust shield. Verify that the relay contact groups and<br />
mounting screws are tight. Tighten, if necessary. Replace contact group dust<br />
shield.<br />
COMPRESSION SPRING<br />
COVER<br />
COIL SPRING STUD<br />
ARMATURE STOP SCREW<br />
BRIDGE OR ARM. EXTENSION<br />
PUSHER<br />
BACK CONTACT<br />
HEEL CONTACT<br />
FRONT CONTACT<br />
CONTACT PRONGS<br />
BASE<br />
CONTACT GROUP<br />
PRESSURE PLATES<br />
STOP PLATES<br />
PUSHER JAW<br />
PUSHER RETAINING CLIPS<br />
ROLLER ON FINGER<br />
ARMATURE<br />
ARMATURE<br />
RETAINING<br />
PLATE<br />
ADJ. NUT<br />
LOCK NUT<br />
YOKE<br />
NUT<br />
ARMATURE<br />
BEARING<br />
PLATE<br />
NAME<br />
PLATE<br />
SAFETY<br />
PIN<br />
COIL<br />
REGISTRATION COIL<br />
PLATES PRONGS<br />
ADJUSTABLE RESIDUAL SCREW<br />
CORE<br />
NOTE: SOME PARTS MAY DIFFER IN DETAIL FROM THOSE SHOWN ABOVE BUT NAME<br />
DESIGNATION REMAINS THE SAME.<br />
6 Verify that the pusher retaining clips are properly assembled and do not bind on<br />
pusher, thus allowing free movement of pusher. The pusher clips cannot be<br />
adjusted or reassembled, replace if necessary.<br />
7 Verify that the pusher is not bent, broken or cracked due to being forced on the<br />
bridge (armature extension). Replace, if necessary.<br />
P1457, Rev. Nov/07 6–15 <strong>Alstom</strong> Signaling Inc.
Corrective Maintenance<br />
Table 6–10. Relay Structure Inspection Procedure (Cont.)<br />
Step<br />
Procedure<br />
8 Verify that each pusher does not rub against the contact springs or stop in any<br />
position. Adjust, if necessary.<br />
9 Verify that the armature does not bind, and rides properly on the armature<br />
bearing plate. Clearance between the front face of the armature and the edge of<br />
the armature retaining plate is .002 inches minimum and .004 inches maximum,<br />
for any position of the armature. Adjust, if necessary.<br />
10 Verify that the compression spring does not rub on stud in any position of the<br />
armature. Adjust, if necessary.<br />
11 Verify that the compression spring fits properly against shoulder on lock nut.<br />
Adjust, if necessary.<br />
12 Verify that the lock nut is properly in place on coil spring stud. Reseat and<br />
tighten, if necessary.<br />
P1457, Rev. Nov/07 6–16 <strong>Alstom</strong> Signaling Inc.
Corrective Maintenance<br />
6.5.2. Mechanical Test and Adjustment Procedure<br />
The Mechanical Test and Adjustment Procedure provided in Table 6–11 applies to<br />
standard B1 and B2 relays, not specialty relays.<br />
Table 6–11. Mechanical Test and Adjustment Procedure<br />
Step<br />
Procedure<br />
1 Inspect the relay components by following the procedure in Tables 6–10.<br />
NOTE<br />
If the relay is a Microchron II Timer Relay (AC or DC), first remove<br />
the timer using the procedure provided in Table 6–12.<br />
2 Mount the relay onto Shop Test Rack or on a plugboard, supporting it about 18<br />
inches above a bench on a plugboard holding stand.<br />
Secure the relay with two retaining nuts to hold the relay in place.<br />
Example Shop Test Rack<br />
G<br />
16 26 36<br />
15 25 35<br />
14 24 34<br />
13 23 33<br />
12 22 32<br />
11 21 31<br />
46 56 66<br />
45 55 65<br />
44 54 64<br />
43 53 63<br />
42 52 62<br />
41 51 61<br />
E<br />
F<br />
6C<br />
6D<br />
D<br />
C<br />
1C<br />
1D<br />
6C<br />
6D<br />
C<br />
D<br />
A<br />
B<br />
X<br />
This rack is designed for both B1 and B2 relays. One of the guide rods is<br />
removable. For testing B1 relays, screw the removable guide rod into location F.<br />
For testing B2 relays, screw it into location E. Meter leads should have alligator<br />
clips for clipping on to terminal posts G.<br />
3 Proceed with this procedure to check the following areas to verify that all<br />
adjustments are proper: armature air gap, bridge travel, back and front contact<br />
make and break, contact openings and pressures.<br />
4 Energize the relay when required. To power the relay, apply a variable current<br />
source to the coil leads (one coming from each relay coil), utilizing a meter tip<br />
plug to interface the current source with the female cap connectors on the coil<br />
leads. Refer to the relay wiring diagram if necessary.<br />
P1457, Rev. Nov/07 6–17 <strong>Alstom</strong> Signaling Inc.
Corrective Maintenance<br />
Table 6–11. Mechanical Test and Adjustment Procedure (Cont.)<br />
Step<br />
Procedure<br />
5 Verify the armature air gap measurement is as specified on the specific relay’s<br />
ED sheet. A feeler gauge of the same thickness as the specified air gap must<br />
pass freely between the armature and core heads at any point, except at the<br />
fixed safety pins, when the relay is energized.<br />
ARMATURE<br />
CORE<br />
SAFETY PINS<br />
LOCATED AT<br />
THE CORE<br />
HEADS<br />
CORE<br />
6 If the armature air gap is not acceptable, adjust the armature gap with the<br />
adjustable residual screw to obtain the required air gap. The screw must be<br />
locked tight in place by the lock nut provided.<br />
7 Verify the bridge travel measurement is as specified on the specific relay’s ED<br />
sheet.<br />
Use a feeler gauge of the same thickness as the specified air gap to verify the<br />
air gap between the bracket and the armature stop screw when the relay is<br />
energized.<br />
ARMATURE<br />
STOP SCREW<br />
GAP<br />
BRACKET<br />
P1457, Rev. Nov/07 6–18 <strong>Alstom</strong> Signaling Inc.
Corrective Maintenance<br />
Table 6–11. Mechanical Test and Adjustment Procedure (Cont.)<br />
Step<br />
Procedure<br />
8 If the bridge travel is not acceptable, adjust the bridge travel. Turn the armature<br />
stop screw until the bridge travel measurement is within specification. The screw<br />
must be locked tight in place by the lock nut provided.<br />
Generally, operating values of a relay are easier to obtain when this air gap is<br />
held to the minimum value.<br />
9 Make and break openings for front and back contacts are measured by inserting<br />
the proper thickness gauge between the adjustable residual screw and core<br />
face.<br />
• With the break gauge in place, all specified contacts are open.<br />
• With the make gauge in place, all specified contacts are closed.<br />
2 FRONT<br />
CONTACTS<br />
BACK CONTACT<br />
10 Verify the contact opening measurements meet the specifications indicated in<br />
the appropriate ED sheet.<br />
11 If the contact opening measurements are not acceptable, bend the pressure<br />
plate forcing the contact spring to the proper position to meet the acceptable<br />
make and break values.<br />
With the contact spring properly positioned, the stop plate is bent toward the<br />
contact spring until it just touches the spring. Note that the spring bears against<br />
the pressure plate and touches the stop plate.<br />
If a pressure plate or stop plate is bent too far away from a contact spring, this<br />
can be corrected by bending the plate to stop a little too near the spring and<br />
then bend the plate away from the spring.<br />
12 Use a pressure gauge to verify the contact pressure meets the specifications<br />
indicated in the appropriate ED sheet.<br />
When making contact pressure measurements, place the pressure as close to<br />
the contact as possible (at the center of the extreme outer end of the spring) to<br />
obtain a true reading. Back contact springs must move a minimum of 0.010 inch<br />
from the stop plate; this measurement is taken at the end of the stop plate.<br />
P1457, Rev. Nov/07 6–19 <strong>Alstom</strong> Signaling Inc.
Corrective Maintenance<br />
Table 6–11. Mechanical Test and Adjustment Procedure (Cont.)<br />
Step<br />
Procedure<br />
13 If the contact pressure is not acceptable, manually adjust the pressure plate and<br />
stop plate.<br />
PRESSURE<br />
PLATES<br />
STOP<br />
PLATES<br />
Contact pressure is created by contact follow resisted by the pressure plate.<br />
Contact follow is the total movement of the heel contact caused by the armature<br />
bridge raising the pusher (not affected by pressure or stop plates). Armature<br />
springs (heel contact spring) are adjusted with a down pressure before<br />
assembling the pusher.<br />
The adjustment of the contact group consists of positioning the pressure plate<br />
and stop plate on each stationary spring to ensure the correct amount of contact<br />
follow.<br />
Armature springs on all groups are adjusted with a down pressure.<br />
14 Using a pressure gauge at the adjustable residual screw, check the pressure<br />
required to just raise the bridge stop screw from its stop. Compare pressure<br />
value to the requirements indicated on the ED sheet. Adjust if necessary.<br />
ADJUSTABLE RESIDUAL SCREW<br />
P1457, Rev. Nov/07 6–20 <strong>Alstom</strong> Signaling Inc.
Corrective Maintenance<br />
Table 6–11. Mechanical Test and Adjustment Procedure (Cont.)<br />
Step<br />
Procedure<br />
15 Check that all armature springs on the contact block are adjusted with a down<br />
pressure. It is important to keep the down pressure about the same on all back<br />
contacts. Each roller on the contact spring bears on the bottom of its slot in the<br />
pusher, when the pusher is raised sufficiently to just open the back contacts.<br />
Typical B Relay<br />
COMPRESSION SPRING<br />
COVER<br />
COIL SPRING STUD<br />
ARMATURE STOP SCREW<br />
BRIDGE OR ARM. EXTENSION<br />
PUSHER<br />
BACK CONTACT<br />
HEEL CONTACT<br />
FRONT CONTACT<br />
CONTACT PRONGS<br />
BASE<br />
CONTACT GROUP<br />
PRESSURE PLATES<br />
STOP PLATES<br />
PUSHER JAW<br />
PUSHER RETAINING CLIPS<br />
ROLLER ON FINGER<br />
ARMATURE<br />
ARMATURE<br />
RETAINING<br />
PLATE<br />
ADJ. NUT<br />
LOCK NUT<br />
YOKE<br />
NUT<br />
ARMATURE<br />
BEARING<br />
PLATE<br />
NAME<br />
PLATE<br />
SAFETY<br />
PIN<br />
COIL<br />
REGISTRATION COIL<br />
PLATES PRONGS<br />
ADJUSTABLE RESIDUAL SCREW<br />
CORE<br />
NOTE: SOME PARTS MAY DIFFER IN DETAIL FROM THOSE SHOWN ABOVE BUT NAME<br />
DESIGNATION REMAINS THE SAME.<br />
P1457, Rev. Nov/07 6–21 <strong>Alstom</strong> Signaling Inc.
Corrective Maintenance<br />
Table 6–11. Mechanical Test and Adjustment Procedure (Cont.)<br />
Step<br />
Procedure<br />
16 Insert a .010 inch feeler gauge under the armature stop screw to hold the back<br />
contacts open. Using a smaller bar under the bottom of the pusher, gently push<br />
up on the bar to see that the pusher rises slightly, without moving the armature.<br />
While holding the armature in this position, verify that the roller on each heel<br />
spring rests on the bottom of the jaw in the pusher.<br />
17 Adjust the springs, if necessary, so they always open the front contacts in case<br />
of a failure at the bottom end of the pusher.<br />
18 For Microchron II Timer <strong>Relays</strong>, follow the electronics replacement procedure<br />
provided in Table 6–13, and then continue with Step 19.<br />
For all other relays, place the cover on the relay. Verify that the gasket in the<br />
base groove is seated properly and then assemble the two gasket washers over<br />
the relay support tubes. Install and tighten the knurled nuts and apply the seal.<br />
19 Check the contact prong spacing on the back of the relay with the appropriate<br />
gauges: P/N 56260-008-01 and P/N 56260-010-01.<br />
20 Follow the electrical test procedure for the relay, provided in Section 4.<br />
P1457, Rev. Nov/07 6–22 <strong>Alstom</strong> Signaling Inc.
Corrective Maintenance<br />
6.5.3. Microchron II Timer Relay Electronics Removal and Replacement<br />
Before performing tests on the relay portion of the Microchron II Timer Relay, the timer<br />
electronics must be removed from the relay structure. The timer electronics if referred to<br />
as the Motherboard for the DC version of the relay, and the Timer board for the AC<br />
version.<br />
NOTE<br />
The location of the timer electronics is on the left side of the relay as you<br />
face the front of the DC version of the relay and on the right side of the<br />
relay as you face the front of the AC version of the relay.<br />
Perform the procedures in the sequence provided.<br />
WARNING<br />
BREAKING THE RELAY COVER SEAL VOIDS THE WARRANTY ON<br />
THE RELAY.<br />
P1457, Rev. Nov/07 6–23 <strong>Alstom</strong> Signaling Inc.
Corrective Maintenance<br />
Table 6–12. Microchron II Timer Electronics Removal Procedure<br />
Step<br />
Procedure<br />
1 Remove the relay cover and seal.<br />
2 Detach the white, four-position connector, P1 (located close to the relay base)<br />
from the Motherboard (DC version) or Timer board (AC version) by squeezing<br />
the side tabs while firmly pulling it away from the board.<br />
Front View of DC Relay<br />
P1<br />
P2<br />
VIEW SHOWN WITH SWITCH BOARD _<br />
AND BRACKET REMOVED<br />
Top View of AC Relay<br />
(J1)<br />
(P1)<br />
(P2)<br />
P1457, Rev. Nov/07 6–24 <strong>Alstom</strong> Signaling Inc.
Corrective Maintenance<br />
Table 6–12. Microchron II Timer Electronics Removal Procedure (Cont.)<br />
Step<br />
Procedure<br />
3 For the AC version of the relay, detach the smaller, white, square shaped 4-<br />
position connector P2 from the bottom of the Thumbwheel board, by squeezing<br />
the side tab while pulling the connector away from the Thumbwheel board.<br />
Locate the black bracket securing the electronics package to the relay base.<br />
Remove and save the two flathead screws that hold the bracket to the base. Put<br />
the two flathead screws and washers in a safe place.<br />
(J1)<br />
(P1)<br />
SCREWS<br />
(P2)<br />
BRACKET<br />
Carefully set the electronics package/bracket assembly aside and continue to<br />
step 5.<br />
For the DC version of the relay, go to step 4.<br />
4 For the DC version of the relay remove the Motherboard and carefully set the<br />
board aside.<br />
NOTE<br />
Always handle printed circuit boards at a static safe station.<br />
Continue to step 5.<br />
P1457, Rev. Nov/07 6–25 <strong>Alstom</strong> Signaling Inc.
Corrective Maintenance<br />
Table 6–12. Microchron II Timer Electronics Removal Procedure (Cont.)<br />
Step<br />
Procedure<br />
5 Locate the relay coil drive connections within the free hanging, four position (P1)<br />
Motherboard connector.<br />
Side View of AC Relay<br />
1<br />
(P2)<br />
(J1)<br />
34<br />
(P1)<br />
4<br />
3<br />
2<br />
1<br />
6 Relay electrical tests are performed using the wires indicated in Step 5.<br />
P1457, Rev. Nov/07 6–26 <strong>Alstom</strong> Signaling Inc.
Corrective Maintenance<br />
Table 6–13. Microchron II Timer Electronics Replacement Procedure<br />
Step<br />
Procedure<br />
1 For the DC version of this relay install the Motherboard and go to Step 5.<br />
NOTE<br />
Always handle printed circuit boards at a static safe station.<br />
For the AC version of this relay, go to Step 2.<br />
2 Place the electronics package/bracket assembly onto the relay base.<br />
3 Confirm that the wires to the white, 4-position connector run through the notch in<br />
the bracket.<br />
4 Use the two flathead screws and washers from Step 3 of Table 6–12, the Timer<br />
Electronics Disconnect and Removal Procedure, to secure the assembly to the<br />
relay base and tighten firmly.<br />
5 Connect the smaller, square shaped, 4-position connector P2 to the<br />
thumbwheel board. The connector is keyed and only fits in one position.<br />
Top View of AC Relay<br />
(J1)<br />
(P1)<br />
(P2)<br />
6 Connect the four-position connector, P1 (located close to the relay base) from<br />
the Motherboard (DC version) or Timer board (AC version).<br />
7 Visually inspect the relay to verify that no wires are pinched between the relay<br />
base and the Motherboard (DC version) or Timer board (AC version).<br />
P1457, Rev. Nov/07 6–27 <strong>Alstom</strong> Signaling Inc.
Corrective Maintenance<br />
Table 6–13. Microchron II Timer Electronics Replacement Procedure (Cont.)<br />
Step<br />
Procedure<br />
8 Check for correct operation of the relay.<br />
NOTE<br />
If the relay completes its cycle (showing steady red LED during<br />
cycle) and then the green LED starts blinking but the relay does<br />
not pick, check the relay coil connections.<br />
9 Install the relay cover and seal the relay.<br />
P1457, Rev. Nov/07 6–28 <strong>Alstom</strong> Signaling Inc.
Parts Catalog<br />
7. SECTION 7 – PARTS CATALOG<br />
7.1. GENERAL<br />
This section identifies and lists the component parts that may be ordered to repair the<br />
<strong>Alstom</strong> family of B relays at the shop level. It also includes a list of the plugboards and<br />
other relay parts required for installation. Parts are identified by drawing number and<br />
catalog number (where available) except for common hardware items that are identified<br />
by a generic description. All drawing numbers consist of 10 digits. Drawing numbers are<br />
equivalent to part numbers. Some parts do not have a catalog number.<br />
7.2. PARTS LIST<br />
Each illustration of B relay components is followed by a parts list giving part description,<br />
drawing number and catalog numbers of replaceable parts. Index numbers are listed to<br />
locate referenced parts in the illustration. Where applicable, references are provided to<br />
other pages to better show where parts are located in the assembly. This section of the<br />
manual covers all currently manufactured parts.<br />
Table 7–1. B Relay Drawings and Parts Lists<br />
Description Figure No. Table No.<br />
B1 Neutral and Biased-Neutral Relay 7–1, 7–2 7–2<br />
B1 Code-Responsive Relay 7–3 7–3<br />
B1 Slow Pickup, Slow-Release, Quick-Crossover and<br />
Electronically-Driven Highway Crossing Flasher Relay<br />
7–4, 7–5 7–4<br />
B2 Neutral Relay 7–6 7–5<br />
B2 Biased-Neutral Relay 7–7 7–6<br />
B2 AC Vane Relay 7–8, 7–9 7–7, 7–8<br />
B2 Code Rate Transmitter Relay 7–10 7–9<br />
B2 Microchron II Timer Relay (DC) 7–11 7–10<br />
B2 AC Microchron II Timer Relay 7–12 7–11<br />
VTB Polar-Biased Relay 7–13 7–12<br />
Coils and Springs — 7–13<br />
Contact Groups 7–14, 7–15 7–14<br />
Contact Group Pushers and Clips — 7–15<br />
Plugboards and Supplies 7–16, 7–17 7–16<br />
Registration Plates and Gaskets 7–18 7–17<br />
P1457, Rev. Nov/07 7–1 <strong>Alstom</strong> Signaling Inc.
Parts Catalog<br />
7.3. B1 NEUTRAL RELAYS<br />
B1<br />
Figure 7–1. B1 Neutral <strong>Relays</strong><br />
P1457, Rev. Nov/07 7–2 <strong>Alstom</strong> Signaling Inc.
Parts Catalog<br />
7.4. B1 BIASED-NEUTRAL RELAYS<br />
B1<br />
Figure 7–2. B1 Biased-Neutral <strong>Relays</strong><br />
P1457, Rev. Nov/07 7–3 <strong>Alstom</strong> Signaling Inc.
Parts Catalog<br />
Table 7–2. B1 Neutral and Biased-Neutral Relay Part Numbers<br />
Ref. Description Drawing No. Catalog No.<br />
A BASE, includes tubes for studs 56013-016-02 P62-0506<br />
B<br />
B1<br />
C<br />
C1<br />
CONTACT GROUPS (See Figure 7–14 and<br />
Table 7–13)<br />
SCREW, for attaching contact groups,.138"<br />
–40X .625" long, flat head<br />
ARMATURE, includes bridge and residual<br />
screw and all riveted parts; for all <strong>Type</strong> B1<br />
Neutral <strong>Relays</strong><br />
ARMATURE, includes bridge and residual<br />
screw and all riveted parts; for all <strong>Type</strong> B1<br />
Biased-Neutral <strong>Relays</strong><br />
— —<br />
03306-120-ON P62-0200<br />
39043-022-01 P62-0312<br />
39043-017-01 P62-0311<br />
1 COVER 56029-096-00 P62-0579<br />
2 NUT LOCK, for nut (Ref. 3) 56024-000-00 P62-0575<br />
3 NUT, knurled 00846-023-00 P62-0142<br />
4 SPRING, for setting over pressure (specify<br />
drawing no. of relay where part is used)<br />
— —<br />
5 ARMATURE RETAINING PLATE 55914-001-00 P62-0473<br />
5A SCREW, slotted pan-head, .164" -32 x .31"<br />
long, with patch<br />
02430-036-00 N/A<br />
6 WASHER, rubber 30646-012-00 P62-0260<br />
7 NUT, knurled, for holding cover in place 56026-004-00 P62-0578<br />
8 SEAL, for relay 35285-000-00 P62-0299<br />
9 HOLDER, for Test Data Form 50023-039-00 P62-0356<br />
9A<br />
SCREW, .112" –24 x .38" long, pan head,<br />
tap<br />
06604-212-ON P62-0593<br />
10 RESIDUAL SCREW, .190" -48 x .33" long 20360-014-00 P62-0255<br />
10A NUT, for residual screw, .190" -48 x .09"<br />
thick, hex<br />
00577-021-00 P62-0128<br />
11 TEST DATA FORM 51553-088-00 P62-0383<br />
11A TEST DATA FORM for Switch-Overload<br />
Relay<br />
51553-100-00 P62-0383<br />
12 NAME PLATE BLANK 00401-942-00 P62-0110<br />
12A SCREW, .112" -40 x .19" long, pan head,<br />
Nylok<br />
02430-038-00 P62-0442<br />
P1457, Rev. Nov/07 7–4 <strong>Alstom</strong> Signaling Inc.
Parts Catalog<br />
Table 7–2. B1 Neutral and Biased-Neutral Relay Part Numbers (Cont.)<br />
Ref. Description Drawing No. Catalog No.<br />
13 WASHER, for .563" diameter cores 01225-094-00 P62-0156<br />
13A WASHER, for .736" diameter cores 01225-103-00 P62-0157<br />
13B WASHER, fiber for .563" diameter cores 34017-031-00 P62-0293<br />
15 SPRING WASHER, for .563" diameter<br />
cores<br />
15A SPRING WASHER, for .736" diameter<br />
cores<br />
01225-104-00 P62-0158<br />
01255-105-00 P62-0159<br />
16 ARMATURE BEARING PLATE 55912-001-00 P62-0470<br />
16A SCREW, stainless steel, slotted, pan head,<br />
.112" -40 x .250" long, with patch<br />
17 COIL, top or bottom (specify drawing no. of<br />
relay where part is used)<br />
18 ARMATURE SCREW, .164" -32 x .63" long,<br />
fillister head<br />
02430-037-00 N/A<br />
— —<br />
01054-004-00 P62-0150<br />
18A NUT, thin hex elastic stop, .164" -32 42333-055-00 P62-0321<br />
19 SLUG, full-length for .563" diameter core 54960-003-00 P62-0425<br />
19A SLUG, half-length for .563" diameter core 54960-004-00 P62-0426<br />
19B SLUG, full-length for .736" diameter core 54960-005-00 P62-0427<br />
19C SLUG, half-length for .736" diameter core 54960-006-00 P62-0428<br />
20 SCREW, for mounting cores, .313" -24 x<br />
1.0" long, SEMS<br />
21 SCREW, for mounting contact group, .138"-<br />
40 x .63" long, slotted, fillister head<br />
23 TAG BLANK, for circuit designation<br />
contains 60 blank tags<br />
25 ARMATURE SCREW, .164" -32 x 1.0" long,<br />
fillister head<br />
28 MAGNET, for old-style relays, 2 required,<br />
charged to 84-86 points<br />
28A MAGNET, replacement for new- and oldstyle<br />
relays,1 required<br />
53141-025-00 P62-0844<br />
03306-120-ON P62-0215<br />
55085-208-00 P62-0432<br />
01054-011-00 P62-0151<br />
53007-043-00 P62-0822<br />
53007-058-00 P62-0818<br />
30 LEAKAGE STRIP 58898-008-00 P62-0675<br />
31 GASKET, for sealing coil cap opening 30646-005-00 P62-0276<br />
32 SHIELD, for covering contact groups 50737-091-00 P62-0227<br />
P1457, Rev. Nov/07 7–5 <strong>Alstom</strong> Signaling Inc.
Parts Catalog<br />
Table 7–2. B1 Neutral and Biased-Neutral Relay Part Numbers (Cont.)<br />
Ref. Description Drawing No. Catalog No.<br />
33 GASKET, for between cover and base 13014-221-00 P62-0225<br />
34 YOKE 01224-038-00 N/A<br />
P1457, Rev. Nov/07 7–6 <strong>Alstom</strong> Signaling Inc.
Parts Catalog<br />
7.5. B1 CODE-RESPONSIVE RELAY<br />
B<br />
B1<br />
Figure 7–3. B1 Code-Responsive Relay<br />
P1457, Rev. Nov/07 7–7 <strong>Alstom</strong> Signaling Inc.
Parts Catalog<br />
46 (1F)<br />
46A (1FB)<br />
46B (1B) or (1R)<br />
46C (1F) or (1N)<br />
46D (1FB)<br />
46E (1FB)<br />
Figure 7–3. B1 Code-Responsive Relay (Cont.)<br />
P1457, Rev. Nov/07 7–8 <strong>Alstom</strong> Signaling Inc.
Parts Catalog<br />
46F<br />
Figure 7–3. B1 Code-Responsive Relay (Cont.)<br />
P1457, Rev. Nov/07 7–9 <strong>Alstom</strong> Signaling Inc.
Parts Catalog<br />
Table 7–3. B1 Code-Responsive Relay Part Numbers<br />
Ref. Description Drawing No. Catalog No.<br />
A BASE, complete, includes tubes 56013-016-04 P62-0508<br />
B CONTACT GROUP 57508-KN N/A<br />
B1 SCREW, for attaching contact groups, .138"<br />
-40 x .625" long, flat head<br />
03306-120-ON P62-0200<br />
1 NAME PLATE 00401-281-00 P62-0113<br />
2 SCREW, slotted, fillister head .190" -32 x<br />
1.25" long<br />
2A WASHER, internal tooth, .190" I.D., .381"<br />
O.D., .025" thick<br />
3 RESIDUAL ARMATURE SCREW,<br />
headless, .242" -40 x .34" long<br />
4 CONNECTOR, flexible, copper, approx. 1-<br />
foot long<br />
03410-140-ON P62-0219<br />
53029-003-00 P62-0973<br />
05100-033-00 P62-0198<br />
42760-112-01 P62-0327<br />
5 TEST DATA FORM, paper 51553-048-00 P62-0387<br />
5A<br />
TEST DATA FORM, for Polar-Stick <strong>Relays</strong>,<br />
paper<br />
6 NUT, for spring (Ref. 8), .242" -40 x .190"<br />
thick<br />
51553-049-00 P62-0388<br />
00846-039-00 P62-0693<br />
7 SUPPORT, for spring (Ref. 8) 54302-004-01 P62-0417<br />
8 ARMATURE SPRING, for all Code-<br />
Responsive <strong>Relays</strong> except the following:<br />
8A ARMATURE SPRING, for A62-0323<br />
(56001-670-13), A62-0519 (56001-679-06)<br />
8B ARMATURE SPRING, for A62-0567<br />
(56001-681-06), A62-0655 (56001-670-02),<br />
A62-0679 (56001-675-01)<br />
9 SCREW, for spring (Ref. 8), .242" -40 x<br />
.190" long<br />
10 TERMINAL BLOCK MOUNTING SCREW,<br />
.164" -32 x .30" long, fillister head<br />
10A WASHER, .174" I.D., .293" O.D., .031 "<br />
thick<br />
00586-149-00 P62-0135<br />
00586-138-00 P62-0782<br />
00586-145-00 P62-0848<br />
46453-002-00 P62-0340<br />
55160-033-00 P62-0440<br />
01273-003-ON P62-0334<br />
11 ARMATURE 29523-051-00 P62-0272<br />
11A ARMATURE, for Polar-Stick <strong>Relays</strong> 29523-072-00 P62-0273<br />
P1457, Rev. Nov/07 7–10 <strong>Alstom</strong> Signaling Inc.
Parts Catalog<br />
Table 7–3. B1 Code-Responsive Relay Part Numbers (Cont.)<br />
Ref. Description Drawing No. Catalog No.<br />
12 SCREW, stainless steel, slotted, .164" -32 x 03408-010-ON P62-0435<br />
.31 " long<br />
12A WASHER, internal tooth, .176" I.D., .340"<br />
O.D., .023" thick<br />
53029-068-00 P62-0402<br />
13 TUBE, for connector 43131-049-00 P62-0335<br />
14 ARMATURE BEARING PLATE 55912-006-00 P62-0472<br />
15 WASHER, for coils 01225-170-00 P62-0163<br />
16 INSULATED TERMINAL BLOCK PLATE 30220-038-00 P62-0274<br />
17 MAGNET (specify drawing no. of relay<br />
where part is used)<br />
18 COIL, top or bottom (specify drawing no. of<br />
relay where part is used)<br />
— —<br />
— —<br />
19 RELAY YOKE 01224-020-00 P62-0153<br />
20 SPRING, for magnets 00586-153-00 P62-0136<br />
21 BUSHINGS, for cores 06714-263-00 P62-0206<br />
23 SCREW, for short core, .313" -24 x 2.75"<br />
long, hex head cap<br />
23A LOCK WASHER, internal tooth for a .313"<br />
screw<br />
24 CONTACT BLOCK, with four contact<br />
supports (no contacts)<br />
03440-044-00 P62-0181<br />
53029-076-00 P65-0729<br />
57506-001-01 P62-0652<br />
25 CONTACT, silver-platinum 51321-023-00 P62-0361<br />
25A CONTACT, tungsten 51321-024-01 P62-0849<br />
26 PLATE, for contact fingers 55911-013-00 P62-0467<br />
27 SCREW, for fastening fingers to insulation 55718-001-00 P62-0456<br />
27A NUT, for screw (Ref. 27), .138" -40 x .09"<br />
thick, hex<br />
03614-007-00 P62-0183<br />
27B LOCK WASHER, for screw (Ref. 27) 01601-122-00 P62-0173<br />
28 FINGER, heel, with silver-platinum contacts 54614-034-01 P62-0421<br />
28A FINGER, heel, with tungsten contacts 54614-034-02 P62-0850<br />
29 TERMINAL BLOCK 47508-128-00 P62-0343<br />
30 SCREW, for long core, .313" -24 x 1.0"<br />
long, hex head cap<br />
03440-085-00 P62-0851<br />
31 SPACER, for magnets 38165-064-00 P62-0306<br />
P1457, Rev. Nov/07 7–11 <strong>Alstom</strong> Signaling Inc.
Parts Catalog<br />
Table 7–3. B1 Code-Responsive Relay Part Numbers (Cont.)<br />
Ref. Description Drawing No. Catalog No.<br />
32 NUT, for screw (Ref. 33), .138" -40 x .09" 03614-007-00 P62-0183<br />
thick, hex<br />
33 SCREW, slotted, fillister head .138" -40 x<br />
.75" long<br />
34 NUT, for screws (Ref. 3,33), .242" -40 x .09"<br />
thick, hex<br />
35 NUT, for screw (Ref. 33) .242" -40 x .16"<br />
thick, hex<br />
46 CONTACT GROUP, 1 independent front,<br />
(tungsten)<br />
46A CONTACT GROUP, 1 dependent front &<br />
back (tungsten)<br />
46A CONTACT GROUP, 1 dependent front<br />
(silver platinum), 1 dependent back<br />
(tungsten)<br />
46A CONTACT GROUP, 1 dependent front &<br />
back (silver platinum)<br />
46B CONTACT GROUP, 1 independent front or<br />
normal (silver platinum)<br />
46C CONTACT GROUP, 1 dependent back or<br />
reverse (silver platinum)<br />
46D CONTACT GROUP, 1 dependent front &<br />
back (silver platinum)<br />
46E CONTACT GROUP, 1 dependent front &<br />
back (silver-impregnated carbon to silver)<br />
46F SCREW, for attaching contact groups, .138"<br />
-40 x .625" long, flat head<br />
03406-124-ON P62-0454<br />
53084-003-00 P62-0411<br />
39549-008-00 P62-0315<br />
58641-011-05 N/A<br />
58641-011-02 P62-0855<br />
58641-011-03 N/A<br />
58641-011-01 P62-0854<br />
58641-012-02 P62-0857<br />
58641-012-01 P62-0856<br />
58641-011-04 N/A<br />
58641-010-01 P62-0663<br />
06606-120-ON P62-0200<br />
48 NAME PLATE 00401-612-00 P62-0116<br />
48A SCREW, self-tapping, slotted .112" x .25"<br />
long<br />
54392-001-00 P62-0419<br />
48B WASHER, .156" I.D., .313" O.D., .031" thick 01250-004-ON P50-0422<br />
49 TUBING, 5mm x 1.25" long 55557-000-00 P62-0450<br />
49A TUBING, 7mm x 1.25" long 55557-004-00 P62-0451<br />
51 DUST SHIELD, for contact groups 50737-091-00 P62-0227<br />
52 GASKET, for between cover and base 13014-221-00 P62-0225<br />
P1457, Rev. Nov/07 7–12 <strong>Alstom</strong> Signaling Inc.
Parts Catalog<br />
Table 7–3. B1 Code-Responsive Relay Part Numbers (Cont.)<br />
Ref. Description Drawing No. Catalog No.<br />
53 GASKETS, for between cover and knurled 30646-012-00 P62-0277<br />
nut<br />
54 COVER, with integral handle 56029-096-00 P62-0579<br />
57 PUSHER 58643-000-00 P62-0664<br />
P1457, Rev. Nov/07 7–13 <strong>Alstom</strong> Signaling Inc.
Parts Catalog<br />
7.6. B1 SLOW PICKUP, SLOW-RELEASE AND QUICK CROSSOVER RELAYS<br />
7A<br />
7B<br />
SECTION B-B<br />
20<br />
Figure 7–4. B1 Slow Pickup, Slow-Release and Quick Crossover<br />
P1457, Rev. Nov/07 7–14 <strong>Alstom</strong> Signaling Inc.
Parts Catalog<br />
7.7. B1 ELECTRONICALLY DRIVEN HIGHWAY CROSSING RELAY AND FLASHER<br />
MODULE<br />
11, 11A<br />
8, 8A, 8C, 8D<br />
(+) VOLTAGE<br />
(-) VOLTAGE<br />
8B<br />
Figure 7–5. B1 Electronically Driven Highway Crossing Relay and Flasher Module<br />
P1457, Rev. Nov/07 7–15 <strong>Alstom</strong> Signaling Inc.
Parts Catalog<br />
Table 7–4. B1 Slow Pickup, Slow-Release, and Quick-Crossover and Electronically<br />
Driven Highway Crossing Relay and Flasher Part Numbers<br />
Ref. Description Drawing No. Catalog No.<br />
1 SPRING, for setting back-contact pressure 00586-095-00 P62-0131<br />
2 YOKE 01224-025-00 P62-0154<br />
2A SCREW, .138" -40 x .88" long, slotted<br />
fillister head<br />
03406-128-ON P62-0453<br />
3 SCREW, stop for armature, .242" -40 x<br />
.344" long, flat point<br />
3A<br />
NUT, for armature stop screw, .242" -40 x<br />
.13" thick, hex<br />
05100-033-00 P62-0198<br />
53084-001-00 P62-0410<br />
4 SHUNT STRIP, two required 17378-023-00 P62-0243<br />
5 SHIM, 0.002" thick, eight required 53879-017-00 P62-0413<br />
5A SHIM, 0.003" thick, eight required 53879-018-00 P62-0414<br />
5B SHIM, 0.010" thick, four required 53879-019-00 P62-0415<br />
6 COIL, bottom, 124 ohms 56015-012-14 P62-0531<br />
6A COIL, bottom, 230 ohms 56015-011-15 P62-0530<br />
7 CONTACT GROUP, 2FB (silver-cadmiumoxide)<br />
7A<br />
CONTACT GROUP (See Figure 7–14 and<br />
Table 7–14)<br />
7B SCREW, for attaching contact groups, .138"<br />
-40 x .625" long, flat head<br />
8 RELAY FLASHER MODULE, electronic, 48-<br />
54 flashes per minute, includes modification<br />
kit for attaching module to relay plugboard.<br />
Can drive 1, 2 or 3 60 ohm <strong>Alstom</strong><br />
FLASHER RELAYS. (SEE NOTE.)<br />
8A<br />
8B<br />
RELAY FLASHER MODULE, same as Ref.<br />
8, except 56-64 flashes per minute. (SEE<br />
NOTE.)<br />
KIT, modification kit containing hardware for<br />
mounting module: long e-posts, spacers,<br />
AAR nuts, AAR washers.<br />
56012-108-40 P62-0500<br />
— —<br />
03306-120-ON P62-0200<br />
30733-003-01 P62-0769<br />
30733-003-02 P62-0784<br />
17550-071-01 P62-0816<br />
P1457, Rev. Nov/07 7–16 <strong>Alstom</strong> Signaling Inc.
Parts Catalog<br />
Table 7–4. B1 Slow Pickup, Slow-Release, and Quick-Crossover and Electronically<br />
Driven Highway Crossing Relay and Flasher Part Numbers (Cont.)<br />
Ref. Description Drawing No. Catalog No.<br />
8C RELAY FLASHER MODULE, electronic, 48-<br />
54 flashes per minute, includes modification<br />
kit for attaching module to relay plugboard.<br />
Can drive one 18 ohm <strong>Alstom</strong> FLASHER<br />
RELAY. (SEE NOTE.)<br />
30733-003-03 P62-0861<br />
8D<br />
RELAY FLASHER MODULE, same as Ref.<br />
8C, except 56-64 flashes per minute. (SEE<br />
NOTE.)<br />
30733-003-04 P62-0862<br />
9 SPRING, for setting back-contact pressure 00586-056-00 P62-0130<br />
11 COIL, 18.0 ohms 56015-022-10 P62-0770<br />
11A COIL, 60.0 ohms 56015-008-27 N/A<br />
12 YOKE 01224-037-00 P62-0824<br />
NOTE<br />
For additional information on <strong>Alstom</strong> flasher modules, request Sales<br />
Bulletin SB-00003-001-00 from your Sales Representative or <strong>Alstom</strong><br />
Customer Service.<br />
P1457, Rev. Nov/07 7–17 <strong>Alstom</strong> Signaling Inc.
Parts Catalog<br />
7.8. B2 NEUTRAL RELAY<br />
8.50<br />
7.59<br />
63A<br />
20<br />
1C<br />
1D<br />
Figure 7–6. B2 Neutral Relay<br />
P1457, Rev. Nov/07 7–18 <strong>Alstom</strong> Signaling Inc.
Parts Catalog<br />
Table 7–5. B2 Neutral Relay Part Numbers<br />
Ref. Description Drawing No. Catalog No.<br />
1 BASE, complete 56013-019-02 P62-0510<br />
2 CORE & BRACKET 56014-004-01 N/A<br />
3 ARMATURE, includes residual screw with<br />
jam nut, bridge travel screw with jam nut,<br />
bridges and safety pins<br />
39043-013-03 P62-0310<br />
4 COVER, w/Handle 56029-102-00 N/A<br />
5 YOKE 01224-012-00 P62-0830<br />
6 SCREW, for mounting cores, .313" -24 x<br />
1.125" long, SEMS<br />
53141-025-00 P62-0844<br />
9 SCREW, .164-32 x .875 long with patch 02430-033-00 N/A<br />
10 NUT, .164-32 x .130 thick, hex 01272-005-ON P85-0276<br />
12 WASHER, flat, .172" I.D., .375" O.D., .031"<br />
thick<br />
01250-006-ON P62-0696<br />
13 ARMATURE RETAINING PLATE 55914-002-00 P62-0474<br />
14 NUT, knurled, for holding cover in place 56026-004-00 P62-0578<br />
15 SCREW, .164" -32 x .313" long with patch 02430-036-00 N/A<br />
17 ARMATURE BEARING PLATE 55912-002-00 P62-0471<br />
18 NUT, .190-32 x .187 thick, lock, knurled 00846-023-00 P62-0142<br />
19 NUT, lock 56024-000-00 P62-0575<br />
20 SCREW, to hold contact groups, .138" -40 x<br />
,625" long, flat head<br />
03306-120-ON P62-0200<br />
21 RELAY SEAL 35285-000-00 P62-0299<br />
22 NAME PLATE 00401-194-00 P62-0111<br />
23 SCREW, for name plate, .086" -56 x .188"<br />
long<br />
03602-006-ON P62-0442<br />
24 SPRING WASHER, to keep coils tight 01225-105-00 P62-0159<br />
25 SCREW, .112" -40 x .25" long, with patch 02430-037-00 N/A<br />
27 HOLDER 50023-039-00 P62-0356<br />
29 SCREW, for holder (Ref. 10), .112" -40 x<br />
.375" long, self-tapping<br />
06604-212-ON P62-0594<br />
30 TEST DATA FORM 51553-088-00 P62-0383<br />
37 GASKET, between cover and base 13014-222-00 P62-0226<br />
38 SHIELD, for contact groups 50737-091-00 P62-0227<br />
P1457, Rev. Nov/07 7–19 <strong>Alstom</strong> Signaling Inc.
Parts Catalog<br />
Table 7–5. B2 Neutral Relay Part Numbers (Cont.)<br />
Ref. Description Drawing No. Catalog No.<br />
39 GASKET, for coils 30646-005-00 P62-0276<br />
40 GASKET, between nut (Ref. 14) and cover<br />
(Ref. 4)<br />
42 WASHER, internal tooth, .086" I.D., .200"<br />
O.D., .015" thick<br />
60 COIL (specify drawing no. of relay where<br />
part is used)<br />
62 SPRING (specify drawing no. of relay where<br />
part is used)<br />
63 CONTACT GROUP (specify drawing no. of<br />
relay where part is used)<br />
63A SCREW, for attaching contact groups, .138"<br />
-40 x .625" long, flat head<br />
67 WASHER, Copper (specify drawing no. of<br />
relay where part will be used)<br />
68 SLUG, Copper (specify drawing no. of relay<br />
where part is used)<br />
75 TAG BLANK, for circuit designation<br />
contains 60 blank tags<br />
30646-012-00 P62-0277<br />
53029-064-00 P62-0408<br />
56015 KN N/A<br />
00586 KN N/A<br />
56012 KN N/A<br />
03306-120-ON P62-0200<br />
01225 KN N/A<br />
54960 KN N/A<br />
55085-208-00 P62-0432<br />
P1457, Rev. Nov/07 7–20 <strong>Alstom</strong> Signaling Inc.
Parts Catalog<br />
7.9. B2 BIASED-NEUTRAL RELAY<br />
8.50<br />
7.59<br />
SECTION THRU CORES AND<br />
MAGNETS LOOKING DOWN<br />
ON CORES NORTH TO RIGHT<br />
63A<br />
Figure 7–7. B2 Biased-Neutral Relay<br />
P1457, Rev. Nov/07 7–21 <strong>Alstom</strong> Signaling Inc.
Parts Catalog<br />
Table 7–6. B2 Biased-Neutral Relay Part Numbers<br />
Ref. Description Drawing No. Catalog No.<br />
1 BASE, complete 56013-019-02 P62-0510<br />
2 CORE & BRACKET 56014-018-01 N/A<br />
3 ARMATURE, includes residual screw with<br />
jam nut, bridge travel screw with jam nut,<br />
bridges and safety pins<br />
39043-013-03 P62-0310<br />
4 COVER, w/Handle 56029-102-00 N/A<br />
5 YOKE 01224-012-00 P62-0830<br />
6 SCREW, for mounting cores, .313" -24 x<br />
1.125" long, SEMS<br />
53141-025-00 P62-0844<br />
9 LEAKAGE STRIP 58898-007-00 P62-0674<br />
10 BRACKET 58897-002-00 P62-0672<br />
11 WASHER, for Ref. 49 01273-022-ON N/A<br />
12 MAGNET (specify drawing no. of relay<br />
where part is used)<br />
53007-029-00 P62-3099<br />
13 ARMATURE RETAINING PLATE 55914-002-00 P62-0474<br />
14 NUT, knurled, for holding cover in place 56026-004-00 P62-0578<br />
15 SCREW, .164" -32 x .313" long with patch 02430-036-00 N/A<br />
17 ARMATURE BEARING PLATE 55912-002-00 P62-0471<br />
18 NUT, .190-32 x .187 thick, lock, knurled 00846-023-00 P62-0142<br />
19 NUT LOCK 56024-000-00 P62-0575<br />
20 SCREW, to hold contact groups, .138" -40 x<br />
.625" long, flat head<br />
03306-120-ON P62-0200<br />
21 RELAY SEAL 35285-000-00 P62-0299<br />
22 NAME PLATE 00401-194-00 P62-0111<br />
23 SCREW, for nameplate, .086" -56 x .125"<br />
long<br />
24 WASHER, .653 I.D., 1.391 O.D., .022 thick,<br />
spring<br />
03602-004-ON P62-0695<br />
01225-104-00 P62-0158<br />
25 SCREW, .112" -40 x .25" long, with patch 02430-037-00 N/A<br />
27 HOLDER 50023-039-00 P62-0356<br />
29 SCREW, for holder (Ref. 27), .112" -40 x<br />
.375" long, self-tapping<br />
06604-212-ON P62-0594<br />
30 TEST DATA FORM 51553-088-00 P62-0383<br />
P1457, Rev. Nov/07 7–22 <strong>Alstom</strong> Signaling Inc.
Parts Catalog<br />
Table 7–6. B2 Biased-Neutral Relay Part Numbers (Cont.)<br />
Ref. Description Drawing No. Catalog No.<br />
36 WASHER, internal tooth, .190" I.D., .381" 53029-003-00 P62-0973<br />
O.D., .025" thick, shk'proof<br />
37 GASKET, between cover and base 13014-222-00 P62-0226<br />
38 SHIELD, for contact group 50737-091-00 P62-0227<br />
39 GASKET, for coils 30646-005-00 P62-0276<br />
40 GASKET, between nut (Ref. 14) and cover 30646-012-00 P62-0277<br />
43 SCREW, slotted, pan head, .190" -32 x .88"<br />
long<br />
46 WASHER, internal tooth, .086" I.D., .200"<br />
O.D., .015" thick<br />
03610-128-ON P62-0178<br />
53029-064-00 P62-0408<br />
47 SUPPORT 54385-031-01 P62-0418<br />
48 SCREW, .190-32 x .38" Long, pan head 03610-112-ON P65-0200<br />
49 SCREW, .164-32 x .44" long, fillister head 03408-014-ON P62-0436<br />
60 COIL (specify drawing no. of relay where<br />
part is used)<br />
62 SPRING (specify drawing no. of relay where<br />
part is used)<br />
63 CONTACT GROUP (specify drawing no. of<br />
relay where part is used)<br />
63A SCREW, for attaching contact groups, .138"<br />
-40 x .625" long, flat head<br />
64 WASHER, Copper (specify drawing no. of<br />
relay where part is used)<br />
65 SLUG, Copper (specify drawing no. of relay<br />
where part is used)<br />
75 TAG BLANK, for circuit designation<br />
contains 60 blank tags<br />
56015 KN N/A<br />
00586 KN N/A<br />
56012 KN N/A<br />
03306-120-ON P62-0200<br />
01225 KN N/A<br />
54960 KN N/A<br />
55085-208-00 P62-0432<br />
P1457, Rev. Nov/07 7–23 <strong>Alstom</strong> Signaling Inc.
Parts Catalog<br />
7.10. B2 AC VANE RELAY, 2F-2B, TWO POSITION<br />
A<br />
14 (BLACK) (BLACK) 64<br />
13 (GRAY) (GRAY) 63<br />
12 (WHITE) (WHITE) 62<br />
11 (RED) (RED) 61<br />
VIEW SHOWING PARTS<br />
MOUNTED ON SCREW (REF.18)<br />
Figure 7–8. B2 AC Vane Relay, 2F-2B, Two Position<br />
P1457, Rev. Nov/07 7–24 <strong>Alstom</strong> Signaling Inc.
Parts Catalog<br />
Table 7–7. B2 Vane Relay, 2F-2B, Two Position Part Numbers<br />
Ref. Description Drawing No. Catalog No.<br />
2 WASHER, .266 ID, .625 OD, .010 Thk Flat 01148-005-00 P62-0152<br />
3 CLIP, Locking 18547-080-00 P62-0246<br />
4 SCREW, .086-56 x .25 Lg Pan Hd 03602-008-ON N/A<br />
5 WASHER, .086 ID, .200 OD, .015 Thk<br />
Shk'prf<br />
53029-064-00 P62-0408<br />
6 NUT, .375-32 For Cover 56026-004-00 P62-0812<br />
10 FORM, for test data 51553-036-00 P62-0382<br />
12 SEAL, Plastic 35285-001-00 N/A<br />
14 NUT, .375-32 x .19 Thk Sq 42835-011-00 P62-0322<br />
15 BEARING COMP, Jewel 51527-001-03 N/A<br />
16 NUT, .313-32 x .13 Thk Hex 12578-002-00 P62-0222<br />
17 STOP 56563-003-00 P62-0597<br />
18 SCREW, .250-28 x 4.13 Lg Fill Hd 55470-019-00 P62-0447<br />
19 SPACER 49655-214-00 P62-0352<br />
20 NUT, .250-28 x .16 Thk Hex 01472-008-00 P62-0166<br />
21 BASE COMP 56013-014-01 P62-0505<br />
23 COVER COMP (W/Holder Assembled) 57287-002-12 N/A<br />
27 PIN, Bearing .091 x .750 Lg 00504-388-00 P62-0126<br />
31 PLATE, Name 00401-955-00 P62-0117<br />
34 NUT, .375-32 x .13 Thk Spanner 00846-028-00 P62-0143<br />
40 SPACER 49655-215-00 P62-0353<br />
41 WASHER, .254 ID, .687 OD, .036 Thk Flat 01148-006-00 P62-0698<br />
44 SHOCK INDICATOR 29006-004-00 N/A<br />
-- CARTON, SG 381-1 65191-014-05 N/A<br />
-- Z-PAD, SG 381-2 65191-015-05 N/A<br />
-- INSERT, SG 323-3 65191-054-05 N/A<br />
45 SCREW, .164-32 x 1.50 Lg, Pan Hd 03608-048-ON N/A<br />
46 WASHER, Stainless Steel 53029-068-00 P62-0402<br />
49 NUT, 10-32 x .125 Thk, Hex 00577-002-00 P62-0127<br />
49 NUT, 10-32 x .125 Thk, Hex 01272-007-ON P76-0129<br />
50 WIRE (Per 82J0004) 80599-003-01 N/A<br />
P1457, Rev. Nov/07 7–25 <strong>Alstom</strong> Signaling Inc.
Parts Catalog<br />
Table 7–7. B2 Vane Relay, 2F-2B, Two Position Part Numbers (Cont.)<br />
Ref. Description Drawing No. Catalog No.<br />
THE FOLLOWING PARTS ARE TO BE SPECIFIED ON ORDERING SHEETS WHEN<br />
REQUIRED<br />
22 VANE COMP 51507 KN N/A<br />
28 MAGNET COMP. (Local) 51508 KN N/A<br />
29 MAGNET COMP. (Track) 51508 KN N/A<br />
35 REGISTRATION PLATE ASSEM. 58879 KN N/A<br />
36 CONTACT GROUP SPACE #1-6 56012 KN N/A<br />
37 GASKET GROUP 57108 KN N/A<br />
P1457, Rev. Nov/07 7–26 <strong>Alstom</strong> Signaling Inc.
Parts Catalog<br />
7.11. B2 AC VANE RELAY, 4F-4B, TWO POSITION<br />
A<br />
14 (BLACK) (BLACK) 64<br />
13 (GRAY) (GRAY) 63<br />
12 (WHITE) (WHITE) 62<br />
11 (RED) (RED) 61<br />
VIEW SHOWING PARTS<br />
MOUNTED ON SCREW (REF. 18)<br />
Figure 7–9. B2 AC Vane Relay, 4F-4B, Two Position<br />
P1457, Rev. Nov/07 7–27 <strong>Alstom</strong> Signaling Inc.
Parts Catalog<br />
Table 7–8. B2 Vane Relay, 4F-4B, Two Position Part Numbers<br />
Ref. Description Drawing No. Catalog No.<br />
2 WASHER, .266" I.D., .625" O.D., .010" 01148-005-00 P62-0152<br />
thick, flat<br />
3 CLIP, locking 18547-080-00 P62-0246<br />
4 SCREW, .086" -56 x .25" long, slotted pan<br />
head<br />
5 WASHER, internal tooth, .086" I.D., .200"<br />
O.D., .015" thick<br />
03602-008-ON<br />
N/A<br />
53029-064-00 P62-0408<br />
6 NUT, knurled, for holding cover in place 56026-004-00 P62-0578<br />
10 TEST DATA FORM 51553-036-00 P62-0382<br />
12 SEAL, tamper evident seal 35285-000-00 P62-0299<br />
14 NUT, .375-32" x .19" thick, sq 42835-011-00 P62-0332<br />
15 JEWEL BEARING, for shaft 51527-001-03 N/A<br />
16 NUT, for bearing, .313" -32 x .13" thick, hex 12578-002-00 P62-0222<br />
17 STOP, resilient, for vane 56563-003-00 P62-0597<br />
18 SCREW, for stop, .250" –28 x 4.13" long,<br />
fillister head<br />
55470-019-00 P62-0447<br />
19 SPACER 49655-214-00 P62-0352<br />
20 NUT, .250-28" x .16" thick, hex 01472-008-00 P62-0166<br />
21 BASE, includes tubes for studs 56013-014-01 P62-0505<br />
22 VANE , complete (for relays with 2F-2B<br />
contacts)<br />
22 VANE, complete (for relays with 4F-4B<br />
contacts)<br />
51507-013-02 P62-0374<br />
51507-013-03 N/A<br />
23 COVER, with holder assembled 57287-002-12 N/A<br />
27 PIN, BEARING, .091" x .750" long 00504-388-00 N/A<br />
28 MAGNET COMP. (Local) (specify drawing<br />
no. of relay where part is used)<br />
29 MAGNET COMP. (Track) (specify drawing<br />
no. of relay where part is used)<br />
51508 KN N/A<br />
51508 KN N/A<br />
31 NAME PLATE 00401-955-00 P62-0117<br />
34 NUT, spanner, .375" -32 x .13" thick 00846-028-00 P62-0143<br />
36 CONTACT GROUP, 1F (AgC-S) – 1B<br />
(S-S) (specify quantity required)<br />
56012-108-11 P62-0493<br />
P1457, Rev. Nov/07 7–28 <strong>Alstom</strong> Signaling Inc.
Parts Catalog<br />
Table 7–8. B2 Vane Relay, 4F-4B, Two Position Part Numbers (Cont.)<br />
Ref. Description Drawing No. Catalog No.<br />
36A SCREW, for attaching contact groups, .138"<br />
-40 x .625" long, flat head<br />
03306-120-ON P62-0200<br />
37 CONTACT GROUP, blank 56012-046-01 P62-0700<br />
38 CONTACT GROUP, (with solder tabs) 56012-038-01 P62-0699<br />
40 SPACER, for stop 49655-215-00 P62-0353<br />
41 WASHER, flat, .254" I.D., .687" O.D., .036"<br />
thick<br />
01148-006-00 P62-0698<br />
44 SHOCK INDICATOR 29006-004-00 N/A<br />
45 SCREW, .164"-32 x 1.50" long, slotted pan<br />
head<br />
46 WASHER, internal tooth lock, for a .190-32"<br />
.164" screw<br />
03608-048-ON<br />
N/A<br />
53029-068-00 P62-0402<br />
49 NUT, .190" -32 x. 13" thick 01272-007-ON P76-0129<br />
39 GASKET (for right hand three contact<br />
groups- rear view)<br />
50 GASKET (for left hand three contact<br />
groups- rear view)<br />
13014-280-00 P62-0229<br />
13014-279-00 P62-0228<br />
51 GASKET (for base) 13014-222-00 P62-0226<br />
52 GASKET (for cover – two required per<br />
relay)<br />
30646-012-00 P62-0277<br />
P1457, Rev. Nov/07 7–29 <strong>Alstom</strong> Signaling Inc.
Parts Catalog<br />
7.12. B2 CODE RATE TRANSMITTER RELAY<br />
ALS<br />
D1<br />
Figure 7–10. B2 Code Rate Transmitter Relay<br />
P1457, Rev. Nov/07 7–30 <strong>Alstom</strong> Signaling Inc.
Parts Catalog<br />
Figure 7–10. B2 Code Rate Transmitter Relay (Cont.)<br />
P1457, Rev. Nov/07 7–31 <strong>Alstom</strong> Signaling Inc.
Parts Catalog<br />
Table 7–9. B2 Code Rate Transmitter Relay Part Numbers<br />
Ref. Description Drawing No. Catalog No.<br />
A BASE, includes tubes for studs 56013-026-01 P62-0513<br />
B CONTACT GROUP, coil, IF contact (silverplatinum)<br />
57016-013-01 P62-0599<br />
C CONTACT GROUP, 2F and 2B, (silverplatinum)<br />
57016-013-02 P62-0600<br />
C1 CONTACT GROUP, 2F and 2B, (tungsten) 57016-013-03 P62-0601<br />
D CONTACT GROUP, 2FB contacts (silverplatinum)<br />
57016-013-04 P62-0602<br />
D1 SCREW, for attaching contact groups, .138" 03306-120-ON P62-0200<br />
-40 x .625" long, flat head<br />
E ROTOR, COMPLETE, 75 rate 57094-009-01 P62-0612<br />
E1 ROTOR, COMPLETE, 120 rate 57094-009-02 P62-0613<br />
E2 ROTOR, COMPLETE, 180 rate 57094-009-03 P62-0614<br />
E3 ROTOR, COMPLETE, 50 rate 57094-009-06 N/A<br />
E4 ROTOR, COMPLETE, 270 rate 57094-009-04 N/A<br />
E5 ROTOR, COMPLETE, 220 rate 57094-009-05 N/A<br />
E6 ROTOR, COMPLETE, 96 rate 57094-009-07 N/A<br />
G CONTACT GROUP, with soldering lugs 56012-028-01 P62-0491<br />
H CAPACITOR, COMPLETE, arc suppression 56644-001-03 P62-0598<br />
J RESISTOR MOUNTING BLOCK 57277-001-02 P62-0636<br />
1 TERMINAL WIRE 55083-012-00 P62-0431<br />
2 SLEEVING, 5mm dia. x 1.25" long 55557-000-00 P62-0450<br />
3 SCREW, for mounting contact blocks, .138" 23308-008-00 P62-0265<br />
-40 x 2.0" long<br />
3A SCREW, for mounting contact blocks, .138" 23308-005-00 P62-0264<br />
-40 x 1.625" long<br />
3B NUT, for screws (Ref. 3, 3A), .138" -40 x 03614-007-00 P62-0183<br />
.09" thick, hex<br />
3C LOCK WASHER, for nut (Ref. 3B) 01601-037-00 P62-0170<br />
4 FRAME 57491-001-00 P62-0651<br />
P1457, Rev. Nov/07 7–32 <strong>Alstom</strong> Signaling Inc.
Parts Catalog<br />
Table 7–9. B2 Code Rate Transmitter Relay Part Numbers (Cont.)<br />
Ref. Description Drawing No. Catalog No.<br />
6 NAME PLATE 00401-956-00 P62-0112<br />
6A SCREW, for nameplate, .138" -40 x .25" 03406-108-ON P62-0189<br />
long, slotted, fillister head<br />
6B LOCK WASHER, internal tooth, .141" I.D., 53029-067-00 P62-0406<br />
.295" O.D., .021" thick<br />
7 COVER 57287-002-11 P62-0643<br />
8 COVER, for bearing 18575-000-00 P62-0248<br />
8A SCREW, slotted, flat head, .138" -40 x .375" 03306-112-ON P62-0104<br />
9 UPPER CAM 58728-001-02 P62-0850<br />
10 LOWER CAM 58728-001-01 P62-0849<br />
11 TEST DATA FORM 51553-051-00 P62-0389<br />
12 POLE, right-hand 57091-001-00 P62-0605<br />
12B POLE, left-hand 57091-002-00 P62-0606<br />
13 SCREW, .164" -32 x .50" long, slotted, flat<br />
head<br />
14 SCREW, for fastening pole to frame, .250" -<br />
28 x .50" long, fillister head<br />
15 SCREW, headless, for mounting contact<br />
blocks, .138" -40 x 1.188" long<br />
15A WASHER, internal tooth, .141" I.D., .295"<br />
O.D., .021" thick<br />
15B WASHER, flat, .172" I.D., .375" O.D., .031"<br />
thick<br />
16 SCREW, for attaching Ref. 12 and 12A,<br />
.190" -32 x .75" long, slotted fillister head<br />
16A LOCK WASHER, internal tooth, .195" I.D.,<br />
.381" O.D., .025" thick<br />
03308-016-ON P62-0297<br />
55370-001-00 P62-0835<br />
23308-004-00 P62-0263<br />
53029-067-00 P62-0406<br />
01250-006-ON P62-0696<br />
03410-124-ON P65-0208<br />
53029-069-00 P62-0401<br />
17 COIL, 150.0 ohm 31066-135-01 P62-0286<br />
18 RESISTOR, 150.0 ohm 59723-124-00 P62-0685<br />
19 SCREW, for attaching Ref. 20, .190" -32 x<br />
.50" long, slotted, fillister head<br />
03410-116-ON P62-0214<br />
20 BRACKET, frame 54297-003-00 P62-0416<br />
21 RESISTOR, 1000 ohm, used in multiple<br />
with coil, for arc suppression<br />
59723-000-00 P62-0714<br />
P1457, Rev. Nov/07 7–33 <strong>Alstom</strong> Signaling Inc.
Parts Catalog<br />
Table 7–9. B2 Code Rate Transmitter Relay Part Numbers (Cont.)<br />
Ref. Description Drawing No. Catalog No.<br />
22 SCREW, .190" -32 x .63" long, slotted, flat 03310-120-ON P50-0431<br />
head<br />
23 NUT, .190" -32 x. 13" thick 01272-007-ON P76-0129<br />
24 STOP 17185-000-00 P62-0237<br />
25 BUSHING 07350-261-00 P62-0209<br />
26 PUSHER, for Contact Group (Ref. C) 57019-000-00 P62-0716<br />
27 PUSHER, for Contact Group (Ref. D) 57019-003-00 P62-0717<br />
28 BUSHING, for Contact Groups 07350-275-00 P62-0210<br />
30 UPPER BEARING 57092-009-01 P62-0609<br />
31 UPPER CLAMPING PLATE, for ribbon 55911-036-00 P62-0469<br />
32 SHIM WASHER, .222" I.D., .417" O.D.,<br />
.050" thick<br />
33 SHIM WASHER, .222" I.D., .417" O.D.,<br />
.005" thick<br />
33A SHIM WASHER, .222" I.D., .417" O.D.,<br />
.008" thick<br />
00975-007-00 P62-0715<br />
00975-005-00 P62-0146<br />
00975-006-00 P62-0147<br />
34 GUIDE, for spring 18559-000-00 P62-0247<br />
35 SPRING, for upper bearing 51055-008-00 P62-0359<br />
36 WASHER, .297" I.D., .432" O.D., .020" thick 01225-199-00 P62-0164<br />
37 RIBBON, COMPLETE 22148-000-02 P62-0256<br />
38 NUT, for locking cams in place, .313" -32 x<br />
.125" thick, hex<br />
12578-002-00 P62-0221<br />
39 ROTOR, with shaft, hub and roll-pin 57094-010-01 P62-0603<br />
40 SCREW, .190" -32 x .375" long, slotted,<br />
fillister head<br />
40A LOCK WASHER, internal tooth, .190" I.D.,<br />
.381" O.D., .025" thick<br />
03410-112-ON P62-0218<br />
53029-069-00 P62-0401<br />
42 ROLL PIN 17188-000-00 P62-0238<br />
43 SPRING, for rotor 34956-004-00 P62-0295<br />
44 CUP WASHER, for nut 22539-008-00 P62-0257<br />
45 NUT, for holding spring on rotor, .50" -32 x<br />
.125" thick, hex<br />
06358-011-00 P62-0205<br />
46 LOWER BEARING 57092-008-01 P62-0608<br />
47 CLAMP 54847-011-00 P62-0423<br />
P1457, Rev. Nov/07 7–34 <strong>Alstom</strong> Signaling Inc.
Parts Catalog<br />
Table 7–9. B2 Code Rate Transmitter Relay Part Numbers (Cont.)<br />
Ref. Description Drawing No. Catalog No.<br />
48 SCREW, .190" -32 x .50" long, slotted 03310-116-ON P62-0176<br />
fillister head<br />
49 NUT, for lower bearing 39549-013-00 P62-0316<br />
50 LOWER CLAMPING PLATE, for ribbon 55911-035-00 P62-0468<br />
51 WEIGHT RING, .063" thick, nine required<br />
for 50 rate transmitters; eight required for 75<br />
rate transmitters ; three required for 96 rate<br />
transmitters<br />
51A WEIGHT RING, .031 " thick, one required<br />
for 75 rate; four required for 120 rate ; one<br />
required for 96 rate transmitters<br />
52 SCREW, .190" -32 x .88" long, slotted,<br />
fillister head<br />
43712-008-00 P62-0336<br />
43712-011-00 P62-0338<br />
03410-128-ON P62-0217<br />
52A NUT, .190" -32 x. 13" thick, hex 01272-007-ON P62-0129<br />
52B FLAT WASHER, .438" O.D., .200" I.D., .03"<br />
thick<br />
52C LOCK WASHER, internal tooth, .190" I.D.,<br />
.381" O.D., .025" thick<br />
01250-009-ON P76-0247<br />
53029-069-00 P62-0401<br />
53 ARMATURE 57110-000-00 P62-0625<br />
54 BASE RING, one required for 50, 75, 96,<br />
120 and 180 rate transmitters<br />
55 STUD, for fastening stationary end of spring<br />
to arm<br />
43712-009-00 P62-0337<br />
20247-004-00 P62-0254<br />
56 STOP, for fastening end of spring on stud 38316-002-00 P62-0308<br />
57 ARM, for stud and stop 54818-014-00 P62-0422<br />
58 NUT, jam .250" -28 x .156" thick, hex 01472-007-00 P62-0165<br />
75 GASKET, between cover and base 13014-222-00 P62-0226<br />
76 NUT, cover 56026-011-00 P62-0578<br />
76A GASKET, cover 30646-012-00 P62-0277<br />
77 SHIELD, for contact groups 50737-091-00 P62-0227<br />
P1457, Rev. Nov/07 7–35 <strong>Alstom</strong> Signaling Inc.
Parts Catalog<br />
7.13. B2 MICROCHRON II TIMER RELAY (DC)<br />
28-29<br />
104<br />
102<br />
103<br />
105<br />
111<br />
108<br />
109<br />
110<br />
18<br />
108<br />
109<br />
110<br />
19<br />
20<br />
25 22 8<br />
30<br />
116<br />
106-107<br />
VIEW SHOWN WITH COVER (REF.13)<br />
SWITCH BOARD (REF.103) AND<br />
BRACKET (REF.105) REMOVED<br />
6<br />
13<br />
4 5<br />
7<br />
9 35 36 113-114<br />
1<br />
16<br />
23<br />
0 1 2 3 15<br />
33<br />
32<br />
11<br />
21<br />
31<br />
24<br />
27<br />
26<br />
112 34<br />
Fig. 1<br />
12<br />
3 2<br />
115<br />
10<br />
13A<br />
34<br />
Fig. 2<br />
Figure 7–11. B2 Microchron II Timer Relay (DC)<br />
P1457, Rev. Nov/07 7–36 <strong>Alstom</strong> Signaling Inc.
Parts Catalog<br />
FRONT VIEW<br />
1 2 3 4 5 6<br />
NEUTRAL B2 TIMER<br />
2FB<br />
3F<br />
2B<br />
ARMATURE AIR GAP<br />
FRONT CONTACT OPENING<br />
REGISTERED IN SPACES<br />
(AgC-S, S-S)<br />
(AgC-S)<br />
(S-AgC)<br />
.010in. min.<br />
.050in (MIN.)<br />
1-4-6-11<br />
+<br />
-<br />
Microchron II Timer Relay Contact Groups<br />
REQ EACH RELAY<br />
REQUIRES<br />
COIL<br />
REFERENCE<br />
CATALOG NO.<br />
CONTACT GROUP 56015-074-01 (2) A62-691 or<br />
A62-744<br />
SPACE 1<br />
SPACE 2<br />
SPACE 3<br />
ORDERING<br />
REFERENCE<br />
50800-101-01 or<br />
50800-101-02<br />
1 SPACE 4 56012-108-32<br />
1 SPACE 5 56012-108-39<br />
1 SPACE 6 56012-108-06<br />
Figure 7–11. B2 Microchron II Timer Relay (DC) (Cont.)<br />
NOTE<br />
The only difference between the 50800-101-01 (tinted seal) and 50800-<br />
101-02 (lead seal) relays is that 50800-101-02 has alternate sealing for<br />
time setting thumbwheel switches.<br />
P1457, Rev. Nov/07 7–37 <strong>Alstom</strong> Signaling Inc.
Parts Catalog<br />
Table 7–10. B2 Microchron II Timer Relay Part Numbers<br />
Ref. Description Drawing No. Catalog No.<br />
1 BASE COMPLETE 56013-019-11 P62-0840<br />
2 COIL COMPLETE 56015-074-01 N/A<br />
3 CORE & BRACKET 56014-000-01 N/A<br />
4 ARMATURE COMPLETE 39043-022-01 P62-0312<br />
5 PLATE, Armature Bearing 55912-001-00 P62-0470<br />
6 PLATE, Armature Retaining 55914-001-00 P62-0473<br />
7 NUT, .190-32 x .187 thick, round lock 00846-023-00 P62-0142<br />
8 NUT, Lock 56024-000-00 P62-0575<br />
9 SPRING 00586-095-00 P62-0131<br />
10 YOKE 01224-038-00 N/A<br />
11 PLATE, Name 00401-925-00 N/A<br />
12 WASHER, .653" I.D., 1.391" O.D., .022"<br />
thick, spring<br />
01225-104-00 P62-0158<br />
13 COVER 56029-104-00 P62-0819<br />
13A COVER COMPLETE 57287-012-01 N/A<br />
14 CONNECTOR, Splice 00958-009-ON N/A<br />
15 HOLDER, Card 50023-039-00 P62-0356<br />
16 FORM 51553-089-00 N/A<br />
18 CONTACT GROUP 56012-108-32 P62-0792<br />
19 CONTACT GROUP 56012-108-39 P62-0794<br />
20 CONTACT GROUP 56012-108-06 P62-0484<br />
21 SCREW, .112” -40 x .19” long pan head ,<br />
with patch<br />
22 SCREW, .112” -40 x .25” long pan head ,<br />
with patch<br />
23 SCREW, .112” -40 x .38” long pan head ,<br />
Self Tap<br />
24 SCREW, for attaching contact groups,<br />
.138” -40 x .63” long flat head<br />
25 SCREW, .164” -32 x .31” long pan head ,<br />
with patch<br />
02430-038-00 P62-0442<br />
02430-037-00 N/A<br />
06604-212-ON P62-0594<br />
03306-120-ON P62-0200<br />
02430-036-00 N/A<br />
P1457, Rev. Nov/07 7–38 <strong>Alstom</strong> Signaling Inc.
Parts Catalog<br />
Table 7–10. B2 Microchron II Timer Relay (DC) Part Numbers (Cont.)<br />
Ref. Description Drawing No. Catalog No.<br />
26 SCREW, .313” -24 x 1.00” long, hex head, 53141-025-00 P62-0845<br />
SEMS<br />
27 NUT, .164” -32 x .229” thick, elastic stop 42333-046-00 N/A<br />
28 RECEPTACLE (4 Pos) Mate-N-Lock (P1) 58920-483-00 N/A<br />
29 TERMINAL, Pin (#20-14 AWG) 55871-161-00 N/A<br />
30 GASKET, (Base) 13014-222-00 P62-0226<br />
31 SHIELD, Dust 50737-091-00 P62-0227<br />
32 GASKET 30646-012-00 P62-0277<br />
33 NUT, .375” -32 x .28” thick, special 56026-004-00 P62-0812<br />
34 SEAL 35285-000-00 P62-0299<br />
35 WIRE, #20 AWG Tefzel White, (Per<br />
82A0006)<br />
36 WIRE, #20 AWG Tefzel Black, (Per<br />
82A0006)<br />
80559-063-01 N/A<br />
80559-066-01 N/A<br />
102 BOARD ASSEMBLY (Mother) 31166-132-01 P62-0842<br />
103 BOARD ASSEMBLY (Switch) 31166-137-01 P62-0841<br />
104 BRACKET 54844-462-00 N/A<br />
105 BRACKET 54844-463-00 N/A<br />
106 SCREW, .138” -32 x .38” long pan head 03606-012-ON P50-0473<br />
107 WASHER, .138” I.D., .250” O.D., .031”<br />
thick, lock<br />
01273-002-ON P73-0275<br />
108 SCREW, .112” -40 x .25” long pan head 03604-008-ON P62-0759<br />
109 WASHER, .112” I.D., .270” O.D., .019”<br />
thick, shk’prf<br />
110 WASHER, .112” I.D., .375” O.D., .40” thick,<br />
flat<br />
53029-066-00 P65-0730<br />
01250-031-ON<br />
111 RIVET, Snap 34496-062-00 N/A<br />
112 TAMPER EVIDENT SEAL, red tint 37947-058-00 N/A<br />
112 TAMPER EVIDENT SEAL, green tint 37947-059-00 N/A<br />
113 TERMINAL 55083-012-00 P62-0431<br />
114 SLEEVE, insulating 55557-000-00 P62-0450<br />
115 TIE, cable 01232-001-ON P85-1222<br />
N/A<br />
P1457, Rev. Nov/07 7–39 <strong>Alstom</strong> Signaling Inc.
Parts Catalog<br />
Table 7–10. B2 Microchron II Timer Relay (DC) Part Numbers (Cont.)<br />
Ref. Description Drawing No. Catalog No.<br />
116 TUBING, .125 shrink blk (Per 82P0004) 81411-019-01 N/A<br />
TAG, instruction (For 50800-101-01 Relay) 55085-720-00 N/A<br />
TAG, instruction (For 50800-101-02 Relay) 55085-728-00 N/A<br />
P1457, Rev. Nov/07 7–40 <strong>Alstom</strong> Signaling Inc.
Parts Catalog<br />
7.14. B2 AC MICROCHRON II TIMER RELAY<br />
25 22 8<br />
101<br />
30<br />
18<br />
102 108-109-119<br />
(J1)<br />
19<br />
18<br />
118<br />
119<br />
(J1)<br />
(P1)<br />
(P1)<br />
(P2)<br />
20<br />
(P2)<br />
106<br />
107<br />
37-38<br />
120<br />
36<br />
113-114<br />
1<br />
9<br />
104<br />
7 5 4 6<br />
(P2)<br />
31<br />
31<br />
33<br />
1<br />
35<br />
24<br />
32<br />
(J1)<br />
34<br />
(P1)<br />
4<br />
3<br />
2<br />
1<br />
35<br />
26<br />
11<br />
21<br />
41<br />
13 36 28-29<br />
116<br />
27<br />
10<br />
115<br />
2-14 3 12-40<br />
16<br />
108<br />
109<br />
119<br />
1 2 3 4<br />
5<br />
103<br />
111<br />
23<br />
15<br />
DS3-PWR/TIMING<br />
DS4-DELAY COMPLETE<br />
1 2 4 5<br />
105<br />
34<br />
Figure 7–12. B2 AC Microchron II Timer Relay<br />
P1457, Rev. Nov/07 7–41 <strong>Alstom</strong> Signaling Inc.
Parts Catalog<br />
Table 7–11. B2 AC Microchron II Timer Relay Part Numbers<br />
Ref. Description Drawing No. Catalog No.<br />
1 BASE COMPLETE 56013-019-14 N/A<br />
2 COIL COMPLETE 56015-074-01 N/A<br />
3 CORE & BRACKET 56014-000-01 N/A<br />
4 ARMATURE COMP 39043-022-01 P62-0312<br />
5 PLATE, Armature Bearing 55912-001-00 P62-0470<br />
6 PLATE, Armature Retaining 55914-001-00 P62-0473<br />
7 NUT, .190-32 x .187" thick, round lock 00846-023-00 P62-0142<br />
8 NUT, Lock 56024-000-00 P62-0575<br />
9 SPRING 00586-095-00 P62-0131<br />
10 YOKE 01224-037-00 P62-0824<br />
11 PLATE, Name 00401-925-00 N/A<br />
12 WASHER, .653" I.D., 1.391" O.D., .022"<br />
thick, spring<br />
01225-104-00 P62-0158<br />
13 COVER COMPLETE 57287-013-01 N/A<br />
14 CONNECTOR, Splice 00958-009-ON N/A<br />
15 HOLDER, Card 50023-039-00 P62-0356<br />
18 CONTACT GROUP, Space 1, 3 56012-108-02 P62-0479<br />
19 CONTACT GROUP, Space 2 56012-108-06 P62-0484<br />
20 CONTACT GROUP, Space 4, 5, 6 56012-050-01 N/A<br />
21 SCREW, .112" -40 x .19" long pan head<br />
Nylock<br />
22 SCREW, .112" -40 x .25" long pan head<br />
SEMS<br />
23 SCREW, .112" -40 x .38" long pan head,<br />
self tap<br />
24 SCREW, for attaching contact groups,<br />
.138" -40 x .63" long, flat head<br />
25 SCREW, .164" -32 x .31" long, pan head<br />
SEMS<br />
26 SCREW, .313" -24 x 1.00" long, hex head<br />
SEMS<br />
02430-038-00 P62-0442<br />
53141-027-00 P62-0844<br />
06604-212-ON P62-0594<br />
03306-120-ON P62-0200<br />
53141-026-00 P62-0845<br />
53141-025-00 P62-0846<br />
27 NUT, .164" -32 x .229" thick, elastic stop 42333-046-00 N/A<br />
28 RECEPTACLE (4 Pos) Mate-N-Lok (P1) 58920-483-00 N/A<br />
P1457, Rev. Nov/07 7–42 <strong>Alstom</strong> Signaling Inc.
Parts Catalog<br />
Table 7–11. B2 AC Microchron II Timer Relay Part Numbers (Cont.)<br />
Ref. Description Drawing No. Catalog No.<br />
29 TERMINAL, Pin (#20-14 AWG) 55871-161-00 N/A<br />
30 GASKET, (Base) 13014-222-00 P62-0226<br />
31 SHIELD, Dust 50737-091-00 P62-0227<br />
32 GASKET 30646-012-00 P62-0277<br />
33 NUT, .375 -32 x .28 thick, special 56026-004-00 P62-0812<br />
34 SEAL 35285-000-00 P62-0299<br />
35 WIRE, #18 AWG Tefzel white (per<br />
82A0006)<br />
36 WIRE, #18 AWG Tefzel black (per<br />
82A0006)<br />
80559-108-01 N/A<br />
80559-065-01 N/A<br />
37 TERMINAL, Socket (#22-18 AWG) (for P2) 59825-248-00 N/A<br />
38 RECEPTACLE (4 pos), Mini Mate-N-Lock<br />
(P2)<br />
58920-513-00 N/A<br />
39 WIRE, #18 AWG (Per 82J0002) 80598-001-01 N/A<br />
40 WASHER, .578" I.D., 1.375" O.D., .031"<br />
thick, fiber<br />
34017-114-00 N/A<br />
41 HEAD 54863-002-00 N/A<br />
16 FORM for 50800-103-01 51553-104-00 N/A<br />
16 FORM for 50800-104-01 51553-105-00 N/A<br />
102 BOARD ASSEMBLY (Timer Processor) for<br />
50800-103-01<br />
102 BOARD ASSEMBLY (Timer Processor) for<br />
50800-104-01<br />
103 BOARD ASSEMBLY (Thumbwheel Switch)<br />
for 50800-103-01<br />
103 BOARD ASSEMBLY (Thumbwheel Switch)<br />
for 50800-104-01<br />
31166-299-01 N/A<br />
31166-299-02 N/A<br />
31166-300-01 N/A<br />
31166-353-01 N/A<br />
104 BRACKET, Board 54844-487-00 N/A<br />
105 BRACKET, Switch 54844-505-00 N/A<br />
106 SCREW, .138-32 x .38" long, pan head 03606-012-ON P50-0473<br />
107 WASHER, .138 ID", .250" O.D., .031" thick,<br />
lock<br />
01273-002-ON P73-0175<br />
108 SCREW, .112-40 x .25" long, pan head 03604-008-ON P62-0759<br />
P1457, Rev. Nov/07 7–43 <strong>Alstom</strong> Signaling Inc.
Parts Catalog<br />
Table 7–11. B2 AC Microchron II Timer Relay Part Numbers (Cont.)<br />
Ref. Description Drawing No. Catalog No.<br />
109 WASHER, .112" I.D., .270" O.D., .019" 53029-066-00 P65-0730<br />
thick, shk’prf<br />
111 RIVET, Snap 34496-062-00 N/A<br />
112 INDICATOR, Shock 29006-004-00 N/A<br />
113 TERMINAL 55083-012-00 P62-0431<br />
114 SLEEVE, Insulating 55557-000-00 P62-0450<br />
115 TIE, Cable 01232-001-ON P85-1222<br />
116 TUBING, .125" Shrink, black (per 82P0004) 81411-019-01 N/A<br />
117 TAG, Instruction 55085-732-00 N/A<br />
118 NUT, .112-40 x .143" thick, hex elastic stop 42333-045-00 N/A<br />
119 WASHER, .112" I.D., .375" O.D., .040"<br />
thick, flat<br />
01250-031-ON<br />
120 TIE, Cable 01232-000-ON N/A<br />
N/A<br />
P1457, Rev. Nov/07 7–44 <strong>Alstom</strong> Signaling Inc.
Parts Catalog<br />
7.15. TYPE VTB POLAR-BIASED RELAY<br />
Figure 7–13. <strong>Type</strong> VTB Polar-Biased Relay<br />
P1457, Rev. Nov/07 7–45 <strong>Alstom</strong> Signaling Inc.
Parts Catalog<br />
Table 7–12. VTB Polar Biased Relay Part Numbers<br />
Ref. Description Drawing No. Catalog No.<br />
A CONTACT GROUP, three dependent front 56012-109-04 P62-0499<br />
and back silver-platinum contacts<br />
B<br />
B1<br />
B2<br />
C<br />
CONTACT GROUP, one dependent front<br />
back, two dependent fronts and one<br />
dependent back silver-platinum contacts<br />
CONTACT GROUP, except with one<br />
dependent front back, one dependent front,<br />
one dependent back silver-platinum<br />
contacts<br />
CONTACT GROUP, except with one<br />
dependent front back silver-platinum, one<br />
dependent back silver-platinum, one<br />
dependent front tungsten, one dependent<br />
back tungsten.<br />
CONTACT GROUP, two dependent front<br />
and back silver-platinum contacts<br />
56012-109-02 P62-0497<br />
56012-109-05 P62-0760<br />
56012-109-06 P62-0836<br />
56012-109-03 P62-0498<br />
1 GASKET, for cover 13014-312-00 P62-0230<br />
2 BASE, for relay 56023-034-00 P62-0574<br />
3 SCREW, .112"-40 x .25" slotted pan head 03604-008-ON P62-0759<br />
3A WASHER, .115" I.D., .270" O.D., .019"<br />
thick, internal tooth lock<br />
53029-066-00 P65-0730<br />
4 TERMINAL 55083-012-00 P62-0431<br />
5 SCREW, .164"-32 x .88" long. slotted pan<br />
head<br />
03608-028-ON P30-0447<br />
5A NUT, .164"-32 x .13" thick, hex 03891-011-00 P62-0186<br />
5B WASHER, .168" I.D., .340" O.D., .023"<br />
thick., internal tooth lock<br />
53029-068-00 P62-0402<br />
6 CONTACT GROUP, for coil connections 56012-060-01 P62-0496<br />
7 SLEEVING, for coil connections 55557-000-00 P62-0450<br />
8 PUSHER, for contact groups, has slot in<br />
back for right-hand contact group on double<br />
armature relays<br />
8A<br />
PUSHER, has slot in front edge, for single<br />
armature relays and for left-hand contact<br />
group on double armature relays<br />
55863-053-00 P62-0465<br />
55863-052-00 P62-0464<br />
P1457, Rev. Nov/07 7–46 <strong>Alstom</strong> Signaling Inc.
Parts Catalog<br />
Table 7–12. VTB Polar Biased Relay Part Numbers (Cont.)<br />
Ref. Description Drawing No. Catalog No.<br />
8B CLIP, two required per contact group (USE 56025-001-00 P62-0577<br />
ONLY ONCE)<br />
9 COVER, for relay 56029-031-00 P62-0581<br />
10 BUSHING, for tube 45896-029-00 P62-0754<br />
12 SPACER 50514-012-00 P62-0755<br />
13 BRACKET COMPLETE 18470-001-01 P62-0746<br />
14 SCREW, .138" - 32 x .31" long., slotted pan<br />
head<br />
03606-010-ON P85-0464<br />
14A NUT, .138" - 32 x. 25" thick, hex 01272-010-ON P65-0498<br />
14B WASHER, .141" I.D., .295" O.D., .021"<br />
thick, internal tooth lock<br />
15 SCREW, .190" - 32 x .75" long., slotted pan<br />
head<br />
16 BLOCK, for cores, for double-armature<br />
relays<br />
53029-081-00 P62-0837<br />
03610-124-ON P65-0208<br />
53336-012-00 P62-0758<br />
17 YOKE, for cores 01224-034-00 P62-0740<br />
18 FRAME, only 18476-000-00 P62-0748<br />
19 TUBE, for fastening relay to plugboard 29474-047-00 P62-0270<br />
20 SEAL 35285-000-00 P62-0299<br />
21 HANDLE, for relay 41909-022-00 P62-0319<br />
22 MAGNET (specify drawing no. of relay<br />
where part is used)<br />
53007-060-00 P62-0838<br />
23 NUT, .190" - 32 x .13" thick x .38" hex 01272-007-ON P76-0129<br />
24 SCREW, .164" - 32 x .63" long, crowned<br />
head<br />
07499-002-00 P62-0211<br />
24A NUT, .164" - 32 x .13" thick, hex 03891-011-00 P62-0186<br />
24B WASHER, .168" I.D., .340" O.D., .023" thick 53029-068-00 P62-0402<br />
25 CORE, for double armature relay 29514-173-00 P62-0750<br />
25A CORE, for single-armature relay 29514-172-00 P62-0749<br />
26 SPRING, pressure, for coils 13108-030-00 P62-0233<br />
27 HOLDER, for test data form 50023-039-00 P62-0356<br />
P1457, Rev. Nov/07 7–47 <strong>Alstom</strong> Signaling Inc.
Parts Catalog<br />
Table 7–12. VTB Polar Biased Relay Part Numbers (Cont.)<br />
Ref. Description Drawing No. Catalog No.<br />
28 FORM, test data 51553-095-00 P62-0839<br />
29 SCREW, .112" - 40 x .3" long, slotted pan<br />
head self tapping<br />
56190-003-00 P62-0593<br />
30 COIL, right or left hand, 0.10 ohms 59857-004-05 P62-0687<br />
30A COIL, right or left hand, 0.12 ohms 59857-004-04 P62-0686<br />
30B COIL, right or left hand, 2.0 ohms 59857-004-09 P62-0764<br />
30C COIL, right or left hand, 4.0 ohms 59857-004-06 P62-0763<br />
30D COIL, right or left hand, 17.0 ohms 59857-005-06 P62-0688<br />
30E COIL, right or left hand, 100.0 ohms 59857-005-07 P62-0689<br />
31 SCREW, for block and yoke, .190"-32 x 13006-063-00 P62-0743<br />
1.88" long, hex<br />
31A NUT, .190"-32 x .13" thick x .38" hex 01272-007-ON P76-0129<br />
31B WASHER, internal tooth shakeproof washer<br />
for a .190" screw<br />
53029-069-00 P62-0401<br />
32 BRACKET, left-hand 18470-000-01 P62-0744<br />
33 PLATE, clamping 18475-000-00 P62-0747<br />
34 SCREW, .112"-40 x .25" long slotted fillister<br />
head<br />
03404-008-ON P62-0445<br />
34A NUT, .112"-40 x .25" hex x .09" thick 01272-002-ON P62-0765<br />
34B WASHER, .115" I.D., .270" O.D., .019"<br />
thick, internal tooth lock<br />
35 SCREW, .164"-32 x .75" long, slotted pan<br />
head<br />
35A WASHER, .168" I.D., .340" O.D., .023"<br />
thick, internal tooth lock<br />
36 SCREW, .138"-40 x .25" long. slotted pan<br />
head<br />
53029-066-00 P65-0730<br />
03608-024-ON P62-0175<br />
03610-124-ON P65-0208<br />
03606-108-ON P62-0753<br />
37 NAME PLATE 00401-309-00 P62-0015<br />
38 SCREW, for supporting magnet, .190"-32 x<br />
1.38" long. fillister head<br />
38A NUT, .190" -32 x .385" x .38" Sq. x .13"<br />
thick<br />
38B WASHER, .190" I.D., .381" O.D., .025"<br />
internal tooth lock washer<br />
12563-020-00 P62-0742<br />
31784-001-00 P62-0751<br />
53029-069-00 P62-0401<br />
P1457, Rev. Nov/07 7–48 <strong>Alstom</strong> Signaling Inc.
Parts Catalog<br />
Table 7–12. VTB Polar Biased Relay Part Numbers (Cont.)<br />
Ref. Description Drawing No. Catalog No.<br />
39 BRACKET, right-hand 18470-000-02 P62-0745<br />
40 ARMATURE COMPLETE 18472-001-01 P62-0245<br />
41 SLEEVE, molded rubber, used with #10<br />
AWG wire on plugboards<br />
42 TERMINAL, solder-type, two required per<br />
insulator<br />
35189-033-00 P62-0298<br />
55871-019-00 P62-0466<br />
44 NUT, .250" -28 hex 01472-003-00 P62-0167<br />
45 WASHER, spring lock for a .250" screw 01273-006-ON P81-0121<br />
46 WASHER, flat for a .250" screw 01250-029-ON P85-0050<br />
47 SCREW, .250" -28 x 1.25" slotted fillister<br />
head<br />
55470-004-00 P62-0448<br />
48 INSULATOR, for plugboard 55862-024-00 P62-0457<br />
49 STUD, for plugboard 48813-007-00 P62-0347<br />
49A NUT, .250" -28 hex, elastic stop 42333-065-00 P62-0320<br />
49B WASHER, flat washer for a .250" screw 01250-011-ON P50-0157<br />
50 SCREW, .164" -32 x .375", slotted fillister<br />
head<br />
50A WASHER, .168", 340" O.D., .023" thick,<br />
internal tooth shakeproof<br />
03408-012-ON P85-0870<br />
53029-068-00 P62-0402<br />
51 NUT, for current test posts .242" -24 00578-015-00 P62-0129<br />
52 CONNECTOR, for current test posts 04906-150-00 P62-0191<br />
53 SCREW, .164" -32 x .88" long. fillister head<br />
for fastening registration plate to relay<br />
54 SCREW, used as current test post, .242" -<br />
24 x 3.75" long<br />
55 SCREW, used a voltage test post, .242" -24<br />
x 3.38" long<br />
28989-046-00 P62-0268<br />
00374-010-00 P62-0108<br />
00376-013-00 P62-0109<br />
56 NUT, for fastening relay to plugboard 00846-029-00 P62-0144<br />
57 NUT, for locking nut (Ref. 56) 01472-008-00 P62-0166<br />
58 NUT, for lest posts, .242" -24 x .313" thick 42843-001-00 P76-0131<br />
59 WASHER, for test posts 01225-002-00 P76-0108<br />
60 NUT, .242" -24 x.188" thick 42839-005-00 P62-0333<br />
61 BUSHING, insulating, for connectors 06347-031-00 P62-0203<br />
P1457, Rev. Nov/07 7–49 <strong>Alstom</strong> Signaling Inc.
P1457, Rev. Nov/07 7–50 <strong>Alstom</strong> Signaling Inc.<br />
Nominal Res.<br />
Ohms<br />
Table 7–13. B Relay Coil and Compression Spring Part Numbers<br />
Coil Used For Relay Coil Compression Spring<br />
Top or<br />
Bottom<br />
Used with<br />
Catalog No.<br />
Drawing No. Catalog No. Drawing No. Catalog No.<br />
105 Either A62-205 56015-023-01 P62-547 00586-095-00 P62-131<br />
0.12 Either A62-211 56015-022-07 P62-543 00586-095-00 P62-131<br />
0.2 Either A62-213 56015-022-06 P62-542 00586-095-00 P62-131<br />
450 Top A62-215 56015-008-15 P62-519 00586-095-00 P62-131<br />
0.45 Bottom A62-215 56015-022-05 P62-541 00586-095-00 P62-131<br />
450 Top A62-217 56015-008-15 P62-519 00586-095-00 P62-131<br />
0.069 Bottom A62-217 56015-056-01 P62-563 00586-095-00 P62-131<br />
450 Top A62-221 56015-008-15 P62-519 00586-095-00 P62-131<br />
0.12 Bottom A62-221 56015-022-07 P62-543 00586-095-00 P62-131<br />
450 Top A62-231 56015-008-15 P62-519 00586-095-00 P62-131<br />
0.2 Bottom A62-231 56015-022-06 P62-542 00586-095-00 P62-131<br />
450 Top A62-236 56015-008-15 P62-519 00586-095-00 P62-131<br />
0.61 Bottom A62-236 56015-022-01 P62-545 00586-095-00 P62-131<br />
0.9 Either A62-260 56015-022-03 P62-540 00586-095-00 P62-131<br />
2.0 Either A62-261 56015-022-02 P62-539 00586-095-00 P62-131<br />
250 Either A62-262 56015-008-14 P62-518 00586-095-00 P62-131<br />
250 Either A62-277 56015-008-14 P62-518 00586-095-00 P62-131<br />
Parts Catalog
P1457, Rev. Nov/07 7–51 <strong>Alstom</strong> Signaling Inc.<br />
Nominal Res.<br />
Ohms<br />
Table 7–13. B Relay Coil and Compression Spring Part Numbers (Cont.)<br />
Coil Used For Relay Coil Compression Spring<br />
Top or<br />
Bottom<br />
Used with<br />
Catalog No.<br />
Drawing No. Catalog No. Drawing No. Catalog No.<br />
3.0 Either A62-293 56015-022-14 P62-546 00586-056-00 P62-130<br />
42 Either A62-295 56015-009-10 P62-521 00586-095-00 P62-131<br />
450 Either A62-296 56015-008-14 P62-519 00586-095-00 P62-131<br />
175 Either A62-300 56015-008-13 P62-517 00586-095-00 P62-131<br />
42 Either A62-305 56015-009-10 P62-521 00586-095-00 P62-131<br />
450 Either A62-308 56015-008-15 P62-519 00586-095-00 P62-131<br />
175 Either A62-309 56015-008-13 P62-517 00586-095-00 P62-131<br />
250 Either A62-310 56015-008-14 P62-518 00586-095-00 P62-131<br />
450 Either A62-311 56015-008-15 P62-519 00586-095-00 P62-131<br />
450 Top A62-312 56015-008-15 P62-519 00586-095-00 P62-131<br />
8 Bottom A62-312 56015-022-01 P62-733 00586-095-00 P62-131<br />
42 Top A62-313 56015-009-10 P62-521 00586-095-00 P62-131<br />
1.6 Bottom A62-313 56015-037-02 P62-552 00586-095-00 P62-131<br />
4.5 Either A62-314 56015-037-03 P62-553 00586-095-00 P62-131<br />
29.5 Top A62-315 56015-035-03 P62-551 00586-095-00 P62-131<br />
20.5 Bottom A62-315 56015-009-08 P62-520 00586-095-00 P62-131<br />
50 Either A62-317 56015-008-10 P62-515 00586-095-00 P62-131<br />
900 Either A62-318 56015-009-17 P62-523 00586-095-00 P62-131<br />
Parts Catalog
P1457, Rev. Nov/07 7–52 <strong>Alstom</strong> Signaling Inc.<br />
Nominal Res.<br />
Ohms<br />
Table 7–13. B Relay Coil and Compression Spring Part Numbers (Cont.)<br />
Coil Used For Relay Coil Compression Spring<br />
Top or<br />
Bottom<br />
Used with<br />
Catalog No.<br />
Drawing No. Catalog No. Drawing No. Catalog No.<br />
900 Either A62-320 56015-009-17 P62-523 00586-095-00 P62-131<br />
28.5 Top A62-325 56015-022-11 P62-776 00586-095-00 P62-131<br />
135 Top A62-335 56015-021-04 P62-538 00586-095-00 P62-131<br />
65 Bottom A62-335 56015-021-03 P62-537 00586-095-00 P62-131<br />
300 Bottom A62-341 56015-012-16 P62-533 00586-095-00 P62-131<br />
220 Bottom A62-345 56015-011-15 P62-530 00586-095-00 P62-131<br />
194 Bottom A62-350 56015-012-15 P62-532 00586-095-00 P62-131<br />
460 Bottom A62-353 56015-012-17 P62-534 00586-095-00 P62-131<br />
450 Bottom A62-355 56015-008-15 P62-519 00586-095-00 P62-131<br />
**194 Bottom A62-357 56015-012-15 P62-532 00586-095-00 P62-131<br />
194 Bottom A62-358 56015-012-15 P62-532 00586-095-00 P62-131<br />
**194 Bottom A62-359 56015-012-15 P62-532 00586-095-00 P62-131<br />
**194 Bottom A62-360 56015-012-15 P62-532 00586-095-00 P62-131<br />
12 Either A62-365 56015-045-10 P62-691 00586-110-00 P62-133<br />
300 Bottom A62-369 56015-012-16 P62-533 00586-095-00 P62-131<br />
800 Bottom A62-370 56015-009-21 P62-525 00586-095-00 P62-131<br />
400 Bottom A62-372 56015-012-17 P62-534 00586-095-00 P62-130<br />
** For use with relays containing aluminum slugs.<br />
Parts Catalog
P1457, Rev. Nov/07 7–53 <strong>Alstom</strong> Signaling Inc.<br />
Nominal Res.<br />
Ohms<br />
Table 7–13. B Relay Coil and Compression Spring Part Numbers (Cont.)<br />
Coil Used For Relay Coil Compression Spring<br />
Top or<br />
Bottom<br />
Used with<br />
Catalog No.<br />
Drawing No. Catalog No. Drawing No. Catalog No.<br />
40 Either A62-380 56015-023-05 P62-548 00586-095-00 P62-131<br />
50-00 Either A62-401 56015-008-10 P62-515 00586-104-00 P62-132<br />
100 Either A62-406&407 56015-008-12 P62-516 00586-056-00 P62-130<br />
1.7 Top A62-410 56015-015-04 P62-536 00586-095-00 P62-131<br />
2.2 Bottom A62-410 56015-014-03 P62-535 00586-095-00 P62-131<br />
220 Bottom A62-415 56015-011-15 P62-530 00586-095-00 P62-131<br />
0.045 Top A62-424 56015-056-03 P62-779 00586-056-00 P62-130<br />
450 Bottom A62-424 56015-008-15 P62-519 00586-056-00 P62-130<br />
250 Either A62-427 56015-008-14 P62-518 00586-095-00 P62-131<br />
250 Either A62-429 56015-041-06 P62-554 00586-110-00 P62-133<br />
135 Top A62-430&431 56015-011-14 P62-529 00586-056-00 P62-130<br />
0.064 Bottom A62-430&431 56015-063-01 P62-568 00586-056-00 P62-130<br />
1225 Top A62-432 56015-029-01 P62-777 00586-056-00 P62-130<br />
0.068 Bottom A62-432 56015-030-01 P62-778 00586-056-00 P62-130<br />
220 Top A62-433 56015-011-15 P62-530 00586-169-00 P62-783<br />
1.85 Bottom A62-433 56015-067-01 P62-781 00586-169-00 P62-783<br />
40 Either A62-519 31066-101-08 P62-279 00586-138-00 P62-782<br />
460 Top A62-521 56015-012-17 P62-534 00586-095-00 P62-131<br />
1.0 Bottom A62-522 56015-065-02 P62-780 00586-138-00 P62-782<br />
Parts Catalog
Parts Catalog<br />
7.16. B RELAY CONTACT GROUPS<br />
1<br />
A. 2FB 1 B. 2FB 1 D. 1FB<br />
1<br />
1 1<br />
E. 2FB F. 2F-1B G. 2F-1B<br />
1<br />
1<br />
H. 1F-2B J. 1F-2B K. 2B<br />
2A<br />
2<br />
3 3<br />
M. 1F-1B N. 3B 1<br />
P. 2F<br />
3<br />
3A<br />
3 3<br />
1 1<br />
Q. 1F -1B R. 2B S. 2F<br />
1<br />
1A<br />
T. 2F-1B<br />
1<br />
U. 3F V. 3F<br />
1<br />
1<br />
W. 1FB-1F<br />
Three different pushers are used, each pusher is identified as 1, 2, or 3.<br />
Three different clips are used, example clips are identified as 1A, 2A, or 3A. These numbers refer to the ref. numbers used in Table 7-14, B Relay<br />
Group Pusher and Clip Part Numbers.<br />
See Table 7-13 for contact group combinations and descriptions for the above references A through W.<br />
Figure 7–14. B Relay Contact Groups<br />
P1457, Rev. Nov/07 7–54 <strong>Alstom</strong> Signaling Inc.
Parts Catalog<br />
MARKED END<br />
OF MAGNET<br />
MARKED END<br />
OF MAGNET<br />
MARKED END<br />
OF MAGNET<br />
MARKED END<br />
OF MAGNET<br />
MARKED END<br />
OF MAGNET<br />
MARKED END<br />
OF MAGNET<br />
Fig. 1 Fig. 2 Fig. 3 Fig. 4 Fig. 5 Fig. 6<br />
Figure 7–15. B Relay Extra Heavy-Duty (EHD) Contact Group Magnet Detail<br />
Figures 7–14 and 7–15, combined with Tables 7–14 and 7–15, provide contact, pusher<br />
and clip details for the typical B relay contact group combinations. B2 Code Rate<br />
Transmitter Relay contact group part numbers are summarized in Table 7–9 and VTB<br />
relay contact groups are included in Table 7–10.<br />
• Figure 7–14 shows the contacts groups identified by a reference letter that<br />
corresponds to Table 7–14’s Ref. column. The illustrations also include a reference<br />
numbers that correspond to the Ref. column in Table 7–15.<br />
• Figure 7–15 contains six illustrations of extra heavy-duty (EHD) contact groups<br />
identified by Fig. numbers corresponding to references in Table 7–14 Combination<br />
column.<br />
• Table 7–14 provides drawing and catalog numbers for the various B relay contact<br />
combinations.<br />
• Table 7–15 provides the three combinations of contact group pusher and clip part<br />
numbers used in the B relay combinations.<br />
P1457, Rev. Nov/07 7–55 <strong>Alstom</strong> Signaling Inc.
Parts Catalog<br />
Table 7–14. B Relay Contact Group Part Numbers<br />
Ref. Combination Front Back Contacts Drawing No. Catalog No.<br />
Contacts<br />
A 2FB AgC to S (MD) S to S (MD) 56012-108-06 P62-0484<br />
B 2FB AgC to S (HD) S to S (HD) 56012-108-09 P62-0488<br />
B 2FB S to S (HD) S to S (HD) 56012-108-08 P62-0487<br />
B 2FB AgC to S (HD) S to AgC (HD) 56012-108-07 P62-0485<br />
D<br />
1FB<br />
1FB<br />
S to S (HD)<br />
AgC to S (MD)<br />
E 2FB 2 SCdO to SCdO<br />
(HD)<br />
S to S (HD)<br />
S to S (MD)<br />
SCdO to SCdO<br />
(HD)<br />
56012-108-35 P62-0486<br />
56012-108-40 P62-0500<br />
F 2F-1B AgC to S (MD) S to S (MD) 56012-108-02 P62-0479<br />
G 2F-1B AgC to S (HD) S to S (HD) 56012-108-03 P62-0480<br />
H 1F-2B AgC to S (MD) S to S (MD) 56012-108-05 P62-0482<br />
J 1F-2B S to S (MD) S to S (MD) 56012-108-34 P62-0483<br />
K 2B - S to S (HD) 56012-108-25 P62-0495<br />
M 1 1F-1B (Fig. 1) AgC to S (EHD) S to S (EHD) 56012-108-12 P62-0803<br />
N 3B - S to S (MD) 56012-108-33 P62-0481<br />
P 2F S to S (MD) - 56012-108-36 P62-0489<br />
Q 1<br />
1F 2 -1B 2 (Fig. 1) SCdO to SCdO<br />
(EHD)<br />
SCdO to SCdO<br />
(EHD)<br />
56012-108-13 P62-0494<br />
R 1 2B (Fig. 3) - S to S (EHD) 56012-108-38 P62-0805<br />
S 1 2F (Fig. 2) AgC to S (EHD) — 56012-108-37 P62-0804<br />
S 1 2F (Fig. 4) AgC to S (EHD) — 56012-108-42 P62-0809<br />
S 1 2F (Fig. 5) AgC to S (EHD) — 56012-108-43 P62-0810<br />
T 2F-1B AgC to S (HD) S to AgC (HD) 56012-108-04 P62-0847<br />
U 3F AgC to S (MD) — 56012-108-22 N/A<br />
V 3F 2 SCdO to SCdO<br />
(HD)<br />
1FB-1F 2 (Fig. 6) AgC to S (MD)<br />
SCdO to SCdO<br />
(EHD)<br />
Legend:<br />
AgC to S = Silver-Impregnated Carbon to Silver<br />
HD = Heavy-Duty<br />
EHD = Extra Heavy-Duty, with magnetic blowouts<br />
W 1<br />
See the 2 notes on the next page.<br />
— 56012-108-01 N/A<br />
S-SMD 56012-108-46 N/A<br />
S to S = Silver to Silver<br />
MD = Medium Duty<br />
SCdO = Silver Cadmium Oxide<br />
P1457, Rev. Nov/07 7–56 <strong>Alstom</strong> Signaling Inc.
Parts Catalog<br />
NOTE 1<br />
When ordering contact groups shown in Table 7–14 Ref. M, Q, R, S or W,<br />
be sure to identify the drawing number of the relay on which the contact<br />
group will be used, so magnets can be magnetized and assembled<br />
correctly.<br />
NOTE 2<br />
Be aware that the following references have a minimum current rating of<br />
0.300 amps for reliable contact operation:<br />
- reference E, 2FB combination with front-back contacts of SCdO (HD)<br />
- reference Q, 1F-1B combination with front and back contacts of SCdO to<br />
SCdO (EHD)<br />
- reference V, 3F combination with SCdO (HD) contacts<br />
- reference W, 1F SCdO to SCdO<br />
Table 7–15. B Relay Contact Group Pusher and Clip Part Numbers<br />
Ref. Description Drawing No. Catalog No.<br />
1 PUSHER, for contact groups Refs. A, B, D,<br />
E, F, G, H, J, P, S T, U, V and W (Fig 7-14)<br />
1A<br />
CLIP, for above, two required (USE ONLY<br />
ONCE, DO NOT REUSE)<br />
2 PUSHER, for contact group Ref. K (Fig 7-<br />
14)<br />
2A<br />
CLIP, for above, two required (USE ONLY<br />
ONCE, DO NOT REUSE)<br />
3 PUSHER, for contact group Refs. M, N, Q<br />
and R (Fig 7-14)<br />
3A<br />
CLIP, for above, two required (USE ONLY<br />
ONCE, DO NOT REUSE)<br />
55863-089-00 P62-0811<br />
56025-001-00 P62-0577<br />
55863-050-00 P62-0463<br />
56025-001-00 P62-0577<br />
55863-009-00 P62-0458<br />
56025-001-00 P62-0577<br />
P1457, Rev. Nov/07 7–57 <strong>Alstom</strong> Signaling Inc.
Parts Catalog<br />
7.17. B RELAY PLUGBOARDS AND INSTALLATION SUPPLIES<br />
Table 7–16 lists the common B relay installation materials. The items listed may be<br />
used during the installation procedure, depending on the specific relay. Figures 7–16<br />
and 7–17 show example materials. Kits include plugboard, two relay mounting guide<br />
rods, terminals, insulators, current test terminal and mounting bolts.<br />
For a listing of installation tools and a tool kit, refer to Appendix C.<br />
P1457, Rev. Nov/07 7–58 <strong>Alstom</strong> Signaling Inc.
Parts Catalog<br />
, 3B<br />
31<br />
E<br />
25A<br />
25B<br />
30<br />
11A<br />
Figure 7–16. B Relay Plugboards and Installation Supplies<br />
P1457, Rev. Nov/07 7–59 <strong>Alstom</strong> Signaling Inc.
Parts Catalog<br />
WRAP AROUND<br />
WIRE TAGS<br />
(REF. 32)<br />
SOLDER<br />
TERMINAL<br />
(REF. 3)<br />
CRIMP<br />
TERMINAL<br />
(REF. 3A, 3B)<br />
INSULATOR<br />
(REF. 2)<br />
SLEEVE<br />
(REF. 29)<br />
BLANK B1<br />
PLUGBOARD<br />
(REF. 7)<br />
B2 PLUGBOARD<br />
KIT<br />
(REF. D)<br />
B1 PLUGBOARD<br />
KIT<br />
(REF. C)<br />
BLANK B2<br />
PLUGBOARD<br />
(REF. 19)<br />
Figure 7–17. Example Installation Supplies<br />
Table 7–16. B Relay Plugboard and Terminal Board Part Numbers<br />
Ref. Description Drawing No. Catalog No.<br />
A<br />
B<br />
TERMINAL, BOARD COMPLETE, with<br />
fourteen terminal posts, includes post nuts<br />
and washers, and mounting hardware<br />
TERMINAL BOARD COMPLETE, includes<br />
thirty-five terminal posts, includes post nuts<br />
and washers and mounting hardware<br />
C PLUGBOARD KIT, for all <strong>Type</strong> B, Size 1<br />
<strong>Relays</strong>, includes insulators Ref. 2; solder<br />
terminals Ref. 3; relay mounting studs with<br />
nuts and washers, Refs. 4, 5, 6, 8, 9;<br />
plugboard Ref. 7; current test post Ref. F;<br />
mounting bolts, nuts and washers Refs. 8,<br />
20, 22 and 23. Does not include registration<br />
plates or voltage post, Ref. E<br />
C1<br />
PLUGBOARD KIT, Same as Ref. C except<br />
has #16-20 AWG crimp type terminals<br />
59861-005-01 P62-0680<br />
59861-002-01 P62-0679<br />
59686-005-01 A62-0506<br />
59686-005-05 A62-0586<br />
P1457, Rev. Nov/07 7–60 <strong>Alstom</strong> Signaling Inc.
Parts Catalog<br />
Table 7–16. B Relay Plugboard and Terminal Board Part Numbers (Cont.)<br />
Ref. Description Drawing No. Catalog No.<br />
C2<br />
C3<br />
PLUGBOARD KIT, Same as Ref. C except<br />
has #10-14 AWG crimp type terminals<br />
PLUGBOARD KIT, Same as Ref. C except<br />
without terminals Ref. 3<br />
D PLUGBOARD KIT, for all <strong>Type</strong> B, Size 2<br />
<strong>Relays</strong> except B2 Vane, Microchron Timer<br />
and VTB, includes insulators Ref. 2; solder<br />
terminals Ref. 3; relay mounting studs with<br />
nuts and washers Refs. 4, 5, 6, 8, 9;<br />
plugboard Ref. 19, current test post Ref. F,<br />
mounting bolts, nuts and washers Refs. 8,<br />
20, 22 and 23. Does not include registration<br />
plates, voltage post, Ref. E, or terminal<br />
block, Ref.10<br />
D1<br />
D2<br />
D3<br />
D4<br />
D5<br />
D6<br />
D7<br />
D8<br />
D9<br />
E<br />
PLUGBOARD KIT, Same as Ref. D except<br />
has #16-20 AWG crimp type terminals<br />
PLUGBOARD KIT, Same as Ref. D except<br />
has #10-14 AWG crimp type terminals<br />
PLUGBOARD KIT, Same as Ref. D except<br />
without terminals Ref. 3<br />
PLUGBOARD KIT, Same as Ref. D except<br />
for <strong>Type</strong> B2 Vane Relay<br />
PLUGBOARD KIT, Same as Ref. D4 except<br />
has #16-20 AWG crimp type terminals<br />
PLUGBOARD KIT, Same as Ref. D4 except<br />
has #10-14 AWG crimp type terminals<br />
PLUGBOARD KIT, Same as Ref. D4 except<br />
without terminals<br />
PLUGBOARD KIT, Same as Ref. D except<br />
for Microchron II Timer Relay<br />
PLUGBOARD KIT, Same as Ref. D8 except<br />
with #16-20 AWG crimp type terminals<br />
VOLTAGE TEST POST COMPLETE,<br />
includes screw, nuts, washers and terminal,<br />
for measuring coil(s) voltage<br />
59686-005-04 A62-0650<br />
59686-005-08 A62-0686<br />
59686-007-01 A62-0508<br />
59686-007-06 A62-0587<br />
59686-007-04 A62-0635<br />
59686-007-10 A62-0685<br />
59686-007-02 A62-0509<br />
59686-007-07 A62-0588<br />
59686-007-05 A62-0636<br />
59686-007-16 N/A<br />
59686-007-12 A62-0675<br />
59686-007-14 A62-0692<br />
42788-001-02 A62-0515<br />
P1457, Rev. Nov/07 7–61 <strong>Alstom</strong> Signaling Inc.
Parts Catalog<br />
Table 7–16. B Relay Plugboard and Terminal Board Part Numbers (Cont.)<br />
Ref. Description Drawing No. Catalog No.<br />
F CURRENT TEST POST COMPLETE,<br />
includes screw, nuts, washers, bushing and<br />
connector, for opening coil circuit to<br />
measure coil(s) current<br />
42788-001-01 A62-0525<br />
G<br />
H<br />
J<br />
J1<br />
J2<br />
CURRENT TEST POST FOR VTB<br />
RELAYS, includes screw, nuts , washers,<br />
for measuring coil(s) current<br />
VOLTAGE TEST POST FOR VTB RELAY,<br />
includes screw, nuts , washers, for<br />
measuring coil(s) voltage<br />
PLUGBOARD KIT FOR VTB RELAY, Size<br />
2, includes insulators Ref. 2; solder<br />
terminals Ref. 3; relay mounting studs with<br />
nuts and washers, Refs. 4, 5, 6, 8, 9;<br />
plugboard Ref. 30; (2) current test posts<br />
Ref. F; (2) voltage test posts Ref. E;<br />
mounting bolts; nuts and washers refs. 8,<br />
20, 22, and 23. Does not include<br />
registration plates.<br />
PLUGBOARD KIT, Same as Ref. J except<br />
with #10-14 AWG crimp type terminals<br />
PLUGBOARD KIT, Same as Ref. J except<br />
with #16-20 AWG crimp type terminals<br />
2 INSULATOR, for holding terminal Ref. 3 in<br />
position on plugboard<br />
3 TERMINAL, solder type, two required per<br />
insulator<br />
3A<br />
3B<br />
TERMINAL, crimp type for #16 – 20 AWG<br />
wire, two required per insulator<br />
TERMINAL, crimp type for #10 – 14 AWG<br />
wire, two required per insulator<br />
42788-002-01 A62-0328<br />
42788-002-02 A62-0329<br />
59686-014-01 A62-0510<br />
59686-014-02 A62-0651<br />
59686-014-03 A62-0652<br />
55862-024-00 P62-0457<br />
55871-019-00 P62-0466<br />
55871-074-00 P03-0326<br />
55871-098-00 P03-0327<br />
4 NUT, knurled, for holding relay to plugboard 00846-029-00 P62-0144<br />
5 STUD, for holding relays except VTB Relay<br />
to plugboards<br />
5A<br />
STUD, Same as Ref. 5 except for VTB<br />
Relay<br />
48813-006-00 P62-0346<br />
48813-007-00 P62-0347<br />
P1457, Rev. Nov/07 7–62 <strong>Alstom</strong> Signaling Inc.
Parts Catalog<br />
Table 7–16. B Relay Plugboard and Terminal Board Part Numbers (Cont.)<br />
Ref. Description Drawing No. Catalog No.<br />
6 NUT, for locking nut Ref. 4 01472-008-00 P62-0166<br />
7 PLUGBOARD, only, for all <strong>Type</strong> B1 <strong>Relays</strong>,<br />
does not include terminals, insulators, test<br />
posts or mounting studs<br />
56022-049-00 P62-0572<br />
8 WASHER, flat .266" I.D., .500" O.D., .031"<br />
thick<br />
01250-011-ON P50-0157<br />
9 NUT, .250" -28 hex, elastic stop 42333-065-00 P62-0320<br />
10 TERMINAL BLOCK COMPLETE 46048-053-01 P62-0339<br />
11 SCREW, .164" -32 x .75" long. slotted pan<br />
head self tapping (For mounting Ref. 10<br />
block)<br />
11A WASHER, internal tooth lock .164" I.D.,<br />
.340" O.D., .023" thick<br />
12 SCREW, used as terminal post for current<br />
and voltage test posts<br />
07608-224-ON P62-0596<br />
53029-068-00 P62-0402<br />
00376-009-00 P62-0107<br />
13 NUT, .242" -24 x .19" thick, hex 42839-005-00 P62-0333<br />
14 WASHER, for terminal posts, .266" I.D.,<br />
.188" O.D., .04" thick<br />
01225-002-00 P76-0108<br />
15 NUT, .242" -24 x .31 " thick, hex 42843-001-00 P76-0131<br />
16 NUT, .242" -24 x .375", spanner, for current<br />
test post<br />
17 CONNECTOR, for current test post<br />
terminals<br />
00578-015-00 P62-0129<br />
04906-126-00 P62-0190<br />
18 BUSHING, insulating, for current test post 06347-031-00 P62-0203<br />
19 PLUGBOARD, only, for all <strong>Type</strong> B, Size 2<br />
<strong>Relays</strong>, does not include terminals,<br />
insulators, test post or mounting screws<br />
20 SCREW, .250" -28 x 1.25" long., fillister<br />
head<br />
22 WASHER, .250" I.D., .487" O.D., .062"<br />
thick, spring lock<br />
56022-021-00 P62-0571<br />
55470-004-00 P62-0448<br />
01273-006-ON P81-0121<br />
P1457, Rev. Nov/07 7–63 <strong>Alstom</strong> Signaling Inc.
Parts Catalog<br />
Table 7–16. B Relay Plugboard and Terminal Board Part Numbers (Cont.)<br />
Ref. Description Drawing No. Catalog No.<br />
23 NUT, .250" -28 X .22" thick, hex 01472-003-00 P62-0167<br />
24 PLATE, filler for blank spaces 42812-000-00 P62-0331<br />
25 SCREW, .250" -28 x .75" long. fillister head 55470-008-00 P62-0449<br />
25A NUT, .250" -28 x .22" thick, hex 01472-003-00 P62-0167<br />
25B WASHER, .250" I.D., .487" O.D., .062"<br />
thick, spring lock<br />
01273-006-ON P81-0121<br />
26 CONNECTOR, 1" centers, for Ref. B 04906-020-00 P76-0110<br />
26 CONNECTOR, 1.250" centers, horizontal<br />
for Ref. A<br />
26 CONNECTOR, 1.125" centers, vertical for<br />
Ref. A<br />
27 BOARD, designation, single, without<br />
lettering<br />
28 BOARD, designation, single, without<br />
lettering<br />
04906-006-00 P03-0107<br />
04906-021-00 P03-0108<br />
59683-010-01 P62-0766<br />
59683-006-01 P62-0767<br />
29 SLEEVE, rubber, insulating 35189-033-00 P62-0298<br />
30 PLUGBOARD ONLY, for VTB, size 2 relay,<br />
does not include terminals, insulators, test<br />
post or mounting screws<br />
31 AAR RING CRIMP TERMINAL, Red, #16-<br />
22 AWG for Tefzel wire<br />
31 AAR RING CRIMP TERMINAL, Blue, #14-<br />
16 AWG for Tefzel wire<br />
31 AAR RING CRIMP TERMINAL, Yellow,<br />
#10-12 AWG for Tefzel wire<br />
32 WRAP AROUND WIRE TAGS, for B1<br />
relays, columns 1-3<br />
32 WRAP AROUND WIRE TAGS, for B2<br />
relays, columns 4-6<br />
56022-031-00 N/A<br />
59825-223-00 N/A<br />
59825-222-00 N/A<br />
59825-199-00 N/A<br />
59539-405-00 P03-0305<br />
59539-406-00 P03-0306<br />
P1457, Rev. Nov/07 7–64 <strong>Alstom</strong> Signaling Inc.
Parts Catalog<br />
7.18. B RELAY REGISTRATION PLATES AND GASKETS<br />
Figure 7–18 and Table 7–17 summarize the B relay registration plates and gaskets for<br />
most B relays. See Figure 7–13 and Table 7–11 for the VTB Polar Biased Relay<br />
registration plate and gaskets.<br />
P1457, Rev. Nov/07 7–65 <strong>Alstom</strong> Signaling Inc.
Parts Catalog<br />
9<br />
8<br />
7 7A<br />
8<br />
7C<br />
7B<br />
A A1 A2, A3 A4<br />
8<br />
7B<br />
7A<br />
8<br />
7B<br />
7A<br />
9<br />
THERE ARE 4 VERSIONS OF THE B<br />
RELAY REGISTRATION PLATE.<br />
B<br />
THERE IS 1 PLUGBOARD<br />
REGISTRATION PLATE.<br />
Figure 7–18. B Relay Registration Plates and Gaskets<br />
P1457, Rev. Nov/07 7–66 <strong>Alstom</strong> Signaling Inc.
Parts Catalog<br />
Table 7–17. B Relay Registration Plate and Gasket Part Numbers<br />
Ref. Description Drawing No. Catalog No.<br />
A REGISTRATION PLATE ASSEMBLY, 58879-000-51* P62-0720*<br />
includes plugboard and relay registration<br />
plates and mounting hardware, for all <strong>Type</strong><br />
B, Size 1 relays except code-responsive<br />
and magnetic-stick<br />
A1 Same as Ref. A, except for code-responsive 58879-005-05* P62-0670*<br />
and magnetic-stick relays<br />
A2 REGISTRATION PLATE ASSEMBLY,<br />
includes plugboard and relay registration<br />
plates and mounting hardware, for all <strong>Type</strong><br />
B, Size 2 code transmitter<br />
58879-005-04* P62-0671*<br />
A3 Same as Ref. A, except for <strong>Type</strong> B, Size 2<br />
Microchron II Timer relays<br />
A4 Same as Ref. A, except for <strong>Type</strong> B, Size 2<br />
vane relay<br />
A5<br />
B<br />
Same as Ref. A, except for VTB relay, see<br />
Figure 7–13<br />
PLUGBOARD REGISTRATION PLATE<br />
ASSEMBLY, includes one registration plate<br />
with 2 screws (Ref. 8)<br />
58879-000-53* P62-0668*<br />
58879-000-05* P62-0669*<br />
58879-009-51 N/A<br />
58876-000-51 N/A<br />
1 Gasket, for cover of <strong>Type</strong> B1 relays 13014-221-00 P62-0225<br />
1A<br />
Same as Ref. 1, except for cover of <strong>Type</strong><br />
B2 relays<br />
2 SHIELD, for back of contact blocks, for all<br />
relays except <strong>Type</strong> B2 vane<br />
2A<br />
2B<br />
Same as Ref. 2, except for contact spaces<br />
4 to 6 of <strong>Type</strong> B2 vane<br />
Same as Ref. 2, except for contact spaces<br />
1 to 3 of <strong>Type</strong> B2 vane<br />
3 SCREW, for attaching contact group, .138-<br />
40 x .625" long, flat head<br />
13014-222-00 P62-0226<br />
50737-091-00 P62-0227<br />
13014-279-00 P62-0228<br />
13014-280-00 P62-0229<br />
03306-120-ON P62-0200<br />
5 GASKET, for coils of <strong>Type</strong> B1 and B2 30646-005-00 P62-0276<br />
neutral relays<br />
6 GASKET, for front of cover 30646-012-00 P62-0277<br />
* When ordering registration plates include the Catalog or Drawing Number of the relay that the<br />
registration plates are intended.<br />
P1457, Rev. Nov/07 7–67 <strong>Alstom</strong> Signaling Inc.
Parts Catalog<br />
Table 7–17. B Relay Registration Plate and Gasket Part Numbers (Cont.)<br />
Ref. Description Drawing No. Catalog No.<br />
7 SCREW, stainless steel, .164-32 x 1.0" long<br />
slotted pan head, for fastening registration<br />
plate to base of <strong>Type</strong> B1 relay<br />
03608-032-ON P76-0257<br />
7A SCREW, stainless steel, .164-32 x 1.187"<br />
long slotted flat head, for fastening<br />
registration plate to base of <strong>Type</strong> B2 relay<br />
18746-033-00 P62-0249<br />
7B NUT, for Ref. 7, .164-32, elastic stop 42333-046-00 N/A<br />
7C<br />
WASHER, for Ref. 7, .174" I.D., .293" O.D.,<br />
.040" thick, lock<br />
8 SCREW, stainless steel, .138-32 x<br />
.375"long, slotted flat head<br />
9 SCREW, stainless steel, .138-32 x .50"long,<br />
slotted flat head self tapping<br />
01273-022-ON<br />
N/A<br />
03306-012-ON P62-0193<br />
06306-016-ON P62-0192<br />
P1457, Rev. Nov/07 7–68 <strong>Alstom</strong> Signaling Inc.
Relay Engineering Data (ED) sheet Lists<br />
A. APPENDIX A – RELAY ENGINEERING DATA (ED) SHEET LIST<br />
A.1.<br />
GENERAL<br />
This appendix includes two tables listing the B relay Engineering Data (ED) sheet<br />
numbers. For your convenience, the information is provided in two formats. Table A–1<br />
provides the ED sheet numbers by catalog number and cross-references drawing<br />
number. Table A–2 provides the ED sheet numbers by drawing number and crossreferences<br />
catalog number.<br />
NOTE<br />
ED60-1 is a generic ED sheet that applies to most relays. It provides<br />
general instructions covering customer adjustments and tests for neutral,<br />
biased-neutral, and polar relays.<br />
To determine a relay's drawing or catalog number, refer to Heading 1.2.2., Identification.<br />
P1457, Rev. Nov/07 A–1 <strong>Alstom</strong> Signaling Inc.
Relay Engineering Data (ED) sheet Lists<br />
Table A–1. ED sheets Listed By Catalog Number<br />
Catalog No. Drawing No. ED sheet No.<br />
A62-120 56001-921-09 ED56601-921-09<br />
A62-122 56001-921-07 ED56001-921-07<br />
A62-125 56001-922-07 ED56001-922-07<br />
A62-126 56001-921-02 ED56001-921-02<br />
A62-129 56001-925-10 ED60-143<br />
A62-130 56001-921-05 ED56001-921-05<br />
A62-131 56001-921-14 ED56001-921-14<br />
A62-132 56001-921-10 ED56001-921-10<br />
A62-140 56001-922-05 ED60-274<br />
A62-145 56002-719-01 ED56002-719-01<br />
A62-150 56002-720-01 ED56002-720-01<br />
A62-155 56001-663-07 ED56001-663-07<br />
A62-156 56001-672-01 ED60-189<br />
A62-157 58640-172-03 ED60-108<br />
A62-161 56001-672-03 ED60-256<br />
A62-162 56001-674-01 ED60-113<br />
A62-163 56001-674-02 ED56001-674-02<br />
A62-164 58640-179-22 ED58640-179-22<br />
A62-170 57490-095-05 ED57490-095-05<br />
A62-171 57490-096-04 ED57490-096-04<br />
A62-172 57490-097-04 ED57490-097-04<br />
A62-173 57490-098-01 ED57490-098-01<br />
A62-175 57490-091-05 ED57490-091-05<br />
A62-176 57490-092-01 ED57490-092-01<br />
A62-177 57490-093-01 ED57490-093-01<br />
A62-178 57490-094-01 ED57490-094-01<br />
A62-205 56001-880-01 ED56001-880-01<br />
A62-211 56001-785-35 ED56001-785-35<br />
A62-213 56001-785-55 ED56001-785-55<br />
A62-215 56001-785-59 ED56001-785-59<br />
A62-217 56001-785-61 ED56001-785-61<br />
P1457, Rev. Nov/07 A–2 <strong>Alstom</strong> Signaling Inc.
Relay Engineering Data (ED) sheet Lists<br />
Table A–1. ED sheets Listed By Catalog Number (Cont.)<br />
Catalog No. Drawing No. ED sheet No.<br />
A62-221 56001-873-01 ED56001-873-01<br />
A62-231 56001-785-10 ED56001-785-10<br />
A62-236 56001-865-01 ED56001-865-01<br />
A62-245 58645-172-06 ED58645-172-06<br />
A62-246 58645-172-04 ED60-110<br />
A62-247 58645-172-05 ED60-163<br />
A62-260 56001-714-03 ED60-257<br />
A62-261 56001-714-01 ED60-286<br />
A62-262 56001-762-02 ED56001-762-02<br />
A62-275 56001-787-02 ED60-129<br />
A62-276 56001-787-01 ED56001-787-01<br />
A62-277 56001-783-02 ED60-131<br />
A62-293 56001-785-91 ED60-101<br />
A62-295 56001-785-31 ED60-277<br />
A62-296 56001-762-01 ED60-297<br />
A62-300 56001-789-05 ED60-130<br />
A62-305 56001-785-37 ED60-194<br />
A62-308 56001-783-01 ED56001-783-01<br />
A62-309 56001-822-06 ED56001-822-06<br />
A62-310 56001-822-02 ED56001-822-02<br />
A62-311 56001-822-01 ED60-195<br />
A62-312 56001-785-83 ED60-219<br />
A62-314 56001-785-12 ED60-145<br />
A62-315 56001-872-01 ED56001-872-01<br />
A62-317 56001-789-03 ED60-152<br />
A62-318 56001-875-01 ED56001-875-01<br />
A62-319 56001-787-05 ED56001-787-05<br />
A62-320 56001-908-01 ED60-138<br />
A62-323 56001-670-13 ED60-215<br />
A62-324 56001-911-01 ED60-228<br />
A62-325 56001-838-01 ED60-295<br />
P1457, Rev. Nov/07 A–3 <strong>Alstom</strong> Signaling Inc.
Relay Engineering Data (ED) sheet Lists<br />
Table A–1. ED sheets Listed By Catalog Number (Cont.)<br />
Catalog No. Drawing No. ED sheet No.<br />
A62-330 56002-703-01 ED56002-703-01<br />
A62-331 56002-710-01 ED60-270<br />
A62-335 56001-909-01 ED56001-909-01<br />
A62-341 56001-790-01 ED56001-790-01<br />
A62-345 56001-736-01 ED60-287<br />
A62-350 56001-851-01 ED60-140<br />
A62-353 56001-830-01 ED56001-830-01<br />
A62-355 56001-808-26 ED56001-808-26<br />
A62-357 56001-792-02 ED56001-792-02<br />
A62-358 56001-778-01 ED56001-778-01<br />
A62-359 56001-780-01 ED56001-780-01<br />
A62-360 56001-774-01 ED56001-774-01<br />
A62-365 56001-904-01 ED60-172<br />
A62-369 56001-817-01 ED56001-817-01<br />
A62-370 56001-792-01 ED56001-792-01<br />
A62-372 56001-785-85 ED60-205<br />
A62-380 56001-759-01 ED56001-759-01<br />
A62-401 56001-721-01 ED60-319<br />
A62-406 56001-745-01 ED56001-745-01<br />
A62-407 56001-745-02 ED56001-745-02<br />
A62-410 56001-785-36 ED56001-785-36<br />
A62-415 56001-738-01 ED60-288<br />
A62-417 56001-901-01 ED60-211<br />
A62-424 56001-785-99 ED56001-785-99<br />
A62-425 56001-785-80 ED56001-785-80<br />
A62-427 56001-917-01 ED56001-917-01<br />
A62-429 56001-926-01 ED56001-926-01<br />
A62-430 56001-916-02 ED56001-916-02<br />
A62-431 56001-916-01 ED56001-916-01<br />
A62-432 56001-785-01 ED56001-785-01<br />
A62-433 56001-937-01 ED60-328<br />
P1457, Rev. Nov/07 A–4 <strong>Alstom</strong> Signaling Inc.
Relay Engineering Data (ED) sheet Lists<br />
Table A–1. ED sheets Listed By Catalog Number (Cont.)<br />
Catalog No. Drawing No. ED sheet No.<br />
A62-485 56005-100-08 ED60-170<br />
A62-486 56005-100-09 ED60-126<br />
A62-490 59301-101-01 ED60-812<br />
A62-491 59301-151-02 ED59301-151-02<br />
A62-492 59301-151-05 ED59301-151-05<br />
A62-493 59301-201-12 ED59301-201-12<br />
A62-494 59301-201-14 ED59301-201-14<br />
A62-495 59301-251-01 ED59301-251-01<br />
A62-498 59301-151-04 ED59301-151-04<br />
A62-519 56001-679-06 ED56001-679-06<br />
A62-519 56001-679-06 ED56001-679-06<br />
A62-522 56001-931-02 ED56001-931-02<br />
A62-530 59301-251-04 ED59301-251-04<br />
A62-532 59301-251-02 ED59301-251-02<br />
A62-533 59301-201-01 ED59301-201-01<br />
A62-534 59301-201-03 ED59301-201-03<br />
A62-536 59301-101-02 ED59301-101-02<br />
A62-537 59301-151-06 ED59301-151-06<br />
A62-538 59301-101-04 ED60-802<br />
A62-541 56002-723-01 ED56002-723-01<br />
A62-542 56001-950-01 ED56001-950-01<br />
A62-543 56001-922-02 ED56001-922-02<br />
A62-544 56001-763-02 ED56001-763-02<br />
A62-545 56001-785-21 ED56001-785-21<br />
A62-546 56001-881-01 ED56001-881-01<br />
A62-547 56005-100-01 ED56005-100-01<br />
A62-548 56005-100-18 ED56005-100-18<br />
A62-549 56001-922-01 ED56001-922-01<br />
A62-550 56001-922-10 ED60-336<br />
A62-552 56001-927-01 ED56001-927-01<br />
A62-553 56001-928-01 ED56001-928-01<br />
P1457, Rev. Nov/07 A–5 <strong>Alstom</strong> Signaling Inc.
Relay Engineering Data (ED) sheet Lists<br />
Table A–1. ED sheets Listed By Catalog Number (Cont.)<br />
Catalog No. Drawing No. ED sheet No.<br />
A62-554 56001-932-01 ED56001-932-01<br />
A62-555 56001-933-01 ED56001-933-01<br />
A62-557 56001-762-04 ED56001-762-04<br />
A62-559 56001-910-08 ED60-268<br />
A62-560 56001-914-01 ED60-155<br />
A62-565 56001-709-06 ED56001-709-06<br />
A62-566 56001-935-01 ED56001-935-01<br />
A62-575 56001-672-05 ED56001-672-05<br />
A62-578 56001-946-01 ED56001-946-01<br />
A62-579 56001-947-01 ED56001-947-01<br />
A62-580 56001-951-01 ED56001-951-01<br />
A62-589 56001-670-10 ED56001-670-10<br />
A62-595 58640-172-01 ED58640-172-01<br />
A62-597 56005-100-20 ED56005-100-20<br />
A62-598 58640-171-04 ED58640-171-04<br />
A62-599 56001-952-01 ED56001-952-01<br />
A62-601 56001-886-01 ED56001-886-01<br />
A62-603 56001-938-01 ED60-106<br />
A62-604 56001-942-01 ED56001-942-01<br />
A62-605 56001-943-01 ED56001-943-01<br />
A62-606 56002-717-02 ED60-253<br />
A62-607 56002-722-01 ED56002-722-01<br />
A62-608 56001-953-01 ED56001-953-01<br />
A62-610 58640-172-04 ED58640-172-04<br />
A62-613 56001-956-01 ED56001-956-01<br />
A62-614 56001-957-01 ED56001-957-01<br />
A62-616 56001-959-01 ED56001-959-01<br />
A62-617 56001-960-01 ED56001-960-01<br />
A62-620 56002-725-01 ED56002-725-01<br />
A62-622 58640-171-03 ED58640-171-03<br />
A62-623 56001-956-02 ED56001-956-02<br />
P1457, Rev. Nov/07 A–6 <strong>Alstom</strong> Signaling Inc.
Relay Engineering Data (ED) sheet Lists<br />
Table A–1. ED sheets Listed By Catalog Number (Cont.)<br />
Catalog No. Drawing No. ED sheet No.<br />
A62-624 56001-921-04 ED56001-921-04<br />
A62-626 58645-172-08 ED58645-172-08<br />
A62-629 59301-251-05 ED59301-251-05<br />
A62-633 56001-961-01 ED56001-961-01<br />
A62-634 56001-962-01 ED56001-962-01<br />
A62-637 56001-963-01 ED56001-963-01<br />
A62-638 58645-172-09 ED58645-172-09<br />
A62-639 56001-965-01 ED56001-965-01<br />
A62-642 57490-121-01 ED57490-121-01<br />
A62-643 57490-122-01 ED57490-122-01<br />
A62-644 56005-100-21 ED56005-100-21<br />
A62-654 56001-968-01 ED56001-968-01<br />
A62-655 56001-670-02 ED56001-670-02<br />
A62-658 56001-969-01 ED56001-969-01<br />
A62-659 56001-664-05 ED56001-664-05<br />
A62-660 56001-664-06 ED56001-664-06<br />
A62-661 56001-970-01 ED56001-970-01<br />
A62-662 59301-151-01 ED59301-151-01<br />
A62-663 59301-200-03 ED60-811<br />
A62-664 59301-101-08 ED60-814<br />
A62-665 56001-945-01 ED56001-945-01<br />
A62-667 56001-971-01 ED56001-971-01<br />
A62-669 56001-972-01 ED56001-972-01<br />
A62-670 56001-973-01 ED56001-973-01<br />
A62-672 56001-975-01 ED56001-975-01<br />
A62-676 58640-179-29 ED58640-179-29<br />
A62-677 56001-944-01 ED60-326<br />
A62-678 56001-672-02 ED60-203<br />
A62-679 56001-675-01 ED56001-675-01<br />
A62-680 58640-169-06 ED58640-169-06<br />
A62-681 56001-978-01 ED56001-978-01<br />
P1457, Rev. Nov/07 A–7 <strong>Alstom</strong> Signaling Inc.
Relay Engineering Data (ED) sheet Lists<br />
Table A–1. ED sheets Listed By Catalog Number (Cont.)<br />
Catalog No. Drawing No. ED sheet No.<br />
A62-691 50800-101-01 ED50800-101-01<br />
A62-694 56005-100-19 ED56005-100-19<br />
A62-715 56001-927-02 ED56001-927-02<br />
A62-716 56001-675-02 ED56001-675-02<br />
A62-717 56001-762-08 ED56001-762-08<br />
A62-718 56001-981-01 ED56001-981-01<br />
A62-719 56001-911-02 ED56001-911-02<br />
A62-720 56001-922-13 ED56001-922-13<br />
A62-721 56001-926-03 ED56001-926-03<br />
A62-722 56001-928-02 ED56001-928-02<br />
A62-723 56005-100-22 ED56005-100-22<br />
A62-724 56005-100-23 ED56005-100-23<br />
A62-725 57490-080-10 ED57490-080-10<br />
A62-733 57490-119-02 ED57490-119-02<br />
A62-736 56001-982-01 ED56001-982-01<br />
A62-740 57490-080-09 ED57490-080-09<br />
A62-741 56001-983-01 ED56001-983-01<br />
A62-742 50800-102-01 ED50800-102-01<br />
A62-743 56001-984-01 ED56001-984-01<br />
A62-744 50800-101-02 ED50800-101-02<br />
A62-761 50800-103-01 ED50800-103-01<br />
A62-763 56001-986-01 ED56001-986-01<br />
A62-764 56001-987-01 ED56001-987-01<br />
A62-765 56001-745-03 ED56001-745-03<br />
A62-766 56001-916-03 ED56001-916-03<br />
A62-767 56001-921-15 ED56001-921-15<br />
---- 56001-988-01 ED56001-988-01<br />
--- 50800-104-01 ED50800-104-01<br />
P1457, Rev. Nov/07 A–8 <strong>Alstom</strong> Signaling Inc.
Relay Engineering Data (ED) sheet Lists<br />
Table A–2. ED sheets Listed By Drawing Number<br />
Drawing No. Catalog No. ED sheet No.<br />
50800-101-01 A62-691 ED50800-101-01<br />
50800-101-02 A62-744 ED50800-101-02<br />
50800-103-01 A62-761 ED50800-103-01<br />
50800-104-01 --- ED50800-104-01<br />
56001-663-07 A62-155 ED56001-663-07<br />
56001-664-05 A62-659 ED56001-664-05<br />
56001-664-06 A62-660 ED56001-664-06<br />
56001-670-02 A62-655 ED56001-670-02<br />
56001-670-10 A62-589 ED56001-670-10<br />
56001-670-13 A62-323 ED60-215<br />
56001-672-01 A62-156 ED60-189<br />
56001-672-02 A62-678 ED60-203<br />
56001-672-03 A62-161 ED60-256<br />
56001-672-05 A62-575 ED56001-672-05<br />
56001-674-01 A62-162 ED60-113<br />
56001-674-02 A62-163 ED56001-674-02<br />
56001-675-01 A62-679 ED56001-675-01<br />
56001-675-02 A62-716 ED56001-675-02<br />
56001-679-06 A62-519 ED56001-679-06<br />
56001-679-06 A62-519 ED56001-679-06<br />
56001-709-06 A62-565 ED56001-709-06<br />
56001-714-01 A62-261 ED60-286<br />
56001-714-03 A62-260 ED60-257<br />
56001-721-01 A62-401 ED60-319<br />
56001-736-01 A62-345 ED60-287<br />
56001-738-01 A62-415 ED60-288<br />
56001-745-01 A62-406 ED56001-745-01<br />
56001-745-02 A62-407 ED56001-745-02<br />
56001-745-03 A62-765 ED56001-745-03<br />
56001-759-01 A62-380 ED56001-759-01<br />
56001-762-01 A62-296 ED60-297<br />
P1457, Rev. Nov/07 A–9 <strong>Alstom</strong> Signaling Inc.
Relay Engineering Data (ED) sheet Lists<br />
Table A–2. ED sheets Listed By Drawing Number (Cont.)<br />
Drawing No. Catalog No. ED sheet No.<br />
56001-762-02 A62-262 ED56001-762-02<br />
56001-762-04 A62-557 ED56001-762-04<br />
56001-762-08 A62-717 ED56001-762-08<br />
56001-763-02 A62-544 ED56001-763-02<br />
56001-774-01 A62-360 ED56001-774-01<br />
56001-778-01 A62-358 ED56001-778-01<br />
56001-780-01 A62-359 ED56001-780-01<br />
56001-783-01 A62-308 ED56001-783-01<br />
56001-783-02 A62-277 ED60-131<br />
56001-785-01 A62-432 ED56001-785-01<br />
56001-785-10 A62-231 ED56001-785-10<br />
56001-785-12 A62-314 ED60-145<br />
56001-785-21 A62-545 ED56001-785-21<br />
56001-785-31 A62-295 ED60-277<br />
56001-785-35 A62-211 ED56001-785-35<br />
56001-785-36 A62-410 ED56001-785-36<br />
56001-785-37 A62-305 ED60-194<br />
56001-785-41 A62-684 ED60-225<br />
56001-785-55 A62-213 ED56001-785-55<br />
56001-785-59 A62-215 ED56001-785-59<br />
56001-785-61 A62-217 ED56001-785-61<br />
56001-785-80 A62-425 ED56001-785-80<br />
56001-785-83 A62-312 ED60-219<br />
56001-785-85 A62-372 ED60-205<br />
56001-785-91 A62-293 ED60-101<br />
56001-785-99 A62-424 ED56001-785-99<br />
56001-787-01 A62-276 ED56001-787-01<br />
56001-787-02 A62-275 ED60-129<br />
56001-787-05 A62-319 ED56001-787-05<br />
56001-789-03 A62-317 ED60-152<br />
56001-789-05 A62-300 ED60-130<br />
P1457, Rev. Nov/07 A–10 <strong>Alstom</strong> Signaling Inc.
Relay Engineering Data (ED) sheet Lists<br />
Table A–2. ED sheets Listed By Drawing Number (Cont.)<br />
Drawing No. Catalog No. ED sheet No.<br />
56001-790-01 A62-341 ED56001-790-01<br />
56001-792-01 A62-370 ED56001-792-01<br />
56001-792-02 A62-357 ED56001-792-02<br />
56001-808-26 A62-355 ED56001-808-26<br />
56001-817-01 A62-369 ED56001-817-01<br />
56001-822-01 A62-311 ED60-195<br />
56001-822-02 A62-310 ED56001-822-02<br />
56001-822-06 A62-309 ED56001-822-06<br />
56001-830-01 A62-353 ED56001-830-01<br />
56001-838-01 A62-325 ED60-295<br />
56001-851-01 A62-350 ED60-140<br />
56001-865-01 A62-236 ED56001-865-01<br />
56001-872-01 A62-315 ED56001-872-01<br />
56001-873-01 A62-221 ED56001-873-01<br />
56001-875-01 A62-318 ED56001-875-01<br />
56001-880-01 A62-205 ED56001-880-01<br />
56001-881-01 A62-546 ED56001-881-01<br />
56001-886-01 A62-601 ED56001-886-01<br />
56001-901-01 A62-417 ED60-211<br />
56001-904-01 A62-365 ED60-172<br />
56001-908-01 A62-320 ED60-138<br />
56001-909-01 A62-335 ED56001-909-01<br />
56001-910-08 A62-559 ED60-268<br />
56001-911-01 A62-324 ED60-228<br />
56001-911-02 A62-719 ED56001-911-02<br />
56001-914-01 A62-560 ED60-155<br />
56001-916-01 A62-431 ED56001-916-01<br />
56001-916-02 A62-430 ED56001-916-02<br />
56001-916-03 A62-766 ED56001-916-03<br />
56001-917-01 A62-427 ED56001-917-01<br />
56001-921-02 A62-126 ED56001-921-02<br />
P1457, Rev. Nov/07 A–11 <strong>Alstom</strong> Signaling Inc.
Relay Engineering Data (ED) sheet Lists<br />
Table A–2. ED sheets Listed By Drawing Number (Cont.)<br />
Drawing No. Catalog No. ED sheet No.<br />
56001-921-04 A62-624 ED56001-921-04<br />
56001-921-05 A62-130 ED56001-921-05<br />
56001-921-07 A62-122 ED56001-921-07<br />
56001-921-09 A62-120 ED56601-921-09<br />
56001-921-10 A62-132 ED56001-921-10<br />
56001-921-14 A62-131 ED56001-921-14<br />
56001-921-15 A62-767 ED56001-921-15<br />
56001-922-01 A62-549 ED56001-922-01<br />
56001-922-02 A62-543 ED56001-922-02<br />
56001-922-05 A62-140 ED60-274<br />
56001-922-07 A62-125 ED56001-922-07<br />
56001-922-10 A62-550 ED60-336<br />
56001-922-13 A62-720 ED56001-922-13<br />
56001-925-10 A62-129 ED60-143<br />
56001-926-01 A62-429 ED56001-926-01<br />
56001-926-03 A62-721 ED56001-926-03<br />
56001-927-01 A62-552 ED56001-927-01<br />
56001-927-02 A62-715 ED56001-927-02<br />
56001-928-01 A62-553 ED56001-928-01<br />
56001-928-02 A62-722 ED56001-928-02<br />
56001-931-02 A62-522 ED56001-931-02<br />
56001-932-01 A62-554 ED56001-932-01<br />
56001-933-01 A62-555 ED56001-933-01<br />
56001-935-01 A62-566 ED56001-935-01<br />
56001-937-01 A62-433 ED60-328<br />
56001-938-01 A62-603 ED60-106<br />
56001-942-01 A62-604 ED56001-942-01<br />
56001-943-01 A62-605 ED56001-943-01<br />
56001-944-01 A62-677 ED60-326<br />
56001-945-01 A62-665 ED56001-945-01<br />
56001-946-01 A62-578 ED56001-946-01<br />
P1457, Rev. Nov/07 A–12 <strong>Alstom</strong> Signaling Inc.
Relay Engineering Data (ED) sheet Lists<br />
Table A–2. ED sheets Listed By Drawing Number (Cont.)<br />
Drawing No. Catalog No. ED sheet No.<br />
56001-947-01 A62-579 ED56001-947-01<br />
56001-950-01 A62-542 ED56001-950-01<br />
56001-951-01 A62-580 ED56001-951-01<br />
56001-952-01 A62-599 ED56001-952-01<br />
56001-953-01 A62-608 ED56001-953-01<br />
56001-956-01 A62-613 ED56001-956-01<br />
56001-956-02 A62-623 ED56001-956-02<br />
56001-957-01 A62-614 ED56001-957-01<br />
56001-959-01 A62-616 ED56001-959-01<br />
56001-960-01 A62-617 ED56001-960-01<br />
56001-961-01 A62-633 ED56001-961-01<br />
56001-962-01 A62-634 ED56001-962-01<br />
56001-963-01 A62-637 ED56001-963-01<br />
56001-965-01 A62-639 ED56001-965-01<br />
56001-968-01 A62-654 ED56001-968-01<br />
56001-969-01 A62-658 ED56001-969-01<br />
56001-970-01 A62-661 ED56001-970-01<br />
56001-971-01 A62-667 ED56001-971-01<br />
56001-972-01 A62-669 ED56001-972-01<br />
56001-973-01 A62-670 ED56001-973-01<br />
56001-975-01 A62-672 ED56001-975-01<br />
56001-976-01 A62-689 ED56001-976-01<br />
56001-978-01 A62-681 ED56001-978-01<br />
56001-979-01 A62-682 ED56001-979-01<br />
56001-980-01 A62-690 ED56001-980-01<br />
56001-981-01 A62-718 ED56001-981-01<br />
56001-982-01 A62-736 ED56001-982-01<br />
56001-983-01 A62-741 ED56001-983-01<br />
56001-984-01 A62-743 ED56001-984-01<br />
56001-986-01 A62-763 ED56001-986-01<br />
56001-987-01 A62-764 ED56001-987-01<br />
P1457, Rev. Nov/07 A–13 <strong>Alstom</strong> Signaling Inc.
Relay Engineering Data (ED) sheet Lists<br />
Table A–2. ED sheets Listed By Drawing Number (Cont.)<br />
Drawing No. Catalog No. ED sheet No.<br />
56001-988-01 ---- ED56001-988-01<br />
56002-703-01 A62-330 ED56002-703-01<br />
56002-710-01 A62-331 ED60-270<br />
56002-717-02 A62-606 ED60-253<br />
56002-719-01 A62-145 ED56002-719-01<br />
56002-720-01 A62-150 ED56002-720-01<br />
56002-722-01 A62-607 ED56002-722-01<br />
56002-723-01 A62-541 ED56002-723-01<br />
56002-725-01 A62-620 ED56002-725-01<br />
56005-100-01 A62-547 ED56005-100-01<br />
56005-100-08 A62-485 ED60-170<br />
56005-100-09 A62-486 ED60-126<br />
56005-100-18 A62-548 ED56005-100-18<br />
56005-100-19 A62-694 ED56005-100-19<br />
56005-100-20 A62-597 ED56005-100-20<br />
56005-100-21 A62-644 ED56005-100-21<br />
56005-100-22 A62-723 ED56005-100-22<br />
56005-100-23 A62-724 ED56005-100-23<br />
57490-080-09 A62-740 ED57490-080-09<br />
57490-080-10 A62-725 ED57490-080-10<br />
57490-091-05 A62-175 ED57490-091-05<br />
57490-092-01 A62-176 ED57490-092-01<br />
57490-093-01 A62-177 ED57490-093-01<br />
57490-094-01 A62-178 ED57490-094-01<br />
57490-095-05 A62-170 ED57490-095-05<br />
57490-096-04 A62-171 ED57490-096-04<br />
57490-097-04 A62-172 ED57490-097-04<br />
57490-098-01 A62-173 ED57490-098-01<br />
57490-119-02 A62-733 ED57490-119-02<br />
57490-121-01 A62-642 ED57490-121-01<br />
57490-122-01 A62-643 ED57490-122-01<br />
P1457, Rev. Nov/07 A–14 <strong>Alstom</strong> Signaling Inc.
Relay Engineering Data (ED) sheet Lists<br />
Table A–2. ED sheets Listed By Drawing Number (Cont.)<br />
Drawing No. Catalog No. ED sheet No.<br />
58640-169-06 A62-680 ED58640-169-06<br />
58640-171-03 A62-622 ED58640-171-03<br />
58640-171-04 A62-598 ED58640-171-04<br />
58640-172-01 A62-595 ED58640-172-01<br />
58640-172-03 A62-157 ED60-108<br />
58640-172-04 A62-610 ED58640-172-04<br />
58640-179-22 A62-164 ED58640-179-22<br />
58640-179-29 A62-676 ED58640-179-29<br />
58645-172-04 A62-246 ED60-110<br />
58645-172-05 A62-247 ED60-163<br />
58645-172-06 A62-245 ED58645-172-06<br />
58645-172-08 A62-626 ED58645-172-08<br />
58645-172-09 A62-638 ED58645-172-09<br />
59301-101-01 A62-490 ED60-812<br />
59301-101-02 A62-536 ED59301-101-02<br />
59301-101-04 A62-538 ED60-802<br />
59301-101-08 A62-664 ED60-814<br />
59301-151-01 A62-662 ED59301-151-01<br />
59301-151-02 A62-491 ED59301-151-02<br />
59301-151-04 A62-498 ED59301-151-04<br />
59301-151-05 A62-492 ED59301-151-05<br />
59301-151-06 A62-537 ED59301-151-06<br />
59301-200-03 A62-663 ED60-811<br />
59301-201-01 A62-533 ED59301-201-01<br />
59301-201-03 A62-534 ED59301-201-03<br />
59301-201-12 A62-493 ED59301-201-12<br />
59301-201-14 A62-494 ED59301-201-14<br />
59301-251-01 A62-495 ED59301-251-01<br />
59301-251-02 A62-532 ED59301-251-02<br />
59301-251-04 A62-530 ED59301-251-04<br />
59301-251-05 A62-629 ED59301-251-05<br />
P1457, Rev. Nov/07 A–15 <strong>Alstom</strong> Signaling Inc.
Relay Engineering Data (ED) sheet Lists<br />
THIS PAGE INTENTIONALLY LEFT BLANK.<br />
P1457, Rev. Nov/07 A–16 <strong>Alstom</strong> Signaling Inc.
Glossary<br />
B. APPENDIX B - GLOSSARY<br />
B.1.<br />
CONTACT DEFINITIONS<br />
Back – (B) Relay contact that is made when relay is de-energized (normally closed).<br />
Break - All front or back contacts are just open when a gauge of a specific dimension is<br />
inserted between the armature residual screw and the core face with the relay<br />
energized.<br />
Break-before-make -In a dependent front-heel-back contact the back contact will break<br />
before the front contact makes as the relay is energized.<br />
Contact Application<br />
• D = Dry Circuit<br />
• EHD = Extra Heavy-Duty<br />
• HV = High Voltage<br />
• HD = Heavy-Duty<br />
• LD = Light Duty<br />
• MD = Medium Duty<br />
• S = Safety<br />
• XHD = Heavy-Duty with Blowout Magnets<br />
Contact Materials –<br />
• AgC = Silver Impregnated Carbon<br />
• AgPt = Silver Platinum<br />
• G = Gold<br />
• S = Silver<br />
• SCdO = Silver Cadmium Oxide<br />
• T = Tungsten<br />
Front – (F) Relay contact that is normally open when relay is de-energized.<br />
Heel – (H) Contact that is driven by pusher.<br />
P1457, Rev. Nov/07 B–1 <strong>Alstom</strong> Signaling Inc.
Glossary<br />
Make - Specified dimension that will cause all front or back contacts to be just made<br />
(closed) when a gauge of this dimension is inserted between the armature residual<br />
screw and core face with the relay energized.<br />
Makes-before-break – (MB) In a dependent front-heel-back contact the front contact will<br />
make before the back contact breaks.<br />
B.2.<br />
GENERAL DEFINITIONS<br />
Approximate - on relay ordering sheets the abbreviation "approx." When used with<br />
armature air gap, it indicates that this air gap is to be adhered to as closely as possible.<br />
In no case should this value be less than the minimums given in Section 1.4 (armature<br />
air gap) of ED60-1.<br />
NOTE<br />
ED60-1 is a generic ED sheet that applies to most relays. It provides<br />
general instructions covering customer adjustments and tests for neutral,<br />
biased-neutral, and polar relays.<br />
Armature Air Gap - The closest point between armature and core face measured when<br />
the relay is energized.<br />
Coil Resistance - This is total coil resistance of relay under test.<br />
Contact Resistance - Total resistance of the individual contact as measured at the<br />
terminals of the relay under test. Resistance to be measured at 1 amp contact current.<br />
Back (NC) measurements made with relay de-energized. Front (NO) measurements<br />
made with relay energized to normal WORKING current.<br />
Down Pressure - Pressure put on fingers so that when contact group is assembled on<br />
relay, all front contacts will be open and all heel contacts will just be making contact with<br />
the back contacts. In addition, each roller must sit on the bottom of its slot when the<br />
pusher is raised to just open the back contacts.<br />
DROP AWAY – (DA) Current or voltage specified on Ordering sheet at which relay just<br />
makes its back contacts. This value is taken after the relay is saturated to a specified<br />
value of current.<br />
Hi-Pot Test (B1 and B2) - The insulation of coils and contacts shall withstand 3000V at<br />
60 Hz.<br />
NOTE<br />
For subsequent tests, voltage should be reduced 20 percent each time.<br />
P1457, Rev. Nov/07 B–2 <strong>Alstom</strong> Signaling Inc.
Glossary<br />
Overpressure -<br />
• Dead Weight - Pressure applied at the residual screw to just raise the bridge stop<br />
screw from its stop with the overpressure compression spring ineffective.<br />
• Final Pressure - Pressure applied at the residual screw to just raise the bridge stop<br />
screw from its stop with the overpressure compression spring effective.<br />
Pick Up Transition Time - Crossover time from break back to make front contact.<br />
PICKUP Current or Voltage – (PU) Specified current or voltage at which the relay just<br />
makes its front contacts.<br />
PICKUP Time - Time required for a relay to make any one of its front contacts after Pick<br />
Up current or voltage is applied.<br />
Release Time - Time required for a relay to break any one of its front contacts after the<br />
relay is de-energized.<br />
Release Transition Time - Crossover time from break front to make back contacts.<br />
Saturation – (Sat) Current necessary to saturate magnetic structure of relay.<br />
Trapped Pressure - Pressure required to just lift a contact off the stop plate without<br />
contacting the pressure plate.<br />
WORKING Current or Voltage – (WC) Current or voltage specified on ordering sheet<br />
needed to energize relay to its front stop.<br />
P1457, Rev. Nov/07 B–3 <strong>Alstom</strong> Signaling Inc.
Glossary<br />
THIS PAGE INTENTIONALLY LEFT BLANK.<br />
P1457, Rev. Nov/07 B–4 <strong>Alstom</strong> Signaling Inc.
Tools and Kits<br />
C. APPENDIX C – TOOLS AND KITS<br />
C.1.<br />
GENERAL<br />
This section summarizes the tools and tool kits used for B relay installation,<br />
maintenance, and troubleshooting. For installation materials refer to Section 7.<br />
C.2.<br />
CORRECTIVE MAINTENANCE TOOLS AND TOOL KITS<br />
Table C–1 lists the tools required to perform the test and adjustment procedures on<br />
typical B relays; tools for special purpose relays are not listed. Figure C–1 includes<br />
many of the tools listed in Table C–1. Consult <strong>Alstom</strong> Signaling Inc. customer service if<br />
additional tools are required.<br />
Table C–2 lists the tools required to perform the test and adjustment procedures on<br />
typical B relays that are not available from <strong>Alstom</strong>.<br />
For relay specific items such as terminals, insulators, and tags, see the specific parts<br />
list.<br />
Table C–1. <strong>Alstom</strong> B Relay Tools<br />
Ref. Description <strong>Alstom</strong> Part<br />
Number<br />
1 AAR Ring Terminal Hand Crimp Tool, for AWG. 10-20 wire 24745-145-00<br />
2 AAR Wrench 15194-010-02<br />
3 Burnishing Tool, used to clean off B relay AgC contacts only 55411-003-00<br />
4 Extractor, for plugboard terminal 59688-000-00<br />
5 Gauge, Pronging, for checking alignment gap, use with:<br />
• Gauge, Indexer (for B1 <strong>Relays</strong>)<br />
• Gauge, Indexer (for B2 <strong>Relays</strong>)<br />
6 Gauge, Step, .033- .040- .140 -.118- .113, for setting bridge<br />
travel and makes/breaks for .125 inch front contact opening<br />
relays<br />
7 Gauge, Step, .033- .040- .120 -.098- .093, for setting bridge<br />
travel and makes/breaks for .125 inch front contact opening<br />
relays<br />
56260-014-01<br />
56260-008-01<br />
56260-010-01<br />
36183-064-00<br />
36183-065-00<br />
8 Hand Crimp Tool, B relay terminal, for AWG. 10-20 wire 24745-148-00<br />
Shop Test Rack (See Fig. C–2) 56573-002-01<br />
P1457, Rev. Nov/07 C–1 <strong>Alstom</strong> Signaling Inc.
Tools and Kits<br />
Table C–1. <strong>Alstom</strong> B Relay Tools (Cont.)<br />
Ref. Description <strong>Alstom</strong> Part<br />
Number<br />
9 Spanner Nut Wrench for B Relay 3E Post 55393-003-01<br />
10<br />
A<br />
B<br />
C<br />
D<br />
E<br />
F<br />
G<br />
H<br />
I<br />
Standard Tool Kit; contains the following minimum<br />
tools/gauges required to readjust <strong>Alstom</strong> type B1 and B2<br />
neutral and biased-neutral relays:<br />
• Gauge, Pressure, 50-6-50 grams, for checking pressures<br />
• Gauge, Pressure, 150-15-150 grams, for checking<br />
pressures<br />
• Gauge, Step, .026-.029-.073-.056-.053, for setting bridge<br />
travel and makes/breaks<br />
• Gauge, Step, .033-.040-.087-.065-.060, for setting bridge<br />
travel and makes/breaks<br />
• Tool, Alignment, for aligning contact springs so contacts<br />
meet square<br />
• Tool, Combination, to bend inside contact group<br />
pressure/stop plates and to align heel springs<br />
• Tool, to bend/align contact springs<br />
• Tool, to bend stop and pressure plates<br />
• Handle for stop and pressure plate bender<br />
59649-206-01<br />
(55412-000-00)<br />
(55412-004-00)<br />
(36183-062-00)<br />
(36183-063-00)<br />
(47951-021-00)<br />
(47951-058-00)<br />
(47951-024-00)<br />
(47951-025-00)<br />
(35718-003-00)<br />
11 Tool, for bending bridge extension 47951-023-00<br />
Vane Relay Test Unit (See Fig. C–3) 20182-111-01<br />
Most tools with <strong>Alstom</strong> part numbers are special order items. Check with <strong>Alstom</strong><br />
Signaling Inc. customer service for price and delivery information.<br />
P1457, Rev. Nov/07 C–2 <strong>Alstom</strong> Signaling Inc.
Tools and Kits<br />
1<br />
A<br />
B<br />
AAR CRIMP TOOL<br />
2<br />
AAR WRENCH<br />
GAUGE, PRESSURE,<br />
50-6-50 (GRAMS)<br />
GAUGE, PRESSURE,<br />
150-15-150 (GRAMS)<br />
3<br />
C<br />
BURNISHING TOOL<br />
4<br />
GAUGE, STEP, .026-.029-.073-.056-.053<br />
EXTRACTOR<br />
D<br />
5<br />
10<br />
E<br />
GAUGE, STEP, .033-.040-.087-.065-.060<br />
TOOL, ALIGNMENT<br />
F<br />
GAUGE, INDEXER<br />
GAUGE, PRONGING<br />
G<br />
TOOL, COMBINATION<br />
TOOL TO BEND / ALIGN CONTACT SPRINGS<br />
6<br />
GAUGE, STEP, .033- .040- .140 -.118- .113<br />
H<br />
I<br />
7<br />
GAUGE, STEP, 033- .040- .120 -.098- .093<br />
TOOL TO BEND STOP<br />
AND PRESSURE<br />
PLATES<br />
HANDLE FOR H<br />
8<br />
11<br />
HAND CRIMP TOOL, FOR AWG 10-20 WIRE<br />
TOOL, FOR BENDING BRIDGE EXTENSION<br />
9<br />
SPANNER NUT WRENCH<br />
Figure C–1. <strong>Alstom</strong> B Relay Tools<br />
P1457, Rev. Nov/07 C–3 <strong>Alstom</strong> Signaling Inc.
Tools and Kits<br />
Table C–2. B Relay Tools Not Available From <strong>Alstom</strong><br />
Description<br />
Bond Paper (for cleaning carbon contacts)<br />
Gauge, Feeler .002 Through .035 (for setting air gap)<br />
Gauge, Feeler, Combination .002 and .004 (for checking air gap between armature and<br />
retaining plate)<br />
Glue, Pliobond 20, McMaster Carr (to glue top end of contact groups to base)<br />
Magnifier, Illuminated Magna- Lite Model 100 (5 Power) (to inspect relays)<br />
Multimeter/DMM Fluke 87 or equivalent<br />
Pin Gauge, .050 inch (for checking front contact openings)<br />
Pin Gauge, .090 inch (for checking front contact openings)<br />
Pin Gauge, .125 inch (for checking front contact openings)<br />
Screw Drivers, Standard (for tightening screws)<br />
Seal Press, 5 Inch Bulldog Seal Press (for applying seal to relay) order from American<br />
Casting, Inc. Also order custom dies for press to identify adjuster/property<br />
Solder, Rosin Core, 60% tin, 40% lead<br />
Soldering Iron, 120-volt, 50-watt<br />
Wire Cutter<br />
Wire Stripper<br />
Wrenches, Open End, 11/32 - 5/16 (for tightening armature air gap and bridge travel<br />
jam nuts)<br />
P1457, Rev. Nov/07 C–4 <strong>Alstom</strong> Signaling Inc.
Tools and Kits<br />
C.3.<br />
SHOP TEST RACK<br />
The Shop Test Rack, P/N 56573-002-01, is used to test relays in the shop. When<br />
complete tests are necessary, the relay is taken out of service and tested by plugging it<br />
on the test rack, Figure C–2.<br />
G<br />
16 26 36<br />
15 25 35<br />
14 24 34<br />
13 23 33<br />
12 22 32<br />
11 21 31<br />
E<br />
46<br />
45<br />
44<br />
43<br />
42<br />
41<br />
F<br />
56<br />
66<br />
55 65<br />
54 64<br />
53 63<br />
52 62<br />
51 61<br />
6C<br />
6D<br />
D<br />
C<br />
1C<br />
1D<br />
6C<br />
6D<br />
C<br />
D<br />
A<br />
B<br />
X<br />
Figure C–2. Shop Test Rack<br />
This rack is designed for both B1 and B2 relays. One of the guide rods is removable.<br />
When testing B1 relays position the guide rod in location F. For testing B2 relays<br />
position it in location E. Meter leads should have alligator clips for clipping on to terminal<br />
posts G.<br />
P1457, Rev. Nov/07 C–5 <strong>Alstom</strong> Signaling Inc.
Tools and Kits<br />
C.4.<br />
VANE RELAY TEST UNIT<br />
Electrical tests for operating values on <strong>Type</strong> B2 two element vane relays are made with<br />
the test unit shown in Figure C–3 (P/N 20182-111-01). This test unit does not include<br />
the ammeters or volt meters required to read relays local and track operating values.<br />
VANE RELAY TEST UNIT<br />
ON<br />
POWER<br />
ON<br />
FUSE<br />
POWER<br />
LINE/<br />
TRACK<br />
ON<br />
LOCAL<br />
2 AMP<br />
ON<br />
ON<br />
SHUNT<br />
OFF<br />
OFF<br />
– + CURRENT – +<br />
COARSE<br />
FINE<br />
– + VOLTS – +<br />
– + COIL – +<br />
Figure C–3. Vane Relay Test Unit, Front Panel<br />
Unit dimensions are 10" high by 17" wide by 5" deep. Major board components are as<br />
follows:<br />
• Two non-inductive adjustable resistors<br />
• One 50-ohm fixed resistor<br />
• Fuse clips and 2-ampere fuse<br />
• Track element power switch<br />
• Short circuiting switches<br />
• Test jacks for meter hookup<br />
P1457, Rev. Nov/07 C–6 <strong>Alstom</strong> Signaling Inc.
Tools and Kits<br />
The vane relay test unit's circuit, meter connections, and vane relay connections are<br />
shown in Figure C–4. The unit can be powered form a variable 120 VAC source or the<br />
user can add a tapped transformer to adjust the supply line to the current LOCAL<br />
winding voltage. The user provides the ammeters and voltmeters for measuring the<br />
vane relay's DROPAWAY, PICKUP, and WORKING currents and voltages. Two<br />
potentiometers and series resistance control the current and voltage to the controlled<br />
element of the vane relay under test. Potentiometer Rp is 250 ohms and potentiometer<br />
Rs is 100 ohms, both are non-inductive resistances. Rp is connected directly across the<br />
supply line and Rs is connected as a variable series resistance. Rp gives a coarse wide<br />
range adjustment, and Rs gives a fine adjustment, to be used near the DROPAWAY,<br />
PICKUP, and WORKING values of the relay.<br />
POWER<br />
FUSE<br />
2A<br />
LINE<br />
EARTH<br />
NEUTRAL<br />
12 11<br />
SW1<br />
TP1<br />
SW2<br />
12<br />
11<br />
LINE/TRACK<br />
POWER<br />
Rs<br />
FINE<br />
100 OHMS<br />
AC SUPPLY LINE<br />
SW-1<br />
POWER<br />
ON<br />
LINE/TRACK<br />
POWER<br />
Rp<br />
COURSE<br />
250 OHMS<br />
R1<br />
50 OHMS<br />
22<br />
21<br />
SHUNT<br />
12 11<br />
SW3<br />
SHUNT<br />
11 12<br />
SW4<br />
CURRENT<br />
VOLTS<br />
COIL<br />
2 ELEMENT VANE RELAY<br />
COIL<br />
VOLTS<br />
CURRENT<br />
– + + – – + + – – + + -<br />
AMMETER<br />
0-250 mA<br />
VOLTMETER<br />
0-150 VOLTS<br />
11<br />
14<br />
12<br />
13<br />
LOCAL<br />
R<br />
TRACK<br />
61<br />
64<br />
62<br />
63<br />
VOLTMETER<br />
0-150 VOLTS<br />
AMMETER<br />
0-2 AMPS<br />
LOCAL<br />
TRACK<br />
Figure C–4. Vane Relay Test Unit Circuit with Relay<br />
P1457, Rev. Nov/07 C–7 <strong>Alstom</strong> Signaling Inc.
Tools and Kits<br />
The vane relay picks when there is a current phase difference between the LOCAL<br />
winding and the TRACK winding. To pick the vane relay with the vane relay test unit the<br />
phase angle is induced. To create the current phase difference and cause the vane<br />
relay to pick, the test unit's LOCAL winding, powered off the supply line, has an inherent<br />
phase shift in that the current lags the voltage by 70 or 80 degrees depending on the<br />
relay type. Refer to the <strong>Alstom</strong> Engineering Data (ED) sheets for the vane relay to<br />
determine the relay's Inherent Phase Angle value, see listing in Appendix A. The test<br />
unit's TRACK winding voltage is reduced from the supply line by a very large series<br />
resistance relative to the impedance of the track winding, so it demonstrates almost no<br />
current/voltage phase shift. Since the current in the LOCAL winding lags the current in<br />
the TRACK winding, this provides the phase difference to pick the relay.<br />
Using this test unit allows the user to measure current/voltage values that closely match<br />
the operating values of the vane relay under service conditions.<br />
In testing some vane relays, a transformer may have to be inserted in the circuit. For<br />
example testing relays with 5 volt TRACK windings requires adding a Universal<br />
Transformer, P/N 31094-000-01 (Cat. A95-50) to step up the Track voltage. Refer to the<br />
vane relay's ED sheet for details. A list of ED sheets is provided in Appendix A.<br />
P1457, Rev. Nov/07 C–8 <strong>Alstom</strong> Signaling Inc.
FOR QUESTIONS AND INQUIRIES, CONTACT CUSTOMER SERVICE AT<br />
1-800-717-4477<br />
OR<br />
WWW.ALSTOMSIGNALINGSOLUTIONS.COM<br />
ALSTOM SIGNALING INC.<br />
1025 JOHN STREET<br />
WEST HENRIETTA, NY 14586