Cable Ladder Installation - Fusion Power System
Cable Ladder Installation - Fusion Power System
Cable Ladder Installation - Fusion Power System

Create successful ePaper yourself
Turn your PDF publications into a flip-book with our unique Google optimized e-Paper software.
<strong>Cable</strong> <strong>Ladder</strong> <strong>Installation</strong><br />
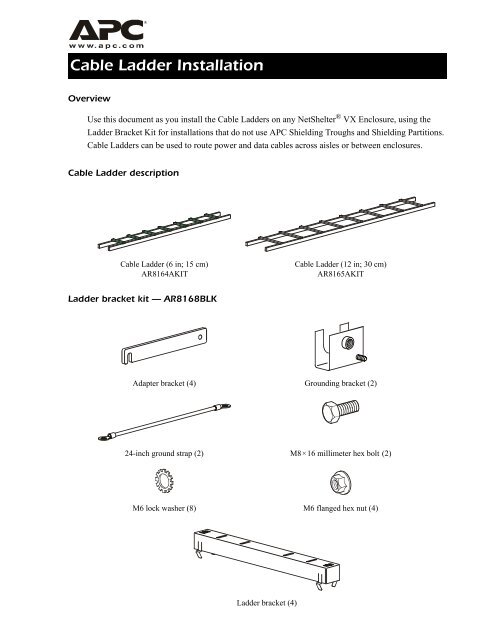
Overview<br />
Use this document as you install the <strong>Cable</strong> <strong>Ladder</strong>s on any NetShelter ® VX Enclosure, using the<br />
<strong>Ladder</strong> Bracket Kit for installations that do not use APC Shielding Troughs and Shielding Partitions.<br />
<strong>Cable</strong> <strong>Ladder</strong>s can be used to route power and data cables across aisles or between enclosures.<br />
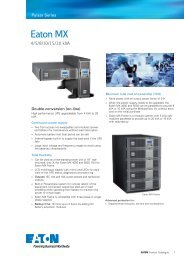
<strong>Cable</strong> <strong>Ladder</strong> description<br />
<strong>Cable</strong> <strong>Ladder</strong> (6 in; 15 cm)<br />
AR8164AKIT<br />
<strong>Ladder</strong> bracket kit — AR8168BLK<br />
<strong>Cable</strong> <strong>Ladder</strong> (12 in; 30 cm)<br />
AR8165AKIT<br />
Adapter bracket (4) Grounding bracket (2)<br />
24-inch ground strap (2) M8×16 millimeter hex bolt (2)<br />
M6 lock washer (8) M6 flanged hex nut (4)<br />
<strong>Ladder</strong> bracket (4)
Tools required (not provided)<br />
Wrench with<br />
10- and 13-mm ends<br />
<strong>System</strong> configuration<br />
Install <strong>Cable</strong> <strong>Ladder</strong>s to support any of several physical configurations of enclosures. See the<br />
specifications for your system for detailed requirements, including minimum clearances and the<br />
maximum number of enclosures supported. The following are sample configurations:<br />
2 <strong>Cable</strong> <strong>Ladder</strong> <strong>Installation</strong><br />
Tape measure Hack saw<br />
• <strong>Cable</strong> <strong>Ladder</strong>s to span aisles between rows of enclosures<br />
• <strong>Cable</strong> <strong>Ladder</strong>s to span gaps between sets of enclosures along a single row
Before installation<br />
1. If necessary, cut the ladders to the length you need, using any tool that will cut metal without<br />
crushing or bending it. Cut each ladder to a length approximately 2 inches (5.1cm) longer than<br />
the width of the aisle that it will span.<br />
Caution<br />
Avoid touching the ends of the ladder after you cut it. The ends may be sharp<br />
enough to cause injury.<br />
2. Insert adapter brackets into the ends of the ladder, with hook-ends facing out. Make sure that the<br />
rungs of the ladder are on the top of the ladder, and that the hook-ends are facing downward.<br />
<strong>Cable</strong> <strong>Ladder</strong> <strong>Installation</strong> 3
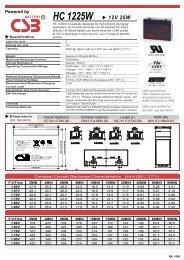
How to install a <strong>Cable</strong> <strong>Ladder</strong> to the side<br />
To install a ladder to extend from the side of a NetShelter VX Enclosure:<br />
1. Place the ladder across the aisle where the ladder is to be installed (for bracket positioning).<br />
2. Place the mounting brackets on on the roof of the enclosure so that the hooks on the ladder align<br />
with the slots on the end of the mounting brackets where the hooks will attach.<br />
Note<br />
The figure below shows where to attach the hooks of a 12-inch (30.5 cm) ladder to the<br />
left side of an enclosure. Use the same procedure to install a 6-inch (15 cm) ladder.<br />
3. Insert the tabs of the mounting brackets into the holes on the roof of the enclosure.<br />
4. Insert the hooks that are in the ends of the ladder rails into the slots on the mounting bracket.<br />
<br />
4 <strong>Cable</strong> <strong>Ladder</strong> <strong>Installation</strong>
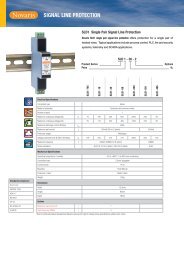
How to install a <strong>Cable</strong> <strong>Ladder</strong> to the front or back<br />
To install a ladder to extend from the front or back of the roof of a NetShelter VX Enclosure:<br />
1. Install a mounting bracket on the roof of the enclosure in one of the locations shown below by<br />
inserting the tabs of the mounting bracket into the holes on the roof of the enclosure.<br />
2. Insert the adapter bracket hooks into the slots on the mounting bracket for a wider ladder<br />
(12 in; 30.5 cm) or for a narrow ladder (6 in; 15.2 cm). The figure below shows a wide ladder<br />
being attached to the back of the roof of the enclosure.<br />
<br />
<br />
<br />
You can attach the other end of the ladder to the front or back of the roof of another enclosure in the<br />
same manner or to the side of the roof of another enclosure, as described in “How to install a <strong>Cable</strong><br />
<strong>Ladder</strong> to the side” on page 4. To adjust ladder length so that the hooks reach the brackets on the roof<br />
of the other enclosure, slide the hooks farther in or out of the ladder on each end of the ladder.<br />
<strong>Cable</strong> <strong>Ladder</strong> <strong>Installation</strong> 5
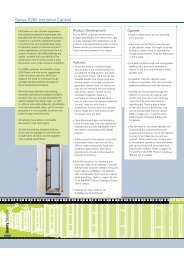
How to ground <strong>Cable</strong> <strong>Ladder</strong>s<br />
1. Attach a grounding bracket to the end of a cable ladder leg, using an M8 hex bolt.<br />
2. Attach a 24-inch ground strap to the grounding bracket as shown using two M6 lock washers<br />
and one M6 flanged hex nut.<br />
3. Route the other end of the grounding strap through the nearest cable entry in the roof.<br />
6 <strong>Cable</strong> <strong>Ladder</strong> <strong>Installation</strong>
4. Attach the ground strap to the grounding stud on the under-side of the roof as shown, using two<br />
M6 lock washers and one M6 flanged hex nut.<br />
<strong>Cable</strong> <strong>Ladder</strong> <strong>Installation</strong> 7
APC Worldwide Customer Support<br />
Customer support for this or any other APC product is available at no charge in any of the following ways:<br />
• Visit the APC Web site to access documents in the APC Knowledge Base and to submit customer support<br />
requests.<br />
– www.apc.com (Corporate Headquarters)<br />
Connect to localized APC Web sites for specific countries, each of which provides customer support<br />
information.<br />
– www.apc.com/support/<br />
Global support searching APC Knowledge Base and using e-support.<br />
• Contact an APC Customer Support center by telephone or e-mail.<br />
– Regional centers:<br />
Direct InfraStruXure Customer Support<br />
Line<br />
(1)(877)537-0607 (toll free)<br />
APC headquarters U.S., Canada (1)(800)800-4272 (toll free)<br />
Latin America (1)(401)789-5735 (USA)<br />
Europe, Middle East, Africa (353)(91)702000 (Ireland)<br />
Japan (0) 35434-2021<br />
Australia, New Zealand, South Pacific<br />
area<br />
(61) (2) 9955 9366 (Australia)<br />
– Local, country-specific centers: go to www.apc.com/support/contact for contact information.<br />
Contact the APC representative or other distributor from whom you purchased your APC product for information on<br />
how to obtain local customer support.<br />
Entire contents copyright © 2004 American <strong>Power</strong> Conversion. All rights reserved.<br />
Reproduction in whole or in part without permission is prohibited. APC, the APC logo,<br />
NetShelter, and InfraStruXure are trademarks of American <strong>Power</strong> Conversion Corporation and<br />
may be registered in some jurisdictions. All other trademarks, product names, and corporate<br />
names are the property of their respective owners and are used for informational purposes only.<br />
*990-7212B-001*<br />
990-7212B-001 06/2004