
I try not to talk about bagels with friends. Talking about them always starts innocently, a little witty banter about the crust, crumb, and color traits and past eating experiences: “that bagel I had in New York that one time,” or “there was this one bagel shop down the street…” This jovial chat slowly evolves into a friendly argument about more-sweet versus more-savory and crunchy versus soft; maybe one even mentions steaming the bagel instead of baking it6.
Finally, the once innocuous chatter results in the participants either forming a stronger friendship over common bagel zealotry or the unfortunate end to the friendship altogether. It’s like the old axiom: never play Risk with a friend you want to keep. Exaggeration? Perhaps. But bagels do seem to rouse an enthusiasm rarely seen with other food (I’d argue pizza might be a solid contender, though). They carry a different meaning depending on where you’ve grown up, what local shops were in the area, and ultimately, where your preferences lie. But these sourdough bagels seem to transcend almost every bagel I’ve had, especially the mass-produced ones—oh yes, definitely those.
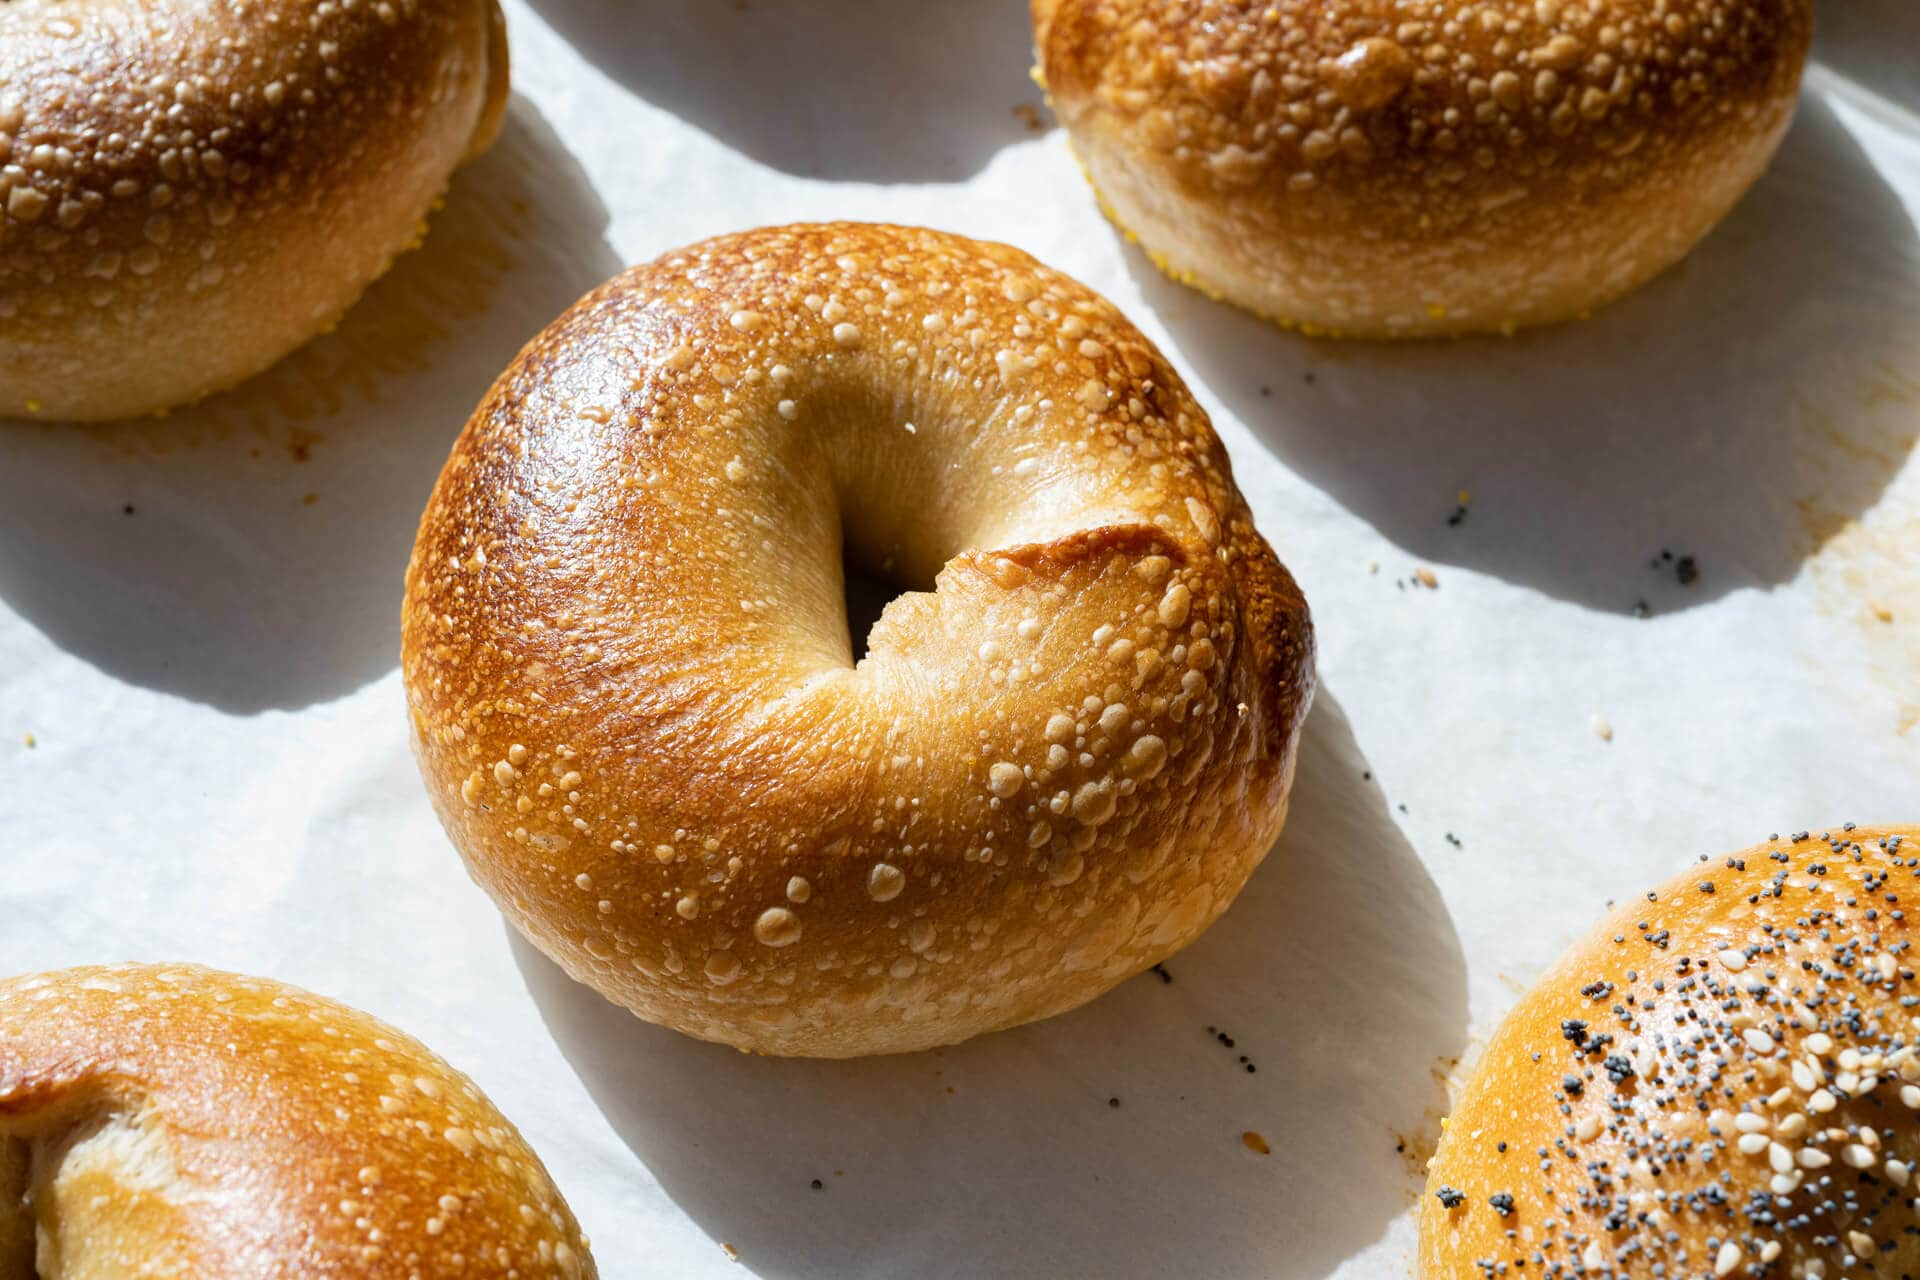
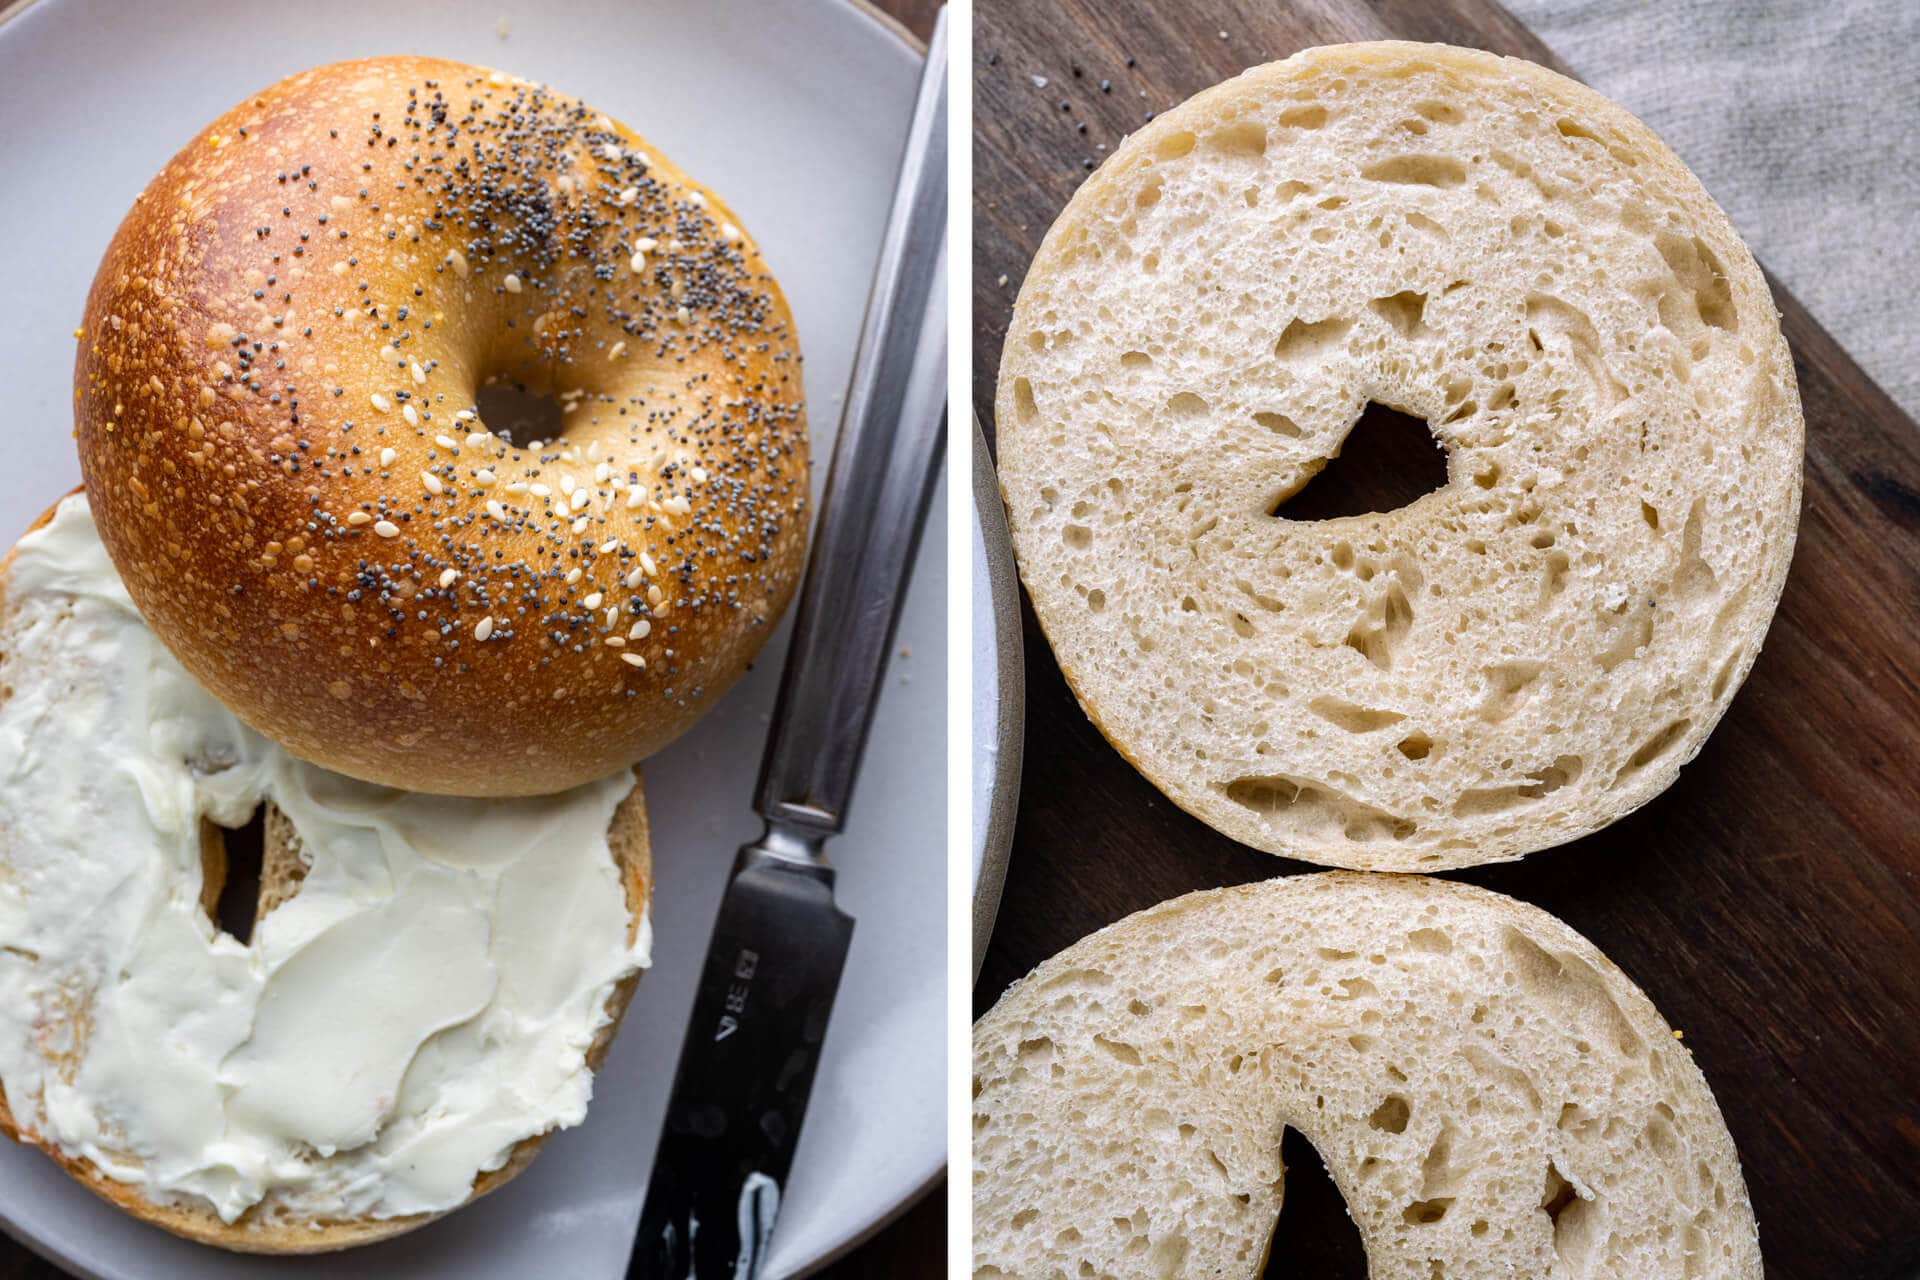
I recall occasionally eating those bagels from the bag at the market: that ultra-chewy (from end to end) vehicle was mostly there to convey cream cheese, or schmear, from package to mouth. Rest assured, these sourdough bagels are not that in the slightest. They have a very thin and crisp exterior, not tough or hard, but rather, a little crunch that gives the chewy bagel a textural counterpoint. You see, the interior is as chewy as you’d expect a bagel, but if the entire thing is chewy, you end up with just a big chewy thing. But if you have a contrasting texture, it seems to amplify the chewy thing, much like adding an acid elaborates other flavors.
And overall, these bagels are pretty darn easygoing. Unlike bread dough, there’s no need to be overly critical of each motion when shaping, and in the end, the bagel rings puff up uniformly, boil beautifully, and bake easily. Speaking of the boil, perhaps one of the things that keep many from making them, but it’s such a simple thing. And while I often draw parallels between this dough and my sourdough pretzel — mostly in that they each have a stiff dough and a pre-bake step — there’s far less prep before baking bagels than pretzel7.
First, let’s look at some tools I use when making these sourdough bagels.
Tools and Ingredients
First, a few of the tools and ingredients I use for this recipe
- Barley malt syrup – this is the classic sweetener added to a bagel dough and it has a very unique flavor and aroma. I like the Eden brand, but any should work well.
- Diastatic malt powder – see the post on diastatic vs. nondiastatic malt and why it’s used in baking.
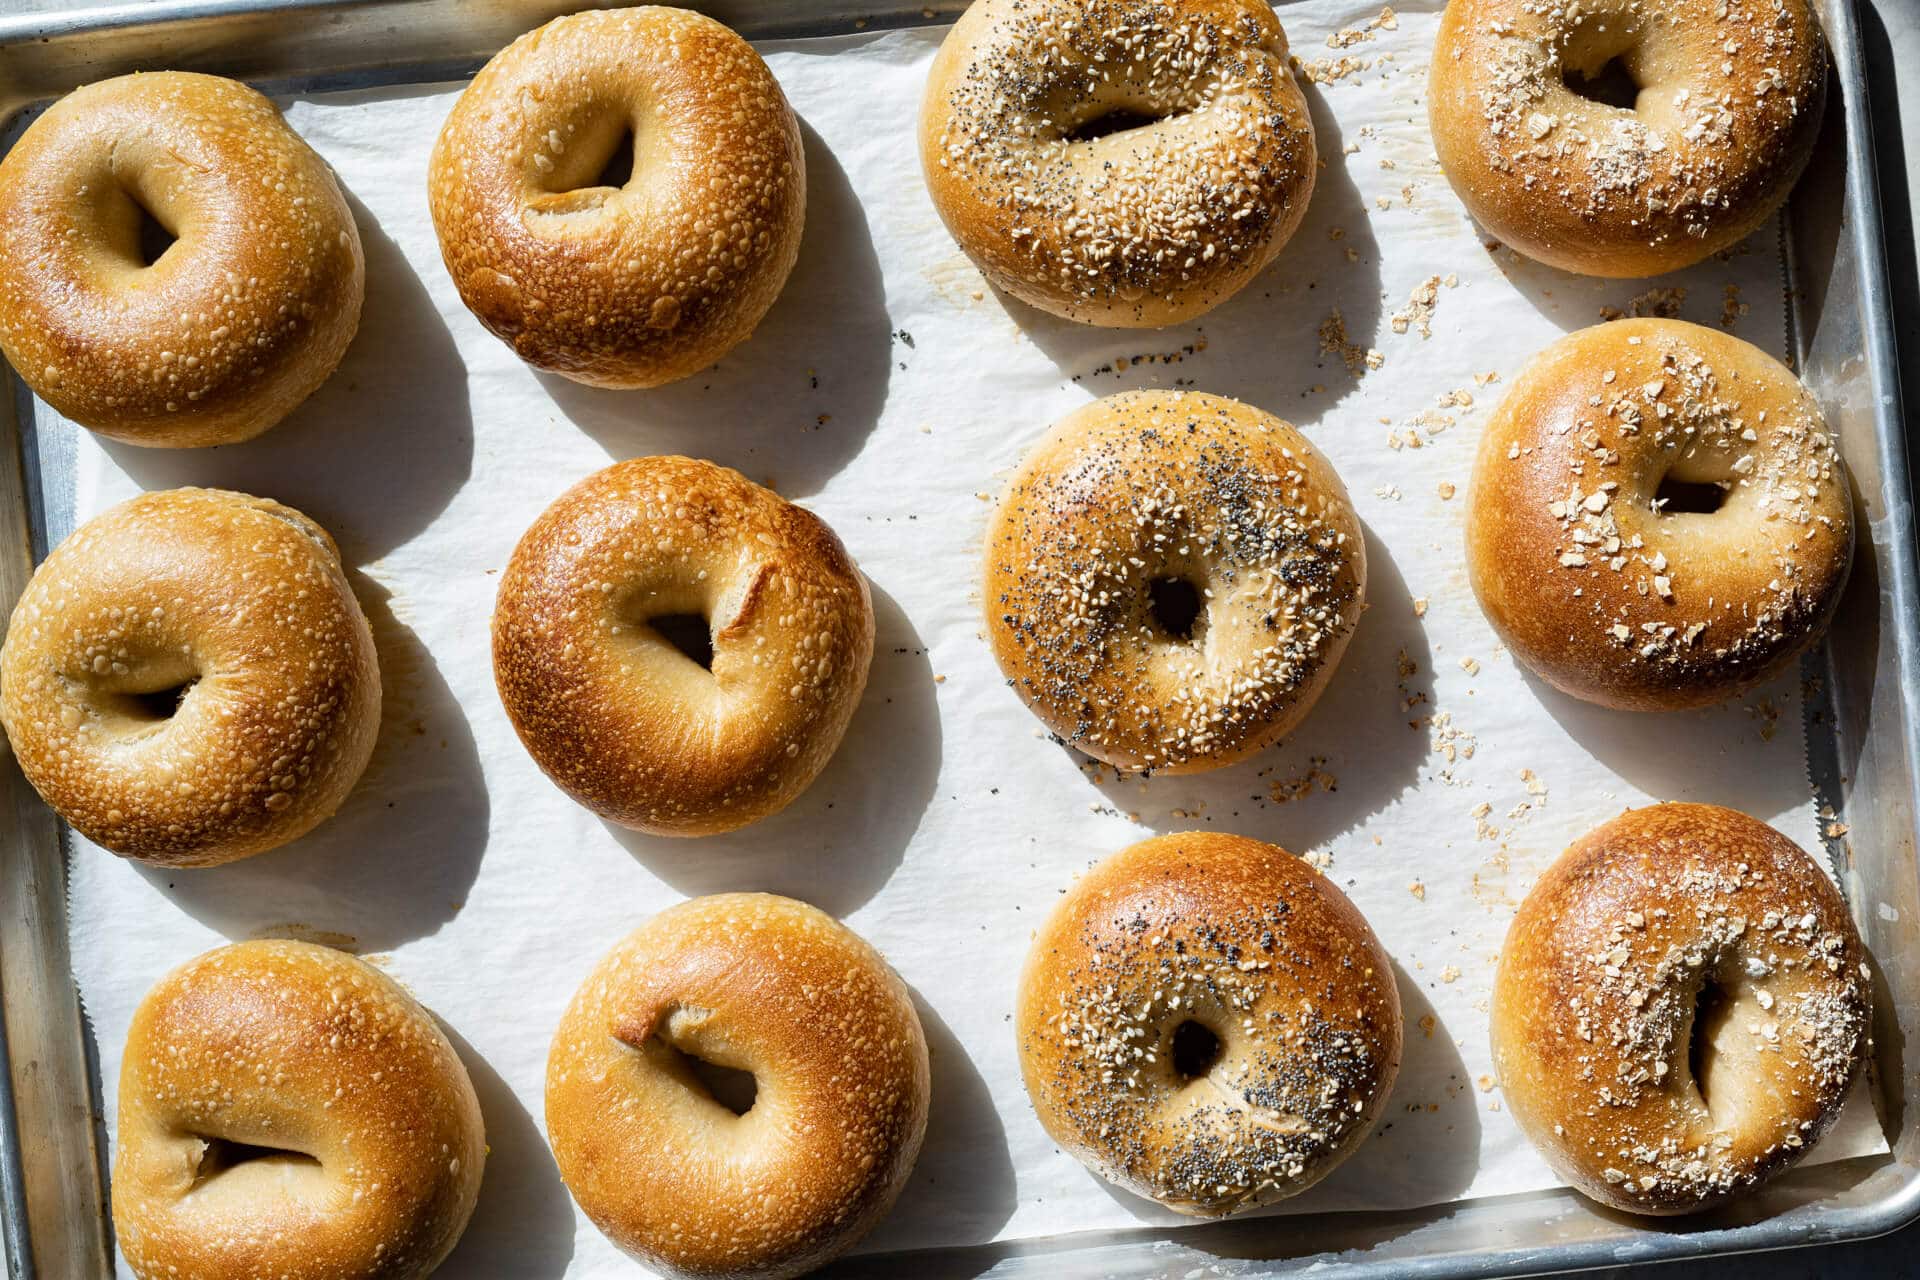
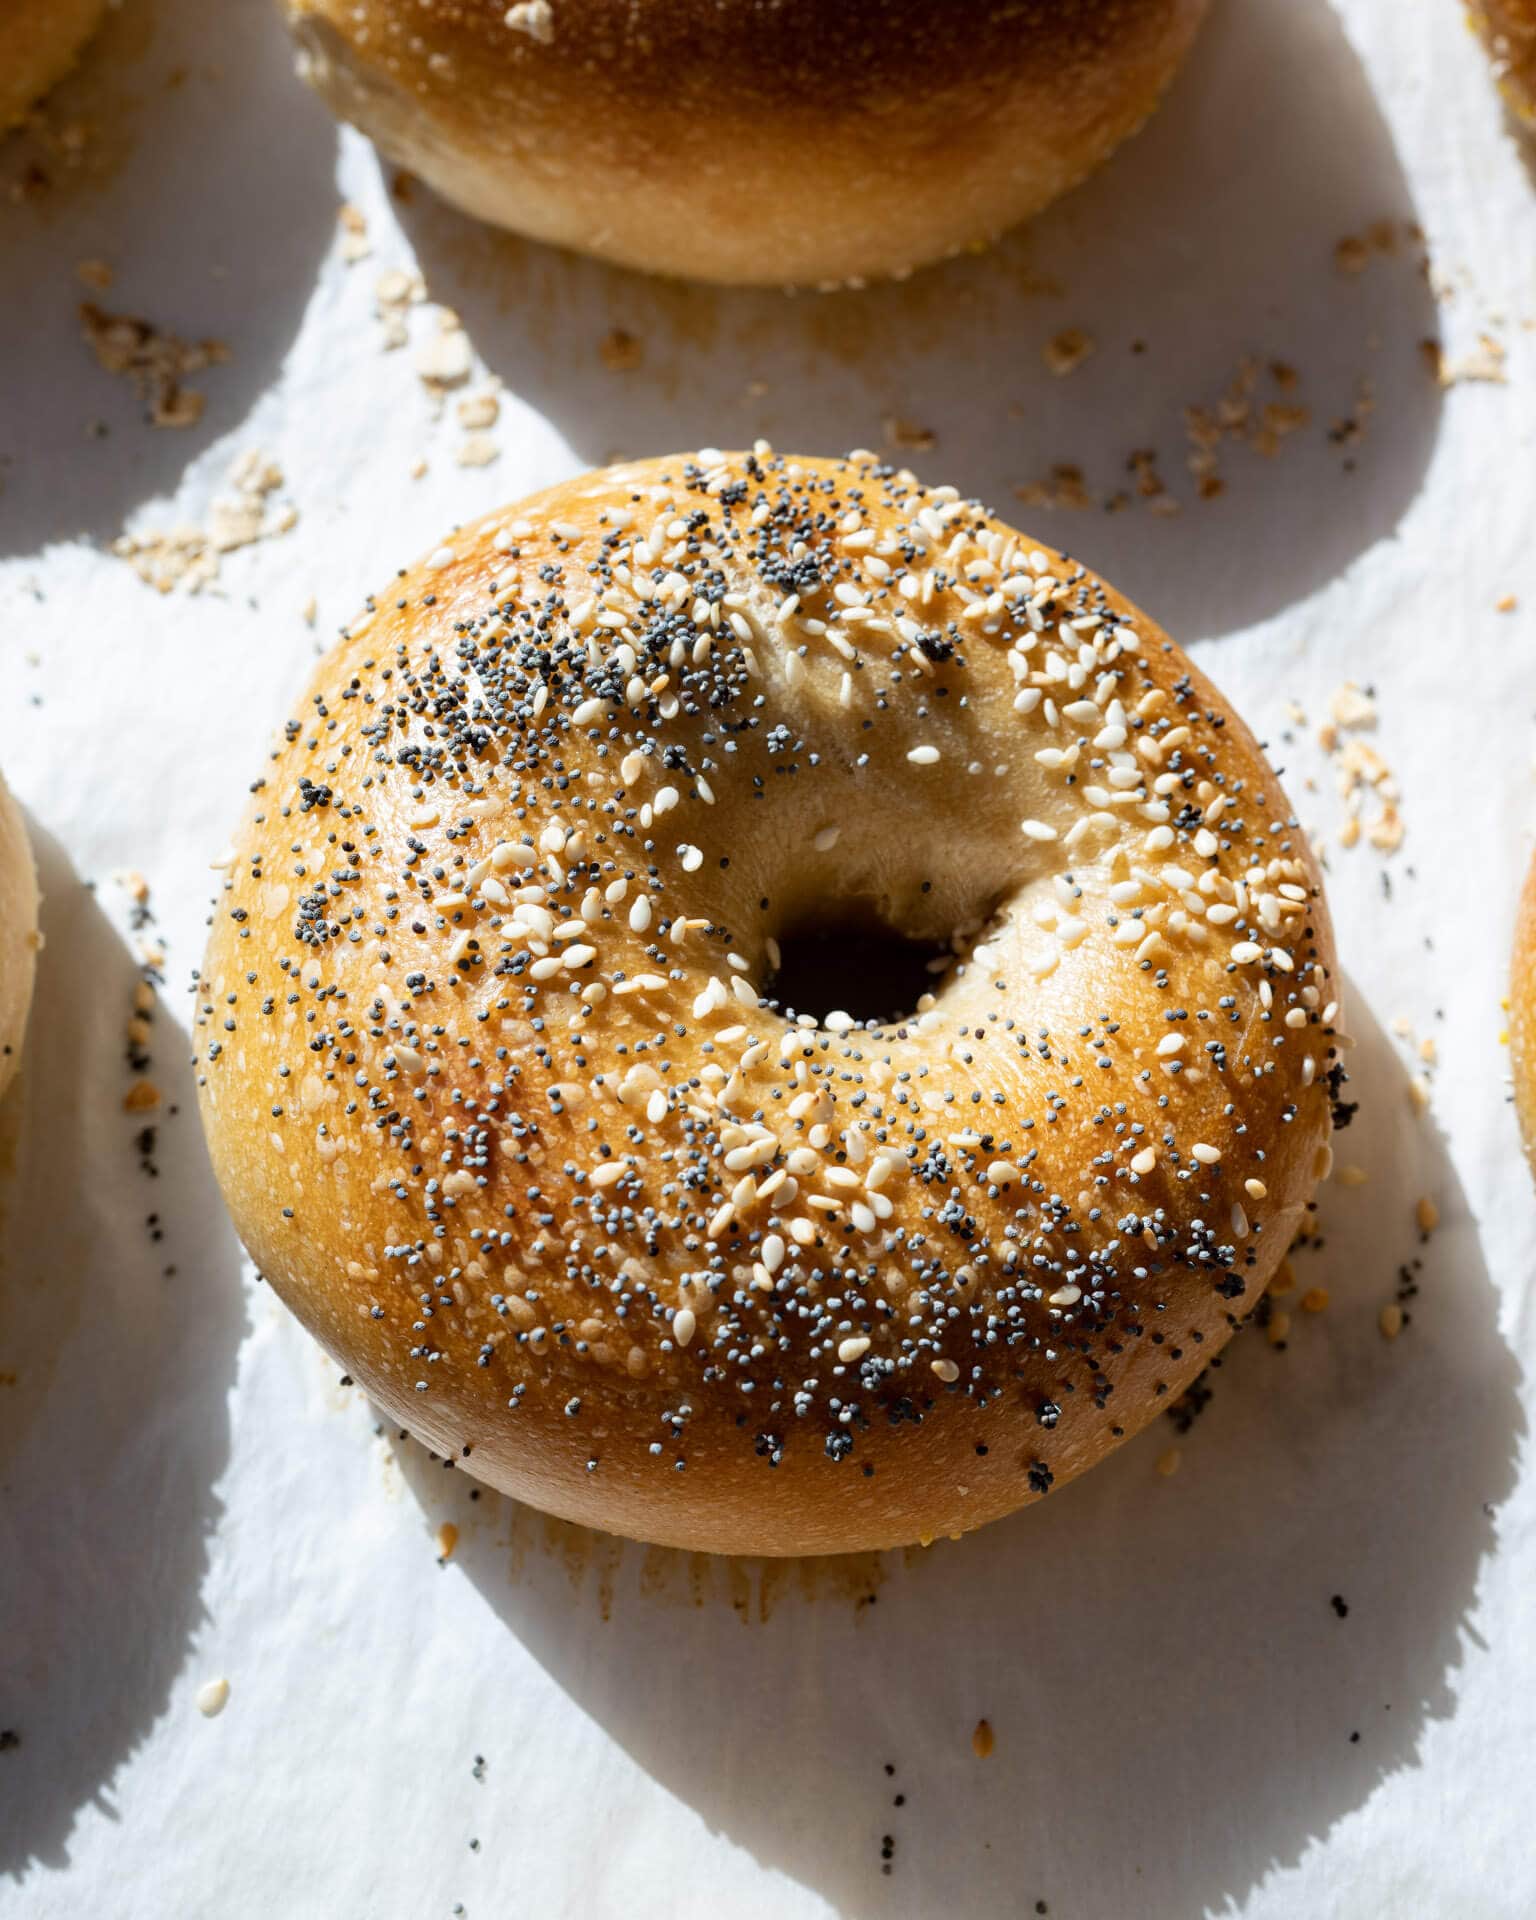
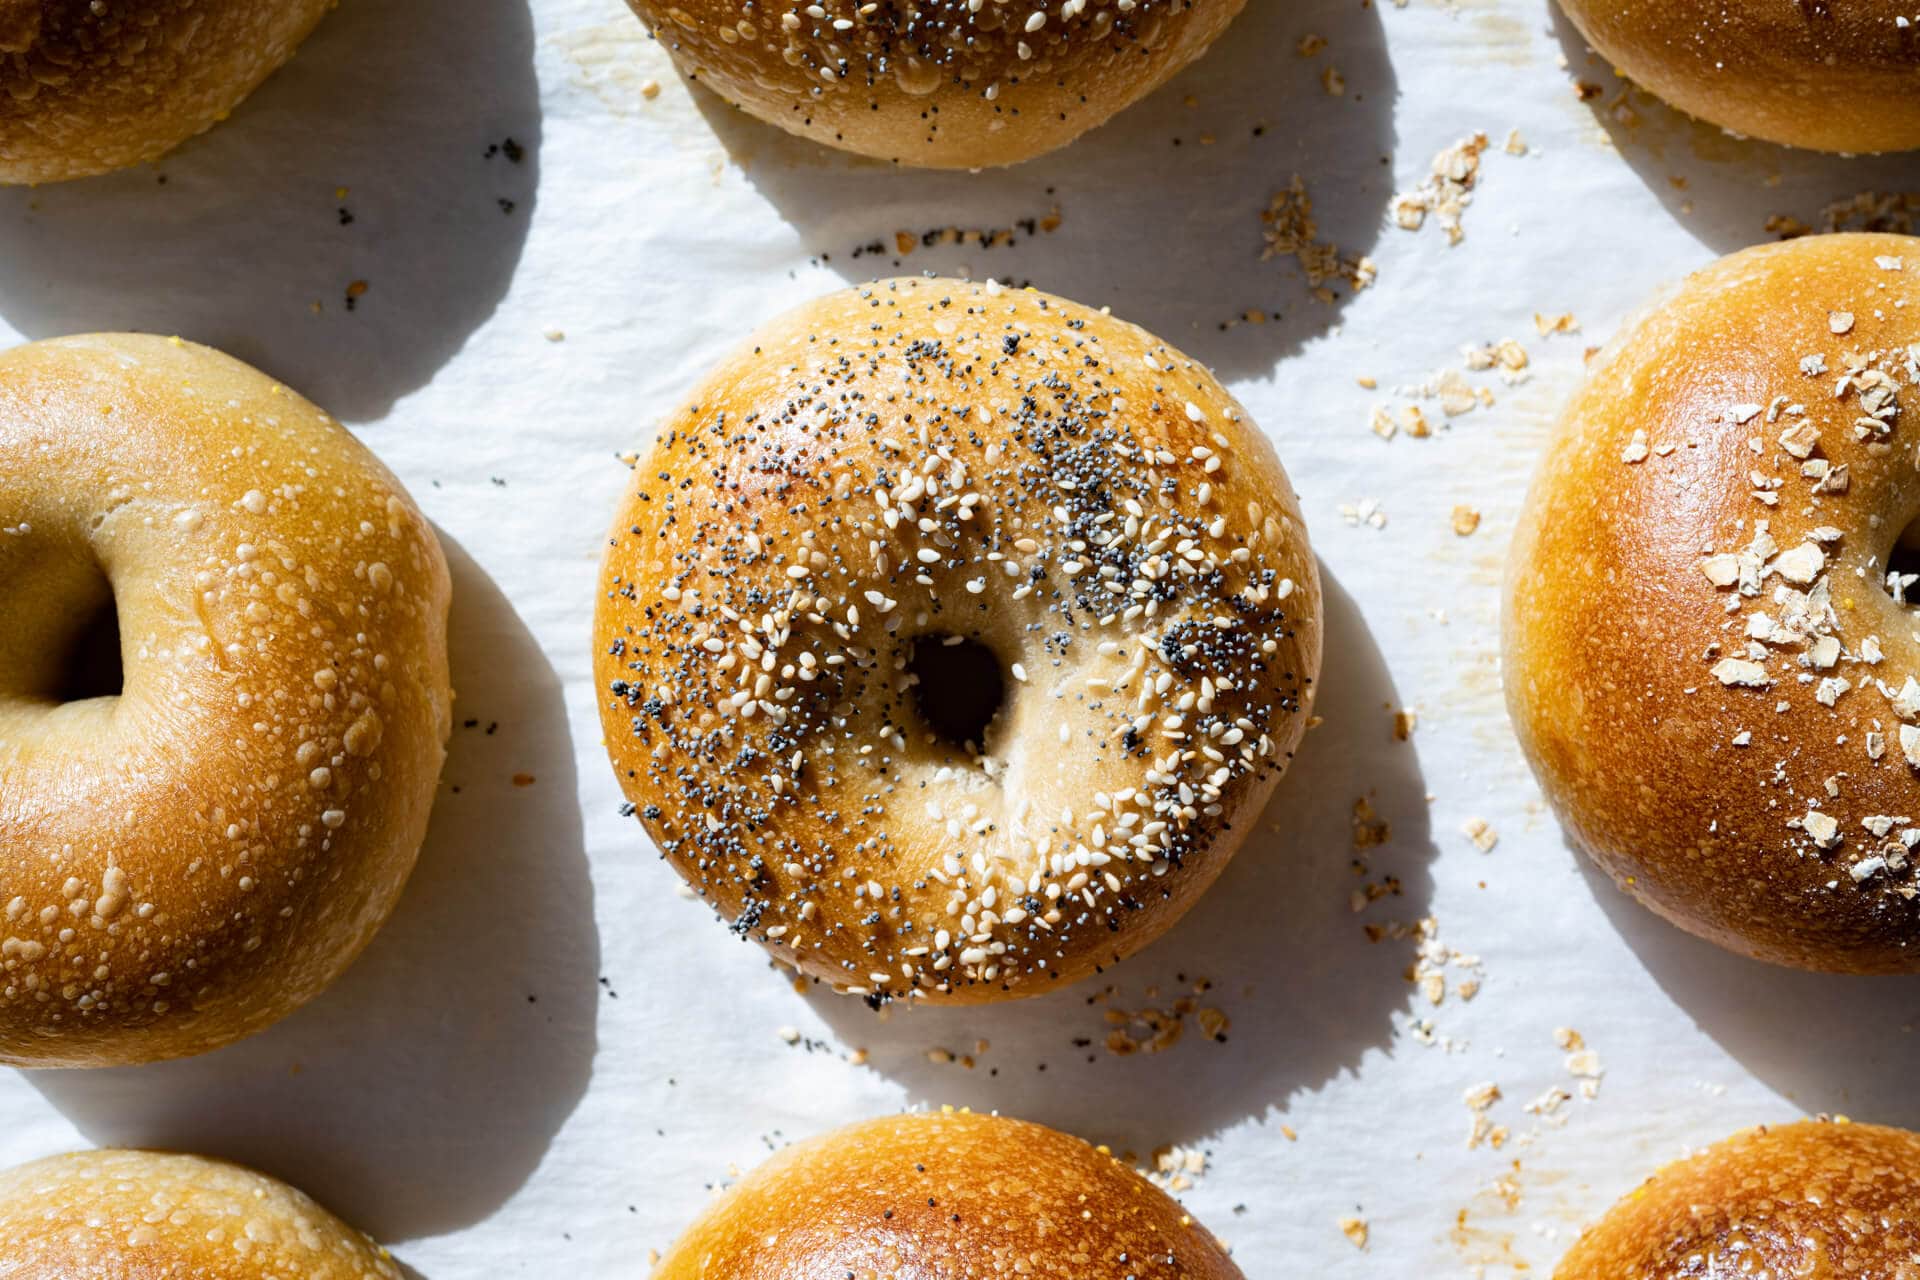
- Everything bagel topping – I love this mix of seeds and dried spices for topping bagels.
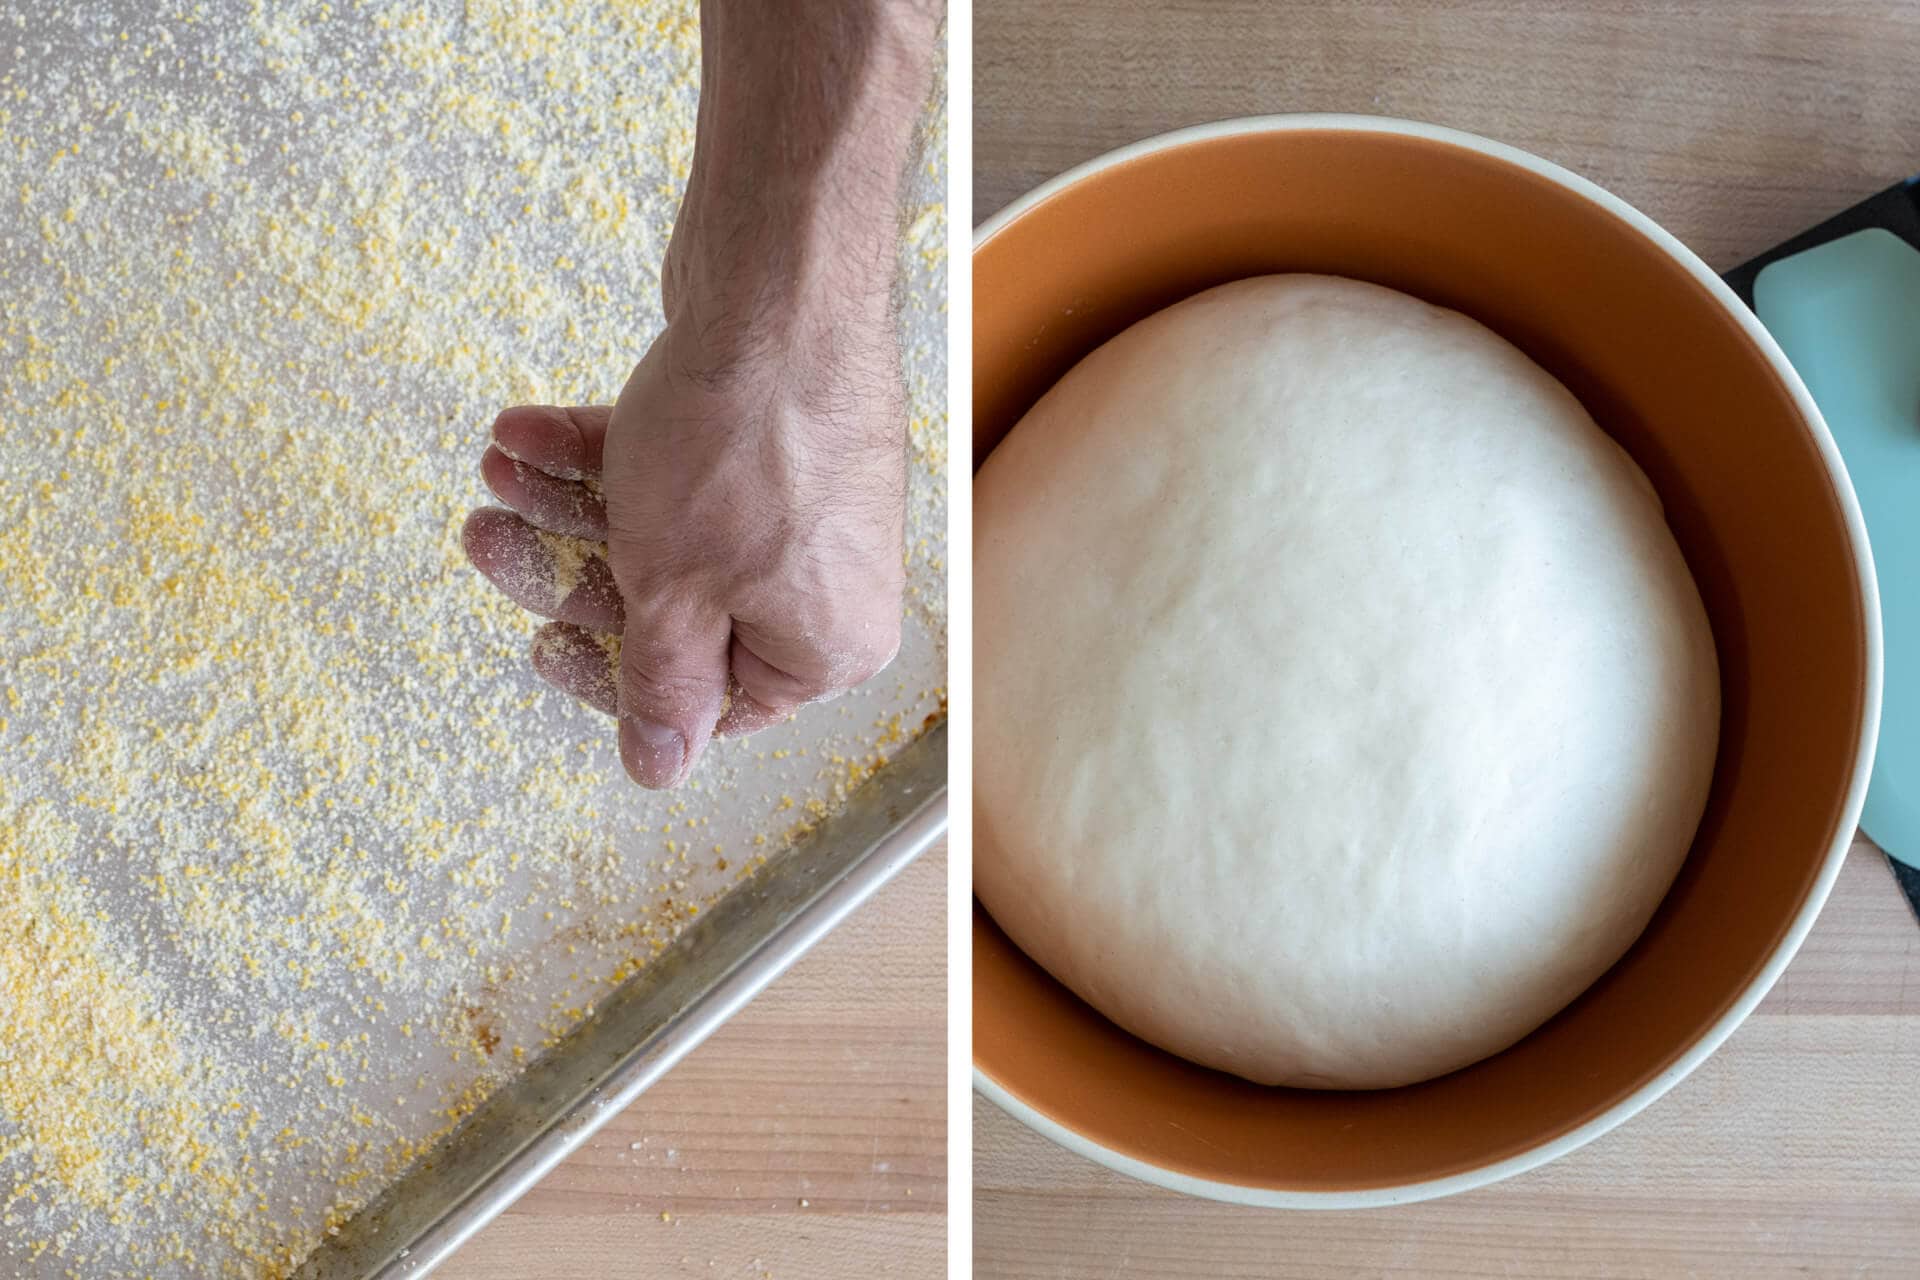
- Cornmeal – traditionally used to keep the bagels from sticking to the baking sheet during proofing (and they add extra starch to the boiling water).
- Half baking sheet – I use this to proof all 12 dough pieces to save space in a home refrigerator.
- Full baking sheet – perfect for baking all 12 bagels, with room in between, on a single baking sheet for even baking.
Flour Selection
Many bagel recipes call for flour with protein percentages that are quite high. I’ve tried this with Tony Gemignani’s Pizza Flour (15% protein), and while there was a bit more chew, I wouldn’t say it was necessary to order some for making sourdough bagels. I like to use Central Milling High Mountain, and King Arthur Bread Flour or Bob’s Red Mill Bread Flour will also work well.
Baking Schedule
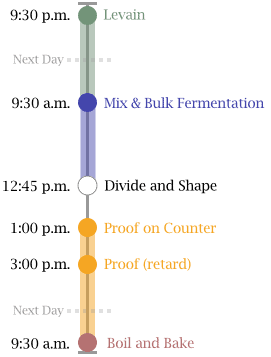
These sourdough bagels take three days to make: from creating the levain at night on day one to boiling and baking them in the morning on day three. I know — three days!? — but the good news is, most of the time you’re not actively handling the dough, it’s fermenting in one stage or another.
All-in-all, this is a straightforward schedule. It’s also quite flexible by a few hours here and there once the dough is chilled and in the fridge: if you can’t boil and bake first thing on day three, it’ll hold a few more hours (or perhaps longer).
Sourdough Bagel Formula
For tips on how to calculate baker’s percentages or how to modify this formula, see my post on baker’s percentages (baker’s math).
| Total Dough Weight | 1,600 grams |
| Pre-fermented Flour | 12.00% |
| Yield | 12 x 125g bagels |
Total Formula
Desired dough temperature: 78°F (25°C). See my post on the importance of dough temperature for more information on dough temperatures.
| Weight | Ingredient | Baker’s Percentage |
|---|---|---|
| 964g | High protein flour (~13% protein, Central Milling High Mountain)8 | 100.00% |
| 530g | Water | 55.00% |
| 29g | Sugar, caster | 3.00% |
| 29g | Barley malt syrup | 3.00% |
| 18g | Salt | 1.90% |
| 7g | Diastatic malt | 0.75% |
| 23g | Sourdough starter (100% hydration; 40% rye, 60% white flour) | 2.40% |
Sourdough Bagel Method
1. Prepare Levain – Night before mixing, 9:30 p.m. (Day one)
Mix the following ingredients together in a container and leave covered to ripen for 12 hours overnight. It mixes up to a stiff consistency so I like to mix and knead the dough in a mixing bowl, then I transfer to a narrow and tall jar.
Try to hit a final dough temperature of 78°F (25°C) for this levain.
| Weight | Ingredient | Baker’s Percentage |
|---|---|---|
| 116g | High protein flour | 100.00% |
| 58g | Water | 50.00% |
| 23g | Ripe sourdough starter | 20.00% |
23.18% Levain In Final Dough Mix.
2. Mix – 9:30 a.m. (Day two)
A note on mechanical mixing: This dough is low hydration and comprised of high protein flour—it’s a firm dough! I used my Haussler Alpha mixer to mix this for 5 minutes on speed one. You could use a KitchenAid stand mixer to mix this dough for a few minutes in the beginning, but I wouldn’t push it too far and risk damaging the mixer—ultimately you make the call. After mixing in the KitchenAid, you could then turn the dough out to the counter to finish kneading like pasta dough, as described below.
| Weight | Ingredient |
|---|---|
| 848g | High protein flour |
| 472g | Water |
| 29g | Sugar, caster |
| 29g | Barley malt syrup |
| 18g | Salt |
| 7g | Diastatic malt |
| 197g | Levain (see Prepare Levain, above) |
Make the malt syrup slurry: This will help the sticky, viscous barley malt syrup incorporate more easily into the dough. To a small mixing bowl, add a bit of the mixing water, barley malt syrup, sugar, diastatic malt powder, and salt. Stir until everything dissolves.
To your mixing bowl, add the malt syrup slurry, flour, water, and ripe levain. If using a mechanical mixer (see the note, above), mix on low speed for approximately 5 minutes until the dough strengthens and begins to smooth. This dough is so firm it doesn’t need much.
If you do choose to use a mechanical mixer, you might need to cool the mixing water to ensure you hit the FDT of 78°F (25°C)9.
If mixing by hand, mix everything in the bowl until well incorporated. Turn the dough out to a clean work surface and knead the dough like pasta: fold half over onto itself and push the mass away from you with the palm of your hand. Continue folding over and pushing away for 8-10 minutes until the dough firms up, and it becomes hard to knead any further.
Transfer your dough to a bulk fermentation container and cover.
3. Bulk Fermentation – 9:45 a.m. to 12:45 p.m.
Give this dough a single fold after 1 hour and 30 minutes into bulk fermentation. For the fold, turn the dough out to a clean work surface and do your best to fold it into thirds. Place the dough back into the bulk fermentation container with its seam side down, and cover. Let the dough rest, covered, for the remainder of bulk fermentation.
4. Divide and Shape – 12:45 p.m.
Use a half baking sheet (so it fits into your refrigerator) to hold the 12 pieces of shaped dough. Later, after boiling the dough, I upsize to a full baking sheet to help the dough evenly bake. Spread a thin layer of cornmeal on the half sheet to prevent the bagel dough from sticking during proofing.
Divide the dough into twelve 125g pieces.
First, degas the piece by tamping down a bit with your hand. Then, do your best to form the piece into a rough rectangle and cinch down from the top, so the dough ends up in a little tube. This cinching doesn’t have to be forceful, and it helps to get the dough into a tube shape.
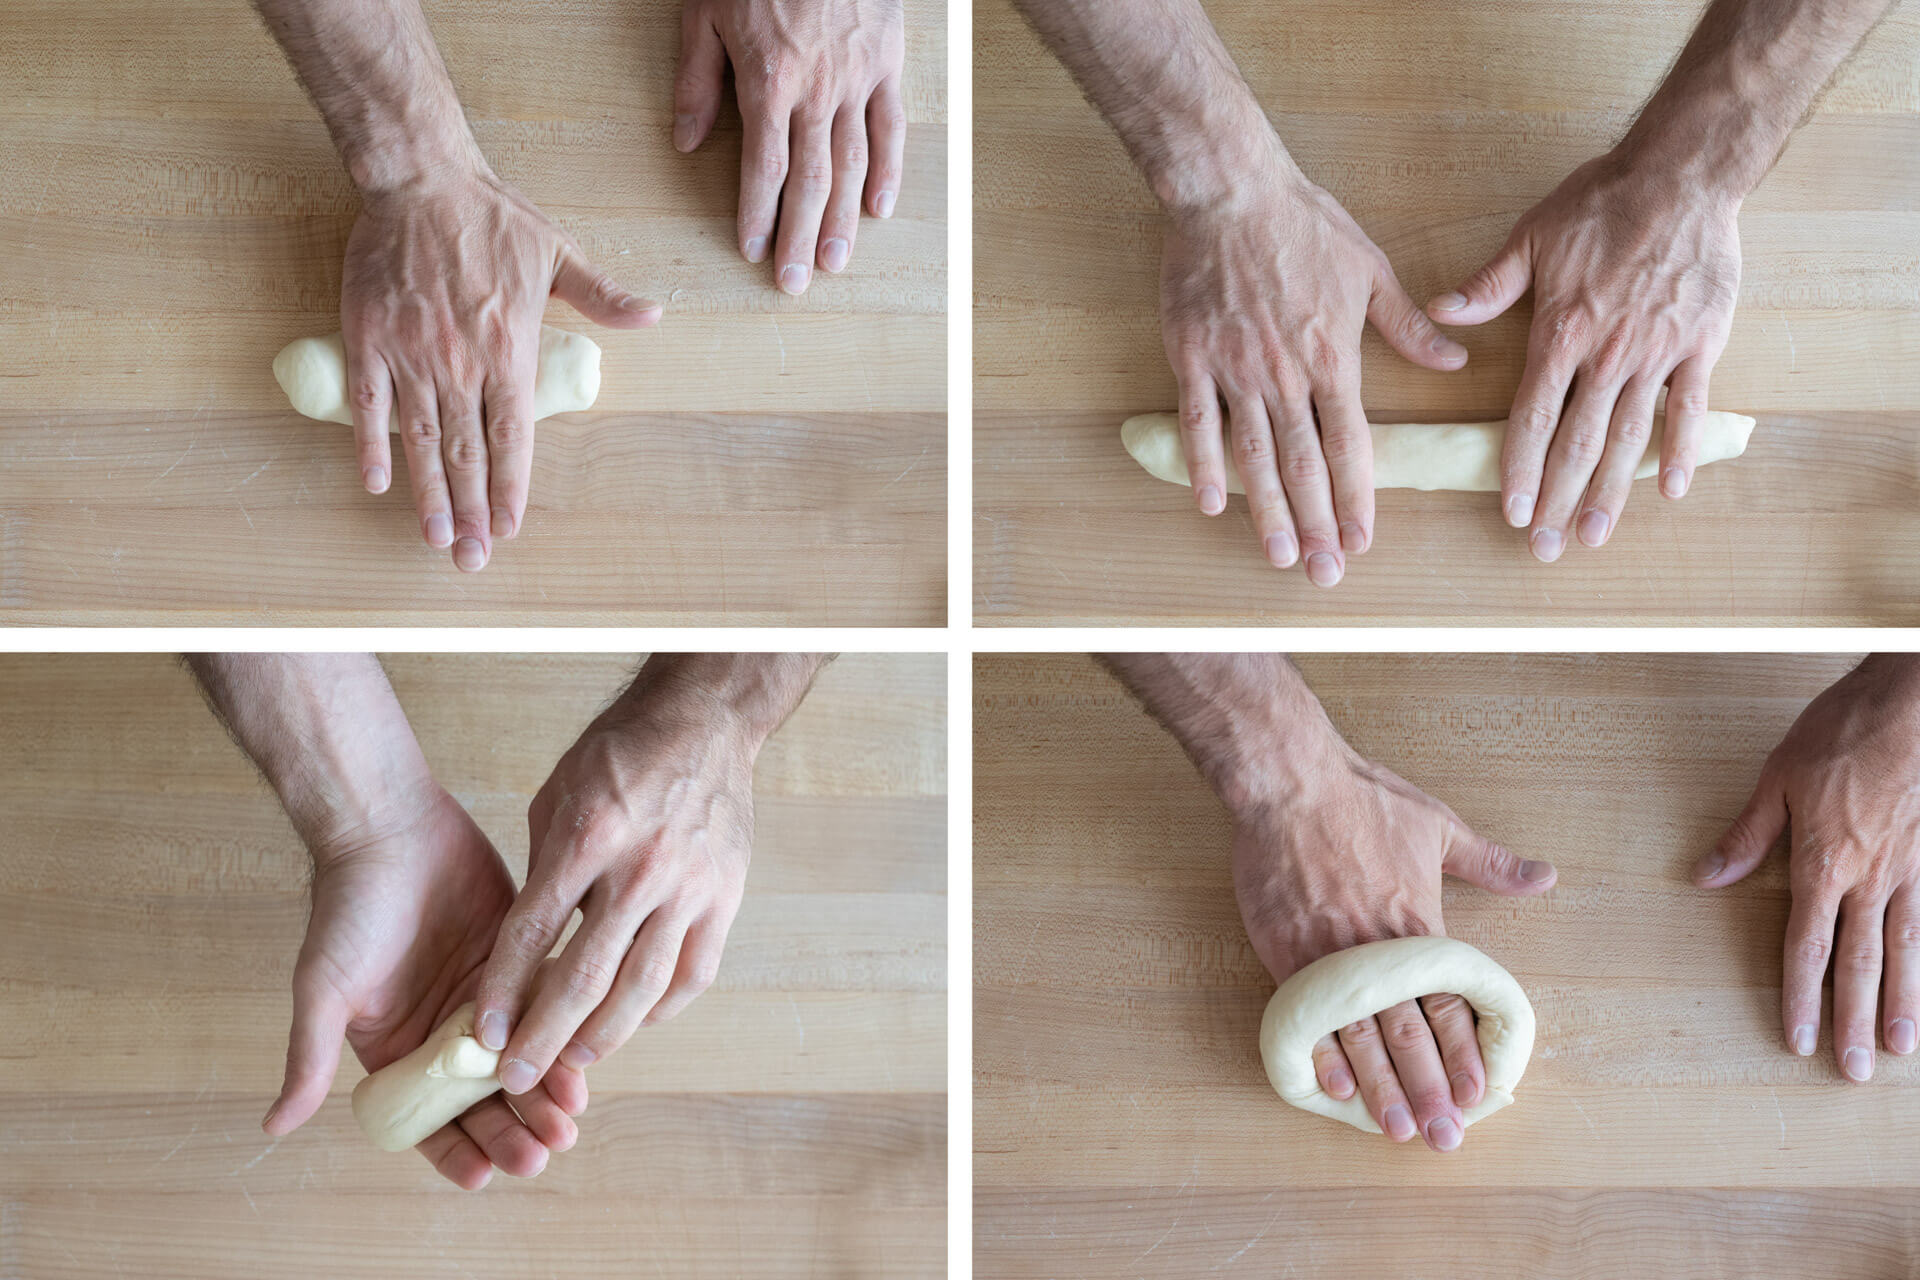
Next, roll your hand in the center a few times to create a bulb at each end. Then, switch to two hands and roll outward to about 12 inches and a tube that’s mostly the same thickness all the way through. If you prefer a bagel with a large hole, roll out the tube, so it’s longer.
Once rolled out to a long tube, wrap it around the backside of your hand between your knuckles and wrist. Overlap the two ends of the dough in the palm of your hand, and gently press the two ends together. Next, press your palm down on the work surface, and in a repetitive motion, roll the dough on the work surface repeatedly to seal.
Here’s a video on my YouTube channel of me shaping one of the pieces
After shaping a piece, transfer it to the cornmeal-dusted baking sheet. Repeat for the remaining pieces, and you will end up with four rows of three.
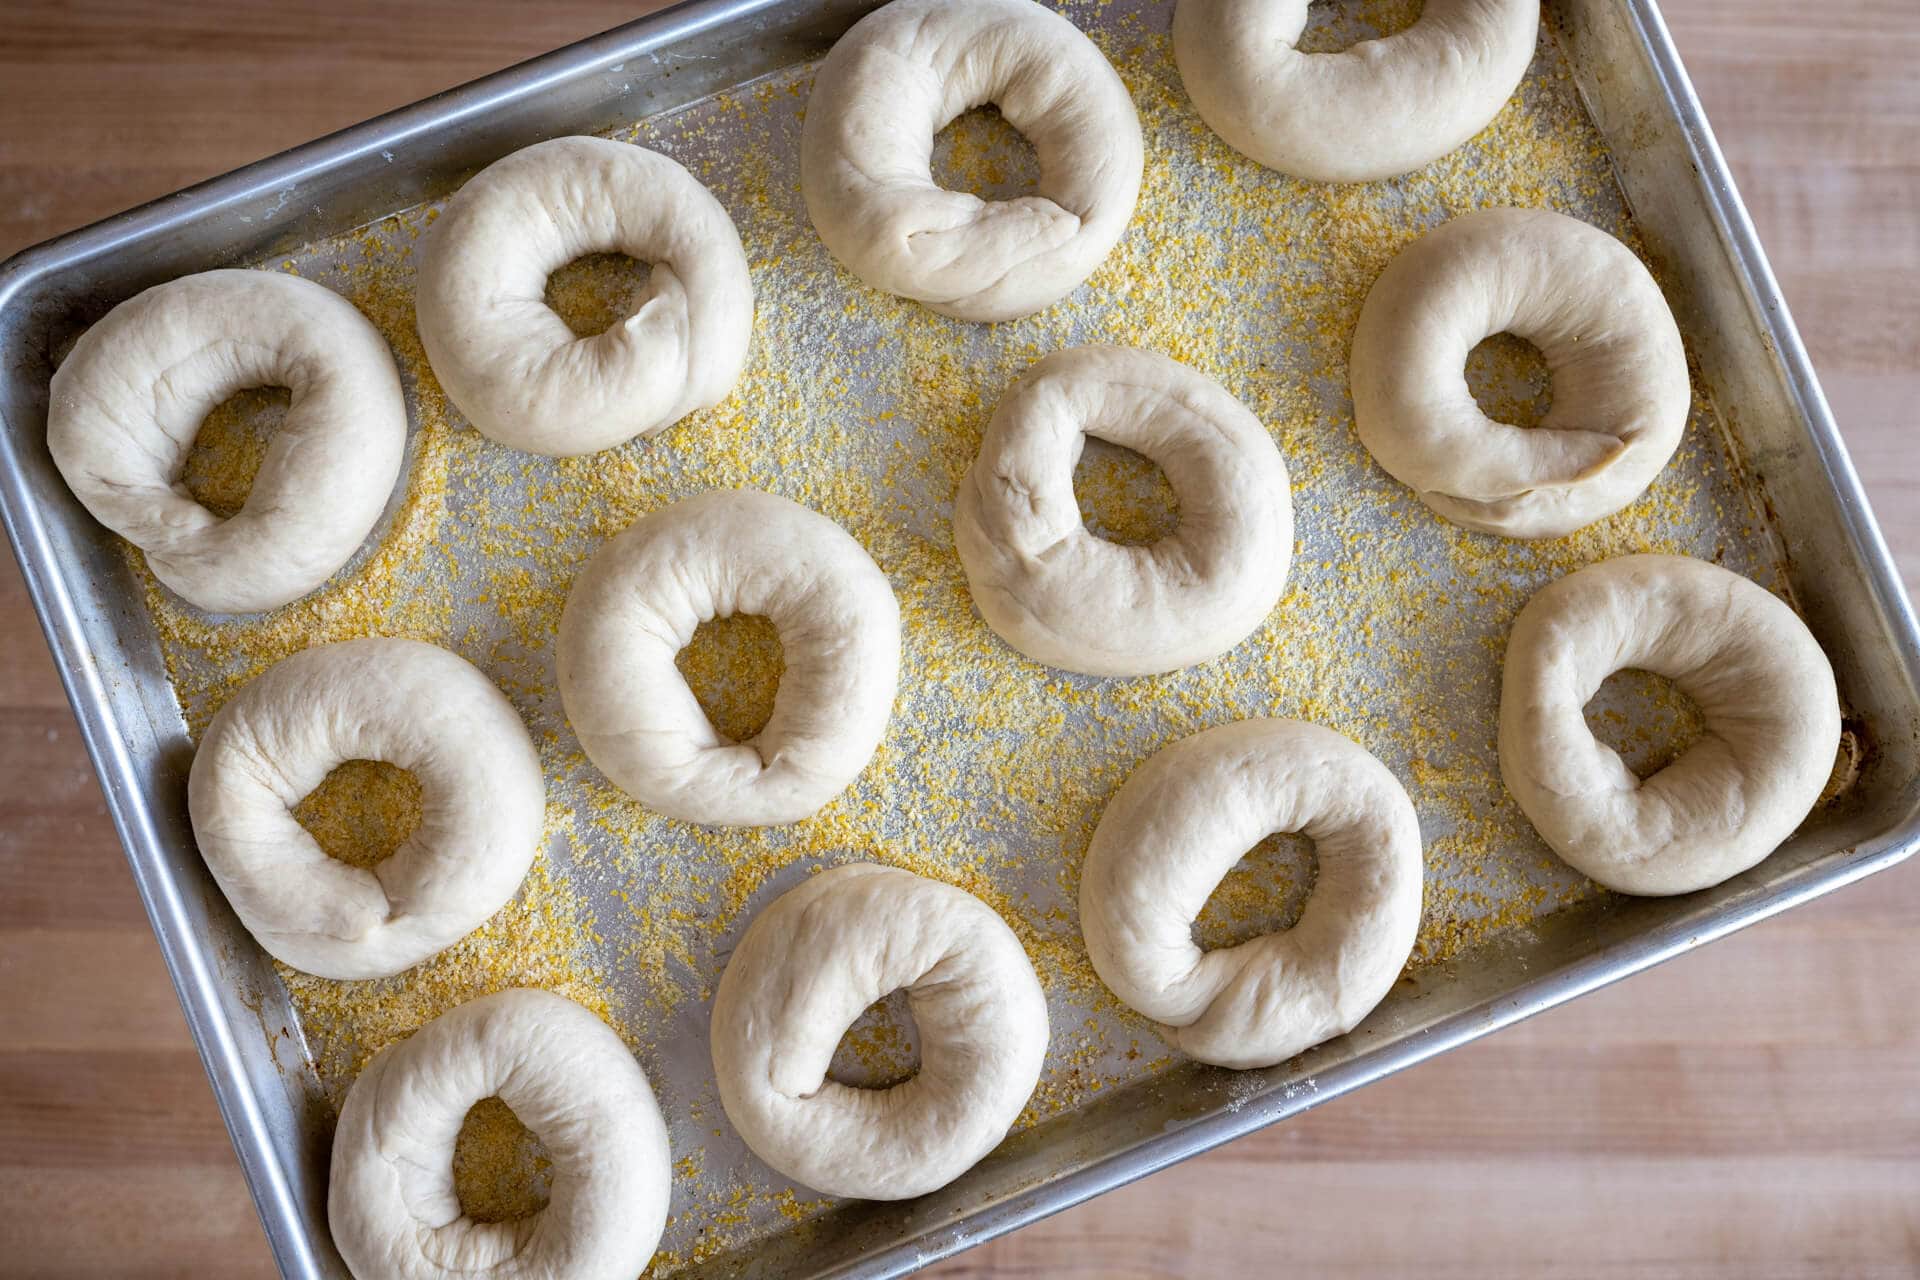
5. Proof – 1:00 p.m. 3:00 p.m. (2 hours room temperature, then retard overnight)
Cover the baking sheet with a large, reusable plastic bag and seal shut. Let the dough proof at room temperature, around 72-74°F (22-23°C), for 2 hours. The dough should puff up slightly after this time but not excessively. If the dough still feels very dense to the touch, give it another 15-30 minutes and check again.
After 2 hours, place the covered baking sheet into the fridge overnight at around 39°F (4°C).
6. Boil and Top – 9:30 a.m. (Day three)
Oven prep: Before you begin boiling your bagel dough, preheat your oven to 475°F (245°C) with convection or 500°F (260°C) without convection. Place one rack at the bottom third of the oven. Place a baking stone or baking steel on the rack to preheat. I steam my oven as described on my oven steaming method post, so place a roasting pan on the bottom filled with lava rocks to prepare to steam. I also fill a cup of ice and place it next to my oven (I will pour this over the lava rocks to steam the oven).
Bagels are unique because you boil the dough before baking. This boiling gelatinizes the starches in the flour and gives them a little more chew and helps them achieve a shiny crust. This gelatinization is very similar to how you make a tangzhong or roux. But for a bagel, the longer you boil them, the thicker the crust and chewier they will become. There is a limit to the boil duration, though, as they will degrade in the water after a while. I have found boiling the dough 40 seconds on each side, for a total of 1 minute and 20 seconds, to be just right.
Many places like to add barley malt syrup or honey to the boiling water, but in side-by-side testing I didn’t find the added syrup to give them any more shine. The cornmeal brought into the boiling water might also add starches, much like when making pasta.
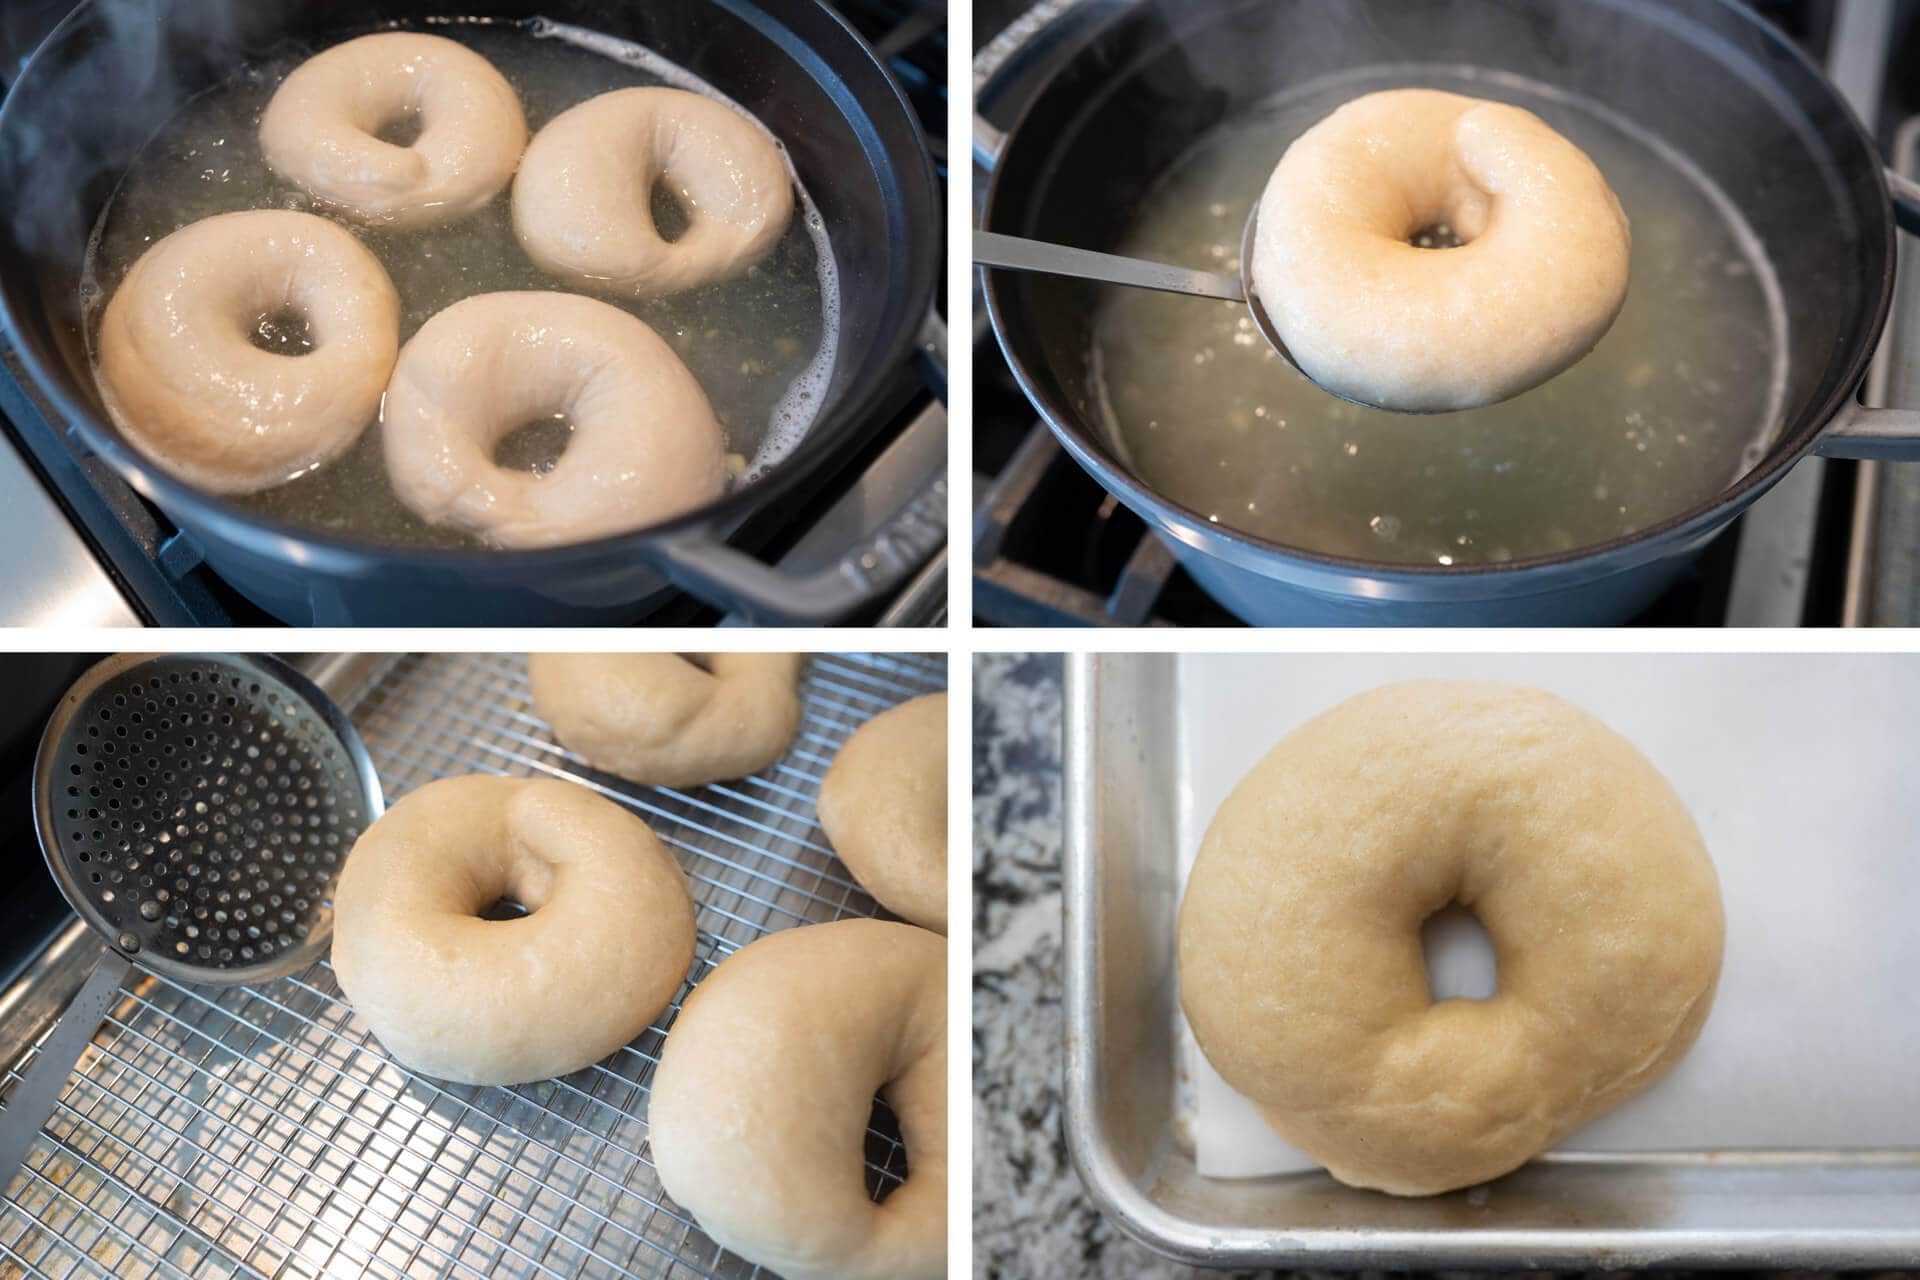
Boiling equipment prep: Fill a wide pot with enough water so the bagel dough can float without touching the bottom (in my 7qt Staub Dutch oven, this was about 1.5 gallons). Bring to a low boil. Next to your stovetop, place a half baking sheet with a cooling rack inside, this will hold the wet bagels for a minute and allow them to drain. Next, line a full baking sheet with parchment paper — this will hold the dough as it bakes. Finally, grab any toppings you’d like (poppy, oat, everything bagel mix, sesame, etc.) and place them in bowls on your work surface.
Boil: Once the water is at a low boil, boil the proofed sourdough bagel dough straight from the fridge, about 40 seconds per side. Using a spider strainer, transfer each piece to the cooling rack inside the baking sheet to drain while you boil the rest of the dough.
Once the pieces are all boiled, move quickly to top them, if desired, and get them onto the final baking sheet.
This dough should float immediately when dropped into the boiling water. If the dough sinks and doesn’t pop up within a few seconds, it’s likely under proofed. Give it more time to proof at warm temperature and try again.
Once the bagels have drained for a minute on the baking rack, transfer them to the full baking sheet lined with parchment paper for baking. Top them with whatever toppings you’d like at this time.
7. Bake – 9:45 a.m.
Slide the full baking sheet with boiled dough into the preheated oven directly onto the baking stone or baking steel. Pour the cup of ice onto the pan with lava rocks and quickly close the oven.
Bake at 475°F (245°C) convection (500°F (260°C) without convection) for 10 minutes with steam. After 10 minutes, vent the oven and remove the steaming pan, rotate the baking sheet 180°, and bake for 5 minutes longer. After this 5 minutes, turn the oven down to 450°F (235°C) and bake for 5 minutes longer for a total of 20 minutes. Remove the sheet when the bagels are nicely colored.
Let cool 15-20 minutes on a wire rack. These are fantastic the first day they’re baked and hold well for a few days after that in a bread box. I also like to wait till they are room temperature, slice in half, and then freeze in a freezer bag. They can be reheated in the toaster, as described in my post on how to store bread.
Conclusion
The entire eating experience is scary in how it takes over, and it’s exactly what I want in a bagel.
When you take a bite of these bagels, you’ll first discover a fleeting crispness that gives in to chewiness, a textural dance that eventually leads to a subtle, onset of sourness. This mellow tang creeps in and propels you to keep going with it, to keep taking bite after bite until you’ve finished the entire bagel without the thought of stopping. The whole eating experience is scary in how it takes over, and it’s exactly what I want in a bagel. That pop of flavor at the end of the bite is not something you find in mass-produced bagels, and I just love it. And while there are sugar and barley malt syrup added to the dough, it does not carry through to make these bagels sweet. There’s a beautiful balance in the eating experience of these sourdough bagels.
After making these bagels the first time, you’ll get the hang of the process. Subsequent batches become easier and more natural, and it’s no stretch to think these could become a weekly staple — and they freeze 10 incredibly well if by chance there’s any left.
Regardless where your bagel preferences lie, I’m confident these sourdough bagels will rank up there with the best you’ve had — and what could be better than making your own with your sourdough starter? And who knows, perhaps they’ll mend that friendship severed by staunch bagel ideals — these could be the olive branch; a crisp and seductively chewy one.
Buon appetito! 🥯
Print
Sourdough Bagel
- Prep Time: 24 hours
- Total Time: 24 hours
- Yield: 12 bagels
Description
My recipe for flavorful and chewy sourdough bagels with a thin and slightly crispy crust. Delicious topped with an everything bagel mix, coarse sea salt, oats, seeds, or anything else you can dream up!
Ingredients
Levain
- 116g high protein flour
- 58g water
- 23g sourdough starter, ripe
Main Dough
- 848g high protein flour
- 472g water
- 29g sugar, caster
- 29g barley malt syrup
- 18g salt
- 7g diastatic malt
- 197g levain
Instructions
- Levain (the night before mixing, 9:30 p.m.)
Mix all the Levain ingredients in a container and leave it at a warm temperature for 12 hours. - Mix (9:30 a.m.)
Add a splash of the mixing water, sugar, barley malt syrup, diastatic malt powder, and salt to a small bowl and mix together. To your stand mixer’s mixing bowl, add the malt syrup slurry, flour, water, and ripe levain. Mix on low speed for approximately 5 minutes until the dough strengthens and begins to smooth. Transfer your dough to a bulk fermentation container and cover. - Bulk Fermentation (9:45 a.m. to 12:45 p.m.)
Give this dough a single fold after 1 hour and 30 minutes into bulk fermentation. - Divide and Shape (12:45 p.m.)
Use a half baking sheet (so it fits into your refrigerator) to hold the 12 pieces of shaped dough. Spread a thin layer of cornmeal on the half sheet to prevent sticking. Divide the dough into twelve 125g pieces. First, degas the piece by tamping down a bit with your hand. Then, form the piece into a rough rectangle and cinch down from the top, so the dough ends up in a little tube. Roll the tube out to a 12″ long tube. Wrap the dough around the backside of your hand and pinch it together in the front. Roll a few times on the counter to seal. Transfer to the cornmeal-dusted baking sheet. Repeat for remaining dough pieces. - Proof (1:00 p.m. to 3:00 p.m.)
Cover the baking sheet with a large, reusable plastic bag and seal shut. Let the dough proof at room temperature, around 72-74°F (22-23°C), for 2 hours. The dough should puff up slightly after this time but not excessively. If the dough still feels very dense to the touch, give it another 15-30 minutes and check again. After 2 hours, place the covered baking sheet into the fridge overnight at around 39°F (4°C). - Boil and Top (9:30 a.m., Day Three)
Oven prep: Before you begin boiling your bagel dough, preheat your oven to 475°F (245°C) with convection or 500°F (260°C) without convection. Place one rack at the bottom third of the oven. Place a baking stone or baking steel on the rack to preheat. Place a roasting pan on the bottom filled with lava rocks to prepare to steam. I also fill a cup of ice and place it next to my oven (I will pour this over the lava rocks to steam the oven).
Boiling equipment prep: Fill a wide pot with water and bring to a low boil. Next to your stovetop, place a half baking sheet with a cooling rack inside, this will hold the wet bagels for a minute and allow them to drain. Next, line a full baking sheet with parchment paper — this will hold the dough as it bakes. Finally, grab any toppings you’d like (poppy, oat, everything bagel mix, sesame, etc.) and place them in bowls on your work surface.
Boil: Once the water is at a low boil, boil the proofed sourdough bagel dough straight from the fridge, about 40 seconds per side. Using a spider strainer, transfer each piece to the cooling rack inside the baking sheet to drain while you boil the rest of the dough. Then, transfer the boiled bagels to the full baking sheet and top, if desired. - Bake (9:45 a.m.)
Slide the pan with all the bagel dough into the oven and pour the cup of ice over the roasting pan with lava rocks. Quickly close the oven.
Bake at 475°F (245°C) convection (500°F (260°C) without convection) for 10 minutes with steam. After 10 minutes, vent the oven and remove the steaming pan, rotate the baking sheet 180°, and bake for 5 minutes longer. After this 5 minutes, turn the oven down to 450°F (235°C) and bake for 5 minutes longer for a total of 20 minutes. Remove the sheet when the bagels are nicely colored. Let cool 15-20 minutes on a wire rack.
Notes
- These are wonderful topped with an Everything Bagel mix, rolled oats, sesame seed mixture, or any other topping you’d like.
If you use this sourdough bagel recipe, tag @maurizio on Instagram and use the hashtag #theperfectloaf so I can take a look!
😱↩
Not that those sourdough pretzels aren’t worth the effort, because they certainly are.↩
King Arthur Flour Bread flour or Bob’s Red Mill Bread Flour will work in this recipe.↩
I used cold water straight from my fridge.↩
I slice them in half and place them in a freezer bag.↩
😱↩
Not that those sourdough pretzels aren’t worth the effort, because they certainly are.↩
King Arthur Flour Bread flour or Bob’s Red Mill Bread Flour will work in this recipe.↩
I used cold water straight from my fridge.↩
I slice them in half and place them in a freezer bag.↩
