LS Swap Chevelle Guide
Messing with perfection
If you've been following along with our Project Chevelle series, you've seen us take one unbelievably stock '72 Chevelle and treat it to some suspension goodies, upgraded brakes, and an engine and transmission swap. These elements all came together to make our little Chevelle into a versatile muscle car that was a thrill to drive. This culminated in one big road trip, where we got to enjoy the fruits of our labor. It was perfect.
And now it's time to mess with perfection. If there's one thing that almost all gearheads share, it's an inability to leave anything alone. If it goes, we can make it go faster. If it turns, we can make it turn better. If it...well, you get the idea. So with that in mind, we tore into our road-tested Chevelle to try something different.
Love them or hate them, LS swaps are all the rage. These high-tech junkyard wonders can make stupid power with a minimal investment, and they're easy to find. GM installed them in about a zillion cars, trucks and vans starting with the Corvette in 1997 and continuing through the modern LT/Gen V engines. The combination of a stout bottom end and cylinder heads that flow pretty well right out of the gate make these engines a natural for cheap horsepower. Like it or not, in 2019 they are the favored engine swap for those who want to go fast for cheap, just like the Ford flathead was in the 40's and the Gen 1 Chevy small block was until recently. Now the internet is overflowing with dyno tests on boosted LS engines that make 1000+ horsepower with stock internals. We decided it was time for us to join the dark side, and Project Chevelle was the perfect candidate.
Our trusty old Chevelle returned to Speedway from its trip to the Street Rod Nationals on Monday, September 6th. A greasy junkyard LQ9 that had been liberated from an Escalade was silently leaking oil on the floor of the shop. We had a date with the dragstrip at LS Fest in exactly one month. Time to get busy.
The build
First, the engine was carted across the street to Speedway Racing Engines. There, our resident engine gurus disassembled the crusty 6-liter to inspect its condition. Some folks opt to use these junkyard engines in as-pulled condition. This is certainly the low-cost option, but it's always possible to get a dud that grenades on its first time out. We didn't have time for any engine explosions, so we elected to play it safe and pull it apart for an inspection. As delivered, our engine was in pretty good shape. The piston skirts exhibited the typical scuffing, but there was no real ledge on the cylinder walls and all the bearings looked decent. Could we have just run it as-is? Probably. But we elected to hone the cylinders and replace the pistons, rings, and bearings. Now we're sure we have a solid foundation for anything that we choose to throw at it in the future.
The stock cylinder heads were re-used. They were surfaced and the seats were cleaned up, but there was no fancy port work or other shenanigans.
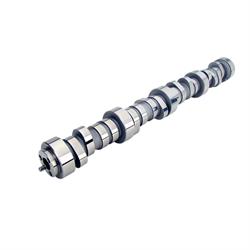
The real magic in this engine is the camshaft. The Comp part #54-456-11 features a healthy .607" intake lift and .614" exhaust. We wanted this engine to have decent street manners and not throw anything too wild at our FiTech engine management, so the duration is relatively tame, coming in at 219° intake and 227° exhaust, both at .050". The LSA is also relatively wide at 112° to smooth out the idle and help with drivability. We re-used the stock rocker arms, but it's important to note that the stock trunnions won't support a cam with this much lift. They were ditched in favor of Comp part #137021.
With the long block assembled, we had a decision to make. We knew we were going to use a FiTech engine controller; we sell quite a few of these and this was a great opportunity to get some hands-on experience with one. The choice that we faced was what version we wanted. FiTech offers an LS ECU and harness-only that plugs into all your stock sensors on an LS engine, making use of the stock intake manifold and throttle body. This would have been the more cost-effective way to go. Instead, we opted to shell out a few more bucks for their Ultimate LS system. In addition to the harness and ECU, this version also includes a racy looking fabricated aluminum intake manifold, throttle body, fuel rails, and injectors. This adds about $600 to the tab, but we felt this was worth it from an aesthetic standpoint alone. Stock truck manifolds perform well, but they don't look great. This kit cleans up the top of our LS, making it look less like an octopus fighting a vacuum cleaner and more like a clean, hopped-up muscle car engine.
Once the crew at Speedway Racing Engines was finished with assembly, they were kind enough to let us bolt our LS to their dyno and make a few pulls. Before we fired it, we went through the initial setup on the FiTech handheld controller. These parameters (engine size, cam profile, etc.) allow the computer to be in the right neighborhood to get the engine started. Once running, the computer will learn and begin to control the air, fuel, and spark more precisely.
When the switch was flipped, our little 6-liter popped right off. The idle was a bit off, and it only took a couple minutes to figure out that our computer thought it was getting signal from two oxygen sensors when in fact there was only one. Once this was straightened out, the idle came right up.
While the FiTech is self-learning, there is also a lot of user-tunability built in as well. Our engine was stumbling when the throttle was stabbed open, so we went back to the handheld tuner and added more fuel to the map. Essentially, the electronic version of bolting bigger squirters to your Holley. Problem solved.
And now the moment of truth. Everyone cleared out of the dyno cell and engine builder Zach Woods took his seat at the controls. With the throttle lever stabbed all the way forward, the little LS screamed all the way to 7000 rpm. When the dust settled, our engine had put down 496 horsepower at 6100 rpm and 460 lb/ ft. at 5100. We'll take it. Some tinkering with fuel curves and a few subsequent pulls revealed that the engine was pretty happy right where it was at, so back across the street it went. Time to drop it into Project Chevelle.
Mystery solved
LS swaps into older cars have become pretty common, but for some of us old-school folks there's still some mystery. What adapters are needed to bolt it in? Isn't the wring a nightmare? Does the transmission still bolt up? Don't I need a special radiator? Well, now that we've done it, we can answer your questions, and I'm happy to report that the performance aftermarket has made this swap pretty darn easy.
We used our Hooker adapter brackets that bolt to the side of the LS block and adapt the good old three hole Chevy mount. In fact, we recycled the polyurethane mounts that we had used to bolt the old 383 into the Chevelle. These adapters are available with various offsets to allow the engine to slide forward and back. There's even an adjustable version to allow for even more versatility. We used a "stock location" mount, which basically kept the back of the block exactly where the old small block had been.
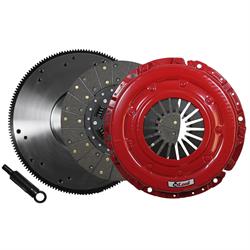
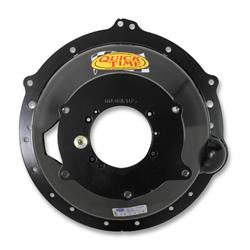
Now on to the transmission. The bellhousing bolt pattern on an LS engine is close to the old small and big block Chevy, with five of the six holes, as well as the dowel pins, being in the same place. The thing that complicates matters a bit is the crank flange. It's almost a half-inch farther forward than the older engines. There are flywheels and pilot bushing adapters available if you insist on using your existing bellhousing, but we elected to use one of our Quick-Time bellhousings along with an all-new McLeod clutch and flywheel designed for this application. The same Tremec 5-speed that was used behind our 383 bolted right up. This only moved the transmission about 3/8", meaning that new holes had to be drilled to allow the stock transmission crossmember to move, but the shifter and driveshaft required no modification.
With our new engine nestled between the framerails, we prepared to jump our next hurdle; headers. Fortunately, Hooker has a Super Competition header specifically for this application. They fit great, and tuck the collector very close to the floor. This was both a blessing and a curse on our car; it's great that we won't be dragging the headers over every speed bump, but it complicated the rest of the exhaust. While we sell some fancy transmission crossmembers that have generous clearance for the exhaust, we wanted to retain our stock crossmember if possible to keep things low-buck. Mission accomplished, but the header dumped right into the crossmember. This is where the only real fabrication had to happen on this swap. We shortened the collector and added a few extra bends to the Flowmaster exhaust that was already on the car. If this isn't something you're comfortable with, a local exhaust shop could do this work for you.
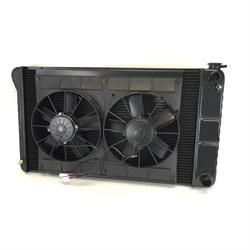
LS radiators differ from regular old GM radiators in a couple ways. First, the thermostat housing on most LS engines is on the water pump and points to the right. So, typically an "LS swap" radiator will have the upper inlet moved from the driver's side to the passenger side. Also, LS engines have steam lines that serve to vent pockets of hot air that may form at the top of the engine. So, another trait of an LS radiator is that it will have a port near the upper hose for the steam line. While there are hacks for both of these issues that will allow you to retain your original radiator, we elected to use one of our Dewitts LS Conversion radiators. Not only do these take care of the hose position and steam line, but they are direct fit and come with the fans and shroud installed. We chose to have ours painted black, and at a glance it looks like it was factory installed in our Chevelle.
On to the fuel system. Since we had already upgraded to a new tank with an in-tank high-pressure pump, all that was necessary was a little re-routing of hoses and a new Aeromotive regulator that would handle the 58 psi. required by the new fuel injection. There are other ways that you can do this, but we elected to feed the fuel rails directly from the pump, then regulate the pressure on the return-side.
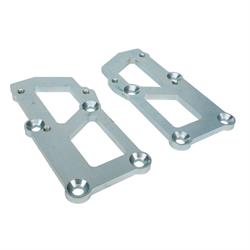
The factory accessory drive bracketry from GM is made from cast aluminum and is pretty stout. The problem is, it was made to fit in an Escalade or a Silverado pickup, not a 70's muscle car. There are a ton of aftermarket solutions to this problem, and we sell several from Holley and others. But we wanted a low-cost solution, so we went to the drawing board and had our engineering department whip up some slick bracketry that didn't break the bank. The good news for you is that we're developing this kit as a new product for the Speedway Motors catalog, and Project Chevelle is serving as a test mule.
And finally, the wiring. Hooking up the FiTech on the dyno was one thing, but what about actually installing it in the car? To be completely honest, we were a little worried. Time was running out; by the time we got this far we were just days away from our departure for LS Fest. There was no time for any complicated electrical issues to pop up. Somewhere around 11pm we laid the harness out on the floor to start sorting it out. By midnight, it was in the car and almost completely connected. All of the plugs for the injectors, coils, and factory sensors were correct and plugged right in. This left two wires to be hooked directly to the battery, a ground, an ignition switch wire, and a tach wire. That's it. It couldn't have been any easier. And what about the alternator? The Fi-Tech harness includes a plug for the stock LS alternator. We strung a length of 8-gauge wire from the post on the back of the alternator to the lug on the starter where the positive battery cable terminated. The fuse panel that powered the rest of the accessories on the car came off the starter lug as well, so all that remained was to simply un-plug the stock voltage regulator on the core support and tie it up. The switch was flipped, the starter cranked, and it roared to life. And yes, the AM radio still works.
How does it run? Check out our LS Swap video to see it in motion. Also, stick around for a full report on the performance of the Chevelle with its new heart. And yes, we did make our LS Fest deadline. We even made a few passes on the dragstrip. There's plenty more to come, so stay tuned!