Table of Contents
Advertisement
420-6796-01UK
REV 0
INSTALLATION & SERVICE MANUAL
Before using this product, read this SERVICE MANUAL carefully to understand the contents stated
herein. After reading this manual, be sure to keep it available nearby the product or somewhere
convenient in order to be able to refer to it whenever necessary.
Manufactured in the UK by:
MANUFACTURING DIVISION (UK)
Advertisement
Table of Contents

Related Manuals for Sega Outrun 2


Summary of Contents for Sega Outrun 2
- Page 1 420-6796-01UK REV 0 INSTALLATION & SERVICE MANUAL Before using this product, read this SERVICE MANUAL carefully to understand the contents stated herein. After reading this manual, be sure to keep it available nearby the product or somewhere convenient in order to be able to refer to it whenever necessary. Manufactured in the UK by: MANUFACTURING DIVISION (UK)
-
Page 2: Table Of Contents
Sound Test........................24 3.8. Moving The Machine........................25 3.9. Control Panel (Handle Mecha.) - ‘HAPP’ Type ................26 3.9.1. Replacing Volume........................26 3.9.2. Greasing – SEGA and HAPP types ..................28 3.9.3. Replacement Of Spring ......................28 3.10. Shift Lever..........................29 3.10.1. Removing Shift Lever .......................29 3.10.2. - Page 3 Price Of Play Settings Austria-Czech-Denmark-Norway-Israel-France2 .......85 DESIGN RELATED PARTS......................86 PARTS LIST...........................87 8.1. Assembly Structure........................87 8.2. ORT-00002JUK TOP ASSY OUTRUN 2 U/R ................88 8.3. ORT-1000JUK ASSY UR CABI PENT..................89 8.4. PTR-1110UK ASSY FRAMEWORK BLACK NEW ..............93 8.5. PTR-1950UK ASSY SFMD BLACK (FLAT DOOR) ..............94 8.6.
- Page 4 9.1. Wire Colours..........................108 9.2. Electrical Schematic .........................108...
-
Page 5: Before Using This Product
Should any doors, lids or protective covers be damaged or lost, do not operate the product. SEGA is not liable in any whatsoever for any injury and/or damage caused by specification changes not designated by SEGA. -
Page 6: Inspections Immediately After Transporting The Product To The Location
Location • Only QUALIFIED SERVICE PERSONNEL should carry out inspection. Normally, at the time of shipment, SEGA products are in a state to allowing usage immediately after transporting to the location. Nevertheless, an irregular situation may arise during transportation preventing this. - Page 7 CONCERNING THE STICKER DISPLAY CONCERNING WARNING STICKERS SEGA product has stickers describing the product SEGA product has warning displays on stickers, manufacture number (Serial Number) and labels or printed instructions adhered/attached to electrical specification. If you require service or incorporated in the places where hazardous assistance you will require the Serial Number.
-
Page 8: Introduction To This Service Manual
INTRODUCTION TO THIS SERVICE MANUAL SEGA ENTERPRISES LTD., supported by its experience in electronic high technology of VLSI’s, microprocessors etc. and with a wealth of experience, have for more than 30 years been supplying various innovative and popular games to the world market. This Service Manual is intended to provide detailed descriptions together with all the necessary information covering the general operation of electronic assemblies, electro-mechanicals, servicing controls, spare parts, etc. -
Page 9: Installation And Maintenance Instructions
Standard Sega machines are fitted with a SR3 coin mechanism, however, as a service to our customers Sega machines can be supplied with no coin mechanism or door allowing the customer to fit a coin handling option from the approved list. Fit only the coin handling arrangements detailed below and follow the instructions provided in Section 6. -
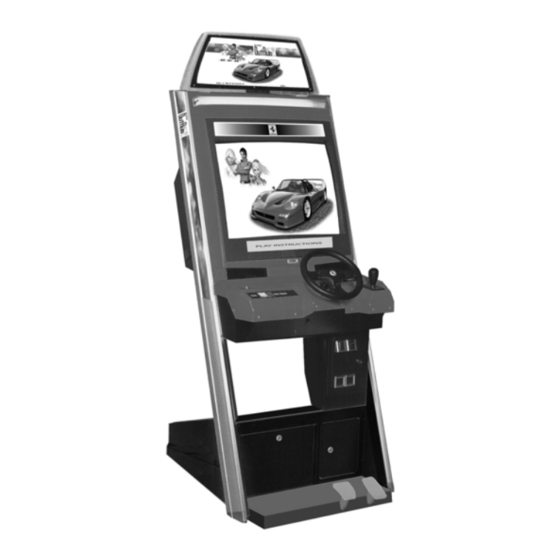
Page 10: Name Of Parts
3.3. Name Of Parts Width Length (cm) Height (cm) Approx Weight (Kg) (cm) MAIN CABINET FLOOR BILLBOARD WHEN ASSEMBLED... -
Page 11: Accessories
3.4. Accessories The machine is supplied with an installation kit. Please ensure the following parts are supplied: Item Component Part Description NOA-1301X BILLBOARD PLATE ORT-1250UK ASSY FLOOR SHORT CTA-0001 JOINT BRKT L CTA-0002 JOINT BRKT R ORT-0001UK DISPLAY CARD ORT UR NOA-1302UK BILLBOARD SHEET ORT-0003UK... -
Page 12: Shipping The Game Board
3.5. Shipping The Game Board Replacement or repair of the Game Board (Chihiro) for this product should be undertaken at the appropriate repair centre. Be sure to follow the specifications below when requesting repairs/sending the board to the repair centre. Not following the specifications may result in the board not being accepted or in extra charges being made. -
Page 14: Shipping The Media Board
3.6. Shipping The Media Board When sending the Media Board for repairs, follow the specifications below and request repairs or send the Board to your retailer/the repair centre. Not following the specifications may result in the board not being accepted or in extra charges being made. -
Page 15: Assembly Instructions
3.7. Assembly Instructions • Perform the assembly by following the procedure herein stated. Failure to comply with the instructions, for example, inserting the plug into an outlet at a stage not mentioned in this manual can cause an electric shock •... -
Page 16: Installing The Billboard
3.7.1. Installing The Billboard • To perform work safely, use a secure and stable step to improve access to the top of the cabinet. Working without using a step may cause accidents. • Only QUALIFIED SERVICE PERSONNEL should carry out this operation. 1. -
Page 17: Installing The Floor And Leg Adjustor Adjustment
3.7.2. Installing The Floor And Leg Adjustor Adjustment • Ensure all connections are secure - poor connections can cause electric shock or short circuit. • Take care not to damage wiring during installation, as this can cause electric shock or short circuit. - Page 18 ‡ Slightly lower the 2 Adjusters on the cabinet and install JOINT BRACKET L & R by inserting from the rear, and secure to ASSY FLOOR using hexagon bolts as shown. • Make sure all of the leg adjusters are in contact with the floor. If they are not the machine may move and cause injury.
-
Page 19: Coin Handling Installation
3.7.3. Coin Handling Installation • Only QUALIFIED SERVICE PERSONNEL should carry out this operation. When fitting the coin mechanism to the door please refer to the specific manufacturers installation instructions for that coin mechanism. To fit the door to the machine follow the procedure below. •... -
Page 20: Wiring Connections
3.7.3.1. Wiring Connections COIN MECH LOOM INSTALLATION • Attach the lamp holder to the bracket on the coin return C220B LM1006IDC button. LM1006LAMP-0.1 • Attach one 15-way connector to the C220 coin mech. • Attach the other 15-way connector to Validator A on the credit board. -
Page 21: Connection To The Power Supply
3.7.4. Connection To The Power Supply • Be sure that the machine is not connected to the mains supply before attempting this operation • Only QUALIFIED SERVICE PERSONNEL should carry out this operation. 1. The AC Unit is located on the right hand side of the base unit, when viewing the screen. It houses the IEC inlet, mains switch and fuse. -
Page 22: Assembly Check
3.7.5. Assembly Check In the Test Mode, ascertain that the assembly has been made correctly and IC BD is satisfactory (see Section 5.3). In the test mode perform the following test: 3.7.5.1. CRT Test • Only QUALIFIED SERVICE PERSONNEL should carry out this operation. In the TEST mode select CRT test to check the C.R.T. -
Page 23: Memory Test
3.7.5.2. Memory Test Selecting RAM TEST or MEDIA BOARD TEST from the menu screen in System Test mode will cause the machine to automatically perform a test RAM TEST of memory on the game boards. If GOOD is displayed next to the number of each memory AUX MEMORY GOOD segment, the game boards are working properly. -
Page 24: Input Test
3.7.5.3. Input Test Select INPUT TEST from the menu screen in either System Test mode or Game Test mode. JVS TEST INPUT TEST NODE SYSTEM PLAYER 1 1 0000 PLAYER 2 2 0000 COIN 1 1 0000 COIN 2 2 0000 ANALOG 1 0000 ANALOG... -
Page 25: Output Test
3.7.5.4. Output Test Select OUTPUT TEST to display the following screen and check the status of each lamp. This test should be used periodically to check that the lamps are functioning correctly. On this screen the cursor will switch automatically between items, lighting up the respective lamps. •... -
Page 26: Moving The Machine
3.8. Moving The Machine • When moving the machine, be sure to remove the plug from the power supply. Moving the machine with the plug inserted can cause the power cord to be damaged, resulting in a fire or electric shock. •... -
Page 27: Control Panel (Handle Mecha.) - 'Happ' Type
3.9. Control Panel (Handle Mecha.) - ‘HAPP’ Type • Before starting work, ensure that the cabinet is isolated from the mains by switching off and removing the IEC mains lead from the wall outlet. • Be careful not to damage wiring. Damaged wiring can cause electric shock and short circuits. - Page 28 1. Loosen the two screws and adjust the gear mesh by moving the VR Bracket. 2. Adjust to an appropriate setting by securing the steering wheel in the straight ahead position. 3. After adjustment, check the volume setting as described in Section 5.4. If necessary, repeat steps 3 &...
-
Page 29: Greasing - Sega And Happ Types
3.9.2. Greasing – SEGA and HAPP types • Use only synthetic grease (grease or spray) as plastic parts are used. Do not use mineral based greases. • Applying grease to parts other than those specified can cause malfunctioning or quality deterioration of parts. -
Page 30: Shift Lever
3.10. Shift Lever If the SHIFT LEVER SWITCH in not showing an input in the TEST MODE, replace the switch. Remove the Shift Lever Unit and apply grease to the mechanism’s sliding portion once every three months. • When performing work, be sure to turn power off. Working with power on can cause an electric shock or short circuit. -
Page 31: Accelerator And Brake
3.11. Accelerator And Brake • Before performing work, be sure to turn power off. Working with power on can cause an electric shock or short circuit. • Use care to ensure the wiring is not damaged. Damaged wiring can cause electric shock or short circuit. - Page 32 3. Take out the six hexagon nuts to remove the Accelerator (or Brake) Unit. 4. Disconnect the Connector and remove the Accelerator (or Brake) Unit.
-
Page 33: Adjusting Or Replacing The Volume
3.11.2. Adjusting Or Replacing The Volume ADJUSTMENT: 1. Loosen the Hex Bolt shown, and adjust the angle for optimum gear mesh. 2. Check the setting in Section 5.4. REPLACEMENT: 1. The Volume is panel mounted: remove by undoing the nut and withdrawing the shaft through the panel hole. -
Page 34: Greasing
3.11.3. Greasing • When performing work, be sure to turn power off. Working with power on can cause an electric shock or short circuit. • Use only synthetic grease (grease or spray) as plastic parts are used. Do not use mineral based greases. •... -
Page 35: Replacement Of Fluorescent Lamps
3.12. Replacement Of Fluorescent Lamps • Never touch places other than those specified. Touching places other than those specified can cause electric shock and short circuit. Disconnect the machine from the supply before attempting the replacement of any lamp. • When performing work, be sure to turn power off. Working with power on can cause an electric shock or short circuit. - Page 36 4. By using a flat bladed screwdriver, remove the four screw caps from the front panel. 5. Take out the four tamperproof screws and the two lower screws, and carefully take off the Front Panel. 6. Remove the Billboard assembly as detailed in Section 3.7.1. 7.
-
Page 37: Game Board
To take out the Game Board (Chihiro), remove together with the wooden base on which the Game Board is mounted. If the Game Board is faulty, return to SEGA within the original packaging provided. There are no user-serviceable parts inside. - Page 38 4. Take out the four screws and remove the Shield Case.
-
Page 39: Removing The Gd-Rom Drive
3.13.2. Removing The GD-ROM Drive Take out the ASSY MAIN BD from the cabinet and remove the GD-ROM Drive from the ASSY MAIN BD as follows: 1. Following the above procedure (steps 1 to 5), take out the ASSY MAIN BD. 2. -
Page 40: Composition Of The Game Board
3.13.3. Composition of the Game Board Once the Chihiro Board has the Key Chip inserted, it is this product's specialized Game Board. ASSY CASE BOX ORT EXP 843-0005D-02 DIP SW SETTING Use this product with the DIP SW settings shown in the figure below. -
Page 41: Replacing The Main Board Battery
3.13.3.1. Replacing The Main Board Battery • To prevent overheating, explosion, or fire: • Do not recharge, disassemble, heat, incinerate, or short the battery. • Do not allow the battery to come into direct contact with metallic objects or other batteries. •... -
Page 42: Replacing The Media Board Battery Pack
3.13.3.2. Replacing The Media Board Battery Pack Prohibitions and Cautions to Handle the Battery Pack • Be careful when handling the battery pack. • We bear no responsibility for problems caused by handling clearly contrary to the content of this manual. - Page 43 • Do not tightly seal the battery pack when installing it onto an external device. • Flammable gas is generated from the battery when its safety mechanism has functioned. If you should fail to observe the above-described instruction, sparks from motors, switches, etc. may cause the gas to fire. Therefore, install the battery pack so that the gas can be quickly released from the external device.
- Page 44 • Do not do away with the used battery packs carelessly because they may contaminate the environment. Be sure to dispose of the used battery packs in accordance with the laws/regulations of your country. If the GD-ROM read time becomes excessively long, it is likely that the Media Board battery pack life if running low.
-
Page 45: Troubleshooting
3.14. Troubleshooting • Only QUALIFIED SERVICE PERSONNEL should carry out these procedures. If a problem occurs, first check the wiring connections. PROBLEMS CAUSE COUNTERMEASURES When the main switch The power is not ON. Firmly insert the plug into the outlet. is turned ON, the machine is not activated... -
Page 46: Fuses
3.15. Fuses • Never touch places other than those specified. Touching places other than those specified can cause electric shock and short circuit. Disconnect the machine from the supply before attempting the replacement of any fuse. • Only QUALIFIED SERVICE PERSONNEL should replace FUSES. •... -
Page 47: Periodic Check And Inspection
3.16. PERIODIC CHECK AND INSPECTION The items listed below require periodic check and maintenance to retain the performance of the machine and ensure safe operation: • Be sure to check annually to see if the power cords are damaged, the plug is securely inserted and that there is no dust in the interior of the machine or between the socket and the power cord. -
Page 48: Contents Of Game
CONTENTS OF GAME The following information assumes that the product is functioning satisfactorily. Should there be any discrepancies, a fault may have occurred. In this case, examine the machine to ascertain and eliminate the cause of the fault to ensure satisfactory operation. Billboard (Always Lit) Speakers... -
Page 49: Basic Controls
4.1. Basic Controls Insert a coin and press the Start Button to begin a game. Choose your car, background music, and other options. View choices with the Steering Wheel, and enter your selection with the Gas pedal. During game play, use the Gas pedal to accelerate your car, and the Brake pedal to stop. The Gear Shifter can be used to shift up and shift down when using Manual transmission. -
Page 50: Game Flow
4.3. Game Flow 4.3.1. Versus Mode Entry After inserting coins and pressing the Start Button, Versus Mode Entry prompts will be displayed for potential players at other game cabinets. Pressing the Start Button within the Versus Mode Entry period will start Versus Mode. Closing Versus Mode Entry To close Versus Mode entry, press the View Change Button and the Brake pedal at the same time before other players join. - Page 51 Changing the car model in the middle of colour selection will automatically return the colour to the selected model’s default colour, after which model and colour selection will again be possible. The selected car will then be displayed in the chosen colour at the start of the game. The available colours vary from car to car.
-
Page 52: Transmission Selection
4.3.3. Transmission Selection You can choose between Automatic transmission and Manual transmission. When Manual transmission is selected, the number of gears varies with the car model. • 6-speed: F50, 360 Spider, Enzo Ferrari • 5-speed: Dino 246 GTS, 365 GTS/4 Daytona, Testarossa, 288 GTO, F40 4.3.4. -
Page 53: Heart Attack Mode
4.3.4.2. Heart Attack Mode • 1) Lady’s Heart Meter This is the mode where you raise the Lady’s Heart Meter by fulfilling her requests. Collect as many of the hearts showing her feelings as possible. You must pursue her request for the duration of the indicated track section. The Lady’s Requests •... - Page 54 • ’Hit the blue cones!’ There are twenty blue cones placed on the roadway—try to hit as many as you can. • ’Cut the line!’ Drive through the yellow heart lines between cars on the roadway. Lines cut once will not come back.
-
Page 55: Time Attack Mode
Special Requests Satisfying certain conditions will open up Special Requests. Ending The game ending will change depending on your performance assessment. 4.3.4.3. Time Attack Mode ‚ • 1) Sector Time 2) Position This mode is a test of time in reaching the goal. Player driving data is recorded for goal time, route best time, and slowest time. - Page 56 (This option is only available in the Time Attack Mode.) There is one exception, however—Goal A, ‘Tulip Garden’, and Goal E, ‘Cape Way’ each have only one route so the Route Choice option will not be available. Goal B, ‘Metropolis’, and Goal D, ‘Imperial Avenue’ each have four possible routes, while Goal C, ‘Ancient Ruins’...
-
Page 57: Versus Play
4.4. Versus Play 4.4.1. Versus Mode Game Play The car colours for versus mode are fixed for each player. 1P: Red, 2P: Yellow, 3P: White/Silver (depending on car model), 4P: Black The position order on the starting grid is determined by the order of Versus Mode entry (decided by who presses the Start Button first). -
Page 58: Gameplay Techniques And Secret Commands
4.5. Gameplay Techniques And Secret Commands 4.5.1. How to Drift After letting go of the Gas pedal, immediately press the Brake pedal. Then, quickly steer sharply into the turn and press the Gas pedal. In the case of Manual transmission, shift down one gear just before the turn, then immediately steer sharply into the turn. -
Page 59: Character Introductions
There are three conditions under which this command cannot be executed: • The player is near the starting grid. • The remaining time is under 8 seconds. • ’No’ has already been chosen once. 4.6. Character Introductions Three major characters appear in the game. 1. -
Page 60: Maintenance Instructions
MAINTENANCE INSTRUCTIONS 5.1. Explanation Of Test Data And Display Use the switches inside the Control Panel to enter the TEST MODE. This will allow you to carry out post installation and periodic checks and adjustments. The following Section details the function of each of the tests: Refer to the service manual supplied with the Monitor for detailed instructions. -
Page 61: Internal Switches And Coin Meters
5.2. Internal Switches And Coin Meters • Never touch places other than those specified. Touching places not specified can cause electric shock and short circuits • Be careful not to damage wiring. Damaged wiring can cause electric shock and short circuits. •... -
Page 62: System Test Mode
5.3. System Test Mode • The contents of settings changed in the TEST mode are stored when the test mode is finished from EXIT in the menu mode. If the power is turned off before the TEST mode is finished, the contents of setting change become ineffective. •... -
Page 63: Ram Test
5.3.1. RAM Test The memory test mode is for automatically checking the on-board memory IC functioning. “GOOD” is displayed for normal IC’s and “BAD “ for abnormal IC’s • When the test is completed, if the results are as shown on the left then the Game Board is satisfactory. -
Page 64: Sound Test
5.3.3. Sound Test Select the sound test to check the status of the amplifiers, soundboards, and speakers. Press the SERVICE button or view change button to move the arrow to the desired test item. Press TEST button to output the sound. •... -
Page 65: System Assignments
5.3.5. System Assignments Allows system options to be set. Select required setting with SERVICE button, confirm with TEST button. Default settings are indicated in parentheses. • CABINET TYPE specifies Control Panel and number of Coin Chutes. The number of players displayed in BOOKKEEPING varies in accordance with the value displayed here. -
Page 66: Coin/Credit Setting (Coin Chute Common Type)
5.3.5.2. Coin/Credit Setting (Coin Chute Common Type) SETTING FUNCTIONING OF COIN CHUTE #1 FUNCTIONING OF COIN CHUTE #2 SETTING #1 1 COIN 1 CREDIT 1 COIN 1 CREDIT SETTING #2 1 COIN 2 CREDITS 1 COIN 1 CREDIT SETTING #3 1 COIN 3 CREDIT 1 COIN... -
Page 67: Coin/Credit Setting (Coin Chute Individual Type)
5.3.5.3. Coin/Credit Setting (Coin Chute Individual Type) SETTING FUNCTIONING OF COIN CHUTE #1 SETTING #1 1 COIN 1 CREDIT SETTING #6 1 COIN 2 CREDITS SETTING #8 1 COIN 3 CREDITS SETTING #9 1 COIN 4 CREDITS SETTING #10 1 COIN 5 CREDITS SETTING #11 1 COIN... -
Page 68: Manual Setting
5.3.5.4. Manual Setting Select manual setting to manually set the coin to credit ratios. The available combinations are detailed below. MANUAL SETTING COIN TO CREDIT 1 COIN 1 CREDIT 2 COINS 1 CREDIT 3 COINS 1 CREDIT 4 COINS 1 CREDIT 5 COINS 1 CREDIT 6 COINS... -
Page 69: Sequence Setting
5.3.5.5. Sequence Setting Selecting SEQUENCE SETTING allows the number of credits required to start the game to be set. Each sequence can be set between 1 and 5. Select EXIT to return to the first screen. -
Page 70: Bookkeeping
5.3.5.6. Bookkeeping This mode consists of 2 pages that allow the data relating to credit and game play time to be checked. In page 1 mode press SERVICE to proceed to page 2, in page 2 mode press TEST to return to the test menu. -
Page 71: Rom Bd Test
5.3.5.8. ROM BD Test In this test, Game Board ROM is checked. If GOOD is displayed, it is satisfactory. The IC number, TYPE, BYTE and WORD refer to the checksum of each unit. Press TEST to exit. On above screen, IC35 and IC36 (program ROMs) do not display GOOD or BAD. Press TEST Button to EXIT. -
Page 72: Game Test Mode
5.4. Game Test Mode [IMPORTANT] When changing the game configuration, changes will not be enabled until the Game Test Mode has been completed. Be sure to exit the Game Test Mode properly after configuration changes. Select GAME TEST MODE from the System Menu screen to display the Game Test Menu screen as follows. -
Page 73: Input Test
5.4.1. Input Test Select INPUT TEST to display the following screen and check the status of input devices. This test should be used periodically to check that each input device is functioning correctly. Test the STEERING, GAS (ACCEL) and BRAKE controls to ensure that they are functioning properly and that the parameters change smoothly as each input device is operated. -
Page 74: Output Test
5.4.2. Output Test Select OUTPUT TEST to display the following screen and check the status of each lamp. This test should be used periodically to check that the lamps are functioning correctly. On this screen the cursor will switch automatically between items, lighting up the respective lamps. •... -
Page 75: Drive Board Test
5.4.3. Drive Board Test Select DRIVE BOARD TEST to display the following screen and check the status of steering motor. Use the SERVICE Button to select the desired test item. Press the TEST Button to activate the selected item. NOTE: This test will not be displayed in Upright cabinet types. •... -
Page 76: Game Assignments
5.4.4. Game Assignments Select GAME ASSIGNMENTS to display the current game settings and make changes. Changes to settings are not enabled until Test Mode is exited. After changing settings, be sure to exit Test Mode. NOTE: When adjusting network play settings, DIFFICULTY, ADVERTISE SOUND, LANGUAGE, SPEEDOMETER, and QUICK START items will be decided by the cabinet with LINK_ID “1”. - Page 77 ? TOTAL MACHINE : The number of network connected game cabinets. (Sets the number of competing cabinets in Versus Mode.) Setting this to “1” limits possible play modes to Single Player mode only. (Default Setting: 1, Maximum: 4) ? GROUP: Used for dividing networked cabinets into groups. For example, to split up a group of four networked machines into two groups of two cabinets, set two cabinets to “1”...
-
Page 78: Bookkeeping
5.4.5. Bookkeeping Selecting BOOKKEEPING will display the following screen. All up-to-date operation data will be displayed on two BOOKKEEPING screens. Use the TEST Button to cycle between the first screen (BOOKKEEPING 1/2) and the second screen (BOOKKEEPING 2/2). ? COIN CHUTE #1: The number of coins inserted into Coin Slot 1. - Page 79 This shows the number of plays and the respective play times. This histogram should be referred to when setting the Game Difficulty. Press the TEST Button to return to the Game Test Menu screen.
-
Page 80: Backup Data Clear
5.4.6. Backup Data Clear Select BACKUP DATA CLEAR to clear the contents of BOOKKEEPING, ranking data and coin/credit data. To clear data, use the SERVICE Button to move the cursor to YES (CLEAR) and then press the TEST Button. When the data has been cleared, the message “COMPLETED” will be displayed. Press the TEST Button again to return to the Game Test Menu screen. -
Page 81: Network Play
This is accomplished via a hub in a ‘Master’ machine linked through LAN cables with all participating machine’s game boards. Please enquire with SEGA Sales using the address at the rear of this manual about the availability of a ‘Network Play Kit’... -
Page 82: Coin Mech Installation And Credit Board Set Up
COIN MECH INSTALLATION AND CREDIT BOARD SET UP 6.1. Introduction A VTS board controls game credits between the Coin Mechanism and the game board for this machine. This electronic circuit allows the price of play to be set for a range of different countries. These functions are set on Dual In Line (DIL) PCB mounted switches. - Page 83 Credit Board Mode Settings Switch 3 Country Setting Switch 3 Setting Coin Validator Programming C120/SR3 Only SW1 SW2 SW3 SW4 SW5 SW6 COIN1 COIN2 COIN3 COIN4 COIN5 COIN6 COIN7 COIN8 COIN9 COIN10 COIN11 COIN12 Coin Controls OFF OFF £1 50p new 50p old C220 Parallel Coin Controls...
-
Page 84: Price Of Play Settings Uk
6.1.1. Price Of Play Settings UK Price Bonus DIL Switch 1 Switch 1 Switch 2 Switch 3 Switch 4 Switch 5 No Bonus 6 = 50p No Bonus 3 = 50p 6 = £1 12 =£2 No Bonus 1.66 = 50p 4 = £1 8 = £2 2 = 50p... -
Page 85: Price Of Play Settings Euro
6.1.2. Price Of Play Settings Euro Price Bonus DIL Switch 1 Switch 1 Switch 2 Switch 3 Switch 4 Switch 5 10¢ No Bonus 10¢ 6 = 50¢ 20¢ No Bonus 20¢ 3 = 50¢ 6 = €1 12 =€2 30¢... -
Page 86: Price Of Play Settings Austria-Czech-Denmark-Norway-Israel-France2
6.1.3. Price Of Play Settings Austria-Czech-Denmark-Norway-Israel- France2 Price Bonus Switch 1 Switch 1 Switch 2 Switch 3 Switch 4 Switch 5 No Bonus 11 = 10 6 = 5 No Bonus 6 = 10 3 = 5 No Bonus 4 = 10 2 = 5 No Bonus 3 = 10... -
Page 87: Design Related Parts
DESIGN RELATED PARTS For the Warning stickers refer to Section 1. PART No. DESCRIPTION ORT-1408UK STICKER MASK UPPER ORT-2003-BUK STICKER START/VIEW ORT ORT-1009UK STICKER SIDE L ORT-1010UK STICKER SIDE R ORT-0001UK DISPLAY CARD ORT UR ORT-0003UK PLAY INSTR SH A MULTI... -
Page 88: Parts List
PARTS LIST 8.1. Assembly Structure ORT-00002JUK ~ TOP ASSY OUTRUN 2 U/R ORT-1000JUK ~ ASSY UR CABI PENT PTR-1110UK ~ ASSY FRAMEWORK BLACK NEW PTR-1950UK ~ ASSY SFMD BLACK (FLAT DOOR) NOA-1200UK ~ ASSY CRT COVER UK ORT-1400JUK ~ ASSY FRONT PANEL PENT... -
Page 89: Ort-00002Juk Top Assy Outrun 2 U/R
8.2. ORT-00002JUK TOP ASSY OUTRUN 2 U/R Item Component No. Description Component Reference ORT-1000JUK ASSY UR CABI PENT OTR-INST-JUR ASSY INST KIT ORT PENT UR 421-7987-ORT-U STICKER ELEC SPEC ORT NAOMI 421-7988-91UK STICKER SERIAL NUMBER UK 421-7020UK STICKER CAUTION FORK... -
Page 90: Ort-1000Juk Assy Ur Cabi Pent
8.3. ORT-1000JUK ASSY UR CABI PENT... - Page 91 Item Component Part Description Component Reference PTR-1110UK ASSY FRAMEWORK BLACK NEW NOA-1200UK ASSY CRT COVER UK ASSY CRT COVER UK ORT-1400JUK ASSY FRONT PANEL PENT CTA-1150UK ASSY CC BOX WW ORT-4000UK ASSY ELEC PTR-1750UK ASSY SERVICE DOOR (BLACK) PTR-1801UK REAR HATCH (BLACK) NOB-1001UK FRAME COVER UR R NOB-1002UK...
- Page 92 Cont. Item Component Part Description Component Reference 280-A01248-PM ROUTER TWIST D12 SO4.8 PAN MED 280-A02048-PM ROUTER TWIST D20 SO4.8 PAN LG 280-A02000-A ROUTER TWIST D20 ADH 280-N02310-0B SLIT HARN WRAP 23mm DIA 1M BLK WIRES THRU LH FRAME HOLE OS1008 CABLE TIE, NYLON 150mm ORT-1117UK WATER GUARD CE PENT...
- Page 93 Cont. Item Component Part Description Component Reference NOB-60201UK WIRE HARN FL NOB 600-9070-45K WIRE HARN EARTH 700mm M4/M5 K BASE LID TO XFMR 600-9090-45K WIRE HARN EARTH 900mm M4/M5 K RH FRAME TOP TO FL BRKT 600-9010-44K WIRE HARN EARTH 100mm M4/M4 FL BRKT TO B/BD HOLDER 600-9080-45K WIRE HARN EARTH 800mm M4/M5 K...
-
Page 94: Ptr-1110Uk Assy Framework Black New
HOOF L PTR-1950UK ASSY SFMD BLACK (FLAT DOOR) 253-5366 CASH BOX NOA-1115UK TNG REAR HATCH 102 601-5699X LEG ADJUSTER BOLT M16x75 SEGA 103 601-10461UK CASTOR 50 SWIVEL 104 601-10462UK CASTOR 50 FIXED 105 220-5575UK LOCK 201 050-F00600 M6 NUT FLG SER PAS... -
Page 95: Ptr-1950Uk Assy Sfmd Black (Flat Door)
8.5. PTR-1950UK ASSY SFMD BLACK (FLAT DOOR) Item Component Part Description Component Reference 220-5725-03 FRAME SINGLE MINI W/O PAINT 220-5725-04 DOOR SINGLE MINI FLAT,NO PAINT 220-5574UK LOCK KEYED DIFFERENT PTR-1951UK CAM CRANKED 6MM, LENGTH 34MM 012-PB3506 N6X1/4" S/TAP PAN B... -
Page 96: Noa-1200Uk Assy Crt Cover Uk
8.6. NOA-1200UK ASSY CRT COVER UK Item Component Part Description Component Reference NOA-1201UK CRT COVER NOA-1202 SPEAKER BOX RND-0037 TAPE SPEAKER BOX 2 SIDED 0.38 (2)-0.19 130-5205 SPEAKER 40HM 10W 100 W/SHIELD 000-P00410-W M4X10 MSCR PAN W/FS PAS (101)-8 340042 RIVET BULBEX 3/16 BF01-0630 (2)-6 NOA-60031... -
Page 97: Ort-1400Juk Assy Front Panel Pent
8.7. ORT-1400JUK ASSY FRONT PANEL PENT Item Component Part Description Component Reference FRONT PANEL ORT ORT-1501UK FRONT PANEL NOA-1501 INNER MASK PNF NOA-1502-02UK INNER MASK NF NOA-1502-02 LIGHT COVER NOA-1503 PRISM PLATE NOA-1504UK LID GCS ORT-1505UK LID GCS NOA-1505 LID VMS ORT-1506UK CLIP-IN LID VMS... -
Page 98: Cta-1150Uk Assy Cc Box Ww
8.8. CTA-1150UK ASSY CC BOX WW PART NUMBER DESCRIPTION COMPONENT REFERENCE CTA-1151UK CC BOX WW CTA-1155UK CHUTE UNIV VTS-STW-U VTS BOARD UPRIGHT TYPE LB1103 STICKER CAUTION 000-P00408-W M4X8 MSCR POSI PAN W/FS (4)-4 000-F00408 M4X8 MSCR POSI CSK BZP (3)-3 CTA-60101UK WIRE HARN VTS CTA... -
Page 99: Ort-4000Uk Assy Elec
8.9. ORT-4000UK ASSY ELEC Item Component Part Description Component Reference CTH-4001 ELEC BASE SHORT NOM-4002 BRKT FOR PWR PROTECT UNIT 400-5443 SW REGU FOR CHIHIRO 838-13616 AUDIO POWER AMP 2CH 280-A02048-PM ROUTER TWIST D20 SO4.8 PAN LG 601-6231-B095 EDGE TRIM NEW TYPE 0.91t (1) BACK EDGE IN MIDDLE 280-A01248-PM ROUTER TWIST D12 SO4.8 PAN MED... -
Page 100: Ptr-1750Uk Assy Service Door (Black)
8.10. PTR-1750UK ASSY SERVICE DOOR (BLACK) Item Component Part Description Component Reference PTR-1751UK SERVICE DOOR (BLACK) DP-1167UK TNG LKG UK 101 220-5575UK LOCK 201 008-T00430-0C M4X30 MSCR TMP PRF TH CR INSERT HALF WAY SO TNG OPENS... -
Page 101: Ort-4100Uk Assy Main Bd
8.11. ORT-4100UK ASSY MAIN BD Item Component Part Description Component Reference CTH-4101UK WOODEN BASE MAIN 843-0005D-02 ASSY CASE BOX ORT EXP 610-0617 GD-ROM DRIVE UNIT NAOMI SHIP BOX WITH MACHINE 105-5435 GD DRIVE BRKT STD 610-0652-0004 GD SOFT ORT LB1111 STICKER PLEASE RECYCLE (2)-1 LB1101... -
Page 102: Ort-1710Uk Assy Ac Unit (Black Pent)
8.12. ORT-1710UK ASSY AC UNIT (BLACK PENT) Item Component Part Description Component Reference RTS-1711UK AC BRKT (BLACK) LB1096 STICKER PROTECTIVE EARTH NXT TO ERTH STUD ON INSIDE 421-6595-5000-T STICKER FUSE 5000mA TYPE T NXT TO IEC INLET ON OUTSIDE EP1381 FILTER IEC &... -
Page 103: Ort-20002Uk Assy Control Panel
8.13. ORT-20002UK ASSY CONTROL PANEL Item Component Part Description Component Reference ORT-2003-AUK CONTROL PANEL BLANK CKT-2702UK CONTROL PANEL BRKT CTA-2003 HINGE 456 CTA-2100UK ASSY HANDLE MECHA W/ BOSS HAPP 610-0408-91 UP/DOWN SHIFTER AL JBA-2001UK STEERING WHEEL HAPP ORT-2005UK STEERING CENTRE FRI-2002-A EMBLEM FERRARI (8)-1... - Page 104 Cont. Item Component Part Description Component Reference 000-P00512-W M5X12 MSCR PAN W/FS PAS (13)-2 029-B00516-0B M5X16 SKT BH BLK (16)-3 FAS-290034 M5X15 LH CAP SCR STN (8)-3 ORT-62014UK WH CONTROL PANEL CTA-60065 WIRE HARN HANDLE EXT CTH-60008UK WH MECHA PEDALS ORT-62100UK WIRE HARN SW CONTROL ORT-62001UK...
-
Page 105: Cta-4200Uk Assy Xfmr
8.14. CTA-4200UK ASSY XFMR Item Component Part Description Component Reference CTA-4201UK WOODEN BASE XFMR CTA 838-11856CE-02 CONN BD W/FUSE 6.3A CE 101 560-5422-01UK XFMR CTA 201 000-P00416-W M4X16 MSCR POSI PAN W/FS (101)-4 202 FX0301 M4 WSHR 16OD FLT BZP (101)-4 203 FX0151 N4X1"... -
Page 106: Ort-6001Uk Assy Wire L
8.15. ORT-6001UK ASSY WIRE L ASSEMBLY NOT SHOWN Item Component Part Description Component Reference 601-0460 CABLE TIE 100mm CTA-60002 WIRE HARN ACCEL BRAKE NOB-6001UK ASSY WIRE L 8.16. NOB-6001UK ASSY WIRE L ASSEMBLY NOT SHOWN Item Component Part Description Component Reference 101 601-0460 CABLE TIE 100MM 102 280-N01610... -
Page 107: Otr-Inst-Jur Assy Inst Kit Ort Pent Ur
8.18. OTR-INST-JUR ASSY INST KIT ORT PENT UR ASSEMBLY NOT SHOWN Item Component Part Description Component Reference NOA-1301X BILLBOARD PLATE ORT-1250UK ASSY FLOOR SHORT CTA-0001 JOINT BRKT L CTA-0002 JOINT BRKT R ORT-0001UK DISPLAY CARD ORT UR NOA-1302UK BILLBOARD SHEET ORT-0003UK PLAY INSTR SH A MULTI 420-3129-P... -
Page 108: Ort-1250Uk Assy Floor Short
8.19. ORT-1250UK ASSY FLOOR SHORT Item Component Part Description Component Reference ORT-1251UK FLOOR BASE ORT-2600UK ACCEL UNIT HAPP ORT-2650UK BRAKE UNIT HAPP ORT-1508UK FLOOR LID 280-A01200-A ROUTER TWIST D12 ADH 050-F00600 M6 NUT FLG SER PAS (2)-5,(3)-5 000-T00620-0C M6X20 MSCR TH CRM (10)-7 050-F00400 M4 NUT FLG SER PAS... -
Page 109: Appendix A - Electrical Schematic
APPENDIX A - ELECTRICAL SCHEMATIC 9.1. Wire Colours THE WIRE COLOUR CODE IS AS FOLLOWS: PINK SKY BLUE BROWN PURPLE LIGHT GREEN Wires other than those of any of the colours listed above will be displayed by 2 alphanumeric characters: BLUE YELLOW GREEN... - Page 110 SCHEMATIC 1 HERE...
- Page 111 SCHEMATIC 2HERE...
- Page 112 SEGA AMUSEMENTS EUROPE LTD./ SEGA SERVICE CENTRE Suite 3a Oaks House 12 - 22 West Street Epsom Surrey United Kingdom KT18 7RG Telephone: +44 (0) 1372 731820 Fax: +44 (0) 1372 731849 © SEGA 2002...
- Page 113 BLACK DRAWN CHECKED D.CHECKED APPROVED ORT-0000UK ORANGE THIS DRAWING WILL IN NO WAY BE COPIED. LIGHT GREEN SEGA ENTERPRISES, L TD. SEGA ENTERPRISES, L TD. EARTH WIRE WHITE PURPLE TO BE RETURNED ON DEMAND. TOP ASSEMBLY GREEN BROWN AWG16 UL1005...
- Page 114 25 AMP BRAID (INSULATED) AMP U/P PIN 175150-1 60 AMP BRAID (INSULATED) AMP U/P SOCKET 175152-1 90 AMP BRAID (INSULATED) AMP M&L PIN 350687-1 BBOARD HOLDER I/O BASE CHECKED D CHECKED APPROVED DRAWN USED ON ASSY OUTRUN 2 UR ORTUR 2/2 ORT-0000UK 20/11/03...