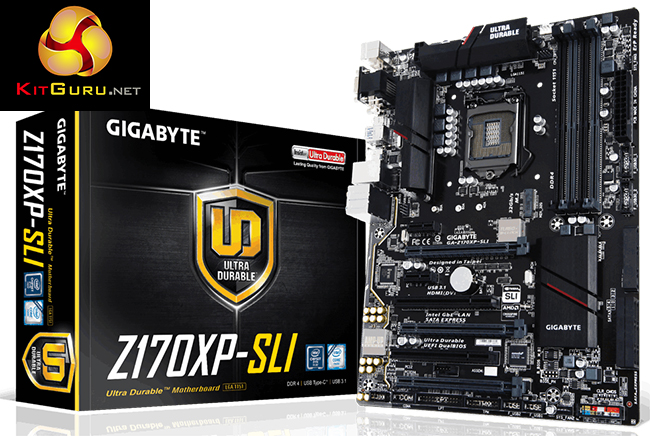
Gigabyte's Z170XP-SLI is aiming to tempt users looking for a motherboard that offers the Z170 platform's core features, but without requiring a significant cash outlay. In the Z170XP-SLI, Gigabyte offers one of the lowest cost boards to support SLI, while also retaining features such as USB 3.1, USB Type-C, and a 32Gbps M.2 connector.
Gigabyte manages to cut costs and squeeze SLI certification into the Z170XP-SLI motherboard's ~£110 price tag by minimising the number of add-on features. Intel's healthy Z170 chipset makes such a design methodology possible, although noticeable divergences from the low-cost approach come in the way of an upgraded audio system, USB 3.1 ports, and no less than three SATA-Express connectors.
Can the Z170XP-SLI prove that jumping onto the Skylake platform does not have to be a costly activity?
Features:
- Fast USB 3.1 with USB Type-C™ – The World’s Next Universal Connector
- 3-Way Graphics with Premium PCIe Lane
- PCIe Gen3 x4 M.2 Connector with up to 32Gb/s Data Transfer (PCIe & SATA SSD support)
- 3 SATA Express Connectors for up to 16Gb/s Data Transfer
- 115dB SNR HD Audio with Built-in Rear Audio Amplifier
- High Quality Audio Capacitors and Audio Noise Guard with LED Trace Path Lighting
- Intel® GbE LAN with cFos Speed Internet Accelerator Software
- APP Center Including EasyTune™ and Cloud Station™ Utilities
- GIGABYTE UEFI DualBIOS™ Technology
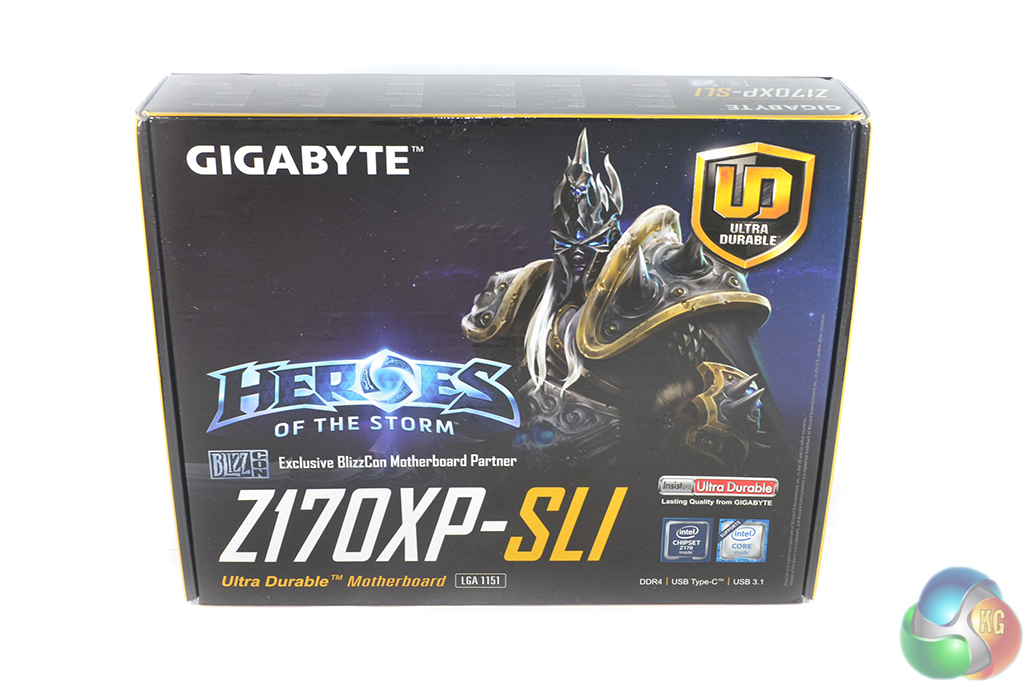
The front of the motherboard's packaging shouts out the product name and also features Heroes of the Storm game branding.
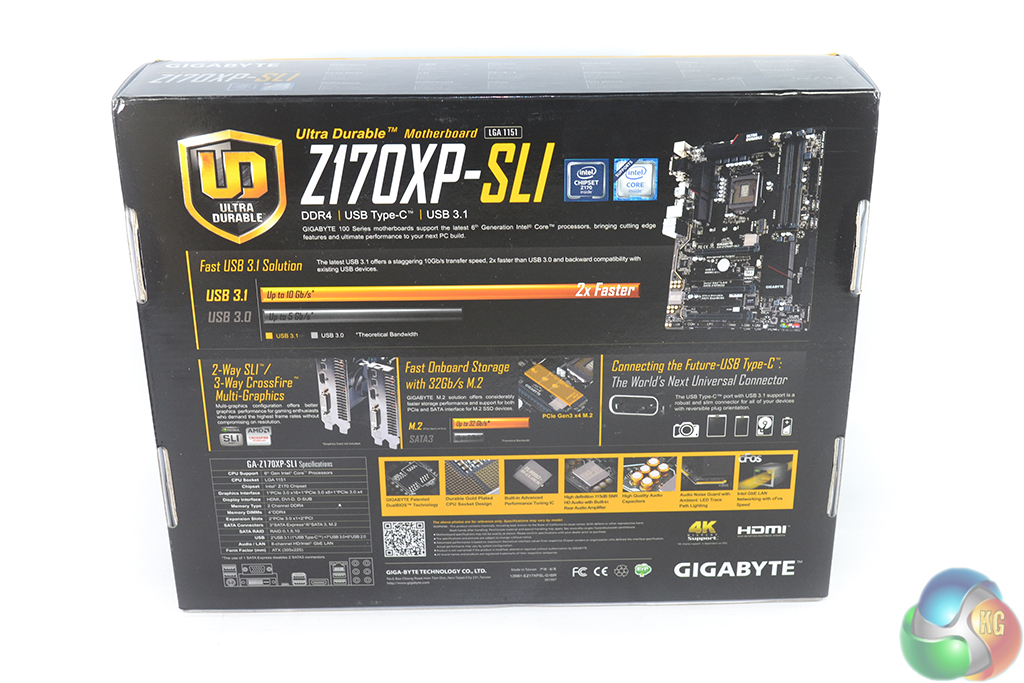
A closer look at features and specifications is found on the rear of the box.
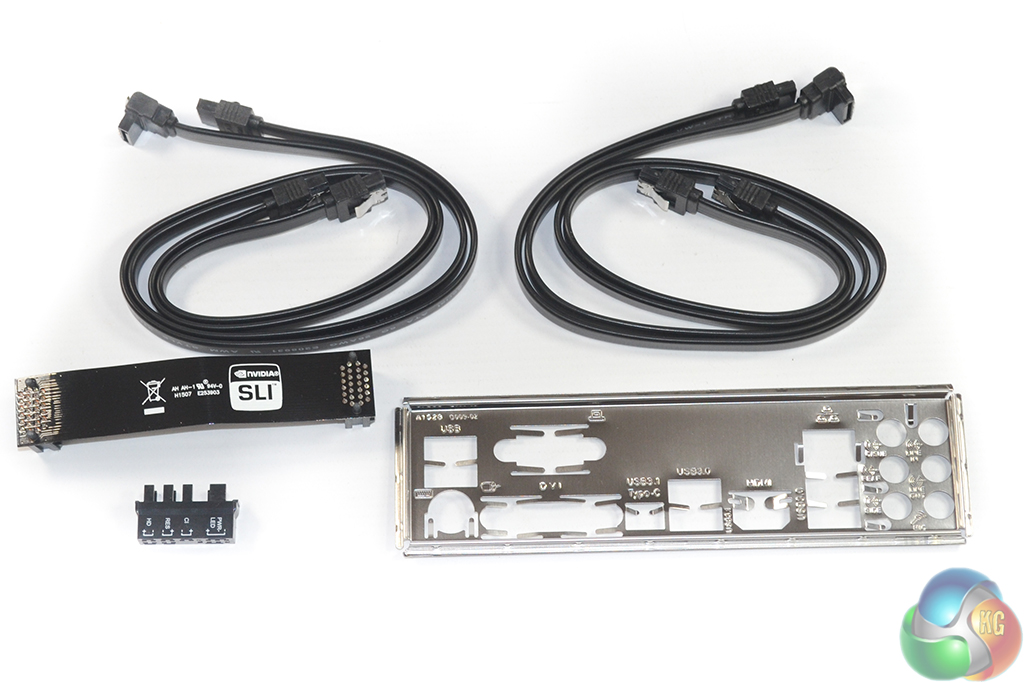
Given the board's entry-level pricing for a SLI-certified part, the comparably healthy bundle is surprising.
Gigabyte includes four SATA cables, which is great to see. Completing the bundle are a basic rear IO shield, a black SLI ribbon, and Gigabyte's G-connector device for easily connecting front panel cables.
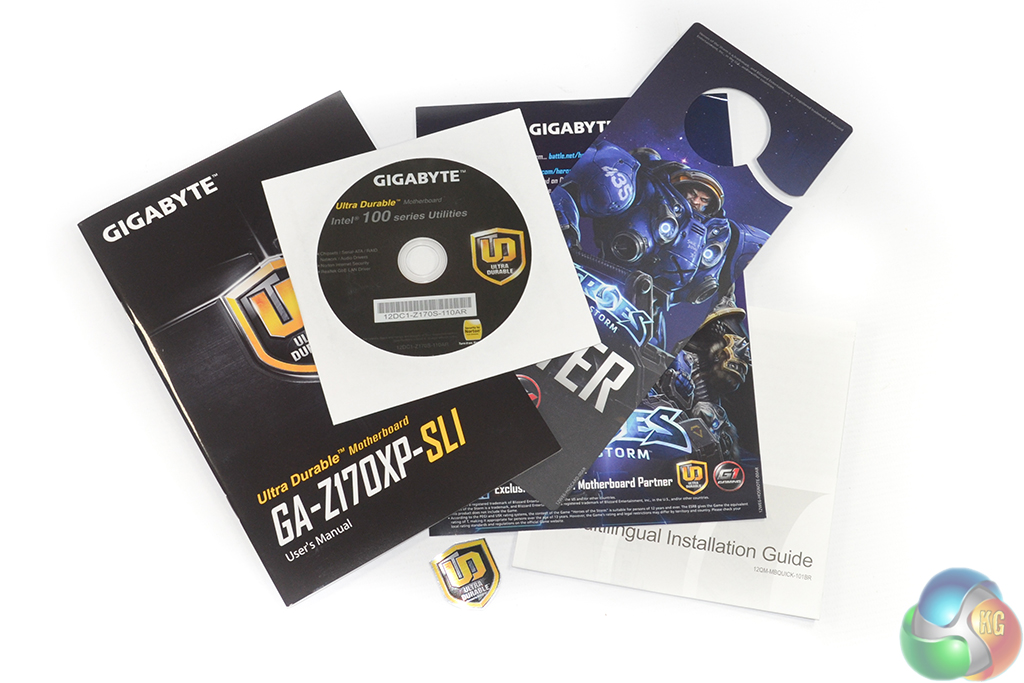
The standard set of documentation is supplied – a user manual, driver CD, and case sticker. A Heroes of the Storm branded door hanger and leaflet are also provided.
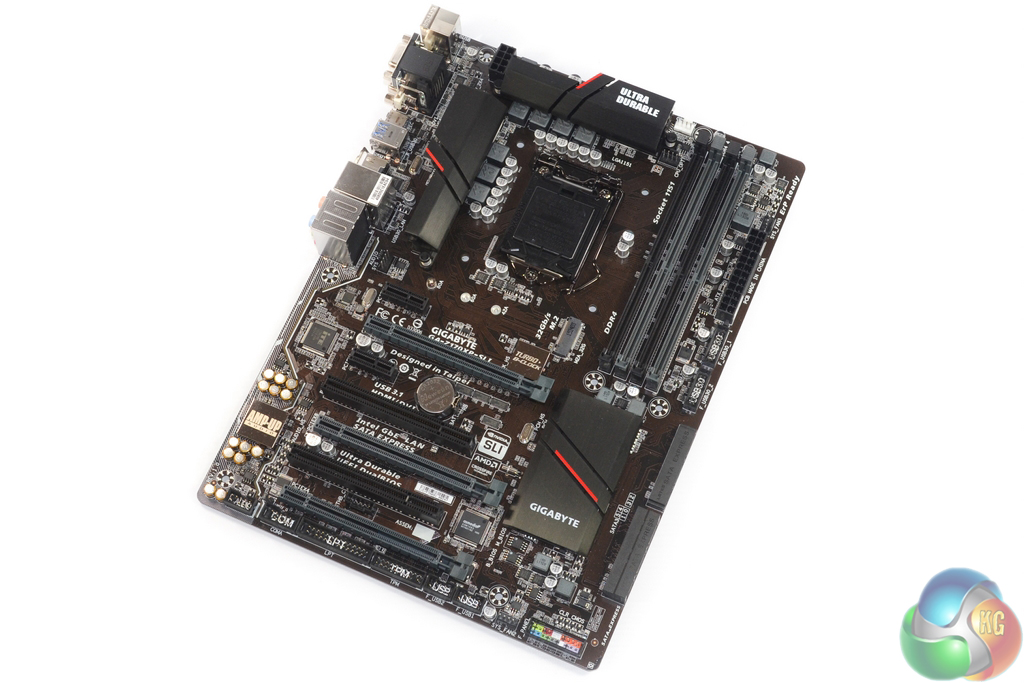
The Gigabyte Z170XP-SLI is slightly narrower than a standard ATX board and therefore loses two of its right-edge screwing locations. This is not an uncommon design feature amongst lower cost parts as it helps to minimise expenditure on unneeded PCB real estate and traces.
The brown, not black, PCB is disappointing although somewhat forgivable given the price point. Users wanting an attractive system may be best served by a different motherboard, or by cramming the Z170XP-SLI full of expansion cards so that the somewhat dull colour scheme is suppressed.
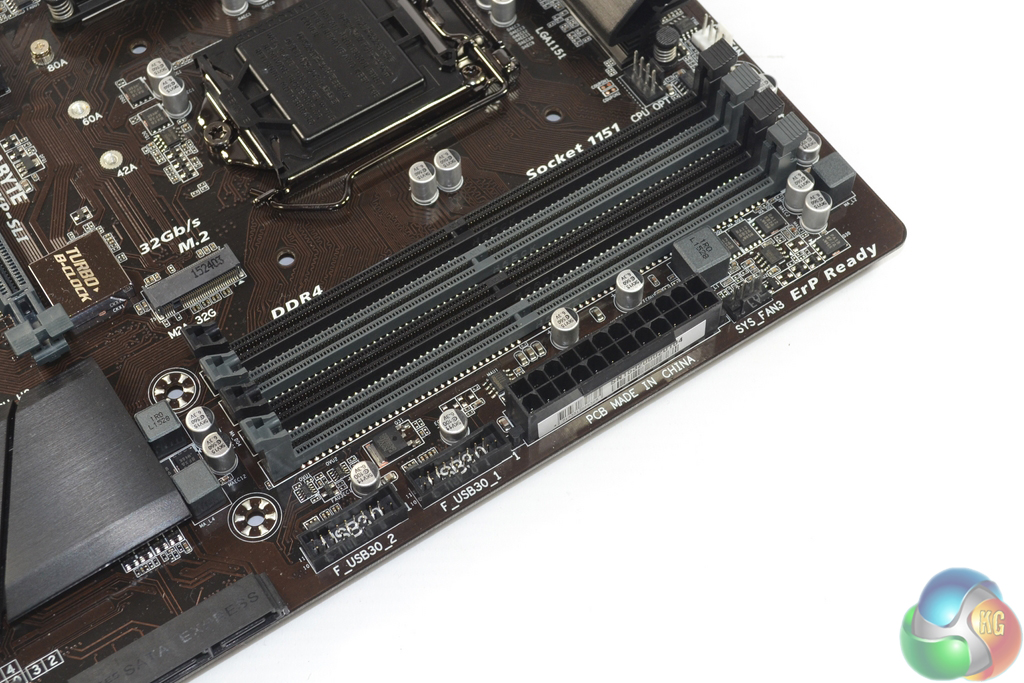
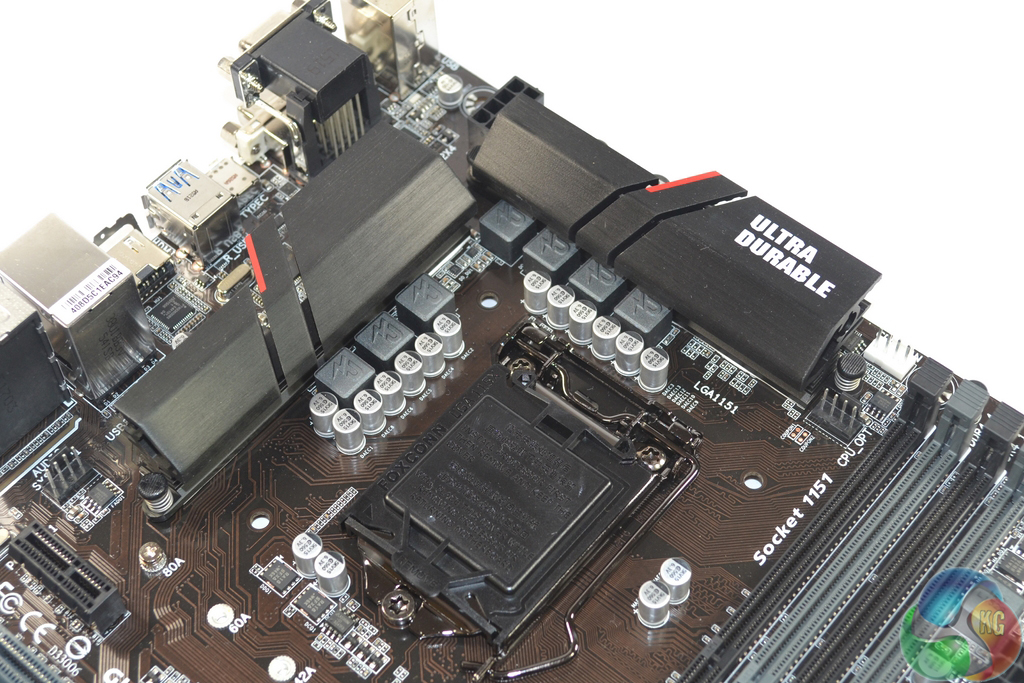
64GB of DDR4 memory can be installed in the four single-latch DIMM slots, with Gigabyte quoting frequency support of up to 3466MHz. Close to the memory slots are the 24-pin power connector and two outwards-facing USB 3.0 headers. Both of the USB 3.0 headers are served by the Z170 chipset's bank of 5Gbps ports.
A total of seven power delivery phases (presumably in a six plus one configuration) are used to feed the LGA 1151 CPU and its integrated graphics core. There's no fancy branding for the MOSFETs, chokes, or capacitors, although Gigabyte does cool the power delivery components with a pair of metal heatsinks. The black blocks of metal are loosely held in place by a pair of spring-tension pins, so do not expect extreme cooling performance from these units.
Gigabyte uses what it calls a Turbo B-Clock IC. The chip allows a range of BCLK frequency adjustments to made, with a region of 90MHz to 200MHz supported. This is actually a positive for an entry-level motherboard, and may prove useful once locked Skylake CPUs are released.
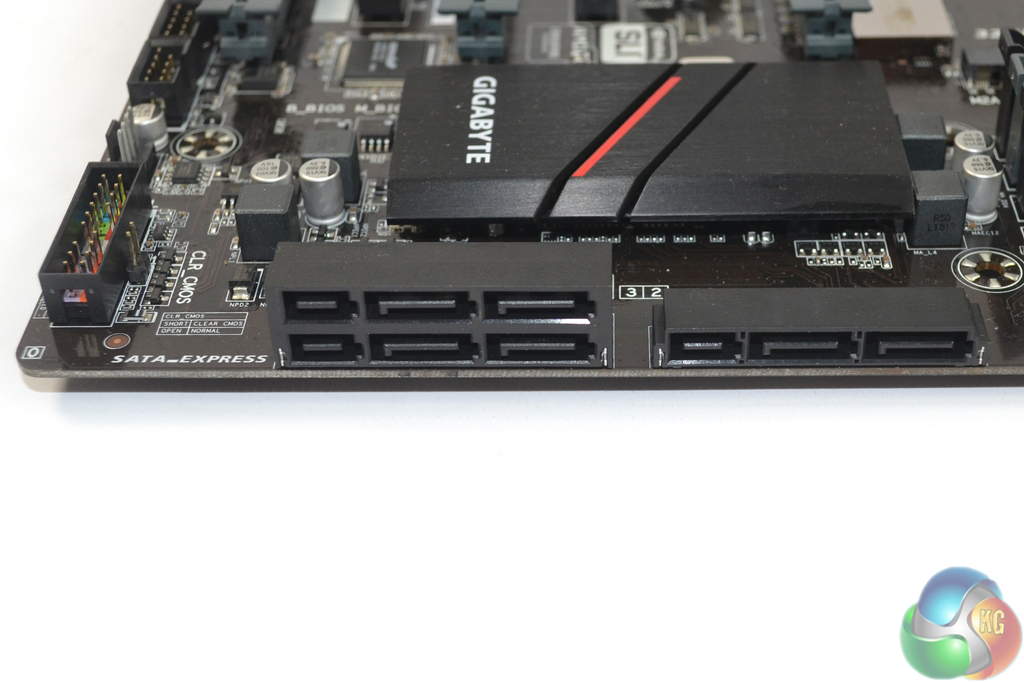
Three SATA-Express ports derive from the Z170 chipset's flexible IO connections. Gigabyte rates the SATA-Express transfer rate for up to 16Gbps by utilising two of the chipset's PCIe 3.0 lanes. SATA-Express has been given a new breath of life thanks to it being the foundation for a front panel USB 3.1 device, as we saw ASRock deploy.
I am struggling to see the logic for including three SATA-Express connectors. Unless Gigabyte knows facts about the storage market and upcoming devices that the rest of the industry has missed, one SATA-Express port would suffice for the vast majority of users. That said, the PCIe lanes derive from the Z170 chipset so do not necessitate additional cost.
When not making use of the SATA-Express connections, all six of the SATA 6Gbps ports are available for standard SSDs and HDDs.
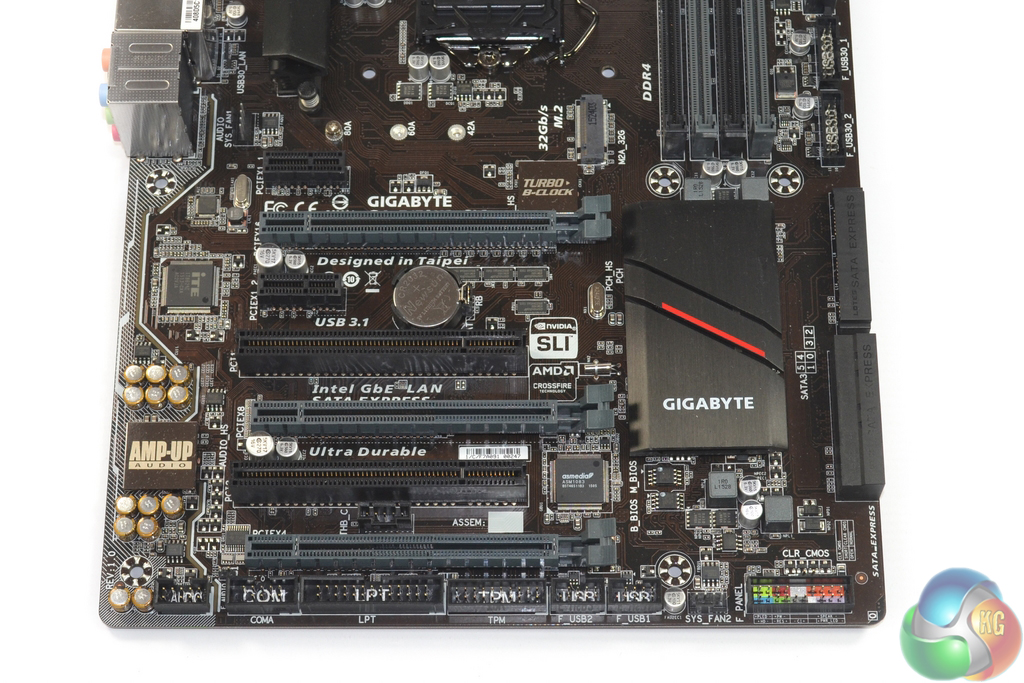
With a single graphics card installed, the top full-length PCIe slot is allocated all sixteen of the LGA 1151 CPU's lanes. Installing an additional AMD or Nvidia card into the second full-length PCIe slot splits the Gen 3 lanes as x8/x8. That lowermost full-length PCIe slot operates at a maximum connection speed of PCIe 3.0 x4 by using chipset-fed lanes, although it shares bandwidth with the second PCIe 3.0 x1 slot (which will realistically never be used due to a dual-slot graphics card cooler).
With a plausible lane configuration of x8/x8/x4 (CPU/CPU/chipset), 3-card CrossFire is supported, although potentially ill-advised due to the necessitated application of higher-latency chipset lanes. Nvidia SLI demands a minimum PCIe link of x8 and is therefore supported in 2-card capacity. Slot spacing is smart for two-card users – a single gap for airflow is left when using dual-slot boards, and triple-slot coolers are usable.
ASMedia's ASM1083 bridge chip is used to provide legacy PCI slots. I am not going to berate the decision to include PCI slots like some readers may – minimising the cost of an upgrade may force budget users to recycle that old PCI WiFi adapter or TV tuner.
The 32Gbps M.2 connector supports drive lengths of 42mm, 60mm, and the popular 80mm sizing. Support for extended 110mm-long drives is not present, although SATA or PCIe connections are possible. Gigabyte places the M.2 connector slightly below the CPU socket. While this location moves a drive away from the heat zone of a graphics card, it also makes an SSD's (typically) ugly green PCB visible inside a build.
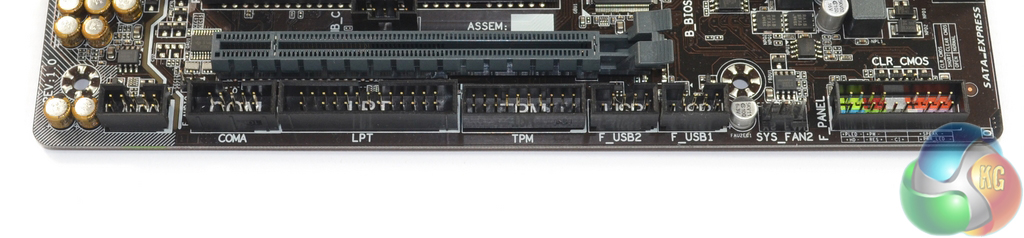
Parallel, serial, and TPM headers are provided for legacy support. There are two USB 2.0 headers found along the bottom edge, allowing a pair of front panel USB 2.0 ports and something like an integrated card reader to be powered.
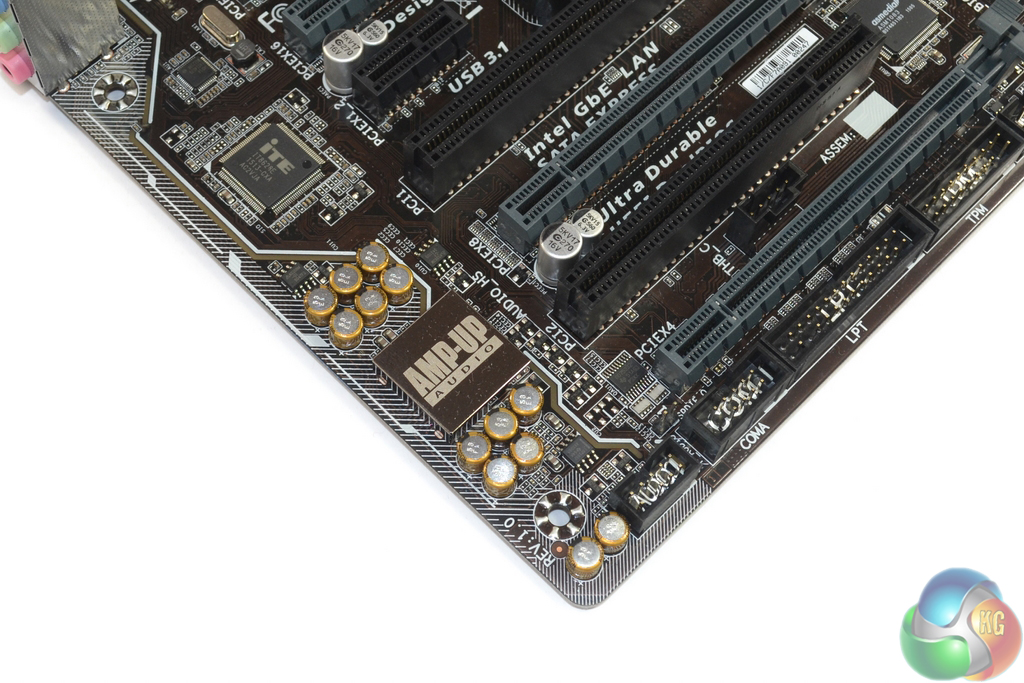
The audio system is based around Realtek's popular ALC1150 codec. Nippon Chemicon audio capacitors and a Texas Instruments OP1652-marked op-amp also form the audio system. Gigabyte shields the audio codec and inserts a controllable yellow LED in the signal pathway.
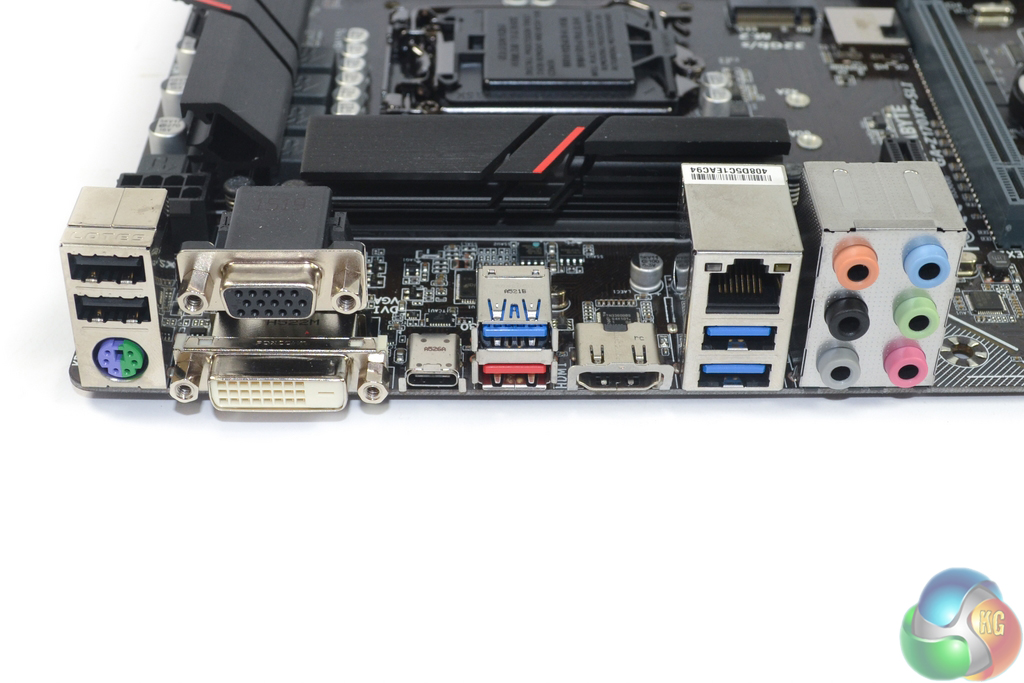
Two USB 2.0 ports and a PS/2 connector are found on the rear IO. I like seeing these connectors provided to aid support with older operating systems (including Windows 7) and times of troubleshooting. Video connections are provided by means of DVI, VGA, and HDMI.
Three blue USB 3.0 ports are provided via the Z170 chipset. 10Gbps Type-A and Type-C USB 3.1 ports are provided by way of ASMedia's ASM1142 chipset. I do not spot the popular EtronTech EJ179V logic IC, implying that Gigabyte is not making use of enhanced power delivery capabilities of the USB Power Delivery specification (commonly associated with the Type-C connector).
Intel's I219-V chipset provides Gigabit Ethernet and cFos software is used for network management. Six audio jacks are present, although the omission of an optical SPDIF connection will disappoint users who want to connect their home cinema surround sound system.
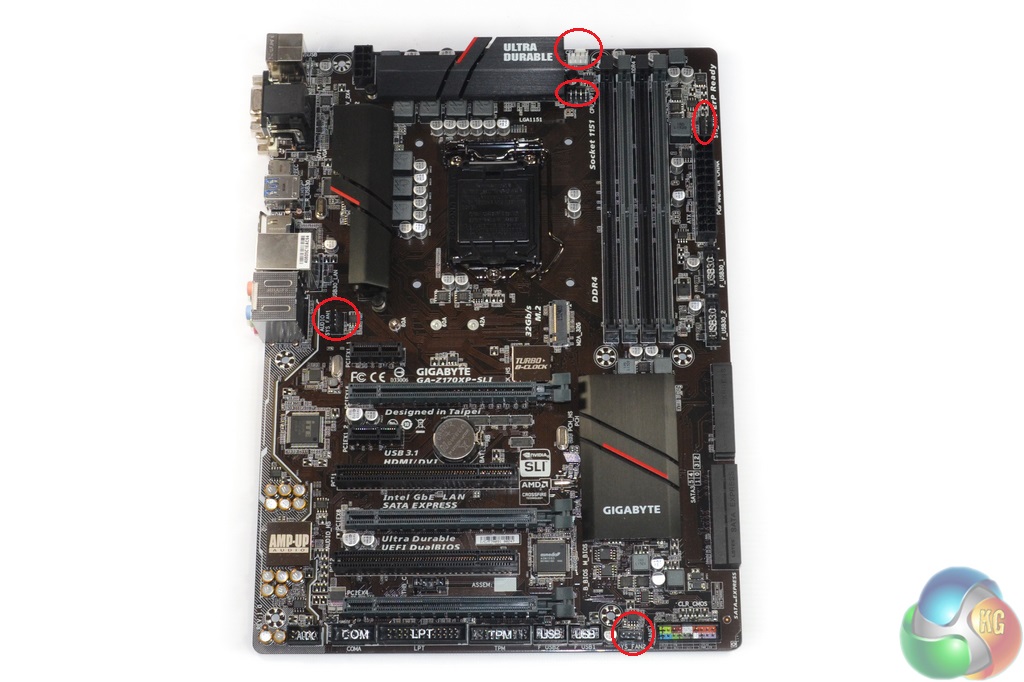
Five 4-pin fan headers are spread sensibly around the board. Two are allocated for CPU duties, with a further two being easily accessible from the LGA 1151 socket. The final 4-pin connector along the board's bottom edge is well-suited for a side panel fan.
ITE's IT8628E chipset is used for monitoring and fan management duties. In typical Gigabyte fashion, dual BIOS chips are provided for redundancy.
UEFI
Firstly, we are pleased to report that our generic wireless mouse worked to its usual standard in the Gigabyte Z170 UEFI. We’ve found the wireless mouse to be troubling with UEFI support in the past, so when it functions correctly in the interface, that is usually a good sign for overall mouse support.
Those who have seen or used Gigabyte's 8- and 9-series motherboards will remember the company's high-resolution interface. This seems to have been abandoned, at least for this Z170 motherboard, and we don't really see that as a bad thing. The high-resolution interface was riddled with flaws and was inconvenient to navigate, so users are likely to be better served by the old style of UEFI layout that is equipped for the Z170XP-SLI.
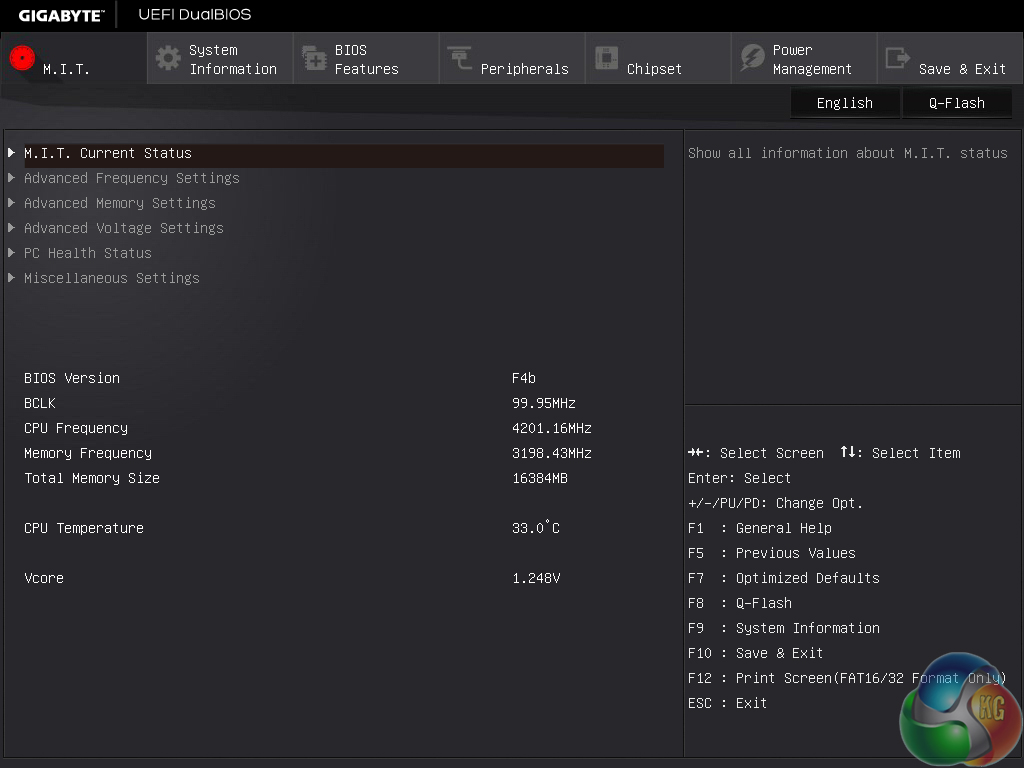
Entry point for Gigabyte's Z170 UEFI is the M.I.T page. This is the point where the main system operating functions, such as voltages, clock speeds, and fan controls, can be accessed.
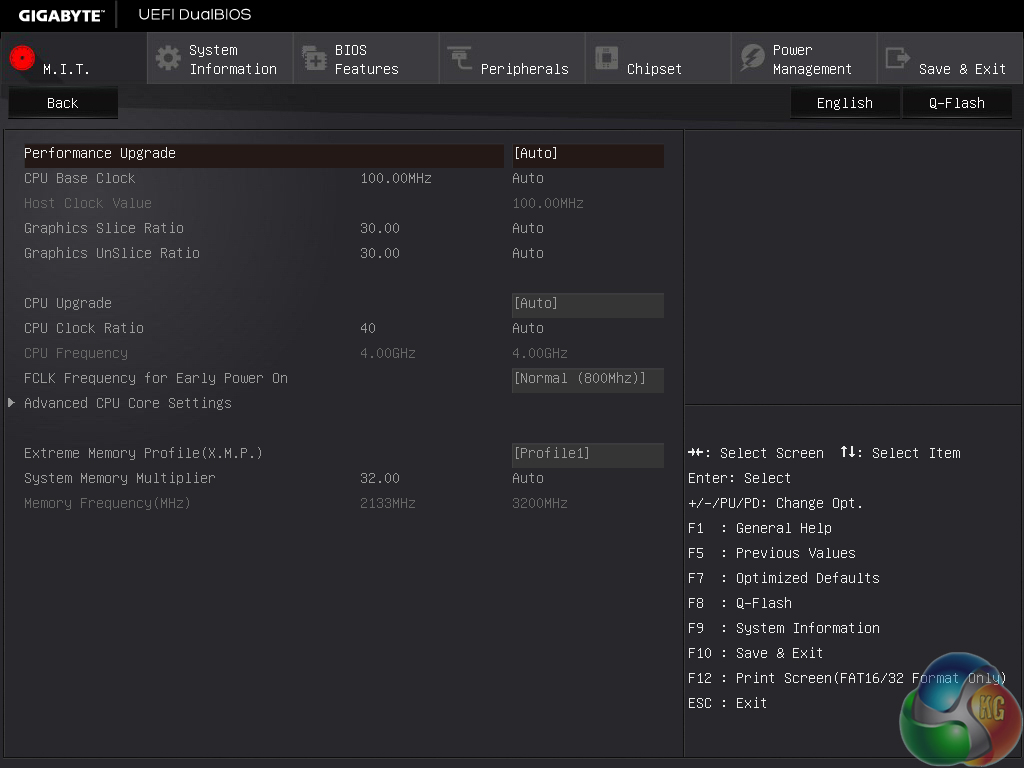
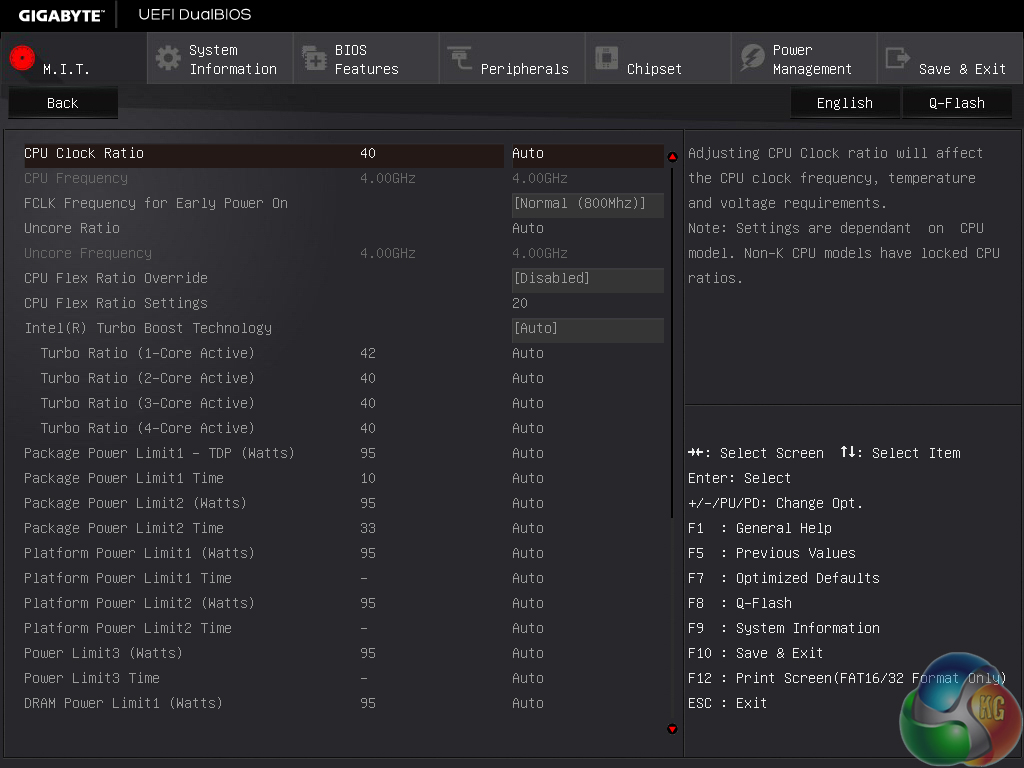
The main system clock speeds are given their own page. Access to the more advanced CPU settings, such as the cache frequency, is given through a separate section.
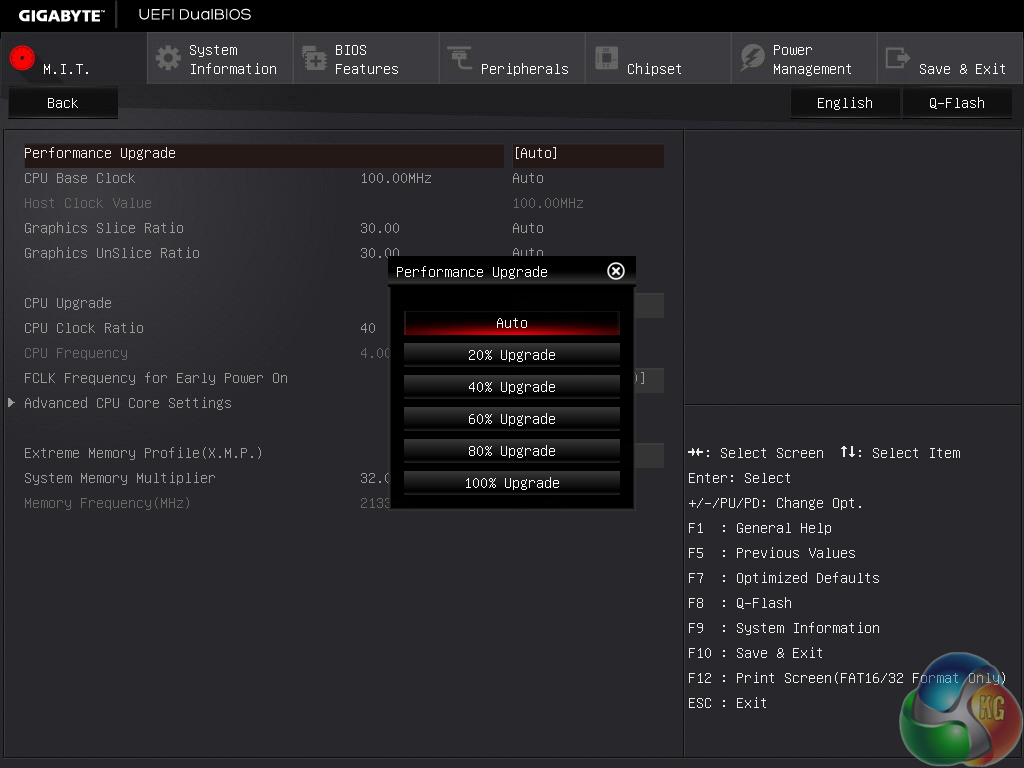
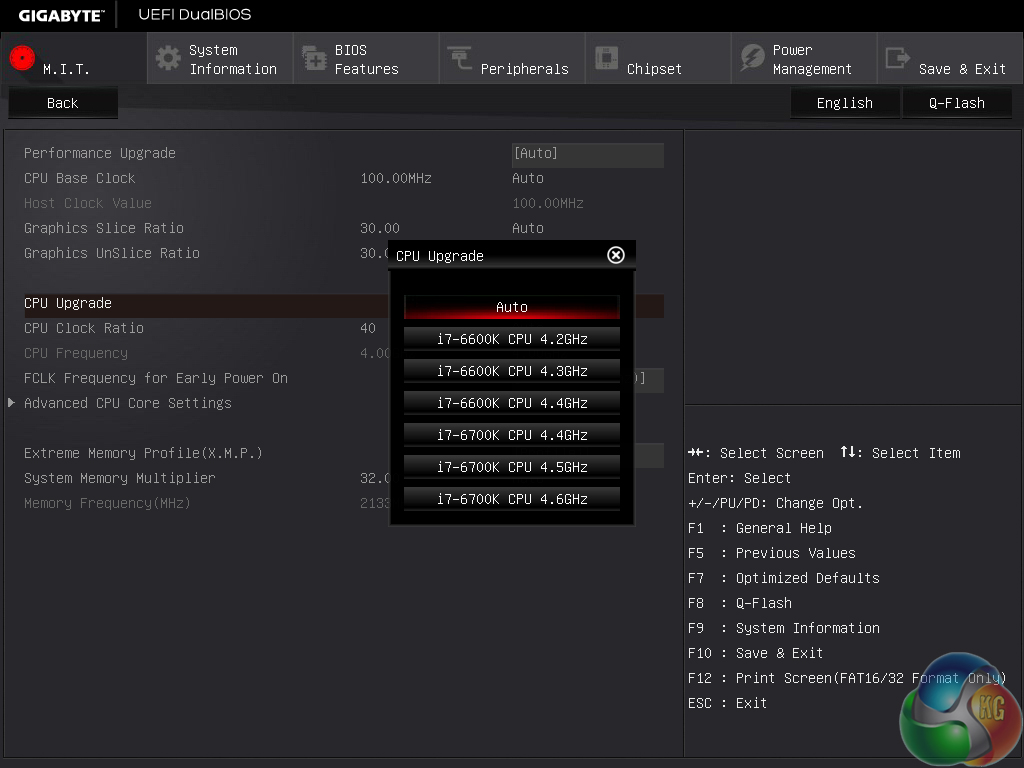
Gigabyte includes a number of Performance and CPU Upgrade pre-set profiles. The CPU Upgrade profiles worked well with our Core i7-6700K chip and used sensible voltage settings.
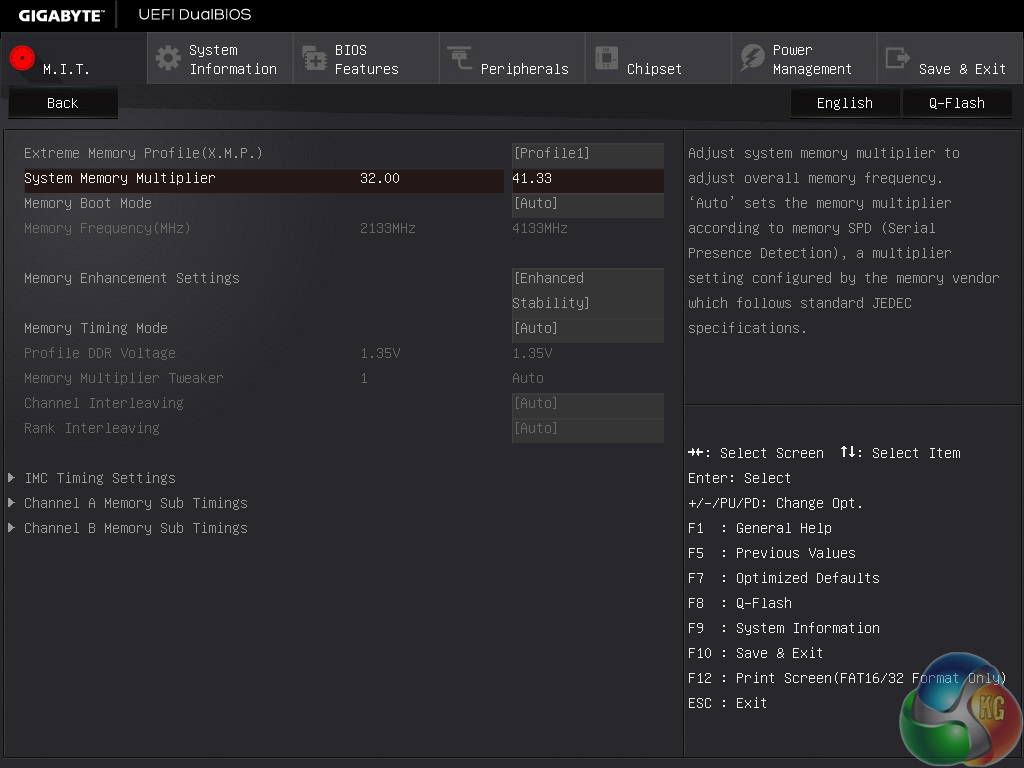
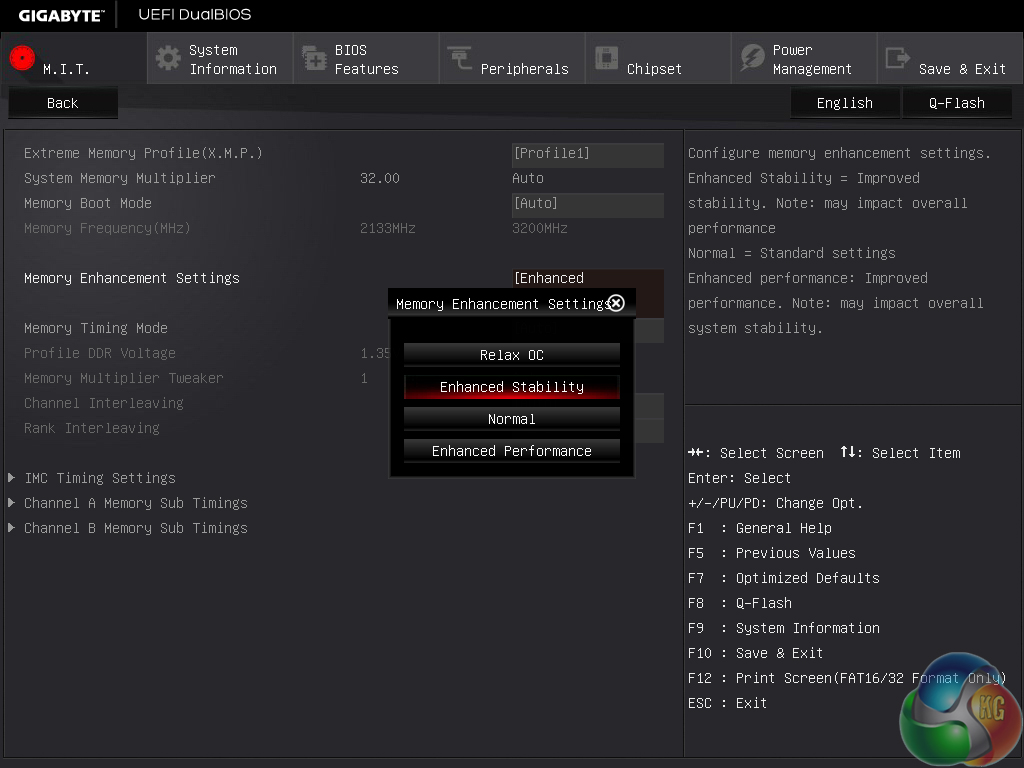
A memory ratio of up to 41.33x is supported in the Gigabyte UEFI. A multiplier this high may be useful for future memory kits or for tweaking the BCLK below 100MHz in order to stabilise a system overclock. A number of Memory Enhancement settings can be selected.

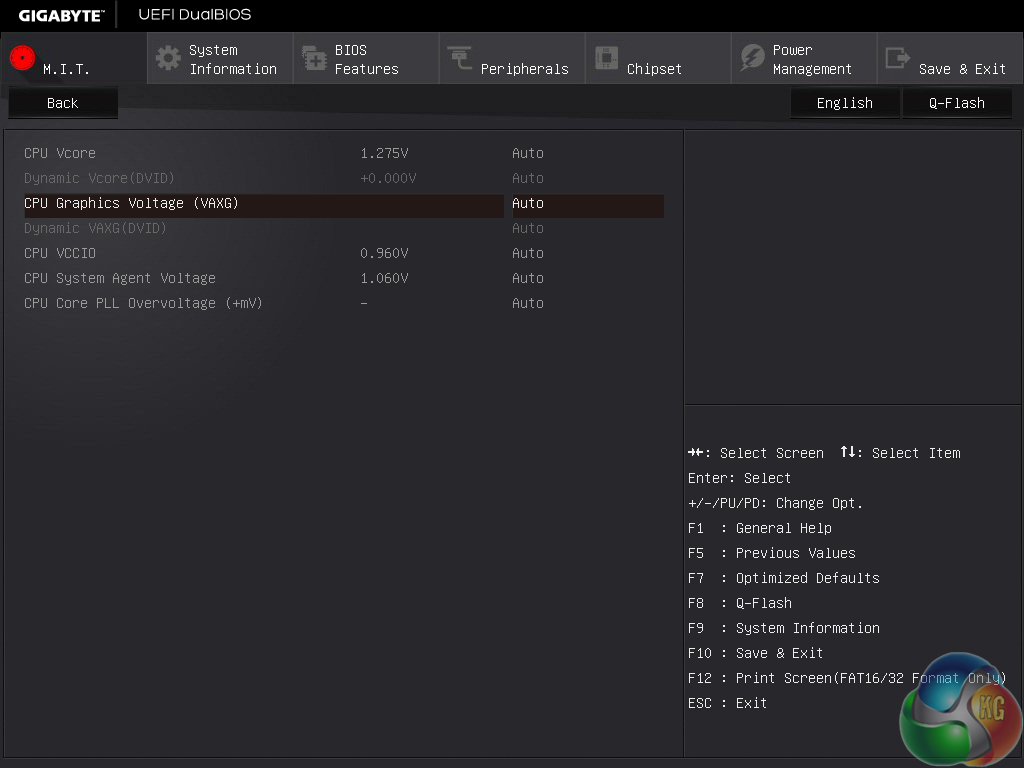
A select few power and voltage settings are provided throughout the UEFI. I was not impressed by Gigabyte's chosen input method for some of the selections. CPU VCore Loadline Calibration, for example, was given only two selections which were toggled using the – and + keys, rather than a drop-down list.
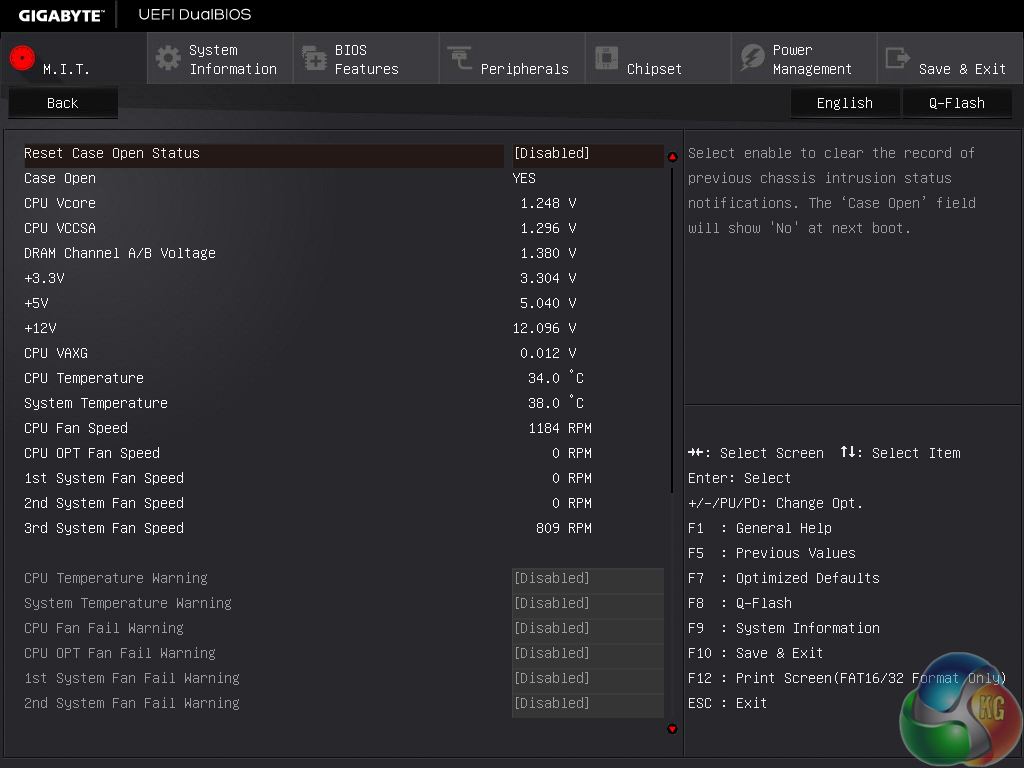
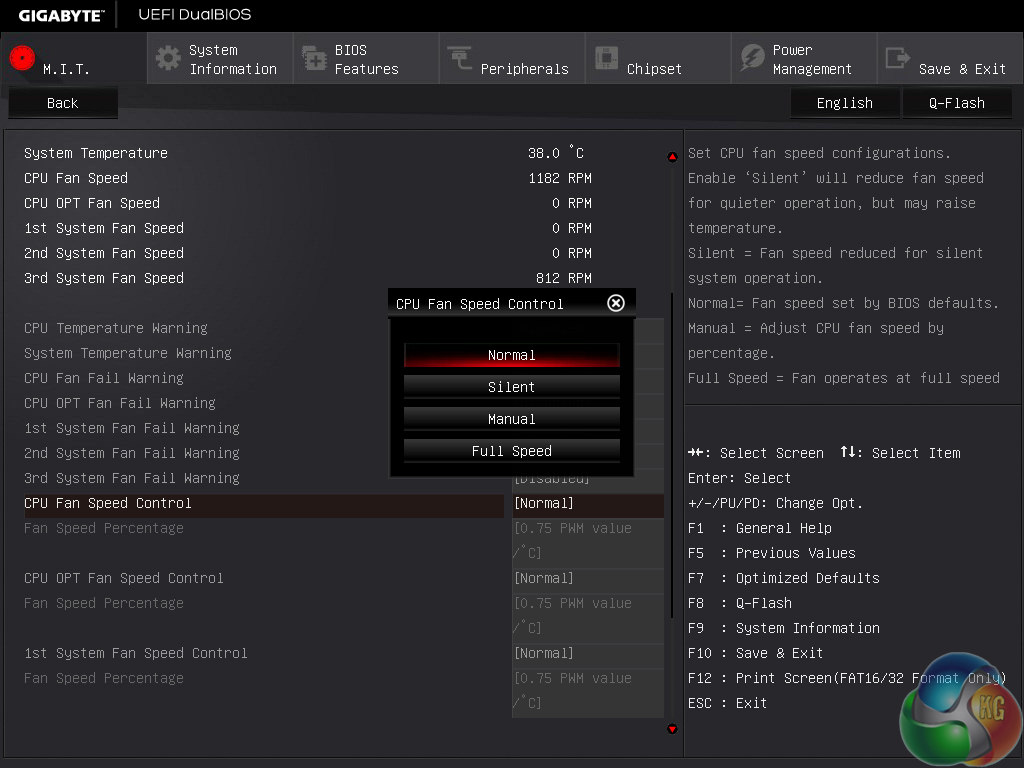
The PC Health Status page monitors system operating parameters, such as voltages, temperatures, and fan speeds. Gigabyte features two pre-defined fan speed profiles, while the third is for manual control and the fourth sets full speed.
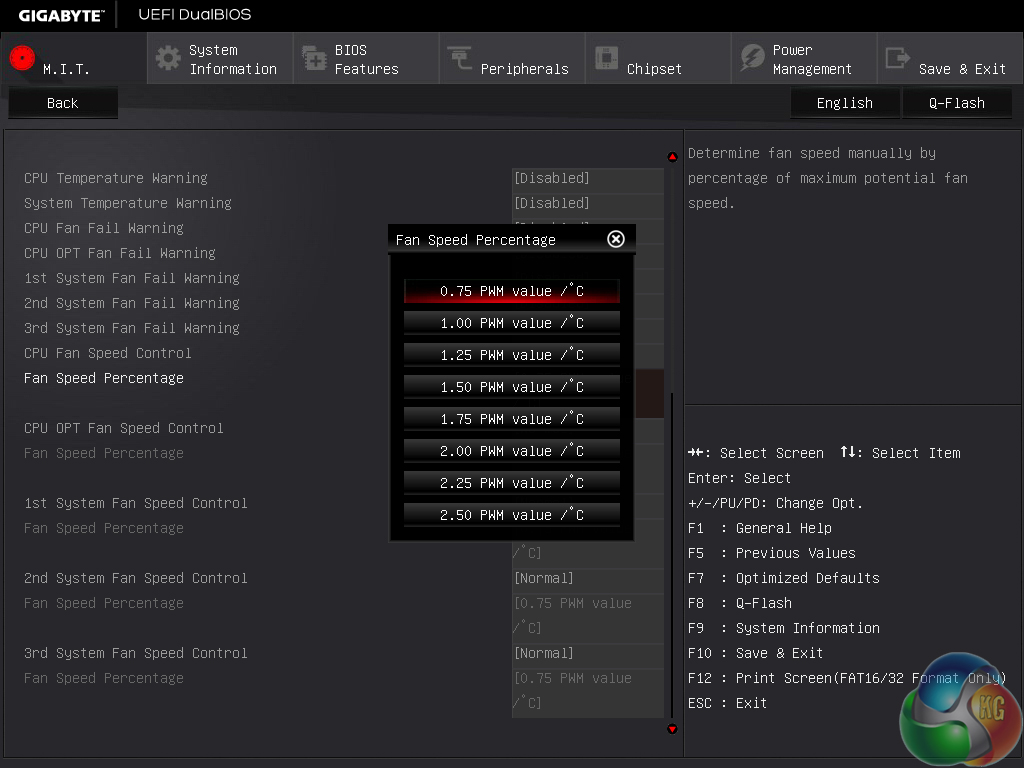
The manual fan control method is terrible. An arbitrary number (to most people) which plots a section of the fan's PWM speed against a temperature reading is simply incomprehensible for most users. There should be a simpler method that uses clear fan speed percentages and temperatures for the listed values.
And if Gigabyte wants to make the setting of a fan speed curve possible (as the current list and units would suggest), an interactive graph should be used. Thankfully, the fan control method through Gigabyte's OS-based software is typically better.
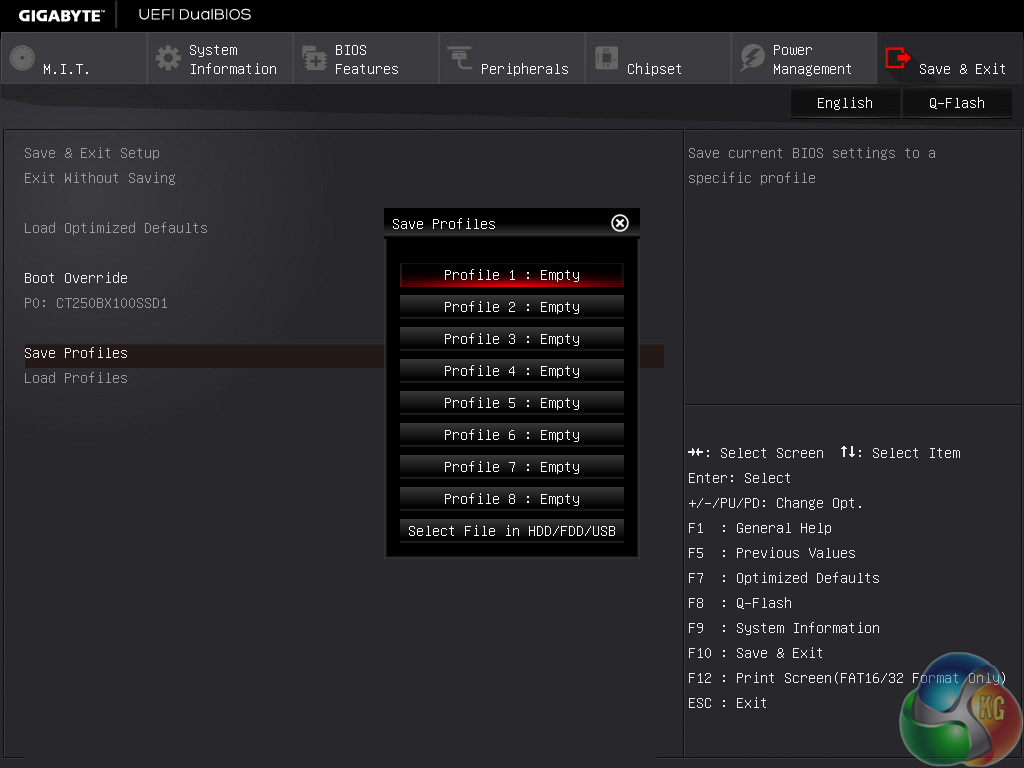
Up to eight configuration profiles can be saved while many more can be transferred to and from a storage device.
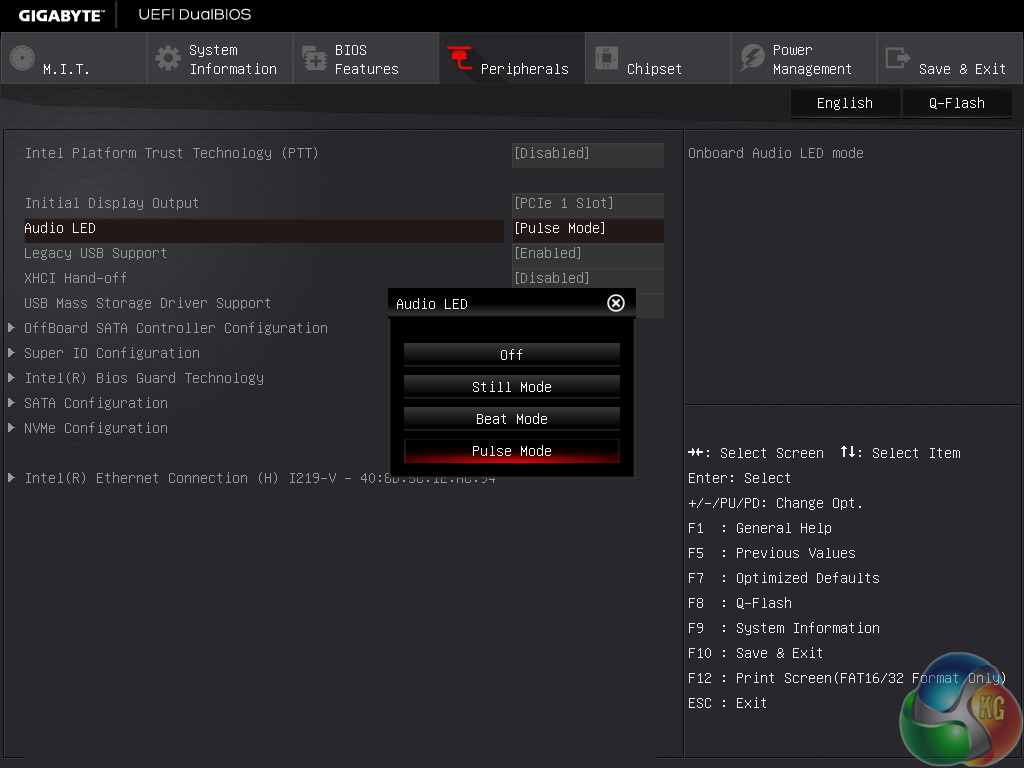
One of the convenient features of the Peripherals page is the ability to control the audio strip LED. This can be set to operate in different modes.
Gigabyte's UEFI is generally easy to navigate and is equipped with enough features for novice users, but it lacks the features and interactivity that we have seen from Asus' and ASRock's latest UEFI iterations. The segregation of voltage settings makes overclocking a simpler task for less experienced users as they are not inundated with a host of settings on a single cramped page.
The fan speed control settings, however, are dire and fail to make much sense. Gigabyte needs to use a list of fan speed settings that is more understandable for a wider user base, or simply utilise a graphical tuning option. Thankfully the OS-based software makes up for this shortcoming.
I tried to test out some of Gigabyte's OS-based software offerings, although I had very little luck with getting any of them to actually do something on our Windows 7-based test system. I would be inclined to point the finger at the ageing operating system, which we have scheduled to be upgraded to Windows 10 shortly.
Intel's Skylake processors are just the latest Intel CPU architecture to see many of the critical system operations handled by the processor. As such, benchmarking a motherboard becomes more of a test to certify that the part operates correctly and meets the anticipated performance levels.
When XMP is enabled, many of the competing vendors' motherboards automatically apply a CPU operating state that sees all cores running at their maximum turbo frequency (typically termed as Multi-Core Turbo, or MCT). Gigabyte, however, does not feature this setting on its Z170XP-SLI motherboard.
We manually overclocked the CPU to its maximum turbo state of 4.2GHz and set the cache frequency to 4.1GHz. This allows us to keep the performance results and testing configuration consistent with data from ASRock's and Asus' motherboards.
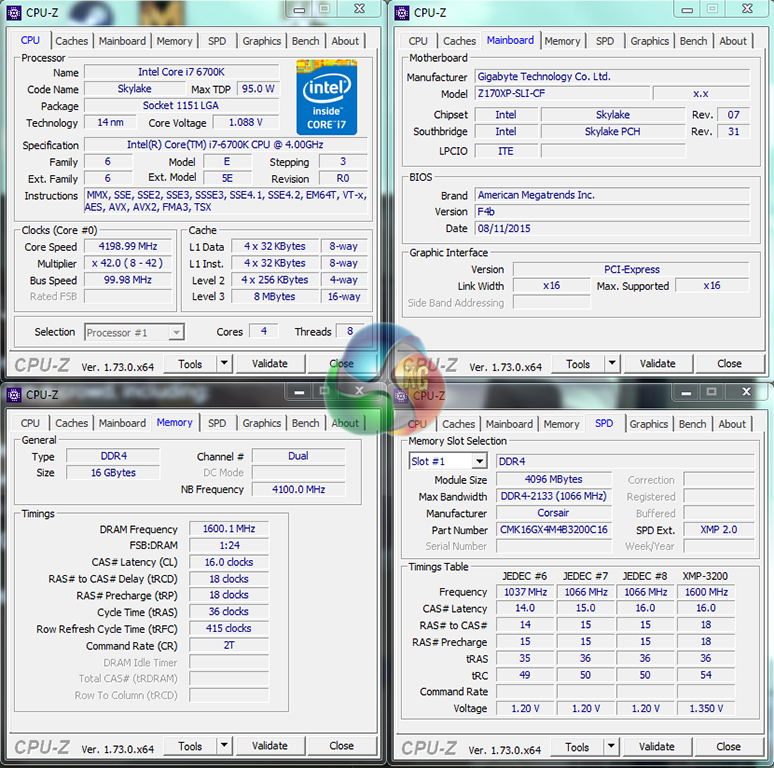
CPU-Z still has issues tracking the voltage levels of Skylake chips. AIDA64 showed that the processor was being delivered up to 1.296V when loaded in our manually-set ‘simulated' MCT state. The VCore value was dropped to around 1.21V using out-of-the-box settings.
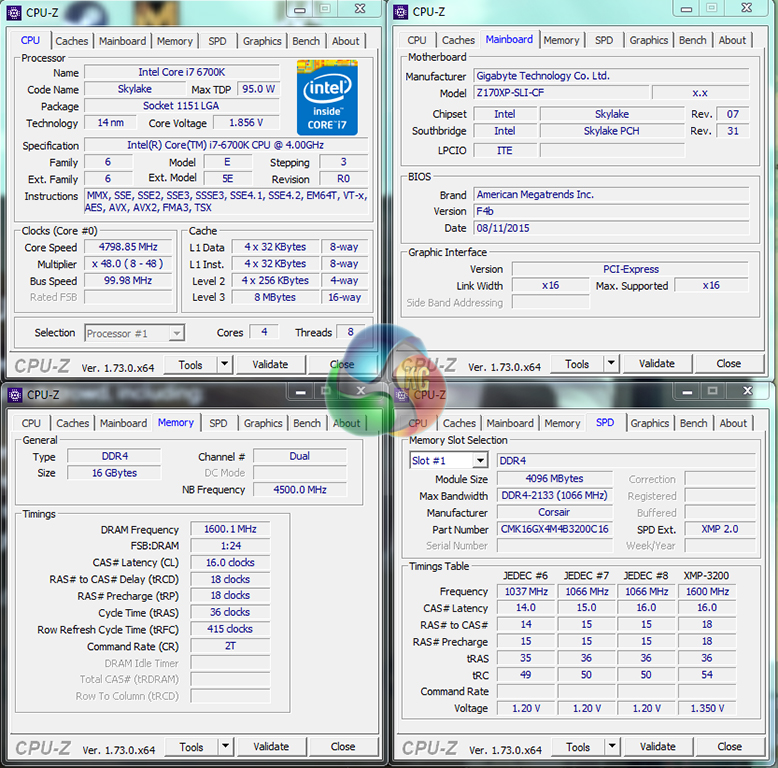
Z170 Motherboard Test System:
- Processor: Intel Core i7-6700K (4.2GHz forced turbo).
- Memory: 16GB (4x4GB) Corsair Vengeance LPX 3200MHz 16-18-18-36 DDR4 @ 1.35V.
- Graphics Card: Nvidia GTX 980 Ti.
- System Drive: 250GB Crucial BX100 SSD.
- CPU Cooler: Corsair H100i.
- Case: NZXT Phantom 630.
- Power Supply: Seasonic Platinum 1000W.
- Operating System: Windows 7 Professional with SP1 64-bit.
Compared Z170 Motherboards:
Software:
- Gigabyte Z170XP-SLI BIOS F4b (latest).
- GeForce 353.30 VGA drivers.
- Intel 11.0 ME drivers.
Tests:
- SiSoft Sandra 2015 SP2b (v2142) – Processor arithmetic and memory bandwidth (System)
- 3DMark 1.5.915 – Fire Strike Ultra (System)
- Cinebench R15 – All-core CPU benchmark (CPU)
- 7-Zip 15.05 beta – Manual video archival (CPU)
- HandBrake 0.10.2 – Convert 1.23GB 1080P game recording using the High Profile setting and MP4 container (CPU)
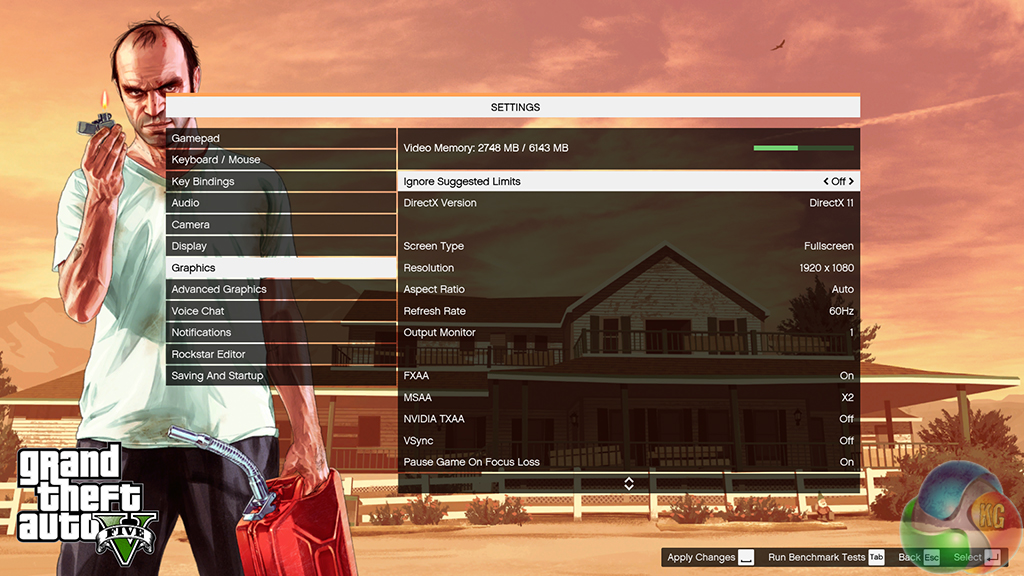
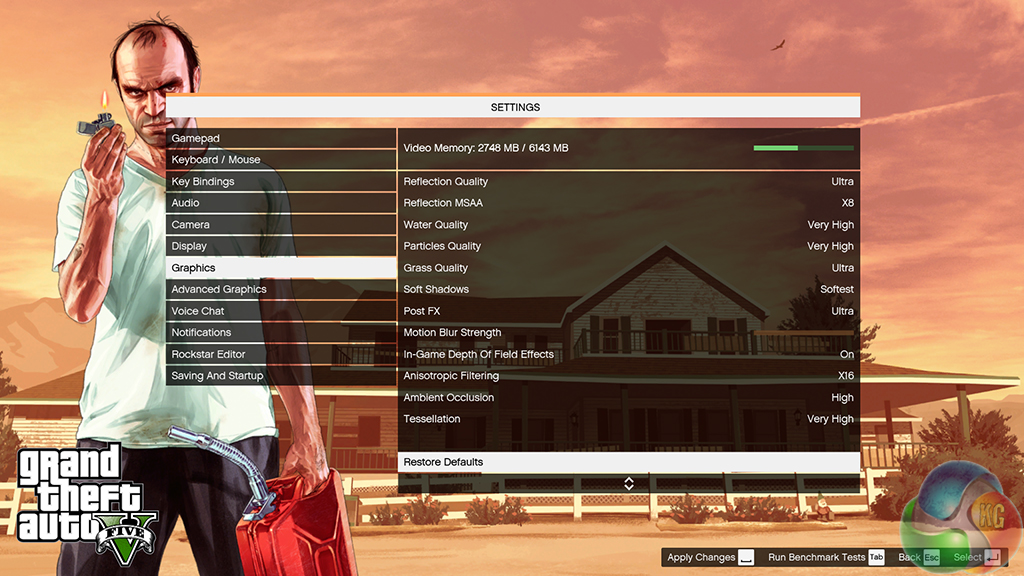
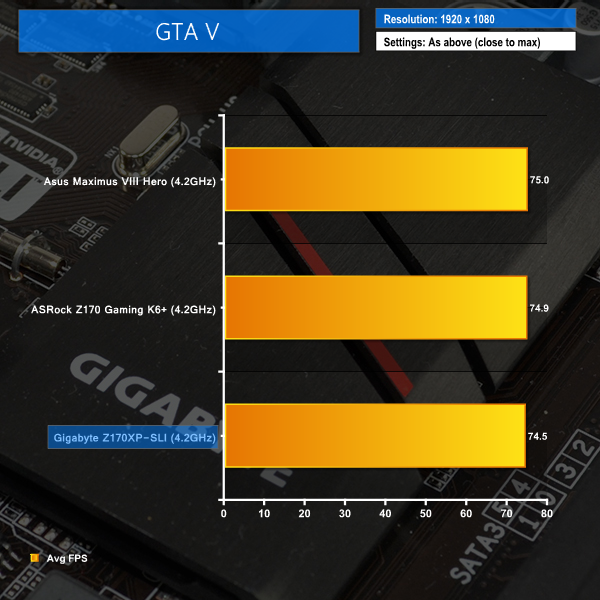
- Grand Theft Auto V – 1920 x 1080, near-maximum quality (Gaming)
- Middle Earth: Shadow of Mordor – 1920 x 1080, ultra quality (Gaming)
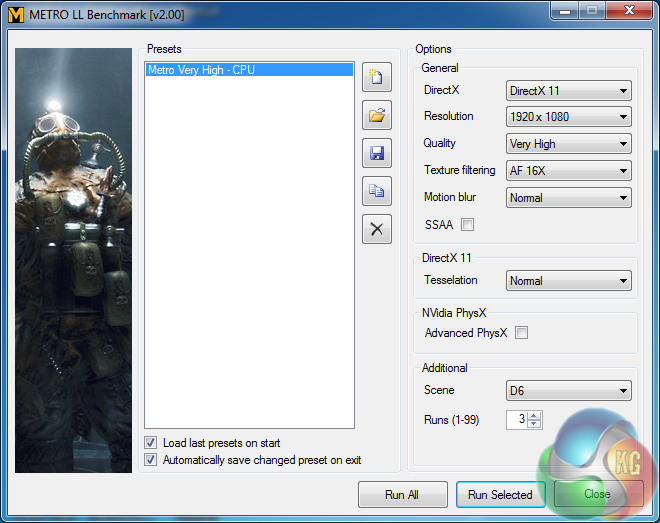
- Metro: Last Light – 1920 x 1080, very high quality (Gaming)
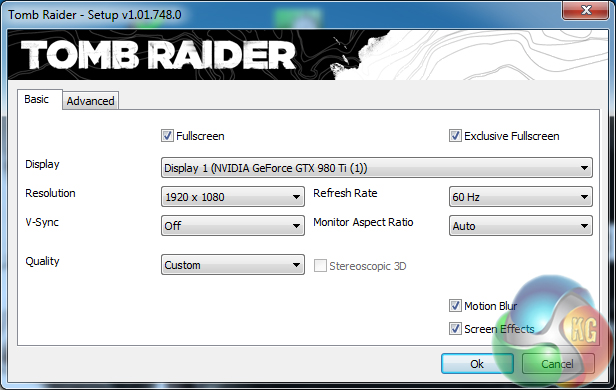
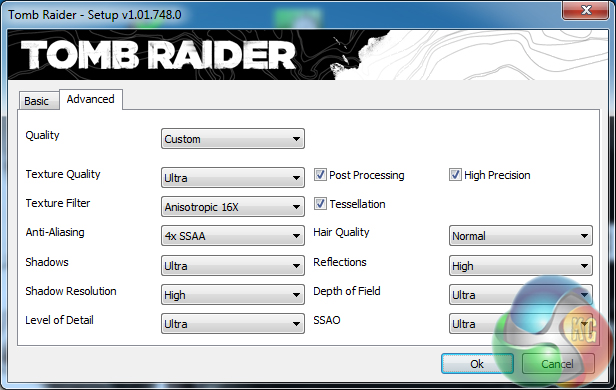
- Tomb Raider – 1920 x 1080, maximum quality, TressFX disabled (Gaming)
- ATTO – SATA 6Gbps, USB 3.0, M.2 transfer rates (Motherboard)
- RightMark Audio Analyzer – General audio performance test (Motherboard)
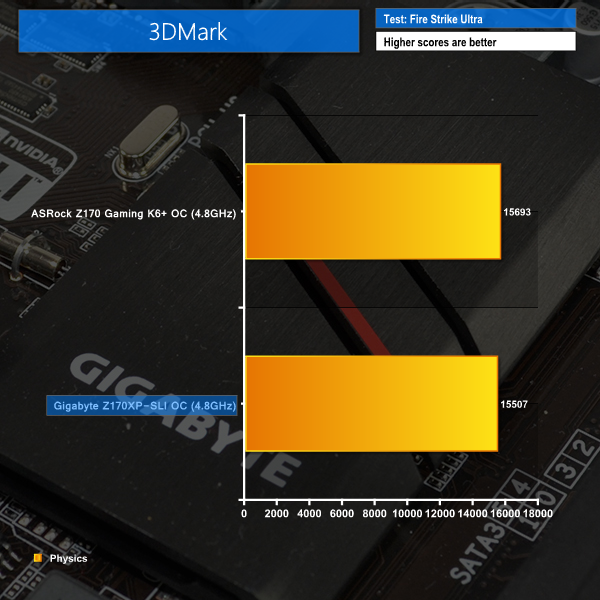
3DMark
We used 3DMark‘s ‘Fire Strike Ultra’ benchmark which is designed to be used on high-resolution gaming PCs.

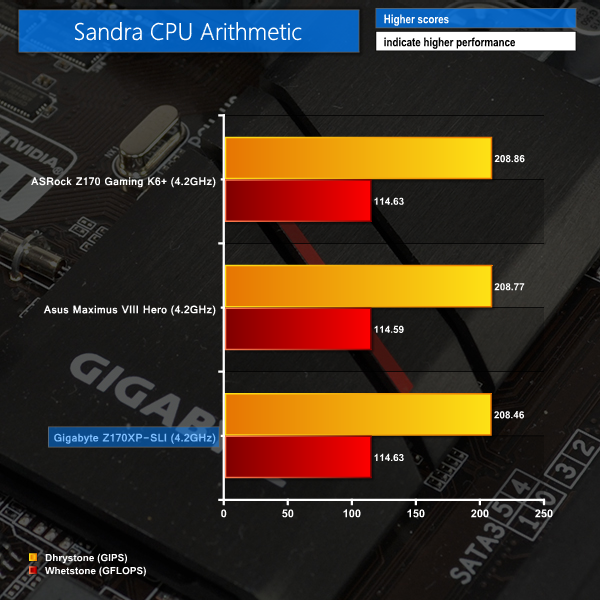
Sandra Processor Arithmetic
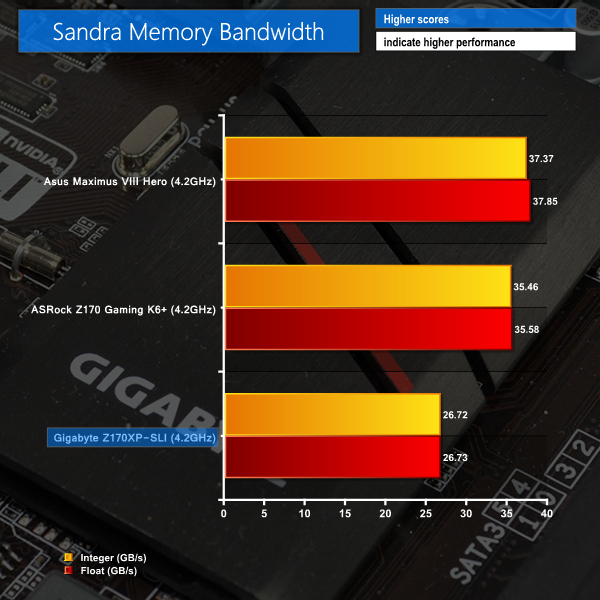
Sandra Memory Bandwidth
Solid performance is shown by Gigabyte's board in the 3DMark Physics and Sandra CPU arithmetic tests.
The Sandra memory bandwidth result is about 10GB/s off the mark of the competing pair, so this gives an indication that Gigabyte currently has a BIOS bug which is hampering memory performance.
We used the latest F4b BIOS, which is technically in beta form, although we have seen Gigabyte use its beta BIOS profiles as the latest updates for many months on some motherboards. The issue is present on the Windows 7 and Windows 8.1 operating systems that we tested, with multiple memory kits, and while using different overclocked settings.
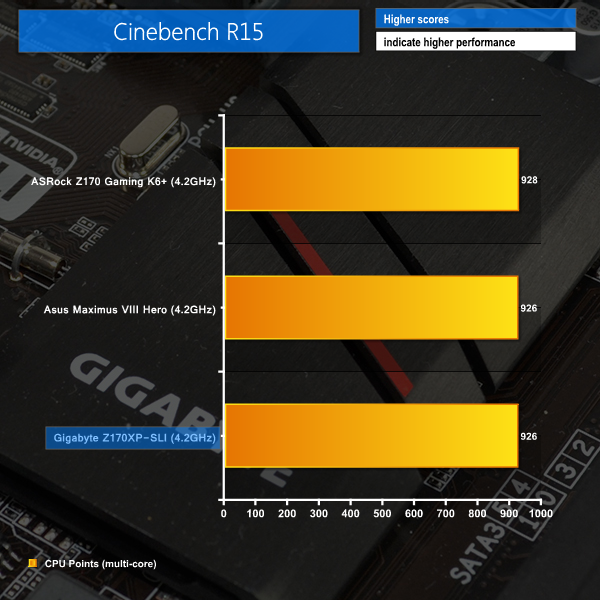
Cinebench
We used the ‘CPU’ test built into Cinebench R15 .
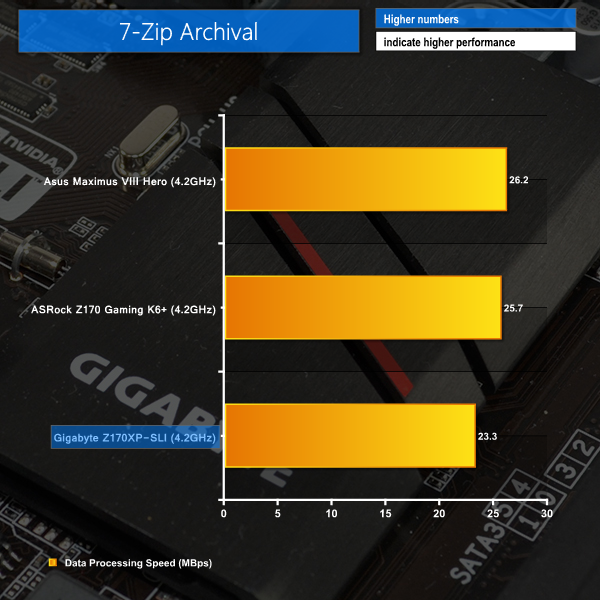
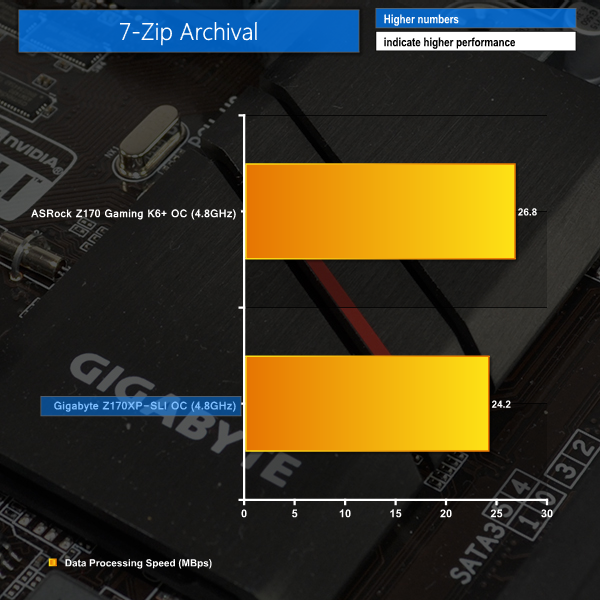
7-Zip
We manually archive a 1.23GB MP4 game recording to test the performance in 7-Zip.
Handbrake Conversion
We measured the average frame rate achieved for a task of converting a 1.23GB 1080P game recording using the High Profile setting and MP4 container.
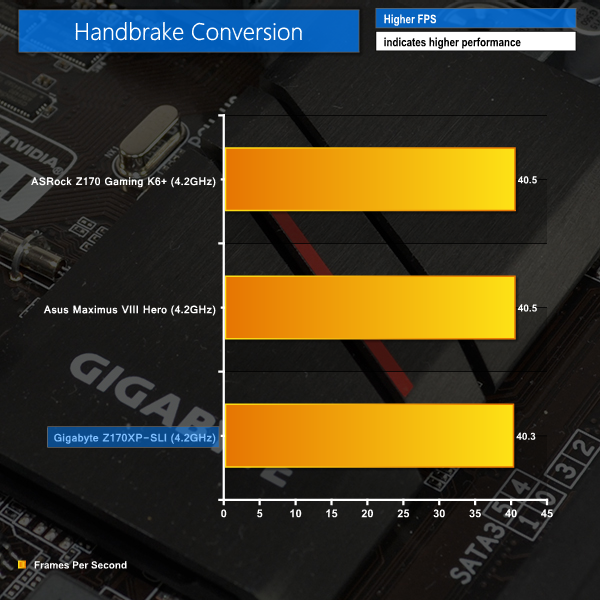
The board's reduced memory performance has little affect on CPU-heavy workloads. The Z170XP-SLI scores a bottom-place finish in our Handbrake conversion test, and is joint-last in Cinebench, but the margins are small.
7-Zip is very sensitive to bandwidth and general performance of the memory subsystem, so it is no surprise to see reduced performance for Gigabyte's offering. As previously mentioned, this reduced memory-related performance seems to be an early BIOS bug and I would not be surprised to see an update fix the issue.
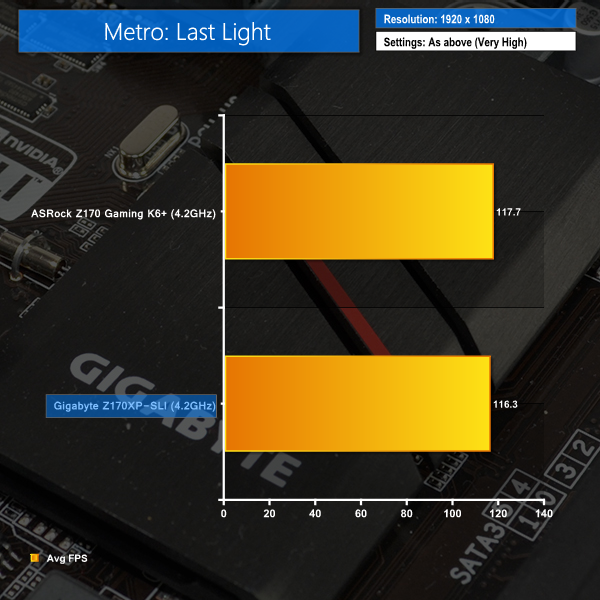
Metro: Last Light
We used a 1920 x 1080 resolution and the Metro: Last Light built-in benchmark set to ‘Very High’ quality to offer an intense challenge for the hardware.
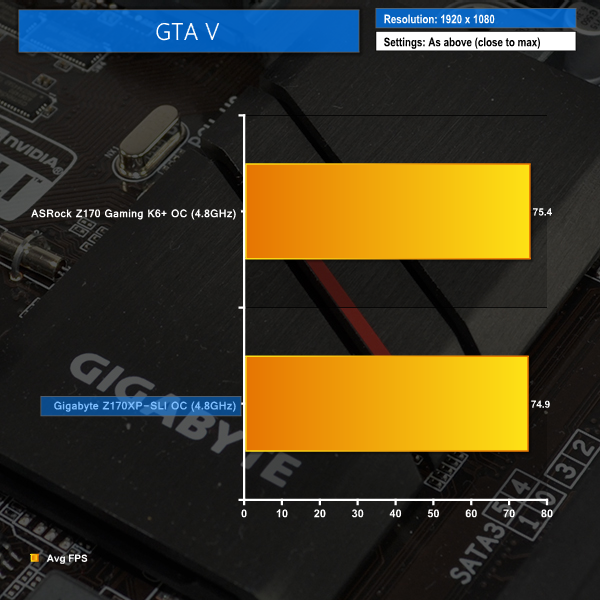
Grand Theft Auto V
We apply very near maximum settings in Grand Theft Auto V and a 1920×1080 resolution to push today’s hardware. Our data was recorded using the built-in benchmark.

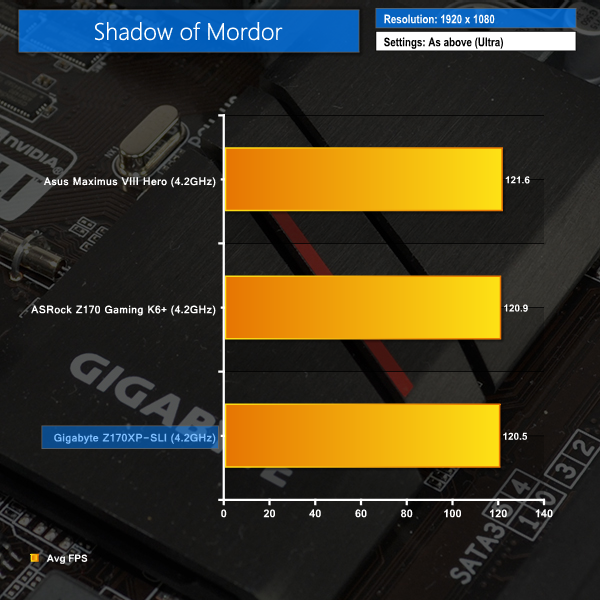
Middle Earth: Shadow of Mordor
We used a 1920×1080 resolution and the Middle Earth: Shadow of Mordor built-in benchmark set to ‘Ultra’ quality.
Tomb Raider
We used a 1920×1080 resolution and the Tomb Raider built-in benchmark set to maximum quality, with TressFX disabled.
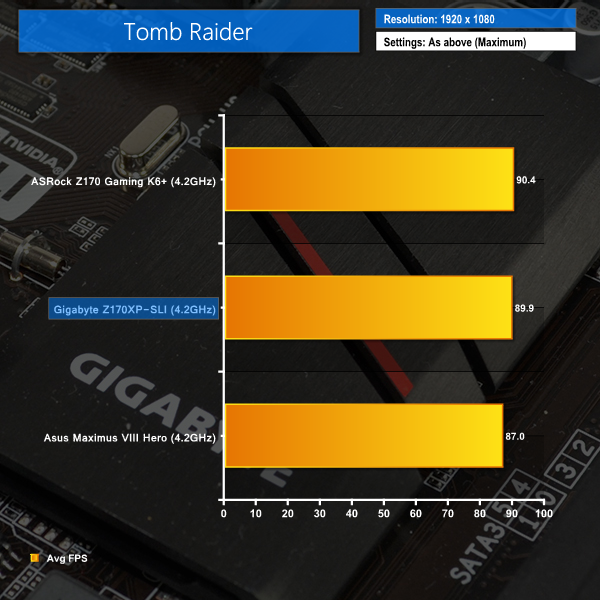
Gaming performance for Gigabyte's Z170XP-SLI is decent. It is generally a little slower than the higher-priced competitors, although a couple of percentage point drops in frame rates are unlikely to be noticeable in general gameplay and is close to benchmarking error margins.
By ploughing the money saved when buying Gigabyte's low-cost motherboard into a higher-performance graphics card, that minor frame rate deficit could be overcome with ease.
M.2 connector
We use Plextor‘s fast M6e 256GB M.2 SSD to test the speed of a motherboard's M.2 connector. We reviewed the 512GB Plextor M6e (and its PCIe x2 adapter card) HERE. Unfortunately we do not have access to a PCIe 3.0-based SSD to fully test the M.2 connector’s performance limits.

Gigabyte's M.2 connector, which is capable of providing a 32Gbps link speed, had no problem powering our Plextor M6e PCIe SSD without any slowdowns.
SATA
For SATA 6Gb/s testing we use a Kingston HyperX 3K (SandForce SF-2281) SSD.
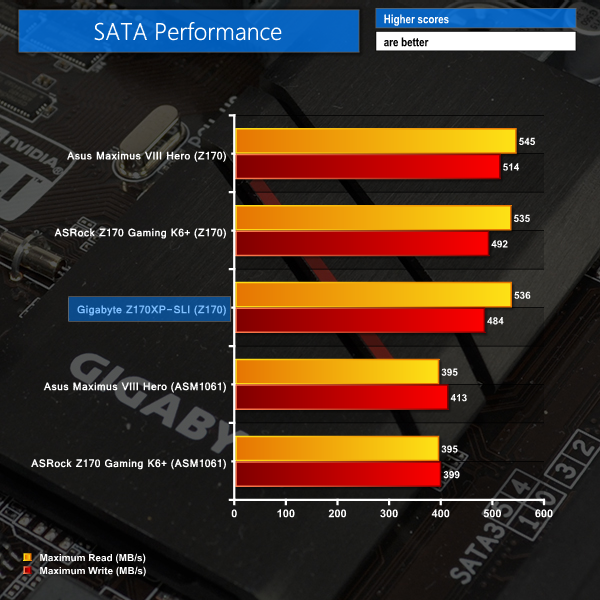
Accounting for degradation in the operating state of our test SSD, SATA 6Gbps performance for Gigabyte's Z170XP-SLI is roughly where would expect it to be for ports fed by the Z170 chipset.
USB 3.0
We tested USB 3.0 performance using the Kingston HyperX 3K SSD connected to a SATA 6Gb/s to USB 3.0 adapter powered by an ASMedia ASM1053 controller.

Using our Windows 7 test system, which is soon to be updated, USB 3.0 performance tops out at around 350MBps due to no UASP driver being present inside the older OS.
Audio
We use RightMark Audio Analyzer (RMAA) to analyse the performance of the motherboard’s onboard audio solution. A sampling mode of 24-bit, 192 kHz was tested.
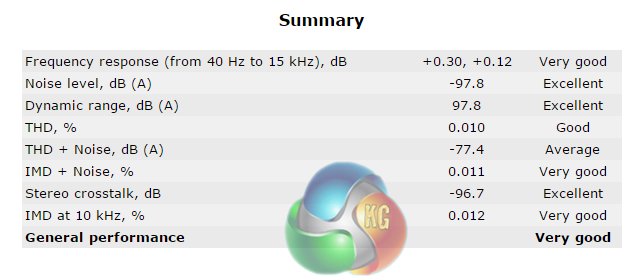
According to RMAA, Gigabyte's audio solution on the Z170XP-SLI is Very Good. Dynamic range and noise level results are particularly strong.
Automatic CPU Overclocking:

The highest – 4.6GHz – CPU Upgrade profile functioned without hesitation using our retail 6700K processor. According to AIDA64, Gigabyte selects a voltage level of around 1.3V, which is fairly easy to control with modest cooling hardware.
The profile allows XMP to be manually selected and does not change any system parameters other than those linked to CPU speed and voltage.
Manual CPU Overclocking:
To test the Gigabyte Z170XP-SLI motherboard’s CPU overclocking potential, we first increased the CPU VCore to 1.40V, and checked that the PCH voltage was running at 1.10V. We also enabled ‘High' load-line calibration (LLC) in order to supply as close to our selected voltage level as possible. The cache ratio was set to 45x.
Manually overclocking the system was straightforward thanks to Gigabyte's easy-to-navigate UEFI. We hit 4.8GHz on the CPU without issue. Finding the cache ratio setting was a little trickier than usual, although the other CPU-related parameters were easy to locate.
The Low LLC setting resulted in a significant voltage drop, so we instead applied the High configuration. Dialling in 1.40V in the UEFI and applying the High LLC mode resulted in a VCore reading of 1.38V under CPU load. A 20mV drop is far from unnoticeable and should be considered when analysing voltage stability of a chip.
We will outline the performance increases that can be obtained from using the Gigabyte Z170XP-SLI motherboard to overclock our system. Our overclocked processor frequency was 4.8GHz and memory speed was maintained at 3200MHz.
As a performance comparison, we have included the overclocked results from one other Z170 motherboard. The maximum overclocked configuration achieved with ASRock's board was a 4800MHz (48 x 100MHz) processor frequency and 3200MHz CL16 memory speed.

Using Gigabyte's Z170XP-SLI motherboard to overclock the system results in additional performance being unlocked. GTA V saw its average frame rate boosted slightly over the stock-clocked configuration, while the minimum frame rate saw a noticeable increase.
The same memory performance bug hampers the Z170XP-SLI motherboard's 7-Zip archival performance even when the CPU and cache frequencies are overclocked. Other than that, overclocked performance from Gigabyte's low-cost offering is generally a small percentage behind that of ASRock's higher-priced part.
We measured the power consumption with the system resting at the Windows 7 desktop, representing idle values.
The power consumption of our entire test system (at the wall) is measured while loading only the CPU using Prime95′s in-place large FFTs setting. The rest of the system’s components were operating in their idle states, hence the increased power consumption values (in comparison to the idle figures) are largely related to the load on the CPU and motherboard power delivery components.

The stock (4.2GHz) clocked power consumption numbers paint somewhat of an inaccurate picture due to our forced workaround to reach the simulated MCT frequency. The load power draw value is only 10% higher than ASRock's and Asus' due to a higher CPU VCore level being set by the auto voltage configuration, rather than the competitors' MCT setting. This load result can be ignored, however the idle number is particularly positive.
Idle power consumption numbers for the overclocked system remain positive. The overclocked Gigabyte board's 13W lower load power draw reading compared ASRock's part is due to the former dropping its load VCore level to around 1.38V. This helps shave a few Watts off the system power usage and degrees off the CPU temperature, although it does present additional head-scratching when trying to pinpoint a stable processor overclock.
The Gigabyte Z170XP-SLI is a solid motherboard that makes entering the Z170 platform, while maintaining diverse multi-GPU capability, an affordable process.
General performance from the motherboard is good, if not quite as fast as noticeably higher-priced solutions from competing vendors. Our testing did identify what seems to be a BIOS bug relating to memory performance and it does impact performance where memory bandwidth is of relevance (7-Zip archival). If this is indeed a BIOS-led issue, a solution should not be difficult to come by but the waiting time for a BIOS update is frustrating for buyers.
Overclocking capacity of the board was strong, and impressive given the modest price tag. We had no problem taking our 6700K processor to 4.8GHz while pushing 1.40V through the chip, and Gigabyte's LLC setting even reduced the VCore level to 1.38V under load but maintained stability. Our CPU cache frequency was held stable at 4.5GHz, too, and this was all alongside four DIMMs of 3200MHz DDR4.
Of course certification for the application of two Nvidia graphics cards in SLI is an important feature, and it actually makes the Z170XP-SLI one of (perhaps the) lowest cost Z170 boards that can run a pair of Nvidia GPUs in SLI. This is ideal for budget-conscious users who want longevity from their system, as adding another GPU into the mix in a few months or years is typically a quick, cost-effective way of boosting frame rates.
Gigabyte has been smart in deciding which features are important to those making a low-cost jump onto the Z170 platform. There's no add-on SATA chipset or fancy power delivery components. But instead Gigabyte allocates resource budget on the addition of USB 3.1 Type-A and Type-C ports, PCI connectors for users wanting to reuse their ageing WiFi card, and a healthy audio system. Add Intel's I219-V NIC and the host of chipset-based offerings into the mix, and the Z170XP-SLI offers a good range of features that general users will appreciate.
The UEFI implementation offered by Gigabyte is easy to use and allocates the core features that one would expect. It's far from impressive though, especially with its dire fan control method and inherent lack of value-added features or interactivity. ASRock and Asus (I have yet to test MSI's Z170 solution) have significantly better implementations, based on my experience.
Priced at £113.99 from OverclockersUK, the Gigabyte Z170XP-SLI is a smart solution to those looking for a low-cost motherboard that gives them the flexibility to utilise SLI in the future. With a 32Gbps M.2 connector, USB 3.1 Type-A and Type-C ports, and an enhanced audio solution, Gigabyte's Z170XP-SLI can be used to build an impressive system. Just don't expect it to feature all of the bells and whistles of the higher-priced offerings and expect to wait for a BIOS update to fix memory performance.
Discuss on our Facebook page HERE.
Pros:
- One of the lowest-cost Z170 boards to support SLI.
- Solid overclocking performance and good built-in overclocking presets.
- Dual BIOS chips for redundancy.
- USB 3.1 Type-A and Type-C ports.
- Good set of features – Intel NIC with cFos software, 32Gbps M.2 connector, ALC1150-based audio system.
- Smart layout decisions, especially expansion slots, fan connectors, and USB 3.0 headers.
Cons:
- Seems to have a BIOS bug that hampers memory performance, although this should be fixable.
- UEFI lacks the features of competing vendors' solutions, such as good fan control and general interactivity.
- Brown, not black, PCB will irritate appearance-conscious buyers.
- Optical SPDIF audio connector may be missed by some.
KitGuru says: A solid solution that gives users wanting SLI support a low-cost entry point to the Z170 platform.