In Part 1 of the Parallels Mac Management for SCCM series I installed the Parallels Configuration Manager Console Extension. I installed this on my site server ‘ConfigMgr’.
Part 2 focused on the installation of the Parallels Proxy which I installed on a remote server called ‘Parallels’ which I intend to use to install the Parallels roles.
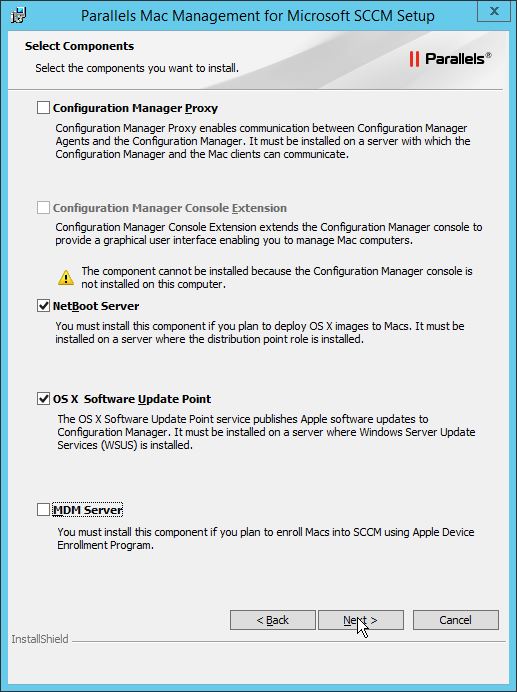
Part 3 of the series concludes the ‘role’ installation, namely the NetBoot Server and OS X Software Update Service.
The Parallels NetBoot server is required for Mac Operating System Deployment. ‘NetBoot is a technology from Apple that enables Mac computers to boot from a network. You need to install this component if you plan to deploy OS X images to Mac computers. The component must be installed on a computer running Windows Server 2008 SP2 or later’ (see http://download.parallels.com/pmm/v4.5/ga/docs/en_US/Parallels-Mac-Management-for-SCCM-Administrators-Guide.pdf)
The OS X Software Update Service ‘allows you to manage Apple software updates
(patches) for OS X using the native SCCM functionality. The component must be installed on a erver where Windows Server Update Services (WSUS) is installed’ (see http://download.parallels.com/pmm/v4.5/ga/docs/en_US/Parallels-Mac-Management-for-SCCM-Administrators-Guide.pdf)
As with the installation of the proxy in Part 2, certain pre-requisites are required, one being the standard Distribution Point role that is added in the SCCM console as NetBoot requires PXE to be enabled.
Pre-Requisites
The following pre-requisites need to be installed on the server that will host the NetBoot server:
- .Net Framework 3.5
- SCCM Distribution Point
- PXE Point enabled on DP
- WDS installed
- BITS 4 installed
The following pre-requisites need to be installed on the server that will host the OS X Software Update Service:
- WSUS installed
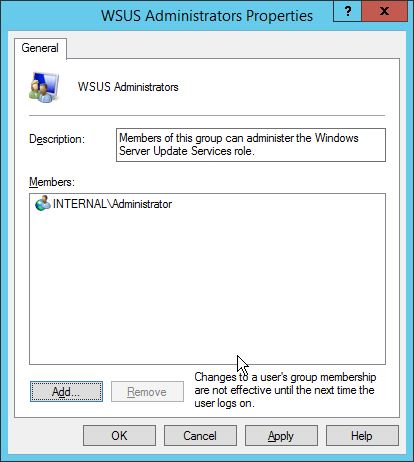
- User account running the OS X Software Update Service added to the WSUS Administrators group
- A WSUS Code Signing certificate is required from PKI
Installation
Start the installation by installing .Net Framework 3.5, I had already installed this feature as part of the pre-reqs for the Parallels Proxy.
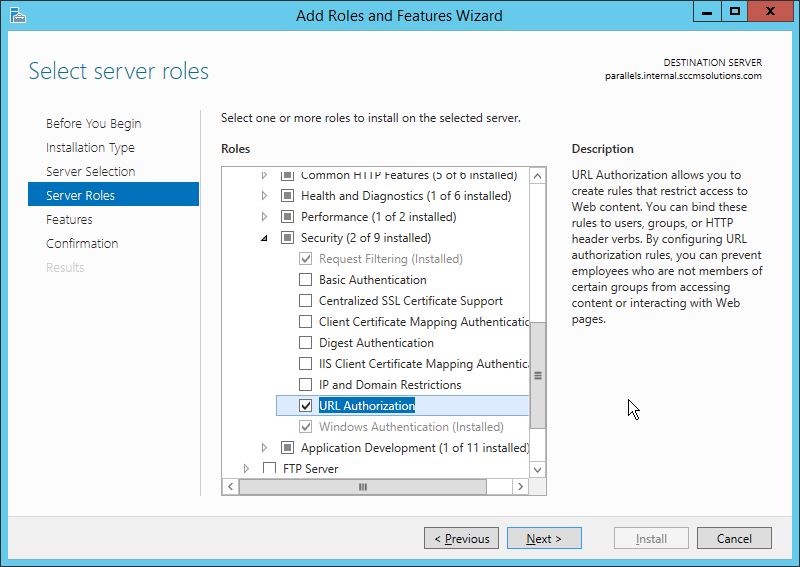
Next, install the pre-requisites required to install the Distribution Point role. The SCCM Current Branch Supported Configuration documentation states the following are needed:
Distribution point
Windows Server roles and features:
- Remote Differential Compression
IIS configuration:
- Application Development:
- ISAPI Extensions
- Security:
- Windows Authentication
- IIS 6 Management Compatibility:
- IIS 6 Metabase Compatibility
- IIS 6 WMI Compatibility
Once installed I then added in URL Authorization from the Web Server>Security section.
BITS was then added.

After the Roles and Features are added load up ‘Internet Information Services (IIS) Manager’ from Administrative Tools and navigate down the ”Default Web Site’. In the main pane double click ‘Authentication’ and then enable ‘Windows Authentication’

Back in the main pane double click ‘Authorization Rules’
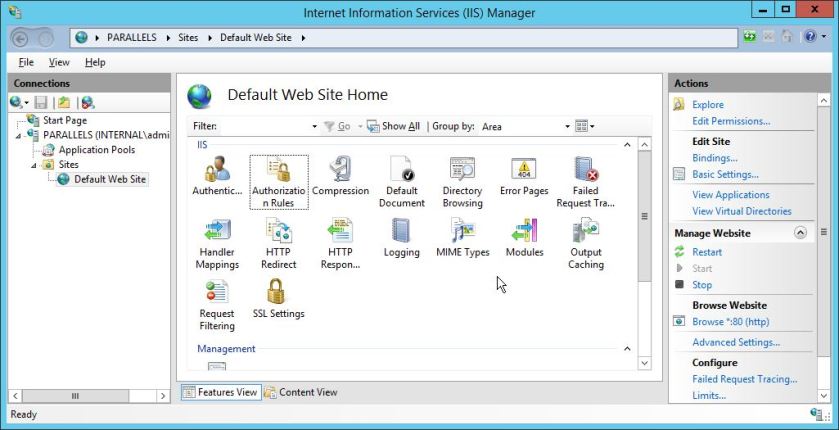
Ensure ‘Allow Users’ is set

WSUS Installation
Next re-run ‘Add Roles and Features’ in Server Manager and add in WSUS
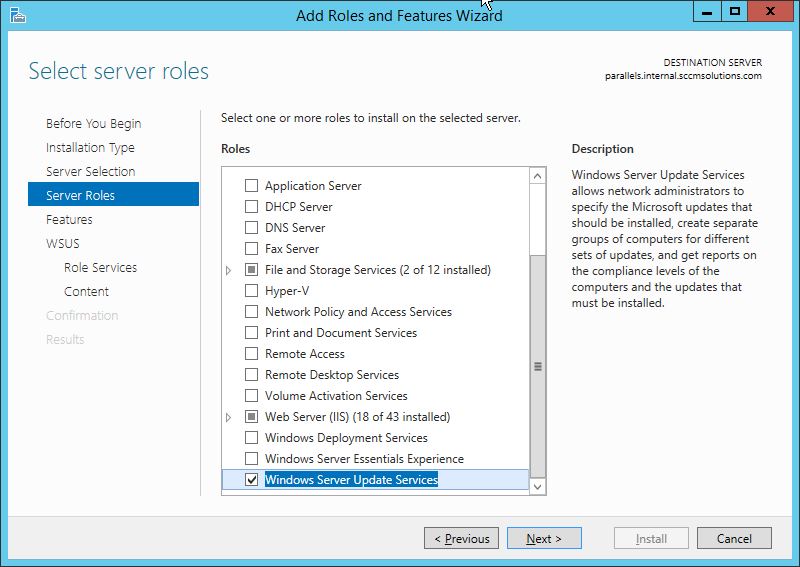
I’ve removed the WID selection and highlighted Database.

I have selected to store the WSUS downloads in C:\WSUS
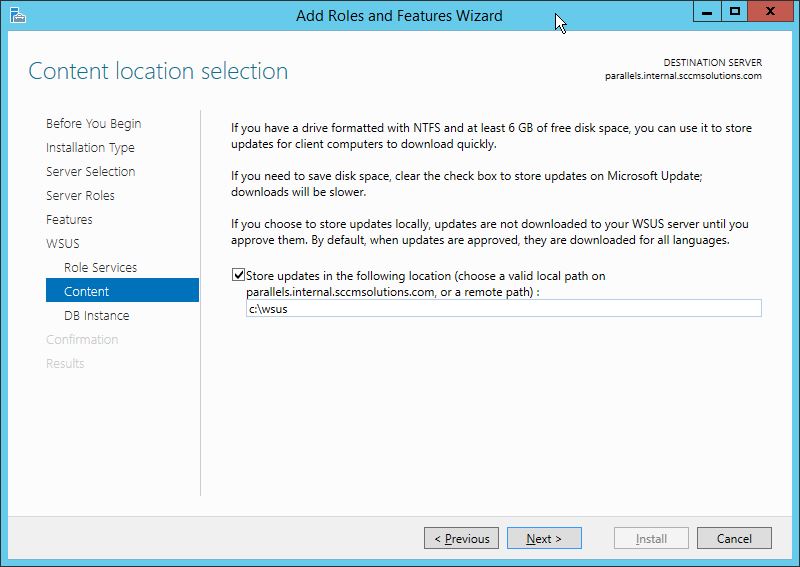
At this stage I have pointed the WSUS configuration to use the site database on my site server.

Once the role is installed remember that the Post Installation tasks need to be run from Server Manager – note the exclamation mark. Click and run the tasks.

WSUS Certificate
One of the pre-reqs required for the OS X Software Update service is to install a WSUS code signing certificate. This can be obtained from the certificate authority in your environment.
In Certificate Authority Console right-click Certificate Templates>Manage.

In the Certificate Templates Console right-click Code Signing>Duplicate Template.
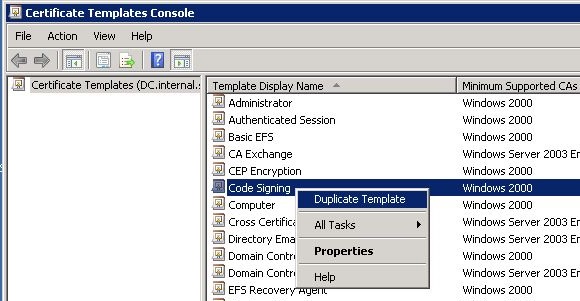
Set the following properties on the template:
In the Compatibility tab:
- set Certificate Authority to Windows Server 2003
- set Certificate recipient to Windows XP / Server 2003

In the General tab:
- set the Template display name

In the Request Handling tab:
- Check Allow private key to be exported
- Check Prompt the user during enrollment

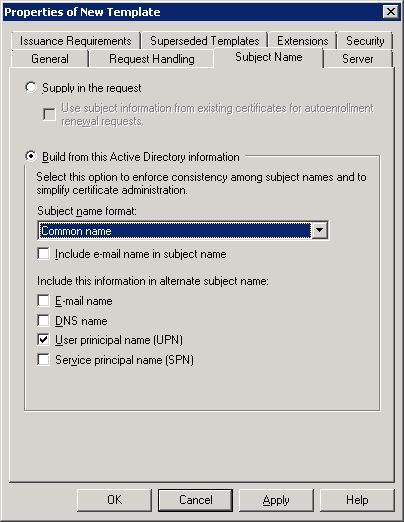
In the Subject Name tab:
- set Subject name format to Common name:
In the Extensions tab, double click on Key Usage and uncheck ‘Make this extension critical’


In the Security tab:
- select Authenticated Users and grant Read and Enroll permissions

Once these options are set click OK and close the Template Console window.
In Certificate Authority Console right click Certificate Templates>New>Certificate Template to Issue.

Select the newly created template and click OK.

The template will become available to use.
![2017-03-19 23_09_18-certsrv - [Certification Authority (Local)_internal-DC-CA_Certificate Templates].jpg](https://sccmentor.files.wordpress.com/2017/01/2017-03-19-23_09_18-certsrv-certification-authority-local_internal-dc-ca_certificate-templates.jpg?w=840)
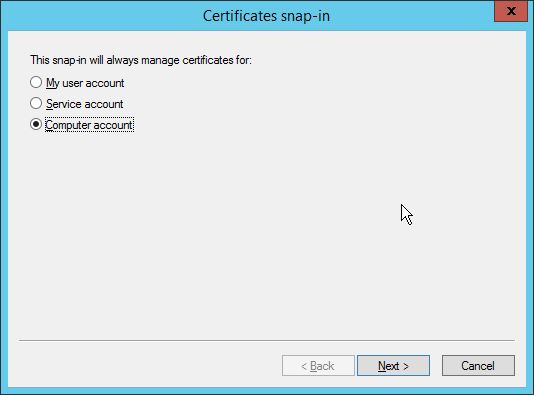
Now go to the server where WSUS has just been installed, in my instance the Parallels server and run MMC.
Click File>Add/Remove Snap-in…

In the left pane of Add or Remove Snap-in window select Certificates and click the ‘Add >’ button.

select ‘My user account’ and click Finish.

Navigate to Certificates – Current User and right click Personal. Select All Tasks>Request New Certificate…

Click Next.

At the Select Certificate Enrollment Policy screen click Next.

Select the WSUS certificate and click ‘Enroll’

Click Finish to complete.

Export the certificate, to do this navigate to Certificates – Current User>Personal>Certificates. Right click on the issued certificate and choose All Tasks>Export…

Click Next.

At the Export Private Key window check Yes, export the private key and then click Next.

At the Export File Format window check Export all extended properties and then click Next.

Enter a password and click Next.

Export the file to a relevant location.

Click Finish to complete the process.

Click OK

On the server running WSUS, again the Parallels server in my case, run the following PowerShell commands as administrator.
[Reflection.Assembly]::LoadWithPartialName("Microsoft.UpdateServices.Administration")
$updateServer = [Microsoft.UpdateServices.Administration.AdminProxy]::GetUpdateServer()
$config = $updateServer.GetConfiguration()
$config.SetSigningCertificate("<Path to pfxFile>", "<PFX file password>")
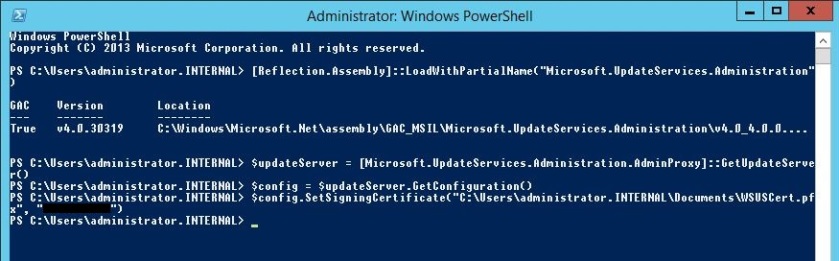
Then issue the command
$config.Save()
Finally we need to set up the update server and clients for locally-published updates.
To do this we need to export the certificate added via the PowerShell previously.
Open up a MMC console. Choose File>Add/Remove Snap-in…

Select Certificates and click ‘Add>’

Select Computer Account and click Next.
Click Finish.

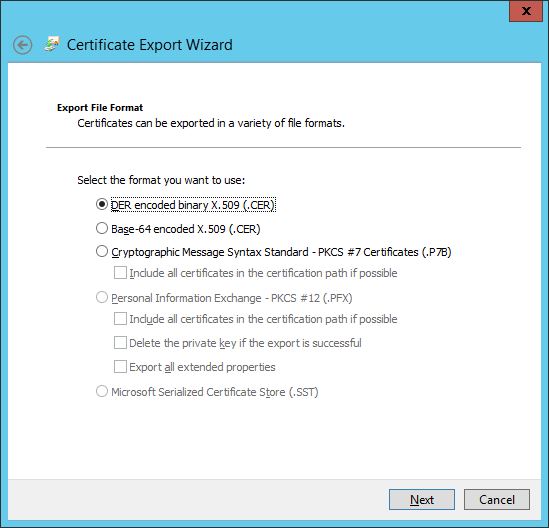
Navigate to WSUS>Cerificates and highlight the Code Signing certificate. Right click and choose All Tasks>Export…

Click Next.

Do not export the private key and click Next.

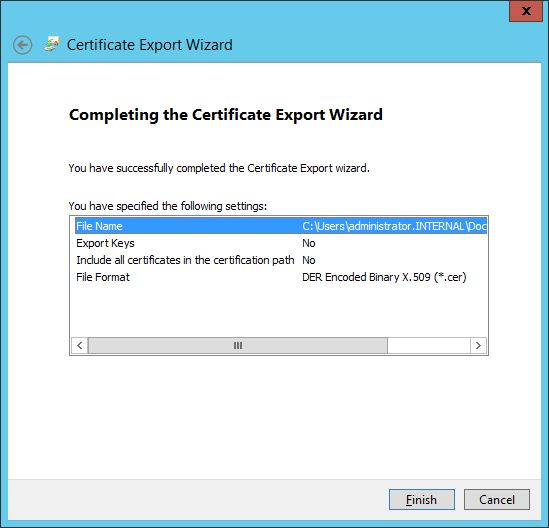
Export as a .cer and click Next.
Export to the relevant location and click Next.

Click Finish to complete the process.
Click OK.

Now, navigate to the Trusted Root Certification>Certificates folder, right click and select All Tasks>Import…

Click Next.

Locate the .cer and import. Click Next.

Click Next.
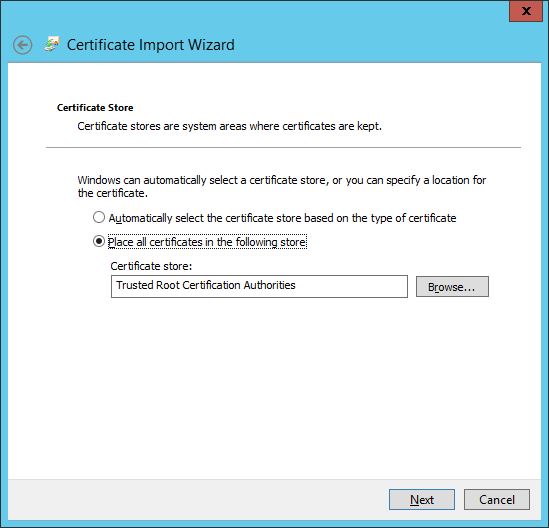
Click Finish.

The certificate will be imported into the store.
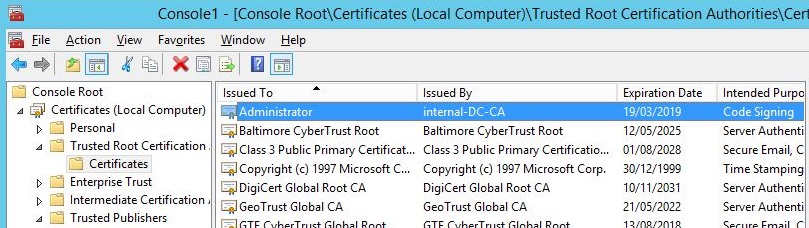
Repeat the process for the Trusted Publishers folder.
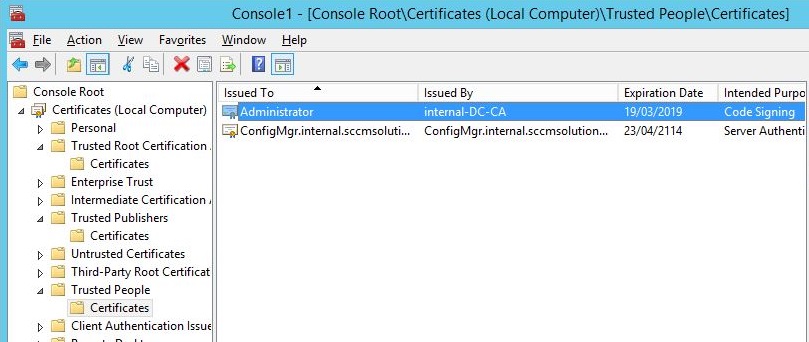
If your SMS Provider is remote, and in my case it resides on my site server, ConfigMgr, then repeat the process of importing the .cer into the Trusted Root Certification and Trusted Publishers folders on that server as well.
DP Installation
Now go to the site server and in the SCCM Console go to the Administration workspace>Site Configuration>Servers and Site System Roles, right click and choose ‘Create Site System Server.
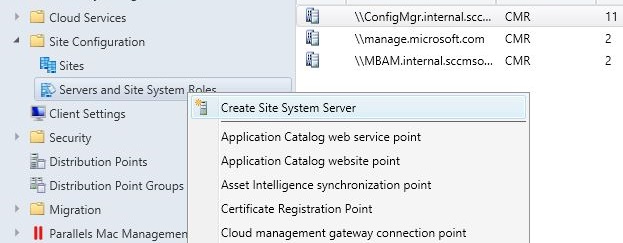
Add in the server to the the site system and choose the Site code from the drop down.

No proxy is required at this stage

Select the Distribution Point role.
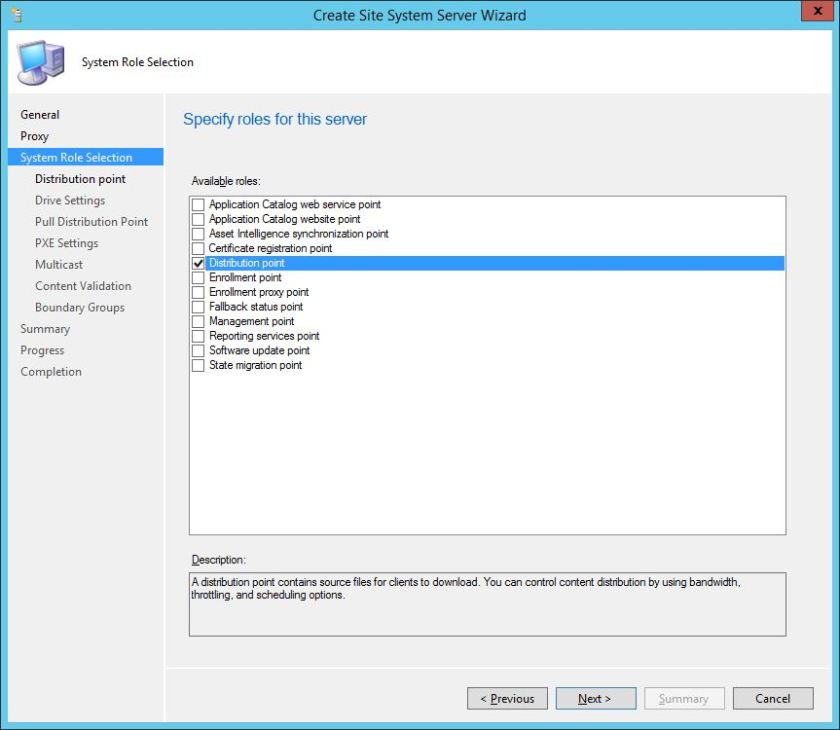
The DP will be HTTP in this instance. Ensure the ‘Allow clients to connect anonymously’ checkbox is ticked to allow Macs to talk anonymously to the DP. Note in this image it hasn’t been but it MUST.

Assign the relevant drive letters for content location

This will not be a Pull DP.

On this screen, enable PXE, allow DP to responded to incoming PXE requests and enable unknown computer support. I haven’t selected ‘Require a password…’

Click Yes when warned about Port requirement – make a note if you need to open up firewall ports on the network.

Click through the wizard to completion.
Install the Parallels components
Now it’s time to run the Parallels installation file and add in the components that are needed.
When prompted select the NetBoot Server and OS X Software Update Point. Click Next.

Click Install

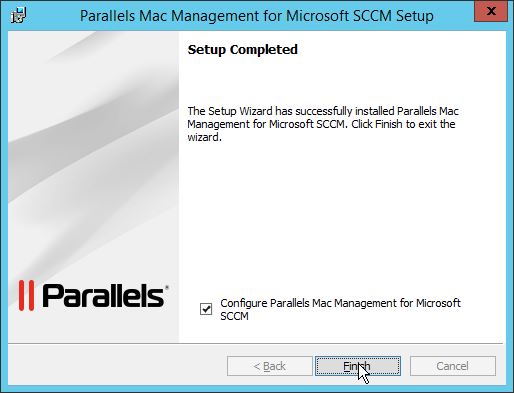
Click Finish but ensure the checkbox to configure is selected.
First up is the configuration of the NetBoot Server. As mentioned previously I have not installed a SMS Provider locally on my Parallels server so I have to point back to the SMS Provider on my site server at this stage. Click Next.

Enter the details of the service account to run the NetBoot Server service. For the rights required for this account see the following KB article http://kb.parallels.com/uk/117937

Select a path to store the NetBoot images. The default is pmmimages. Click Next.

Click Next at the summary screen.

Click Finish when complete

Finally the configuration of the OS X Software Update service is required.
Select an account to run the service. The account you choose must have administrative right on the local server and must be a member of the WSUS Administrators group.
So add the account to that group.
then enter the details into the configuration wizard. Click Next.

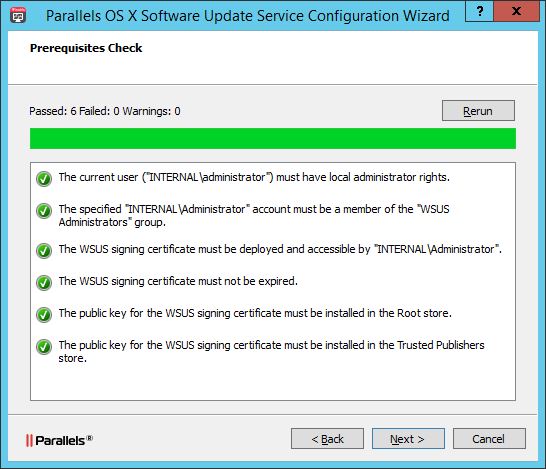
A pre-requisite check will be performed. Address any issues and re-run if necessary. Click Next.
Click Finish at the summary screen.

You’ll be notified that your configuration has been applied.

Now re-run the PowerShell commands, run previously, as administrator.
[Reflection.Assembly]::LoadWithPartialName("Microsoft.UpdateServices.Administration")
$updateServer = [Microsoft.UpdateServices.Administration.AdminProxy]::GetUpdateServer()
$config = $updateServer.GetConfiguration()
$config.SetSigningCertificate("<Path to pfxFile>", "<PFX file password>")
Then issue the command
$config.Save()
You can re-run each configuration wizard, including the proxy config from Part 2 from the Parallels menu

MDM Server?
You may have noticed a MDM Server option when installing the Parallels Mac Management solution and that we un-ticked this previously.
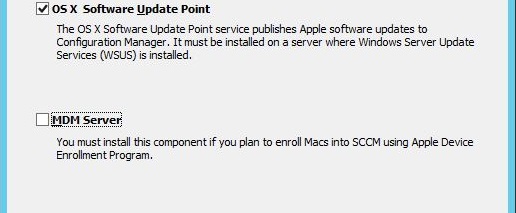
The Parallels MDM Server enables you to deploy and enroll new Mac computers in SCCM using the Apple Device Enrollment Program. This component must be installed on a server located in DMZ. I will not be covering this role in this series.
Now that we have all our roles installed I’ll be taking a look, in Part 4, at how we can licence Parallels, discover Macs in the environment and get the Parallels Mac client installed on a device.

Hi,
I am following your guide and completed Step 1 and Step 2. Finished DP on Parallel Server.
When I run Parallels Mac Management for SCCM.exe, I am getting a message – “Welcome to Setup Wizard for Parallels Mac Management for SCCM – The setup wizard will allow you to remove Parallels Mac for SCCM”
I don’t want to remove but, I want to add Netboot and OS X Software update feature. Not sure why, I am getting above error.
The Parallel server is running Configuration Manager Proxy (the first feature) in Parallel for Mac Management for SCCM. I will try to get hold of Parallel support on Monday.
Thanks for informative guide.
Ram
My Home Lab Setup:
CM
PARALLEL ( this server will run proxy, netboot and os x software update).
Ram,
This is an error on my part and I probably need to address this on the blog. You can’t go back in and add extra components, you’ll have to remove the existing install and deploy again. TBH it’s a pretty simple install of the Parallels software so won’t cause you any problems. BTW if you start to follow Part 3 then you will need an internal certificate for WSUS. I have to go back and address this and amend the blog. You should see the warning sign on the screenshot for the WSUS pre-reqs https://sccmentor.files.wordpress.com/2017/01/2017-01-24-23_18_55-parallels-os-x-software-update-service-configuration-wizard.jpg. All the details on doing this are here http://kb.parallels.com/en/123756 but I will be adding this to the blog post as soon as possible. Hope this helps.
Thanks for the update . I will do the needful and have it deployed during this week. Still waiting for trial license key.
I was following wsus certificate steps. I have completed 1 to 13 steps. Don’t understand Step 14 – Step 16. Where exactly, I need to install the exported certificate using PS? In my case WSUS is installed on Parallel Member Server.
Ram – I’ve just updated the document to highlight the whole process. Hope that clears up your question. Cheers Paul
Thanks for certificate update. I will do the needful tomorrow PM.
The re-install went without any issue. Since, I followed all the pre req as per your notes, I did not face any difficulty during the install. Now on to part 4 and look forward to part 5 and the rest.
Thanks
Ram
Excellent news Ram. I’m hoping to get more Parallels content out this week. Keep a look out
Finished the following:
1. License Activation
2. Mac Discovery
3. Installed Parallel Mac Client
For those who are having issue with Parallel Network Discovery – Check this link
http://kb.parallels.com/ca/122595. I did not include subnets range. So the parallel network discovery failed. After, I entered subnets range mac systems started to show up in config console under device.
Ram
Reblogged this on System Center.