advertisement

Avocent ® HMX High Performance
KVM Extender System
Quick Installation Guide
HELPFUL RESOURCES
Product documentation downloads are available at: www.avocent.com/manuals
Search for additional product information at: www.avocent.com
For further assistance, contact Avocent
Technical Support.
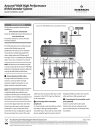
Avocent ® HMX 6000 Series Transmitter Shown
5
4
6 14
The HMX high performance KVM extender system offers flexible ways to link peripherals and systems across standard networks by encoding high quality DVI video, digital audio and USB data into IP messages. Prior to completing the following steps, ensure your computer is turned off.
NOTE: All references to the installer/user guide in this document refer to the Avocent ® HMX High
Performance KVM Extender System Installer/User
Guide for the HMX 5000 and 6000 Series.
1 Connecting transmitter video
If using a dual-head extender, you can choose to connect either two high resolution single-link monitors or one higher resolution dual-link monitor.
7
2
1
2 3
NOTE: For the HMX 5100 extender, connect a single-link digital video cable from your computer to the DVI-D port on the back of the transmitter. See the installer/user guide for more information on supported video resolutions.
Connect the digital video link cable from the primary video port on the computer to the DVI-D-1 port on the back of the transmitter. If your configuration supports the second video link, connect the video cable from the secondary video port on the computer to the DVI-D-2 port on the back of the transmitter.
2 Connecting other transmitter peripherals
For stereo speakers and microphones, attach the cables to the appropriately labeled transmitter ports. If you wish to connect USB devices, plug the type B connector into the designated USB transmitter port and the other end into a USB computer port.
3 Connecting to the transmitter serial port (optional)
Connect a serial null-modem cable between the remote computer serial port and the AUX port on the back of the transmitter.
1
To Contact Avocent Technical Support: Visit www.avocent.com
590-1273-501A
Emerson, Emerson Network Power and the Emerson Network Power logo are trademarks or service marks of Emerson Electric Co. Avocent and the Avocent logo are trademarks or service marks of Avocent
Corporation. All other marks are the property of their respective owners. This document may contain confidential and/or proprietary information of Avocent Corporation, and its receipt or possession does not convey any right to reproduce, disclose its contents, or to manufacture or sell anything that it may describe. Reproduction, disclosure, or use without specific authorization from Avocent Corporation is strictly prohibited. ©2015 Avocent Corporation. All rights reserved.
Avocent ® HMX High Performance
KVM Extender System
Quick Installation Guide
NOTE: For information on pinouts, please see the installer/user guide.
Avocent ® HMX 6000 Series Transmitter Shown
4 Connecting the transmitter to the receiver
For a direct connect configuration, insert one end of a CAT cable into the System port on the front of the transmitter and the other end into the System port on the front of the receiver. In a matrix configuration, insert one end of the CAT cable into the transmitter System port and the other end into an appropriate Gigabit Ethernet switch port. Repeat this process with an additional
CAT cable on the receiver.
6 14
5
4
NOTE: All references to CAT cables include CAT
5, 5e, 6 or 7.
5 Connecting the Teaming port
(optional)
For improved video quality or increased bandwidth, the Teaming port can be used in conjunction with the System port. Insert a fiber channel or active copper SFP module into the Teaming port on the front of the transmitter. Connect the applicable fiber optic links or CAT cables into the module, then insert the other end into the appropriate ports on the Gigabit Ethernet switch.
NOTE: If the switch is over 100 meters away from the transmitter, the Teaming port should be set up within the configuration utility as the default to replace the System port. Also, the Teaming functionality is not supported if you are using fiber connections more than 100 meters in length.
7
2
6 Connecting the transmitter
Management or VNC port
If the HMX 5200 or 6200 extenders are operating in a direct connect configuration, the configuration utility can be accessed via the Management port. Connect one end of a CAT cable to the port on the front of the transmitter and the other end directly to your computer Ethernet port.
1
2 3
This same port on an HMX 6210T transmitter is a VNC port that transmits low-bandwidth video output to authorized remote viewers. Connect one end of a CAT cable to the VNC port on the front of the transmitter and connect the other end to an Ethernet switch.
2
To Contact Avocent Technical Support: Visit www.avocent.com
590-1273-501A
Emerson, Emerson Network Power and the Emerson Network Power logo are trademarks or service marks of Emerson Electric Co. Avocent and the Avocent logo are trademarks or service marks of Avocent
Corporation. All other marks are the property of their respective owners. This document may contain confidential and/or proprietary information of Avocent Corporation, and its receipt or possession does not convey any right to reproduce, disclose its contents, or to manufacture or sell anything that it may describe. Reproduction, disclosure, or use without specific authorization from Avocent Corporation is strictly prohibited. ©2015 Avocent Corporation. All rights reserved.
Avocent ® HMX High Performance
KVM Extender System
Quick Installation Guide
NOTE: See the installer/user guide for further information on these ports and the configuration utility.
7 Connecting transmitter power
Assemble the power adaptor and the power cord. Insert one end of the power cord into the transmitter and plug the other end into an appropriate power source.
8 Connecting receiver video
If using a dual-head extender, you can choose to connect either two high resolution single-link monitors or one higher resolution dual-link monitor.
Connect the digital video link cable from the primary video port on the computer to the DVI-D-1 port on the back of the receiver. If your configuration supports the second video link, connect the video cable from the secondary video port on the computer to the DVI-D-2 port on the back of the receiver.
NOTE: For the HMX 5100 extender, connect a single-link digital video cable from your computer to the DVI-D port on the back of the receiver. See the installer/user guide for more information on supported video resolutions.
Avocent ® HMX 6000 Series Receiver Shown
13
12 14
9
8
11
9
4
10
9 Connecting other receiver peripherals
For stereo speakers and microphones, attach the cables to the appropriately labeled transmitter ports. Connect the keyboard, mouse and any other USB devices by plugging one end of the USB connector into the designated receiver port and the other end into a USB computer port.
10 Connecting to the receiver serial port
Connect a serial null-modem cable between the AUX port on the back of the receiver and the local computer serial port.
NOTE: For information on pinouts, please see the installer/user guide.
11 Connecting the receiver Teaming port (optional)
Insert a fiber channel or active copper
SFP module into the Teaming port on the front of the receiver. Connect the applicable fiber optic links or CAT cables into the module, then insert the other end into the appropriate ports on the Gigabit
Ethernet switch.
3
To Contact Avocent Technical Support: Visit www.avocent.com
590-1273-501A
Emerson, Emerson Network Power and the Emerson Network Power logo are trademarks or service marks of Emerson Electric Co. Avocent and the Avocent logo are trademarks or service marks of Avocent
Corporation. All other marks are the property of their respective owners. This document may contain confidential and/or proprietary information of Avocent Corporation, and its receipt or possession does not convey any right to reproduce, disclose its contents, or to manufacture or sell anything that it may describe. Reproduction, disclosure, or use without specific authorization from Avocent Corporation is strictly prohibited. ©2015 Avocent Corporation. All rights reserved.
Avocent ® HMX High Performance
KVM Extender System
Quick Installation Guide
NOTE: If the switch is over 100 meters away from the transmitter, the Teaming port should be set up within the configuration utility as the default to replace the System port. Also, the Teaming functionality is not supported if you are using fiber connections more than 100 meters in length.
12 Connecting the receiver
Management port
If the HMX 5200 or 6200 extenders are operating in a direct connect configuration, connect one end of a
CAT cable to the port on the front of the transmitter and the other end directly to your computer Ethernet port.
13 Connecting receiver power
Assemble the power adaptor and the power cord. Insert one end of the power cord into the receiver and plug the other end into an appropriate power source.
14 Powering the extender system
On the transmitter and receiver back panels, ensure that both Option switches are in the “up/off” position. Turn on the transmitter prior to turning on the remote computer. Then, turn on the receiver.
Avocent ® HMX 6000 Series Receiver Shown
13
12 14
9
8
11
9
4
10
4
To Contact Avocent Technical Support: Visit www.avocent.com
590-1273-501A
Emerson, Emerson Network Power and the Emerson Network Power logo are trademarks or service marks of Emerson Electric Co. Avocent and the Avocent logo are trademarks or service marks of Avocent
Corporation. All other marks are the property of their respective owners. This document may contain confidential and/or proprietary information of Avocent Corporation, and its receipt or possession does not convey any right to reproduce, disclose its contents, or to manufacture or sell anything that it may describe. Reproduction, disclosure, or use without specific authorization from Avocent Corporation is strictly prohibited. ©2015 Avocent Corporation. All rights reserved.
advertisement
* Your assessment is very important for improving the workof artificial intelligence, which forms the content of this project
Related manuals
advertisement