
The is a guest post by Spencer:
Spinners, I’ve gathered, aren’t satisfied just spinning their batts of freshly carded wool into yarn. As soon as a nice spool of yarn is complete, they want to ply it. My own theory is that this is a way to make it look like there is less yard around, as the spinner is always working to make vast quantities of fluff vanish via their craft. The spinner with a giant stash of single-ply can hide half of it by plying it together. The spinner who three-plys can hide even more. The Lazy Kate, then, is a tool of deception.
As with my other wool-related builds, I began by searching online for a prototype. What’s funny about Lazy Kate’s, I quickly learned, is that no two appear to be alike. Some hold the bobbins horizontally, and others vertically. Some use string tensioners, others a friction system that rubs on the sides of the bobbins. Designs vary as much as types of knitted shawls on Ravelry.

I ended up going with the prototype below, as it seemed to be the most commonly used and didn’t mean having to take up metalworking any time soon.

As you can see, this model holds three bobbins (for making three-ply yarn) and utilyzes a piece of cotton attached to a spring for tensioning the thing. Here’s a tip: Don’t ask your knitter if he or she would like to make five or six ply. Apparently, three ply is the limit and they just keep it at that.
Having spoken with the spinner I often find hammering away at the foot pedals in our very own living room, I was told that the tensioning of the bobbins keeps the contraption from leading to overspun yarn. Or maybe it was underspun yarn. I can’t remember. But I do know that tensioning the bobbins keeps tension in the spinning and knitting house low, so I added a string tensioner and all was good.
The Build:
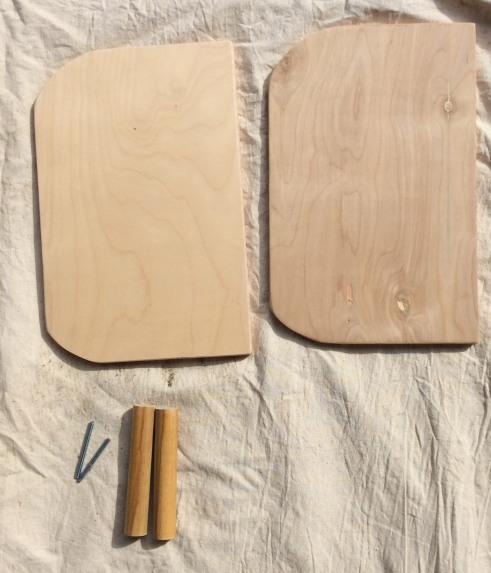
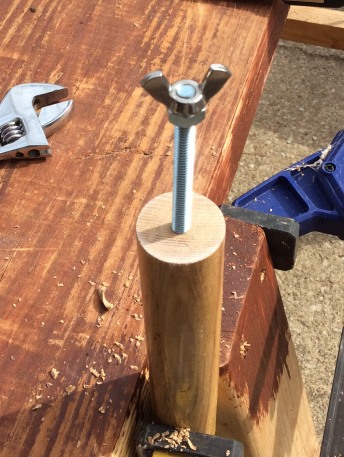
I started by making the frame out of some 3/4 plywood I had squirreled away in the bike shed, thinking that a heavier Lazy Kate would make for a less buoyant Lazy Kate. I also cut two 7″ pieces off an old shovel handle (you could use a dowel rod) to attach the two pieces of plywood together. Note that one of these round pieces needs to spin as it’s also the tightener on the tensioning system. Measure the length of your bobbins and add a few inches to determine the size of your frame. You can see in the pic that I got some threaded 1/4″ rod for attaching the pieces of old shovel handle to the frame.
One end of each round piece got the threaded rod, so I drilled a vertical hole (1/4″) and glued the rod in place.
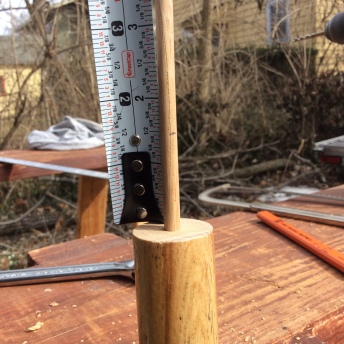
The other end of the rod got a piece of 1/4 oak dowel rod. (I picked up the dowel rod at our local hardware store for about $3 for 3 feet.) After gluing the dowel rod into the round piece of shovel handle, I trimmed the dowel rod down to 1.5″ — this would be used to allow the round connector piece to spin freely in the frame. Note that everything was glued, so there was some down time during the build to let things dry.
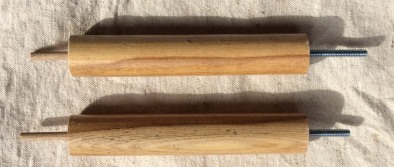
These are the finished-up connectors. Though not pictured in this image, I also added a 1″ piece of the 1/4″ dowel rod, perpendicularly, to one of the pieces of round former shovel handle. This would allow for a connection for the cotton tensioning string. You can see this in the final pictures.
Next came the construction of the three bobbin holders. They’re simply 11″ pieces of that 1/4″ dowel rod glued into 1″ wide pieces of that same shovel handle. These slot three three holes in both sides of the frame and hold the bobbins. These bobbin holders are pictured at the lower left in this picture:

And here are a few pics of the Lazy Kate all bobbined up for plying. As you can see, you can run it with two or three bobbins; with only two bobbins, the tensioning string just hangs out on the unused bobbin holder. I asked if this could be used to make single ply from single ply, and was told to go write this blog post.


Pingback: My Better Half OR The Man Behind the Carder | Knitting the Stash!
Pingback: Hog Island Part 5: At Long Last, 3-Ply | Knitting the Stash!
Pingback: Episode 1: Overdue Introductions | Knitting the Stash!
Nice tutorial. Maybe someday I’ll give it a try. Thank you.
LikeLike
Wrap the appropriately sized tension line around the base of the bobbins, attaching one end to the dowel and the other to the wooden coat hanger. Adjust your tension by using a smaller or larger rubber band.
LikeLike
Teachers! Did you use this instructable in your classroom? Add a Teacher Note to share how you incorporated it into your lesson.
LikeLike