beatmania IIDX
Konami (1999-2014)
🔗Known Hardware
Bemani PC (ADE-6291)
- Beatmania IIDX 25 CANNON BALLERS (__LDJ)
- Beatmania IIDX 26 Rootage (__LDJ)
- Beatmania IIDX 27 HEROIC VERSE (__LDJ)
- Beatmania IIDX 28 BISTROVER (__LDJ)
- Beatmania IIDX 29 CastHour (__LDJ)
- Beatmania IIDX 30 RESIDENT (__LDJ)
Bemani PC (ADE-704A)
- Beatmania IIDX 20 Tricoro (__LDJ)
- Beatmania IIDX 21 Spada (__LDJ)
- Beatmania IIDX 22 PENDUAL (__LDJ)
- Beatmania IIDX 23 Copula (__LDJ)
- Beatmania IIDX 24 SINOBUZ (__LDJ)
Bemani PC (C300)
- Beatmania IIDX 27 HEROIC VERSE (__TDJ)
- Beatmania IIDX 28 BISTROVER (__TDJ)
- Beatmania IIDX 29 CASTHOUR (__TDJ)
- Beatmania IIDX 30 RESIDENT (__TDJ)
Bemani PC Type 1
- Beatmania IIDX 10th Style (GCD01)
- Beatmania IIDX 11 RED (GCE11)
- Beatmania IIDX 12 Happy Sky (GCEC0)
- Beatmania IIDX 13 DistorteD (GCFDD)
- Beatmania IIDX 9th Style (GEC02)
Bemani PC Type 2
- Beatmania IIDX 14 Gold (GCGLD)
- Beatmania IIDX 15 DJ Troopers (__HDD)
- Beatmania IIDX 16 Empress (__I00)
- Beatmania IIDX 17 Sirius (__JDJ)
- Beatmania IIDX 18 Resort Anthem (__JDZ)
- Beatmania IIDX 19 Lincle (__KDZ)
Twinkle
- Beatmania IIDX (GQ863)
- Beatmania IIDX 2nd Style (GC985)
- Beatmania IIDX 3rd Style (GC992)
- Beatmania IIDX 4th Style (__A03)
- Beatmania IIDX 5th Style (GCA17)
- Beatmania IIDX 6th Style (GCB4U)
- Beatmania IIDX 7th Style (__B44)
- Beatmania IIDX 8th Style (GCC44)
- Beatmania IIDX Club Version (__896)
- Beatmania IIDX Club Version 2 (GE984)
- Beatmania IIDX Substream (GC983/GE983)
🔗Known Parts
- 12v Push Button Bulb
- Aura AST-2B-4 Pro Bass Shaker
- Cosel YAS1005E
- idec NRPS11 Series Circuit Breaker
- Konami C02 USBIO
- Konami D01 USBIO
- Konami IO-2 USBIO
- LECIP Alpha Neon M-1H ballast
- M3 8mm Machine Screw
- Mitsubishi/OSRAM FDL18B Alternatives
- Mountain Switch DS-412-RED (10PA005)
- Omron Solid State Relay
- Optical Turntable Encoder
- Philips FL8D Fluorescent Light Bulb
- Sanwa Lampholder
- Sanwa Rectangular Push Button (Smoke)
- Sanwa Rectangular Push Button (white)
- Turntable Bearing
- Ushio Blue Halogen Spotlight
- Ushio Green Halogen Spotlight
- Ushio Red Halogen Spotlight
- Ushio Yellow Halogen Spotlight
🔗Images and Diagrams
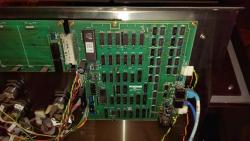
Wiring hookups for the front panel above the CP.
🔗Repair Manuals
No manuals currently added.
🔗Repair Tips
🔗 Always On/Off Top Spotlights
If you have top spot lights that are stuck on regardless of the test menu setting, then you may have bad solid state relays on the lights control board above the top speakers. These can be replaced with a new aftermarket solid state relay as listed above to make the lights operate properly again.The solid state relay is also used for the top neons, but has much simpler control circuitry (directly controlled from the 74F04 hex inverter). If the SSR has been replaced, but the neons do not light, assuming the neons aren't broken, the transformer is the next logical part to check. The LECIP M-1H ballast is the correct replacement part for this.Other active components that may be worth checking in the region of the top spots are the N13T1 PUT (NTE6402 sub) or 2SC2320 NPN transistor (NTE85 sub). The Toshiba TLP596G photo relay (PVT412PBF -- the lead-free version of PVT412 -- appears to be a pin-compatible replacement) is also used here. These are probably much less likely to fail than the SCR, however.
🔗 Broken Effects Sliders
On some cabinets, the effects sliders always read 0, regardless of physical condition. If you remove the control panel and unscrew the screws for the front LED board panel, you will find the control board for the LED panel and the sliders. There will be a small rectangular circuit breaker close to the ribbon cable connecting the main board to the slider board. If this is popped out, you can reset it by depressing gently on the white button until it snaps back into place. This should fix the sliders.
🔗 Flickering Spotlights
If the spotlights appear to flicker on/off, especially when driving all spotlights in test mode after the game has been on for a while, check the solder joints on the power input side of the top light box. There is a power resistor which likely gets quite hot, and you may see some signs of heat in that section of the board. Also, the idec NRPS11-6A circuit breaker may be aging and faulty.
🔗 Wobbly Control Deck
If your control deck is moving around on your machine:First, check the obvious. There are 4 bolts (with convenient "wheels" that you can grab to twist on/off) located inside of the coin door. These should be screwed on securely.If the control deck is still "wobbly" it is likely that the glue has failed on the butt joints. Remove the entire control deck to gain access to the back (where the wires are coming out). You will see 4 pieces of wood that join the top portion of the control deck (where the buttons/turntable are) to the bottom of the control deck (that screws into the cabinet). You will likely see that the 4 pieces of wood are freely moving away from the bottom piece of wood.To repair this, you can simply get some wood glue and a pack of glue syringes, inject glue into the crack, and clamp it down until it dries. However, it is likely to break again. Alternatively, purchase a few metal L-Brackets and nuts/bolts from home depot to securely join the 4 butt joints to the bottom piece of wood.
🔗 Spotlights That Stay On Only Briefly
If your top spotlights and neons stay on only for a few minutes after you turn the cabinet on (or after un-plugging and re-plugging the AC cable to the top spotlight board), your power supply might be going bad. Another way to tell is if the area close to the AC cable is extremely hot. If you take the protective top cover off, you should see the power module and will be able to immediately tell if it is the reason for the head. Replacing the power module should be sufficient to solve the problem. I haven't been able to find the original part, but the Cosel YAS1005E power module has compatible electrical characteristics, pinout and footprint.
🔗 "Please Release the Test Button"
Your game boots, detects IO/Card/FPGA, but then goes to a screen reading "Initializing the Backup RAM Complete. Please Release the Test Button" even though you are not holding the test button. Check the 12VDC power supply to the effector board. It may be unpowered and the game is reading that state as all buttons depressed including test.
🔗 Replacement Screw Specifications
This is a partial list of screws found on a IIDX cabinet.