


We’re huge fans of Ranganath Krishnamani’s illustration work here at Dribbble so we were very excited for him to share his process with us! Ranga is based in Bangalore, India and often finds inspiration by observing everyday things that may initially seem mundane. Ranga is currently working on an illustration series called Signal Lights and today he’ll be taking us behind the scenes to show us his creative process for the newest piece in the series.

Starting any new project, whether commissioned or personal, is always very exciting. But sometimes it’s hard to know what to create or where to even begin. Today, I’ll share some insight on how I come up with meaningful concepts and take you through the full step-by-step of the illustration process. Hopefully, it’ll inspire you to play around with different subject matters and also help streamline your own design process.
Step 1: Explore ideas
I typically start by letting my mind wander. I either daydream or look at random pictures on my phone and online of people, places, or objects that might trigger something new in my mind. I draw ideas out in my sketchbook and begin to explore the concept further.
I’m naturally drawn to people going about their daily lives, everyday objects, and other things that may seem mundane or are easily overlooked by most. I feel like these are the kind of subjects that give you an opportunity to look at simple things differently and create new meaning in your own personal way.
Step 2: Narrow down the concept
I’ve been working on a new series called Signal Lights which is all about my everyday commute and the observations I make during my time spent on the road. I thought this would be a subject that many can relate to. I start off by picking the main subject that makes up my composition. Going through some of my old photos, there are several I took of balloon sellers. The photos remind me of a scene I recently observed while waiting at a signal light: A little girl crossing the street with her mother, looking delightfully at the balloons.

Step 3: Sketch the scene
Now that I’ve decided on the main subject, I set aside my visual references and start solidifying the composition. I use the photos I took of the scene to start sketching some potential layouts on paper. In this initial sketching phase, I try to add as much detail to the drawings. Then I’ll go in and eliminate the details based on the mood I’m going for in the final rendering of the composition.

Step 4: Choose a color palette
I normally go with my instincts when choosing a color palette. But I also get a ton of inspiration from Dribbble, Pinterest, and Kuler to help find the right mood I’m going for. In general, I prefer using minimal color palettes in my illustrations. I play around with just a few colors and try to get creative with it. In this case, I want to follow a similar color scheme as my previous illustration in the series. I use that illustration for reference, pick out each color used, and place it next to my new sketch.

Step 5: Block out color
Using my color palette, I focus in on the main subject of the illustration and block out shapes with color. I start off with the darkest color, transitioning to the middle tones, and finally the highlights. After that, I move into the background and continue blocking out the main shapes with color before diving into the finer details. At this stage, I stick to a monotone palette to get a sense of color depth before introducing the rest of the colors into the composition.
Once I get into the details, the next step is tweaking and simplifying forms. For example, I realized that the composition seemed a little too tight because all of the overlapping objects—so I increased the width of the artboard to give more breathing space around the main subjects.


Step 6: Create depth
By this stage, I have a good sense of the composition—but I notice that all of the objects seem to call out for attention at the same time. To add depth, I use gradients and mask out details from the surrounding objects, and build more environment around the main subjects. I also intentionally vary the tones of color so I can create the illusion of depth.

Step 7: Add light and shadow
My illustrations are heavily influenced by light and shadow interacting together. The light source is mostly decided when I’m initially sketching out the composition. This makes it a lot easier when it comes to the coloring stage. I use my photos and sketches a reference and replicate the single light source from there onto the illustration.

Step 8: Add texture
Adding texture helps break the flatness of an illustration and even adds a tactile effect. When I first started illustrating, I would struggle with texture tend to go overboard with it. Now, I’ve learned that it’s all about using texture thoughtfully! I usually use a splattered textured brush to add noise. I stick to a couple of simple variations and play around with the stroke width and blending modes to highlight or underplay the texture.

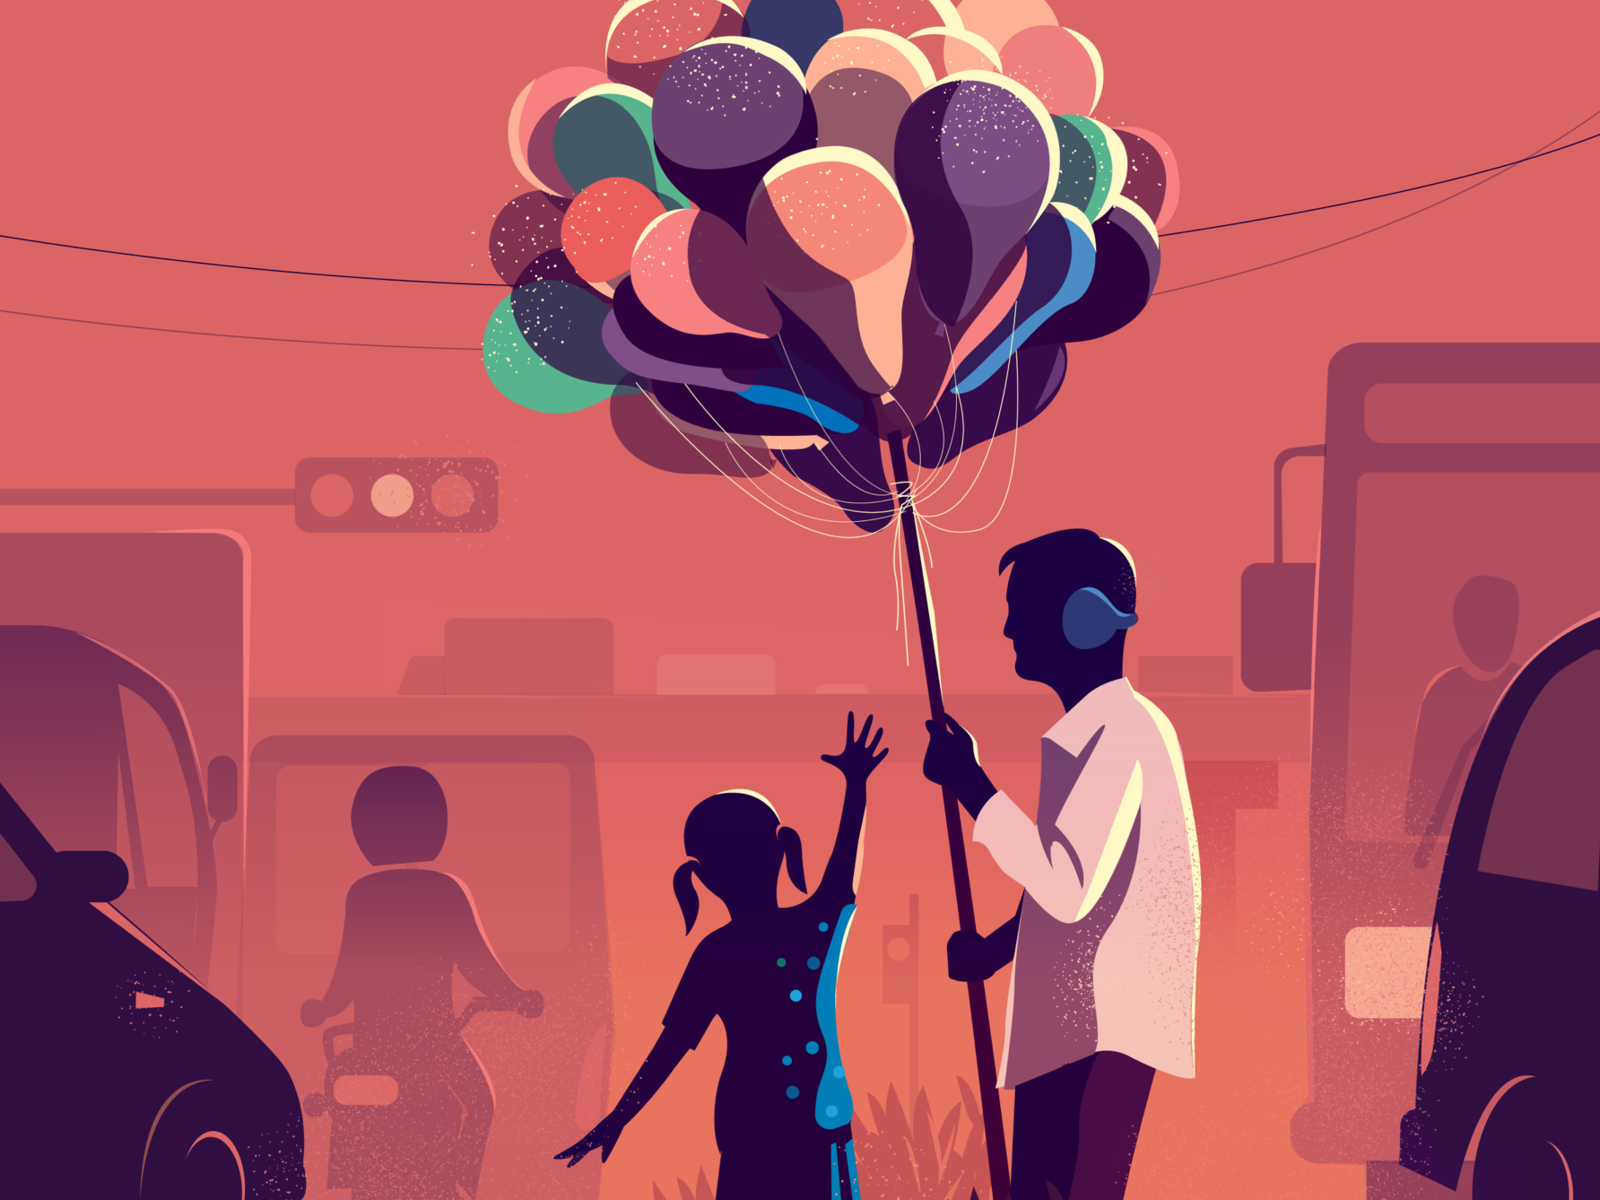
Step 9: Final refinements
Here is the point in my process where I focus on the overall refinements and details. It’s all about stepping back and looking at the big picture to see how all the elements come together cohesively in the final illustration. As you can see, I added a bit more texture and electric wires to the final art piece—and now, it’s done!

Takeaways
- Doodle, draw, and sketch anything that interests you. You never know where you’ll find your next big idea.
- Plan out your compositions on paper first where you can easily modify and refine your thoughts before jumping in front of a computer.
- Build on your first exploration and strive to turn it into a series. I find this helps you take a closer look at your surroundings and find new meaning in unexpected places.
- Keep the process simple and stick with what works for you.
- Enjoy the process and happy creating!
That’s it! I hope this tutorial inspires you to explore new subjects in your art and to continue refining your own creative process.
Interested in connecting with Ranga? Find him on Dribbble, and Instagram.
Find more Process stories on our blog Courtside. Have a suggestion? Contact stories@dribbble.com.


